Khao Neoo Mamuang (ข้าวเหนียวมะม่วง) Mango Sticky Rice

Khao Neoo Mamuang (ข้าวเหนียวมะม่วง) Mango Sticky Rice

Hello Everyone! Yes, besides sharing mango recipes on the blog for the month, I’ll also be tackling the fruit with a Thai influence. I mentioned in my post last week that Thai food is one of the many favourite cuisines that I enjoy – and let’s be honest here – I’m in the middle of satisfying my insane cravings for it!

Mango Sticky Rice is a traditional Thai dessert where the main ingredients needed are sticky glutinous rice, canned or fresh coconut milk, palm sugar, and mangoes. Although this dessert originated in Thailand, it is highly consumed throughout the Indo-China region of Southeast Asia such as Laos, Cambodia, and Vietnam. Mango Sticky Rice is usually only eaten during the peak mango season, which is during the summer months of April and May. Notable shops in Bangkok famous for their Mango Sticky Rice will only sell this dessert for 4 months per year from February to June.

Khao Neoo Mamuang (ข้าวเหนียวมะม่วง) Mango Sticky Rice

I can’t remember if the first time I had this dish was during a trip to Bangkok way back when, or at a Thai restaurant when I was still in Brunei – but nonetheless, I remember my Aunt (who is Thai) teaching me how to make this dish a couple of years back. At that time I wasn’t interested in cooking or food, so I didn’t realise then how easy it was to put this dish together and that is really only required the pantry essentials to make. Aside from having to get the mangoes from the market when I wanted to make this dish, I already had sugar, peanuts, coconut milk, and sticky rice at home.

To prepare the dish, the glutinous rice is first soaked in water and then cooked by steaming, or cooked in a rice cooker. I cooked mine over a gas stove together with the sugar and kept a very close eye on it. The coconut milk is heated, without boiling, separately with salt and then added to the cooked glutinous rice to flavour it. Mangoes are then peeled and sliced to serve with the rice, and smothered in more salted coconut milk. The result is just heavenly! If you’re a mango lover like me, then you’re definitely going to fall in love with this exotic Thai dessert.

Khao Neoo Mamuang (ข้าวเหนียวมะม่วง) Mango Sticky Rice

Disclaimer: I do apologise to any of my Thai followers, or any who have just stumbled upon my blog, and this post in particular. I’ve seen so many variations of the spelling for Khao Neoo Mamuang and I’m not sure if I’ve picked the right one! *cheeky grin*

Khao Neoo Mamuang (ข้าวเหนียวมะม่วง) Mango Sticky Rice Ingredients

PREP TIME 1 HOUR | COOKING TIME 30 MINS | SERVES 4-6

INGREDIENTS

  • 2 ripe mangoes, peeled and sliced
  • 1 cup sticky glutinous rice
  • 2 cups water
  • 1/2 cup coconut milk (fresh, canned, or frozen)
  • 2 tbsp white granulated sugar
  • 1/2 tsp salt
  • Roasted peanuts, roughly chopped to garnish

METHOD

  1. Sticky Glutinous Rice: Rinse the sticky glutinous rice and then leave to soak for about an hour. Drain was ready to use.
  2. Transfer the rice to a medium-sized non-stick cooking pot together with the 2 cups of water and the sugar. Bring to a slow simmer over low heat, partially covered with a lid (to leave room for steam to escape).
  3. Once simmering, leave to cook for a further 20 minutes or until the water has been absorbed by the rice. Turn the heat off, but leave the rice in the pot with the lid on tight. Allow it to sit for a further 5 to 10 minutes.
  4. Salted Coconut Sauce: While the rice is cooking away, prepare the salted coconut sauce by adding the coconut milk to a small saucepan together with the salt. Bring to a slow simmer over low heat, about 10 minutes. It is important to heat it slowly to avoid curdling the coconut milk. This happens when it is heated too quickly.
  5. Once done, turn the heat off and set aside. If your rice is already done at this point, then add half of the salted coconut sauce to the rice and give it a good mix. Set aside the other half of the sauce for later.

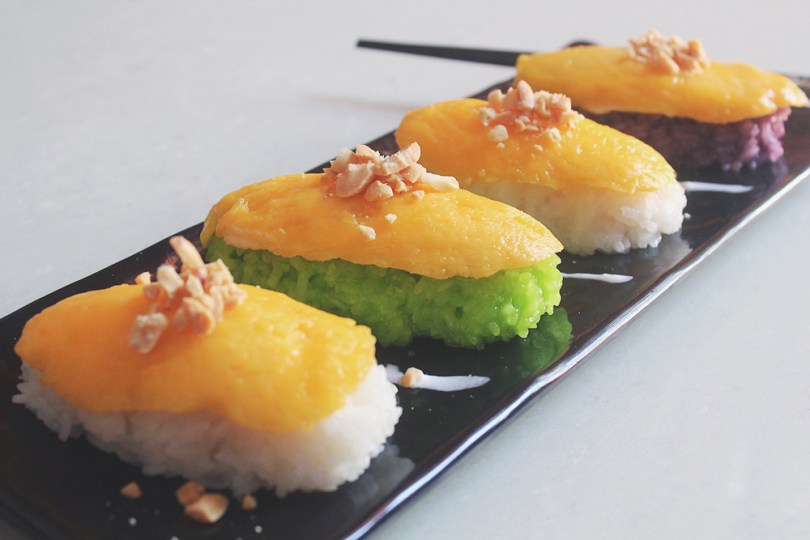
Tips: Experiment with naturally flavouring the sticky rice for another dept of flavour. I used juices from pandan leaves and ube (purple yam) when tackling this recipe. All you have to do is add these flavourings together before cooking the rice.

  1. Shape the sticky rice into logs and place on a serving plate. Top the rice logs with a slice of ripe mango and roasted peanuts.
  2. Drizzle with the remaining salted coconut sauce or use for dipping.
  3. Serve and enjoy while warm!

Khao Neoo Mamuang (ข้าวเหนียวมะม่วง) Mango Sticky Rice

Mango Sticky Rice is usually served differently with one big serving of rice and mango slices on the side. I decided to plate mine up differently after stumbling upon an Instagram post of Mango Sticky Rice “Sushi” hence why they look like nigiri!

BON APPÉTIT

– Ally xx

myTaste.com

Advertisement
Ube Halaya (Purple Yam Jam)

Ube Halaya (Purple Yam Jam)


Hello Everyone! Today’s recipe is a dessert that is made from grated and boiled purple yam which is locally known as ‘Ube’ in the Philippines. Besides the purple yam jam (Ube Halaya), many different desserts such and pastries such as ice cream, tarts, and cakes make use of this root crop. Halaya (en español: jalea), directly translates to jelly or jam, but it is hardly a traditional jelly or jam.

Ube Root

I know I basically say this is every post that I upload, but let’s face it, if it not one of my favourites then I wouldn’t be posting the recipe online! Anyway, this is also one of my favourite Filipino desserts besides Leche Flan. Here in Brunei, you can find this root crop in the local markets known as ubi belayar ranging from $3.00 to $5.00, and sometimes even $7.00 per kilo especially if it has been newly harvested (you just have to shop around to find the stall that sells for much cheaper). We managed to buy some from an old man selling them for $3.00/kg and the root still looked fresh.

Ube Halaya (Purple Yam Jam) Process

Ube Halaya (Purple Yam Jam) Process

I am not sure of how readily available the purple yam is in various countries, but I am aware that you can buy ready-made boiled and grated purple yam in Asian stores. Having a prepared product such as this definitely saves time in the kitchen, but if it’s definitely available raw from the markets, I definitely recommend making it from scratch and burn some calories in the kitchen with this dish! In the past, I have found that by just grating and pounding the flesh, you still get lumps of the yam in your end result, and therefore not as smooth. We therefore pass the flesh through a sieve as well to get rid of any remaining lumps. A lot of work, but a stellar end result; smooth and creamy lump-free halaya!

Ube Halaya (Purple Yam Jam) Ingredients

PREP TIME 1 HOUR | COOKING TIME 1 HOUR 10 MINS | SERVES 8-10

INGREDIENTS

  • 2.5kg purple yam, skin on, thoroughly washed and scrubbed
  • 1 can (395g) condensed milk
  • 125g unsalted butter, chilled

METHOD

  1. Submerge the purple yam in a very large pot (the largest you have!) of hot water. Bring the water to a boil and cook the purple yam for 30-45 minutes or until the yam is soft and tender. If you don’t have a pot big enough to fit the yam, you may cut it on half (or quarters if needed).
  2. Once tender, remove from the pot and set aside to cool down before peeling the skin off.
  3. Working it batches, finely grate the purple yam. Once you’ve done that, get out your mortar and pestle and get pounding! Once you’re done with the pounding, get you sieve out and press the mashed purple yam through the sieve. This ensures that your ‘jam’ is smooth and there are no lumps in your mixture. This is probably the most labour-intensive part of the recipe!
  4. Next, heat a large cooking pot on low and add in the butter to melt.
  5. Once the butter has completely melted, add in the condensed milk and stir well. Add the purple yam in and stir occasionally so that the mixture does not stick to the bottom of the pot. Cook until the texture or the mixture becomes really thick (about 20-25 minutes). When cooked, turn the heat off and let it sit in the cooking pot for another half hour before transferring them into moulds/containers.
  6. Refrigerate for at least two hours, then serve and enjoy with family and/or friends!

Ube Halaya (Purple Yam Jam)

PS: It was very hard as to not resist the temptation to wrap this yam jam in spring roll wrappers as an experiment to see if they would work just as well as wrapping leche flan. Guess what? It was successful! There’s this phrase in Tagalog that you would use when you have too much of something that you get fed up, but it’s quite the opposite when you have it wrapped in spring roll pastry; it becomes “hindi nakakasuya”. Anyway, basically add about a teaspoon or two of purple yam jam on top of a spring roll wrapper together with a few strips of fresh coconut; then fold, locking the wrapper on each side. Freeze it overnight before frying and viola! Crispy Fried Ube Halaya. You’re welcome.

Cripsy Fried Ube Halaya (Purple Yam Jam)

BON APPÉTIT

– Ally xx

myTaste.com

Ube Cake with Mango Cream Cheese Frosting

Ube Cake with Mango Cream Cheese Frosting

Hello Everyone! As I already mentioned in yesterday’s post, I have a very special recipe for all of you today as today is my Mother’s 55th Birthday! Not only that, it is also my Cousin’s 35th Birthday! A very Happy Birthday to the both of them! Not only do they share the same birthday, but they also share the same-ish name. My mom’s name is Josephine, while my cousin’s name is Joseph; and my mother is also his godmother in both his baptismal and wedding. So yes, these two people are very important to me.

Happy Birthday Mom Josephine & Kuya JR
Happy Birthday to my mom Josephine & my cousin Joseph Russell! This is the latest photo that I could find of the two of them. This photograph dates back to December 2012 when my cousin JR got married. Kuya J, payat mo oh! Anyare? Hehehe.

To be completely honest, this cake has given me a lot of headaches to the point where I just had to redo everything again. The plan was to bake it the day before so that it would be in the fridge overnight; that obviously didn’t happened. Something went wrong in the batter; it was very pale and it looked like the batter and the eggs whites separated because when I took them out of the oven, the top half was very airy white the bottom half was cake-y. Since I had quite a tiring day yesterday, I gave up on baking the cake and decided to bake it early the next morning (today). The cake this time went well, I just mixed the batter very well and added some food colouring to bring out the purple a bit more.

Ube Cake with Mango Cream Cheese Frosting

However, today my frosting decided that it wanted to wreck havoc. The frosting was actually an experiment, because I wanted to incorporate mango into the cream cheese frosting somehow. The big mistake that I did was that I mixed the mango purée together with the cream cheese and and butter instead of smoothening out the cream cheese and butter first. I ended up with a mess of what looked like really bad scrambled eggs. I tried so hard to save it, but in the end I started all over again. At one point I kind of just had about enough with this cake… But I told myself to carry on because it’s a special cake for my Mom’s Birthday! The flavours were all there, form the cake in the beginning, and even the frosting, but it would’ve ended up looking like a shit cake if I hadn’t redone the whole thing.

Anyway, all mishaps aside, the cake turned out to be pretty good! But what decided to ruin everything yet once again was the weather. It was pitch black and raining when I was about to do the final touches on the cake and I have no natural light to photograph my cake. I am so devastated. It was as if everything was trying to ruin this cake for me… Thank goodness that it was still a little bit bright outside, but I really had to put my ISO up and decrease my shutter speed to get some light!

Ube Cake with Mango Cream Cheese Frosting Ingredients

PREP TIME 30 MINS | COOKING TIME 30-35 MINS | SERVES 8-10

INGREDIENTS

For the cake batter

  • 2 & 1/2 cups cake flour*
  • 1 cup ube (purple yam), cooked and finely grated**
  • 1 cup white sugar
  • 7 egg yolks, lightly beaten
  • 7 egg whites
  • 3/4 cup milk
  • 1/2 cup corn syrup***
  • 1/2 cup vegetable oil
  • 3 tsp baking powder
  • 1 tsp salt
  • 1 tsp vanilla extract
  • Blue & red food colouring (optional)

For the frosting

  • 1 very ripe mangoes, puréed
  • 1 package (250g) cream cheese, softened
  • 100g unsalted butter, softened
  • 1 cup confectioners’ sugar

*I barely use cake flour, and if you so happen as to not have cake flour in your pantry, you can substitute 1 cup of cake flour with 2 tablespoons of corn flour place into a measuring cup and then filling it with plain flour all the way to the 1 cup mark.

**Place the ube (leaving its skin on) in a pot of boiling water and boil for about 45 minutes to an hour, depending on how big it is, or until tender. Peel off its skin and then grate.

***If you’re like me and you don’t have corn syrup sitting in your pantry because you barely use it anyway, you can substitute corn syrup by dissolving 3/4 cup of granulated sugar in 1/4 cup of boiling water.

METHOD

  1. Preheat oven to 165C (325F or gas mark 3). Grease three 8.5-inch cake pans with a little butter and set aside.
  2. Ube Cake: In a medium-sized bowl, mix together the flour, baking powder, and salt. Set aside.
  3. Place the grated ube into a large bowl and mix together with the milk and vanilla extract; gradually mix into the ube until it is smooth. Then add in the corn syrup, egg yolks, and oil. Mix together and then add in the flour mixture and mix until smooth. Set aside.
  4. In another large bowl, beat the egg whites until foamy. Gradually add in the sugar, then red and blue food colouring (optional), while continuing to beat until stiff peaks form.
  5. Fold in a third of the egg white mixture into the batter, then quickly fold in remaining whites until no streaks remain. Pour batter into prepared pans.
  6. Bake in the preheated oven for 30 to 35 minutes, or until a toothpick inserted near the centre comes out clean. Cool for 10 minutes before removing the cakes from the pans to wire racks to cool down completely.
  7. Mango Cream Cheese Frosting: Using an electric handheld mixer, beat the cream cheese, butter, and maple syrup in a small bowl until smooth. Then beat in the confectioners’ sugar, and then fold in the mango purée.
  8. Assembly: Place one cake layer on a serving plate and trim the tops so that they are level. spread with about 1/4 cup of frosting. Top with the second layer of cake and spread another 1/4 cup of and frosting. Finally, top with the last layer of cake and frost the top and sides of the cake. Decorate with the cake trimmings and store in the fridge before serving. Enjoy!

Happy Birthday Mom Josephine

Ube Cake with Mango Cream Cheese Frosting

BON APPÉTIT

– Ally xx

myTaste.com