Hearty Chicken Chipotle Soup

Hearty Chicken Chipotle Soup

Hello Everyone! Another week, another soup on the blog today! Just three more soupy recipes to go until the end of Winter Warmer Month, and gosh until the end of July as well! I can’t believe time has flown by that fast! It’s making me said because that basically means that I have about 2 weeks left in this beautiful city that I have called home for the past 4 and a half years. It’ll be heartbreaking to leave, but it’s time that I get my career life together and make that transition from uni life to a professional working life.

Hearty Chicken Chipotle Soup

Anyway, enough about how my life is and will be for the next few weeks/months/years, let’s get onto today’s recipe shall we? If you’ve read my previous blog post on my Moroccan Pumpkin Soup, you might remember me going on about how I can’t believe that they don’t sell chipotle peppers in any of the big grocery stores here in Sydney. Well, when I was out doing a quick shopping run at a with my friend Marissa (basically just buying extra ingredients to go with our dinner for that day), I tried my luck to see if the Asian store that we went to sold chipotle peppers. To my surprise, they did, canned and in adobo sauce as well! My reaction was sort of like a what the *bleep* is this for real kind of reaction. I even said to myself that I should’ve popped by this store before I went all Moroccan on my pumpkin soup, and this was honestly like 2 day after I had posted my pumpkin soup recipe. Since they had them in store, and only 4 cans remaining, I decided to buy a can and figure out ow I can use them for another recipe seeing as I practically went cuckoo trying to find these peppers.

Hearty Chicken Chipotle Soup Ingredients

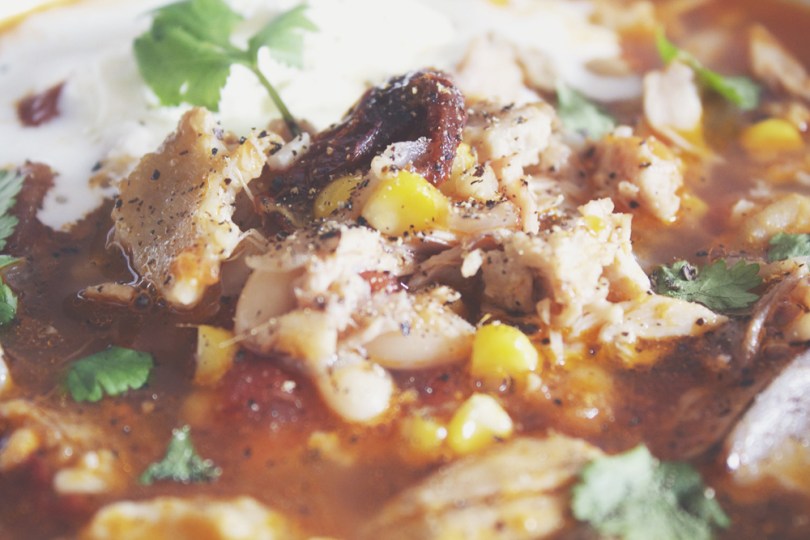
Today I had actually scheduled a recipe for Cauliflower and Stilton Soup, but instead, seeing as I had the chipotle peppers, I decided to do a Hearty Chipotle Chicken Soup. The soup that I made is the exact definition of a Winter Warmer Soup; it had a nice kick to it from the chipotle peppers, and a lovely sweetness to it from the corn, while the beans and the chicken meat bulked the soup up. You can find the original recipe on Taste of Home. I’ve tweaked the method a bit as well as some of the ingredients for my recipe.

For the chicken broth, I bought 2 chicken carcasses from the butcher and boiled it together with some bay leaves, sea salt, black peppercorns, and ginger for about 45 minutes to an hour to get the flavour into the broth. I then shredded the meat from the carcasses and used them to bulk my soup up instead of using chicken breasts as the original recipe used. I also used fresh field grown gourmet tomatoes and roasted them over the gas stove to give it that flame-roasted flavour to them for my soup. Yes I probably picked the most time consuming way to make this soup, but it was all worth it in the end I believe. I completely forgot to deseed the chipotle peppers, as the original recipe stated, before adding them to the soup, but I’m glad I didn’t because, though it gave the soup a good kick, it wasn’t as spicy as I thought it be. If I had deseeded them, I don’t think they give the heat that I had with this dish.

Hearty Chicken Chipotle Soup Ingredients

PREP TIME 10 MINS | COOKING TIME 1 HOUR 20 MINS | SERVES 3-4

INGREDIENTS

  • 3 cups chicken broth
  • 3 small field grown gourmet tomatoes, flame-roasted and cut into chunks
  • 2-3 dried bay leaves
  • 2 large chicken carcasses, washed and cleaned thoroughly
  • 2 chipotle peppers in adobo sauce, sliced or minced
  • 2 ears of corn, cut from the cob
  • 2-3 garlic cloves, minced
  • 1 small red onion, diced
  • 1 can (400g) cannellini beans, drained
  • 2 tsp adobo sauce (from the chipotle peppers)
  • Fresh cilantro or coriander
  • Ground salt and black pepper to taste
  • Thickened cream or sour cream
  • Thumb-sized ginger, sliced
  • Whole black peppercorns

METHOD

  1. Add the chicken carcasses together with the bay leaves, ginger, salt, and whole black peppercorns, to a large pot with enough water to cover the chicken. Boil for about 45 minutes to an hour over medium-high heat. Remove the chicken carcasses from the broth and set aside to cool. Strain the broth into a bowl and discard the bay leaves, ginger, and peppercorns. Set aside for later.
  2. Once the chicken carcasses have cooled down, pull the meat from the chicken carcasses and shred to small pieces. Set aside.
  3. Heat the same pot over medium-high with a little bit of cooking oil. Sauté the garlic until golden brown and fragrant. Then add in the onions and cook until soft. Add in the shredded chicken pieces and season with a bit of salt and pepper. Give it a good mix and follow with the adobo sauce, chipotle peppers, cannellini beans, sweet corn, and tomatoes to the chicken mixture. Give it a good mix and let it cook further for about 5-6 minutes before adding the chicken broth in.
  4. Bring to a boil. Once boiling, bring the heat down to medium-low and let the soup simmer away for a further 10-15 minutes to ensure all the flavours blend together.
  5. Divide the soup equally into serving bowls (3 large bowls, or 4 small bowls) and top with a dollop of whipped thickened cream and fresh cilantro. Serve immediately and enjoy!

Hearty Chicken Chipotle Soup

Anyway, before I end this post, I would just like to share my experiences of how I’ve heard other people try to pronounce chipotle (chee-poat-lay). The very best, and even I still remember until now even if it’s been just about 2 years ago, I’ve heard chip-poh-lah-tay from Jack Harries (jacksgap) on YouTube when he was doing a chilli challenge with Jamie Oliver, also note the way they say jalapeño, jah-lah-pee-nose instead of HAH-lah-pen-yose.

BON APPÉTIT

– Ally xx

myTaste.com

Tom Yum Gài (ต้มยำไก่)

Tom Yum Gài (ต้มยำไก่)

Hey Everyone! Just letting you guys know that I’m currently in Victoria with my family for 9 days; staying in Cranbourne with a family friend. Anyway, yes, besides that, today’s recipe is based on what I uploaded on Tuesday; using the homemade tom yum paste to make a (yes) chicken feet tom yum soup. Now I know what you’re thinking, “Chicken feet, really? And gizzards as well? Ew!” – actually not ew, well in my opinion that is! When I first learnt this dish from my Auntie, she cooked this with these cuts of chicken. My mom even gives the chicken feet a little pedicure; scrubbing them clean and cutting off their nails on each toe – so much work that I myself wouldn’t even be bothered to do! If you’re not into chicken feet, this spicy and sour soup can be made with other meats varying from mixed seafood such as prawns, squid, and clams, or other cuts of chicken, pork, and fish.

Also, I didn’t know this until I did a bit of research, but tom yum is actually a Lao and Thai dish; all along I thought it was just Thai. Anyway, for those of you who don’t know what tom yum is, it is a clear, spicy, and sour soup served widely in many neighbouring countries such as Cambodia, Brunei, Malaysia, and Singapore, but has also been popularised around the world. “Tom” actually refers to the boiling process while “yum” refers to a spicy and sour salad; and therefore “tom yum” is a hot and sour soup characterised by the fragrant herbs used to flavour the broth. The basic broth is made of stock and fresh ingredients such as lemongrass, kaffir lime leaves, galangal, lime juice, fish sauce, and crushed fresh chillies. When I first learnt to cook this dish, I added coconut milk to the broth. Over time, we eliminated the coconut milk because my mom can’t eat, or more like, isn’t allowed to have anything with coconut in her diet.

Tom Yum Gài (ต้มยำไก่) Ingredients

PREP TIME 30 MINS | COOKING TIME 1 HOUR | SERVES 5-6

INGREDIENTS

  • 1kg chicken feet, wash, cleaned, and nails cut off
  • 250g chicken gizzards, washed and cleaned
  • 2.5L boiling water
  • 1 heaped tbsp Homemade Tom Yum Paste (or more if you’ve deseeded your chillies before making it into a paste), likewise, you may use store-bought paste
  • 1 tsp chicken stock powder
  • 4 pcs kaffir lime leaves
  • 3 inch galangal, sliced
  • 2 large tomatoes, quartered
  • 2 pcs red bird’s eye chillies
  • 2 red onions, quartered
  • 2 stalks lemongrass, cut into 2-inch lengths
  • Juice of 2 limes
  • Fish sauce to taste

METHOD

  1. Add the all the ingredients, except for the kaffir lime leaves, fish sauce, lime juice, and tom yum paste, into a large pot. Bring to a boil and let it simmer for about 15 to 20 minutes.
  2. Then add in the kaffir lime leaves, lime juice, and tom yum paste. Give it a good mix and then add in the fish sauce about a tablespoon at a time; taste until the seasoning and taste is to your liking. At this point, you may also add in straw mushrooms or oyster mushroom if you wish. Let it cook for a further 45 minutes, or until chicken feet and gizzards are tender.
  3. Serve with steamed rice and enjoy! Quite a nice dish actually for a cold winter night.

Tom Yum Gài (ต้มยำไก่)

BON APPÉTIT

– Ally xx

myTaste.com

Nasi Lemak (Coconut Rice)

Nasi Lemak (Coconut Rice)

Hello Everyone! I’m back tonight with a recipe for you guys. So I did a little bit of reading on what Nasi Lemak actually translates to – I knew “Nasi” (pronounced nah-see) meant rice, but I was not sure what “Lemak” (pronounced leh-mahk) meant. Lemak apparently, if directly translated means “fat” and therefore Nasi Lemak means “fat rice”, but in the cooking context, lemak means enriched, and in this case, rice enriched with coconut milk.

The truth is, no one really know where the dish originated from as coconut rice is common in many other South-east Asian cultures such as Indonesia, Malaysia, and Thailand. Apparently there is an old folklore story from a village just south of the country’s state, Kuala Lumpur, where a village girl accidentally spilled a cup of coconut milk in a pot of rice while she was helping her mother cook. Though her mother was enraged, she ended up liking the taste of the rice with coconut milk, and hence the birth of Nasi Lemak.

Nasi Lemak (Coconut Rice)

Traditionally, the two elements that make up this dish are the rice of course, and the spicy sambal (a chilli-based sauce) that either has anchovies or prawns in it accompanying the rice. Sliced cucumbers, half a hard-boiled egg, and roasted peanuts are also essential condiments found in this dish. Nowadays, many variations of accompaniments are served with the dish, such as chicken, beef or prawn curry, and even fried chicken. It is then wrapped and packed in a banana tree leaf as this gives an added fragrance. Restaurants nowadays serve up a modernised version on a plate with all the trimmings.

Back home in Brunei, Nasi Lemak was practically on every menu in every restaurant. They were sold in almost every stall at the Gadong Pasar Malam (Night Market) and even on the side of the streets if I’m not mistaken. All ranging between $1.00 to $3.00, probably a little bit more in restaurant, but surely no more than $5.00. I remember I went to Mamak in Chinatown somewhere in the middle of last year to meet up with Sam’s friends (now my friends too) from the Netherlands. I had a sudden crave for Roti Kosong and Nasi Lemak, but it was so difficult to order it. I think I may have complained about this place before in terms of price comparisons to back home, and I am about to do it again. Their Nasi Lemak here was $9.00, and if you wanted a curry or fried chicken to go with it, it was another $3.00 extra, $4.00 if you wanted seafood. After that, never getting Nasi Lemak here ever again. Thus I decided to give homemade Nasi Lemak a go! Now, I may have steered away from ‘traditional’ by using pre-made sambal, but it tasted pretty good!

Nasi Lemak (Coconut Rice) Ingredients

Nasi Lemak (Coconut Rice) Ingredients

Here is where you can get quite creative yourself. As I’ve mentioned before, the rice and the sambal is essential. The other components are basically up to you. I paired my Nasi Lemak with Sambal Kangkung, which is basically water spinach stir fried in the chilli-based sauce with garlic and onions, and a piece of fried chicken. You can whip up your own curry with your choice of meat or vegetables to accompany this dish.

Ayam Goreng Ingredients

Kang Kong Belacan Ingredients

PREP TIME 1 HOUR | COOKING TIME 20-25 MINS | SERVES 4

INGREDIENTS

For the coconut rice

  • 2 cups long grain rice
  • 1 cup of water
  • 2 pandan (screwpine) leaves, tie them into a knot as shown above
  • 1 small can (170ml) coconut milk

For the fried chicken

  • 4 pcs chicken thigh cutlets, skin-on, washed and cleaned
  • 1/2 vegetable oil, for shallow frying
  • 2 tbsp cornflour
  • 2 tbsp plain flour
  • 2 tbsp water
  • 1 tsp dried chilli flakes
  • 1 tsp sesame oil
  • 1/2 tsp salt
  • Dash of ground black pepper

For the sambal kangkung

  • 1 bunch kangkung, washed, leaves separated from the stems, and stems cut into short lengths
  • 2 cloves garlic, minced
  • 2 red bird’s eye chillies, sliced
  • 1/2 red onion, diced
  • 1 & 1/2 tbsp sambal belacan
  • 1 tbsp vegetable oil
  • 2 hard-boiled eggs, halved
  • Handfull of small-sized ikan bilis (dried anchovies), fried
  • Handfull of peanuts, roasted
  • Sliced cucumbers
  • Banana leaf

METHOD

  1. First things first, combine all the marinade ingredients for the fried chicken in a large bowl. Mix the chicken around until well coated in the batter. Cover the bowl with cling wrap and set aside to marinade for 1 hour.
  2. Coconut Rice: Just like making steamed rice, rinse your rice and drain. Add the coconut milk, a pinch of salt, and water. Add the pandan leaves into the rice and cook your rice. Once done, transfer to a serving dish lined with a banana leaf together with the other condiments.
  3. Fried Chicken: Preheat oven to 180C. Heat up oil in a large frying pan an working in batches, shallow dry the chicken until skin is crispy and golden (about 4-5 minutes per side). Remove from the heat and place on a baking tray lined with aluminium foil. Place the wings in the oven for a further 8-10 minutes to finish off in the oven.
  4. Sambal Kangkung: Heat oil in a medium frying pan over high heat. Add the garlic and 1 of the sliced bird’s eye chilli and sauté until golden brown. Add in the onions and sauté until soft. Bring the heat down to low and then add in the sambal belacan, cooking the belacan over high heat will cause it to spit all over the stovetop and we don’t want to have a messy cooking area. Cover if needed. Sauté the belacan until fragrant.
  5. Add the the kangkung leaves, stems and a little bit of water to dilute the belacan you think can’t handle the heat. Cover until the leaves start to wilt. Toss around the belacan to coat the leaves and stems evenly (kangkung literally takes only a minute to cook). Serve together with your coconut rice and fried chicken, and top with fresh red chillies.

Nasi Lemak (Coconut Rice)

BON APPÉTIT

– Ally xx

myTaste.com

Stir-fried Pipis in XO Sauce

Stir-fried Pipis in XO Sauce

I remember the first time having this, not too long ago actually, about 1 and a half weeks ago, instant love. I was having dinner with Pam (ex-housemate, fellow foodie, and now long-distance twinnie) and her family who had just arrived that morning from Singapore. We were meant to have a homemade pizza night but we were all feeling a bit tired to cook. Still happy anyway because I got to meet Pam after 4 months since we last saw each other, and I got to meet her family. We had dinner in Chinatown (forgive me, I don’t actually remember the name of the restaurant), and amongst the many dishes we ordered, the stir-fried pipis in XO sauce caught my attention.

It was so yummy, well cooked, and had a good amount of spice to it. It was that good that I had to recreate it for myself, and I did – with larger pipis as well (the ones at the restaurant were baby-sized)! They were only $16.00/kg at the seafood market in Market City. The pipis were already cleaned and had no sand and grit in them. They were also alive which amused me quite a bit to be honest. I stood there over the bucket and started playing with them – tapping their shells, and picking them up and squeezing their shells shut, until the lady approached me and asked me if I wanted to buy them. I bought roughly about 800g for about $13.00 and I was able to get two meals out of it – with steamed jasmine rice and pan-fried eggplant. So delish!

XO sauce is a spicy seafood sauce commonly used in southern Chinese cooking. It’s made of roughly chopped dried seafoods, including scallops, dried fish and shrimp, and subsequently cooked with chilli peppers, onions, and garlic. XO sauce can be used as a condiment on the side of main dishes or used in cooking to enhance the flavour of fish, meats, vegetables, and otherwise bland foods such as tofu or noodles. The named is derived from fine XO (extra-old) cognac, which is a popular Western liquor in Hong Kong which denotes high quality, prestige, and luxury.

Check out the original recipe from Yahoo!7 Lifestyle.

Stir-fried Pipis in XO Sauce Ingredients

PREP TIME 5 MINS | COOKING TIME 10-12 MINS SERVES 4

INGREDIENTS

  • 800g live pipis
  • 1/2 cup fish stock (or clam juice)
  • 1/4 cup XO sauce
  • 1/4 cup Chinese Shaoxing rice wine
  • 2 tbsp oyster sauce
  • 2 tbsp olive oil
  • 3 red birds-eye chillies, sliced
  • 2 stalks green onion, sliced
  • Juice of 1 lime

METHOD

  1. Heat olive oil in a large frying pan (or preferably a wok if you have one) over high heat. Sauté the green onions and red chillies (reserve a few for garnishing later) for 2 minutes or until softened.
  2. Add the pipis and cook for a further 3 minutes or until most of the shells have opened.
  3. Add in the XO sauce, fish stock, Shaoxing wine, and oyster sauce. Simmer for about 3 minutes or until all shells have opened (cook for no more than 5-6 minutes, discard any unopened shells). Transfer to a serving plate.
  4. Top with reserved green onions and red chillies. Drizzle with lime juice and serve with steamed rice.

Stir-fried Pipis in XO Sauce

BON APPÉTIT

– Ally xx

myTaste.com

Spicy Carrot, Chickpea & Almond Soup with Roasted Croutons

Spicy Carrot, Chickpea & Almond Soup with Roasted Croutons

Hello Everyone! Sorry for the lack of posts once again. I’ve been a bit busy with University, preparing for the last 2 weeks to go! It’s been hectic! Also, the weather hasn’t been very cheerful for the past couple of days. Winter is definitely kicking in! It’s cold, damp and miserable. On occasions there’d be rays of sunshine, but Sydney weather being deceptive and all, the sunshine never lasts long. So what better way to warm up that a nice bowl of spicy soup with crunchy croutons? Soup has never tasted so good.

Today I cooked from the UNSW Student Cookbook, a recipe by Serena Coady. This dish was served at the Cookbook Launch last week and I fell in love with it. It tasted so good that I really wanted to make a whole bowl for myself after a measly taste test without the croutons. Today was definitely the perfect time to whip it up. I tweaked the recipe just a bit in terms of using different bread, herbs and beans, and leaving the sour cream as is, but otherwise I pretty much followed the recipe.

To be honest, the title of this recipe doesn’t quite live up to it – the spicy part that was. I was a bit disappointed that my soup was not spicy at all, like I wouldn’t even say it was mildly spicy. So I may have added a bit too much of dried chilli flakes to give it that kick that I was after. Now that really grasped the word ‘spicy’! It may just be cultural thing, I know a lot of my Western friends who can’t take anything spicy at all, or even calling a dish that had a dash of paprika in it ‘really spicy’. I seriously have no comment for that.

Spicy Carrot, Chickpea & Almond Soup with Roasted Croutons Ingredients

PREP TIME 5 MINS | COOKING TIME 25 MINS SERVES 4

INGREDIENTS

  • 500g carrots, peeled and sliced
  • 1 medium brown onion, diced
  • 5 cups vegetable stock
  • 1 can (400g) chickpeas, drained
  • 1/2 cup flaked almonds
  • 1 tbsp smoked paprika
  • 2 tsp dried chilli flakes
  • 1/2 tsp dried oregano leaves
  • 3-4 slices of Pane di Casa bread from Bakers Delight
  • 1/4 cup + 2 tbsp extra virgin olive oil
  • Dollop of sour cream
  • Ground salt and pepper to taste

METHOD

  1. Preheat oven to 250C.
  2. Heat 2 tbsp of olive oil in a large pot over medium to high heat and sauté onions until soft, about 2 minutes. Add in the carrots with the chillies, paprika and oregano and sauté until combined. Season with a touch of salt and pepper. Increase the heat to high and stir intermittently for 15 minutes until carrots are tender and browned. Add the vegetable stock and chickpeas and bring to a boil. Simmer for another 10 minutes. Add the almond flakes into the soup, saving some for garnish later.
  3. Meanwhile, spread the flaked almonds on a lined baking tray and place in the oven for about 5 minutes or until the flakes are golden brown. Remove and set aside.
  4. Rip the slices of bread into bite size pieces and toss with 1/4 cup of olive oil in a small bowl. Spread onto the same lined baking tray and roast in the oven for about 8-10 minutes or until golden brown. Set aside.
  5. Pour the soup over into a blender (working in batches if I does not all fit) and blend on low speed for about a minute until well combined and smooth. Pour into a bowl and add a dollop of sour cream. Sprinkle with almonds, croutons, and paprika. Serve.

Spicy Carrot, Chickpea & Almond Soup with Roasted Croutons

A definite favourite winter warmer.

BON APPÉTIT

– Ally xx

myTaste.com

Prawns with Salted Duck Egg Sauce

Prawns with Salted Duck Egg Sauce

Hello everyone! Apologies for the lack of posts over the week. I assure you all that I am still eating well and I have not gone back to consuming instant noodles 🙂 The lack of posts is usually because I’ve already uploaded the recipe for it, or that what I’ve made is just a simple lunch/dinner that wasn’t photo-ready, and even also because I use natural lighting for all my photos, so when the sun is down, no photo = no post. And yes, my friends can vouch for the existence of many other photos that I have been accumulating over the past 3 years from when I first started to cook. The reason why I don’t want to use old photos is because some of them are out of focus, not presented well, or not the correct lighting, and basically…all over the place? I’m not too sure how to word the last one, but what I’m trying to say is that I’ve kind of adapted to the whole white background scene for my photographs, and I want to keep it consistently like that (unless of course for food that is not my own). I’m a little bit OCD so I like all my photographs to have the same style…for now.

Anyway, enough of the rant, about my apparent perfectionism, today I decided to make one of my favourite dishes, Prawn with Salted Duck Egg Sauce. If you read my previous post last week, I posted a recipe similar to this but with fried chicken instead. I also mentioned that I first tried this dish with prawns but have never actually made it for myself with prawns. So last week Saturday when I went to Paddy’s Market with Lina and Marissa, I bought myself some fresh tiger prawns to make this dish.

I must admit, I love prawns, but I barely cook with it only because I always have this tendency to overcook them. I always end up with dry and tough prawns which is a shame because, when cooked right, they’re just melt in your mouth delicious. I can never cook them to perfection as well because I’m always scared of them actually being undercooked. I am proud to say though that I was able to cook these prawns to melt-in-the-mouth perfection. I have never been happier. Plump, firm but tender, succulent, fresh prawns. Truly foodgasmic. Also a quick and simple dish that requires probably less than 10 minutes to cook. The only down side is that prawns are never cheap. Here at least that is…the ones I used here were almost $30 per kilo while I know I can get even fresher prawns back home for less than $10 per kilo.

PREP TIME 5 MINS | COOKING TIME 20-25 MINS SERVES 2-3

INGREDIENTS

  • 400g fresh tiger prawns, shelled and deveined (to save time, you can buy prawns that have already been shelled and deveined)
  • 2 salted duck egg yolks, steamed and smashed
  • 2 sprigs fresh curry leaves (dried leaves can be used as well if not available)
  • 2 red bird’s eye chillies, chopped
  • 2 cloves garlic, finely diced
  • 1 can (350ml) evaporated milk
  • 2 tbsp extra virgin olive oil
  • Ground salt and pepper

METHOD

  1.  Heat oil in a large frying pan over high heat. Sauté the garlic, curry leaves and half of bird’s eye chillies until fragrant. Stir in the egg yolks until they start to foam. Add the evaporated milk and bring to a boil until the sauce has slightly thickened. *This recipe calls for 350ml of evaporated milk, if you want a drier dish, then use less milk
  2. Season the prawns with salt and pepper and then add to the sauce mixture. Turn the heat down to medium and let the prawns simmer for 3-4 minutes. Once the prawns have turned pink, remove from the heat and garnish with remaining chillies. Serve immediately with steamed rice.

Prawns with Salted Duck Egg Sauce

BON APPÉTIT

-Ally xx

myTaste.com

Fried Chicken with Salted Duck Egg Sauce

Fried Chicken with Salted Duck Egg Sauce

Hello Everyone! Today for lunch I decided to pull out an old recipe that I have been making for a while now. I first came across a similar dish back in 2009/2010 maybe, at a restaurant back home, Mangrove Paradise Restaurant, where one of the waiters recommended the stir fried prawns with salted egg sauce. I am so glad that they made that recommendation because the dish was simply divine! I never tried to recreate this dish at home because, if you read my story on My Kitchen Journey, I was never really into cooking until 2 years ago really.

I was looking up recipes online one day figuring out what to make, and then I remembered this dish. I searched and searched online but could not find the one that I specifically had. I came across variations of the dish, but it wasn’t what I wanted to make. I then came across this recipe from yummylittlecooks which was close enough. I tweaked the recipe and method a bit, but I actually haven’t tested this recipe out with prawns, which I should definitely do next time, with some fresh curry leaves (I couldn’t find any this week so I resulted to used dried ones). They go so well with fried chicken though!

PREP TIME 1 HOUR | COOKING TIME 20-25 MINS SERVES 4-5

INGREDIENTS

  • 1/2 cup canola oil for shallow frying

For the marinade

  • 15 pcs chicken mid-wings, washed and cleaned
  • 1/2 tsp salt
  • 1 tsp sesame oil
  • 2 tbsp water
  • 2 tbsp cornflour
  • 2 tbsp plain flour
  • Dash of ground black pepper

For the sauce

  • 3 salted duck egg yolks, steamed and smashed
  • 2 sprigs fresh curry leaves (dried leaves can be used as well if not available)
  • 3-4 red bird’s eye chillies, chopped
  • 1 can (350ml) evaporated milk

METHOD

  1. Combine all the marinade ingredients in a large bowl and mix the chicken around until well coated. Cover the bowl with cling wrap and leave to marinade for 1 hour. Do not refrigerate it to bring the meat down to room temperature before cooking.
  2. Preheat oven to 180C. Heat up oil in a large frying pan an working in batches, shallow dry the chicken until skin is crispy and golden (about 4-5 minutes per side). Remove from the heat and place on a baking tray lined with aluminium foil.
  3. Place the wings in the oven for a further 8-10 minutes to finish off in the oven. *In the past I have found that my wings were still a bit raw on the inside after frying, and frying them longer in the pan would either burn my wings or make it go dry, which is why I added this step in to finish cooking the wings without burning, and the wings remained crispy on the outside and juicy on the inside
  4. Meanwhile, drain some on the oil from the pan and sauté the egg yolks, curry leaves and half of bird’s eye chillies until fragrant. Add the evaporated milk and bring to a boil until the sauce has slightly thickened. *This recipe calls for 350ml of evaporated milk, if you want a drier dish, then use less milk
  5. Place the chicken wings on a shallow serving bowl and pour the sauce over the top. Garnish with the remaining chillies and curry leaves. Serve with steamed rice.

Fried Chicken with Salted Duck Egg Sauce

BON APPÉTIT

-Ally xx

myTaste.com

Kangkung Belacan

Kangkung Belacan

My mom used to make this dish all the time back home. Honestly, I’ve never made it for myself ever since being here in Sydney, except for today. On occasions though when I’d be eating out with friends in various Asian-Malaysian restaurants, I would come across this on their menu and MY GOODNESS were they overpriced! Like I get the whole profit making thing but honestly, it’s like more than a 500-600% profit for this simple dish! Mamak in Chinatown for example is priced at $14.00 while Delima Restaurant is priced at $17.95. I know Delima adds prawns to their kangkung, but seriously. Overall, if I totalled how much I spent for this dish, it would total to about $3.00 inclusive of all the ingredients, and naturally it’d be even cheaper back home. Here a bunch of kangkung averages to about $1.50 depending where you get it from, while back home you paid 99c for five bunches.

Kangkung, also known as ‘water spinach’, is a vegetable commonly used in Southeast Asian cuisines, mainly Indonesia, Malaysia and Singapore where it is usually stir-fried in a chilli sauce. Kangkung is also evident in other Asian cuisines and I do recommend that you check out how else it can be used by going to wikipedia (I know, the whole conception of wikipedia not being a reliable source, but trust me). Belacan, or sambal belacan, basically consists of fresh red hot chillies, roasted Malaysian shrimp paste and lime, made into a paste or sauce to be used either as a condiment, or as an ingredient in cooking.

So for today’s recipe as titled: Kangkung Belacan (stir-fried water spinach with chillies and shrimp paste).

Kangkung Belacan

PREP TIME 5 MINS | COOKING TIME 10 MINS SERVES 3-4

INGREDIENTS

  • 2 tbsp canola oil
  • 2 cloves garlic, minced
  • 1/2 red onion, diced
  • 2 red bird’s eye chillies, sliced
  • 1 & 1/2 tbsp sambal belacan*
  • 1 bunch kangkung, washed, leaves separated from the stems, and stems cut into short lengths
  • Handfull of small-sized ikan bilis (dried anchovies)

*I used a store bought paste, but you can always follow a recipe make your own.

METHOD

  1. Heat oil in a medium frying pan over high heat. Add the ikan bilis and fry until crisp. Set aside.
  2. In the same pan, add the garlic and 1 of the sliced bird’s eye chilli and sauté until golden brown. Add in the onions and sauté until soft. Bring the heat down to low and then add in the sambal belacan, cooking the belacan over high heat will cause it to spit all over the stovetop and we don’t want to have a messy cooking area. Cover if needed. Sauté the belacan until fragrant.
  3. Add the the kangkung leaves, stems and a little bit of water to dilute the belacan you think can’t handle the heat. Cover until the leaves start to wilt. Toss around the belacan to coat the leaves and stems evenly (kangkung literally takes only a minute to cook).
  4. Transfer to a serving plate and top with the fried ikan bilis and fresh red chillies. Serve with hot rice.

Kangkung Belacan

BON APPÉTIT!

– Ally xx

myTaste.com