Garlic Bread Pasta Salad

Garlic Bread Pasta Salad

Hello Everyone! And just like that, another month in quarantine has passed and we’re two days away from the 8th month of the year. It’s crazy just thinking how we’ve gone through more than a third of a year (from mid-March to present day), here in the Philippines that is, in quarantine. I’m still lucky to be one of the few companies that still require a majority of their staff to work safely at home, but that may change in the next few days. There’s a high chance that it will be mandatory to report back to the office IF we do not go into another lockdown by August 1.

Garlic Bread Pasta Salad

Moving on, I remember that this wasn’t a recipe I had originally planned to tackle for my blog. To be honest, I can’t even remember what I had initially wanted to share with you guys. I was scrolling through recipes one Friday evening after work, looking for new recipes to add to my weekly menu so that I could prepare my market/grocery list for my weekend shop. I came across this recipe and thought, wow! Garlic bread AND pasta, together, tossed in a salad? YES! Plus, the dish fits perfectly with the theme of green for Colours of the Rainbow.

Garlic Bread Pasta Salad ; Garlic Focaccia Bread

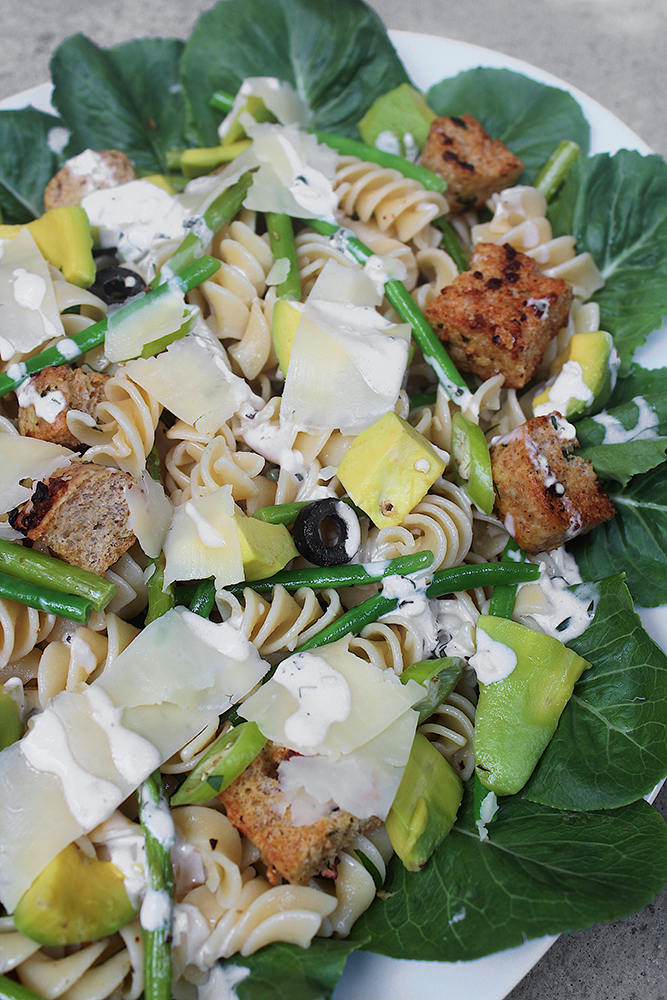
With crispy garlic bread croutons and a creamy homemade caesar dressing, this easy pasta salad will be a hit with family and friends over a summer backyard barbecue! I used store-bought olive focaccia bread for the croutons, but really you can just use plain bread such as white, wheat, sourdough, etc. for this. You can also get creative and use your favourite veggies for this dish, and even swap out the caesar dressing for a healthier or lighter option. I think a simple thyme, lemon, and olive oil dressing would do the trick too!

Before we dive into tonight’s recipe, please take the time to check out the original where I drew my inspiration from over on Taste Australia. Also, I have a little announcement for you guys at the end of this post so make sure to read it!

Garlic Bread Pasta Salad Ingredients

PREP TIME 25 MINS | COOKING TIME 25 MINS | SERVES 6-8*

* Can serve more as a small side dish

INGREDIENTS

For the pasta salad

  • 250g fusilli, or any other type of pasta
  • 100g green beans, trimmed
  • 100g baby asparagus, tough ends snapped off and cut to the same lengths of the french beans
  • 2 green chillies, thinly sliced
  • 2 medium-sized avocados, roughly chopped
  • 1 bunch choice of leafy greens, trimmed and leaves separated
  • 2 tbsp sliced black olives
  • Handful of finely chopped malunggay leaves
  • Salt and freshly ground black pepper, to taste
  • Shaved parmesan, to garnish

For the garlic bread

  • 200g day-old bread, cut into 2cm pieces
  • 60g unsalted butter
  • 3 garlic cloves, minced
  • Handful of finely chopped malunggay leaves

For the caesar dressing

  • 1/3 cup free range egg mayonnaise
  • 4 anchovy fillets, minced
  • 1 garlic clove, finely minced
  • 1 tbsp red wine vinegar
  • Handful of grated parmesan
  • Salt and freshly ground black pepper, to taste
  • Squeeze of fresh lime juice

METHOD

  1. Caesar Dressing: Combine all the ingredients for the caesar dressing into a small bowl and whisk together. Taste and adjust as needed and then set aside in the fridge before using. You may make this a day ahead to allow the flavours to fully develop overnight, otherwise it’s also good on the same day.
  2. Garlic Bread: Preheat oven to 200C (400F or gas mark 6) and line a baking tray with parchment paper. Set aside.
  3. Heat butter and garlic in a small saucepan over medium and cook until the butter is foamy.
  4. Place the bread in a large mixing bowl and pour the butter mixture over the bread. Sprinkle with half of the chopped malunggay leaves. Toss until evenly combined and then transfer the bread mixture to your prepared baking tray.
  5. Bake for 15-20 minutes or until toasted. Once done, sprinkle the remaining malunggay leaves and then set aside to cool.
  6. Pasta Salad: While the garlic bread is baking in the oven, cook the pasta in a large saucepan of salted boiling water,following packet directions or until al dente. Add the asparagus and green beans in the last 3 minutes of cooking of the pasta. Drain and refresh under cold running water, and then drain again before transferring to a large mixing bowl.
  7. Add three-quarters of the caesar dressing the pasta and veggies. Toss to combine and then add the avocado, black olives, shaved parmesan, and half of the garlic bread croutons. Toss again before transferring it onto a large serving dish.
  8. Drizzle with the remaining dressing, and top with the remaining garlic bread croutons and extra shaved parmesan. Serve and enjoy as a side salad with baked, grilled, or pan-fried salmon (or any other choice of meat that tickles your taste buds)!

Garlic Bread Pasta Salad

As mentioned at the beginning of this post, I have a special announcement to make. For those of you who have been loyal followers of Amcarmen’s Kitchen since 2015, you’ll know that every year for the month of August, I gather my fellow foodie friends to feature their own recipe on my blog. With the theme of the year being Colours of the Rainbow each guest foodie, or also known as an  Auguester, has chosen a colour of the rainbow that they will translate into their dish. This year I’ve managed to round up 12 foodies, with some returning faces since I started the series 5 years ago, and some fresh new faces for this year. All I can say that it’s going to be an exciting month so stayed tuned for that! Our first Auguester will be live on the blog on Monday 3rd August!

Garlic Bread Pasta Salad with Pan-fried Salmon

BON APPÉTIT

– Ally xx

myTaste.com

Advertisement
Salted Sweet Corn Ice Cream (No-churn)

Salted Sweet Corn Ice Cream (No-churn)

Hello Everyone! Earlier on the beginning of this month we’ve been experiencing dangerously high heat indexes, to the high 40s and I think even 50 degrees celsius in some cities in the provinces. The scorching weather we’ve been experiencing has left me craving for something sweet and something cold to beat the heat! Something like Salted Sweet Corn Ice Cream!

Central Coast, NSW (July 2011)

I remember when I was still studying in Australia for my Bachelor’s Degree in Design; I went on a weekend away trip up north to the country with my friend to visit her family. We stopped over… Somewhere (I can’t remember where) and ended up having Cold Stone Ice Cream at the beach in the dead winter. So there’s really no excuse to only have ice cream during the summery days! *cheeky grin* Also, I just realised that the photo above was taken almost 9 years ago (July 2011)!

Mini tangent aside, you can still whip this up even though we’re now entering the rainy season here in the Philippines; I mean we still have relatively hot and humid days in between the rainy days anyway.

This Salted Sweet Corn Ice Cream is sweet, summery, and creamy with that perfect hint of salt for that classic sweet-and-salty buttered corn at the backyard cookout kind of flavour. Perfect for a quick quarantine dessert! The great thing about it is that you don’t need an ice cream churner for this recipe, and most may already be readily available in your pantry. If not, be sure to pick them up on your next grocery run.

Salted Sweet Corn Ice Cream (No-churn)

It’s common for many to not associate or equate corn to something sweet, but rather used in savoury meals. But in Southeast Asia, specifically in Malaysia, Singapore, and the Philippines, corn is widely used in various desserts, most especially in ice cream.

Before we dive into tonight’s recipe, please take the time to check out the original where I drew my inspiration from over on My Recipes by Stacey Ballis.

Salted Sweet Corn Ice Cream (No-churn) Ingredients

PREP TIME 4 HOURS* | COOKING TIME | SERVES 4-6

*For freezing time, minimum 4 hours or up to 24 hours.

INGREDIENTS

  • 1 bag (200g) frozen corn**, thawed, quickly blanched, and roughly chopped
  • 1 can (218g) sweetened condensed milk
  • 1 cup (250ml) all purpose cream
  • 1 tsp vanilla extract
  • Pinch of salt
  • Yellow food colouring (optional)

** Alternatively, you can use fresh corn or canned corn as well for this recipe. Whichever is readily available.

Note:

When selecting fresh corn, look for plump ears with tight, green husks that feel cool and a little bit moist in your hand. Note that the natural sugars in sweet corn start converting into starch the minute it’s picked so buy the freshest ears you can find and be sure to use them within a day or two of bringing them home.

METHOD

  1. In a chilled medium-sized mixing bowl, whip the all purpose cream using an electrical hand-held mixer until soft peaks start to form.
  2. Add the sweetened condensed milk and continue to whip to soft peaks, it should be fluffy and mousse-like. Add the corn together with the vanilla extract and pinch of salt. Gently fold through and then, using a stick blender, blitz the mixture to break down the corn kernels.
  3. Pass the mixture through a sieve to get rid of the corn fibres to get a smooth-textured ice cream. Pour into an airtight container and freeze for 4 hours or up to 24 hours. Let sit at room temperature for about 15-20 minutes before scooping and serving on a hot summer’s day!

It’s excellent garnished with caramel sauce (and/or caramel popcorn), nut of choice or cornflakes for an added element of crunch! Enjoy!

Salted Sweet Corn Ice Cream (No-churn)

So before I end tonight’s post, I just want to share the little mishaps I had when making this ice cream. Firstly, I wanted to add just a hint of yellow food colouring to give a mixture a slight tint. I was slowly tipping the bottle over and nothing came out. I shook the bottle a bit, and only a tiny drop came out. I shook it again and then… boom. I think a teaspoon or more of it spilled out. Now it looks like the kind of ice cream you’d get from the stores that are 90% food colouring/flavouring *le sigh*.

Secondly, after freezing the ice cream mixture overnight, I was super excited to dig into it the next day. To my dismay, the ice cream was way too salty for my liking. It was really unpleasant to eat. On top of that, the ice cream tasted nothing like sweet corn at all. The corn kernels that were added to the mixture were hard and frozen. I was basically eating salty ice cream with cold chunks of corn that barely taste like corn. I was so disappointed.

I decided to try and fix this without having to throw out the first batch I made, all I needed was more cream, which I had to wait to get a week later on my fortnightly grocery run. I took the batch of ice cream out of the freezer and just let it sit on the countertop for about half an hour until it melted back into cream. Then I whipped the new all purpose cream in a chilled bowl until soft peaks started to form and then added the melted ice cream to the bowl. This definitely made the cream mixture less salty, but still hits just right. This also made the colour of the ice cream less intense.

Salted Sweet Corn Ice Cream (No-churn)

After adding the cream and melted ice cream together, I whipped it further and then got my stick blender out to blitz the corn into the cream mixture. This basically ensures that the corn flavour is mixed into the cream and also solved the issue of having icy chunks of corn. And violà! Fixed.

BON APPÉTIT

– Ally xx

myTaste.com

Avocado & Shiitake Rice Paper Rolls

Avocado & Shiitake Rice Paper Rolls

Hello Everyone! I feel like keeping this short one tonight – only because I really don’t have much to say about the dish itself, nor do I have a back story like I did last week about it. Yet again, I have to say that this isn’t one of the prettiest dishes I’ve put up – to be honest, I didn’t really put much thought in how I could have presented this dish. I really had to up the saturation when editing the photographs because it just looked so dead in terms of colour, and of course, composition.

Avocado & Shiitake Rice Paper Rolls

Despite that, this is an easy to make and perfectly healthy snack if you only plan on eating 1 roll, a light dinner if eating 2, and a hefty lunch if you’re planning on eating 4 or more of these! Don’t be deceived like I was – I thought 3 rolls wasn’t going to fill me up for dinner – how wrong I was! I was already struggling towards the end of my second roll!

They’re perfect for a delectable spring or summer dish, with crispy, crunchy, creamy textures and bright, bold flavours. I mean, despite the rain we’ve been having lately, we’ve also seen some beautiful sunny days. Before we head on over to the recipe for tonight, please do check out the original recipe that I adapted from Kristina on Spabettie.

Avocado & Shiitake Rice Paper Rolls Ingredients

PREP TIME 20 MINS | COOKING TIME 10 MINS | MAKES 12 ROLLS

INGREDIENTS

For the rice paper rolls

  • Half pack (125g) cooked rice noodles, drizzled with sesame oil
  • 12 rice paper wrappers
  • 12 large dried shiitake mushroom slices, rehydrated
  • 1 large ripe avocados, peeled, pitted, and sliced
  • 1 small red bell pepper, sliced into matchsticks and blanched
  • 1/4 cup roasted peanuts, roughly chopped
  • Bunch of spring onion, cut into matchsticks and blanched

For the spicy peanut sauce (Recipe adapted from Food in a Minute)

  • 1 small garlic clove, finely minced
  • 1/2 small red onion, finely minced
  • 1/2 cup creamy peanut butter
  • 1/2 cup water
  • 1/4 cup roasted peanuts, roughly chopped
  • 2 tsp chilli powder

METHOD

  1. Spicy Peanut Sauce: Heat a dash of cooking oil (about a tablespoon) in a small saucepan. On low heat, add the minced garlic and sauté until golden in colour and fragrant, about 30 seconds. Then, add the minced onion to the pan and cook for a further 30 to 45 seconds, until slightly softened. Be careful as to not brown/burn the garlic.
  2. Add the peanut butter, roasted peanuts, chilli powder, and water to the pan and stir until smooth. Remove from the heat and set aside.
  3. Rice Paper Rolls: Have two large plates ready, one filled with water and the other for filling/rolling your rice paper rolls. Ensure all your ingredient fillings are also prepared and ready for rolling!
  4. Place a wrapper into the plate with water, flipping so that both sides of the wrapper is soaked. Remove from the water while still firm and place on the other plate and begin to build up your roll.

Tip: Do not over soak the rice paper sheet as it will soften as it sits. This is so that it will not soften to the point that it sticks to the surface of the plate or rips when handling.

Avocado & Shiitake Rice Paper Rolls

  1. Place 2-3 slices of avocado and red bell pepper matchsticks in the middle of the rice paper, with 1-2 slices of shiitake mushroom (depending on its size), and a handful of sesame rice noodles. Top with a tablespoon of the spicy peanut sauce, pinch of crushed roasted peanuts, and a spring onion matchstick.
  2. Roll like a burrito by folding the short sides over, then turning and folding one long side over. Roll, tuck, roll, tuck, until completely enclosed. Repeat for the remaining rice paper sheets – should make at least 12 rolls.
  3. Serve immediately with a side of spicy peanut sauce for dipping. Enjoy!

Avocado & Shiitake Rice Paper Rolls

BON APPÉTIT

– Ally xx

myTaste.com

Spice-roasted Pineapple Nice Cream

Spice-roasted Pineapple Nice Cream

Hello Everyone! April is here and those who have been following my blog, or even just my social media pages (Facebook & Instagram) will know that a new month means that I get to play around with new ingredients! As the overall theme for this year is a “fruitful” one, I’m playing around with different kinds of fruit each month for 2019! For January I went nuts for Coconuts! For February it was all about Mangoes. For March they say an Apple a day keeps the doctors away! I ran a poll on Instagram stories for my followers to guess between Pineapple, Banana, and Lemon based on the set of ingredients for tonight’s post.

Of course, based on the title of this post, we all know that April with be all about Pineapples! I did mention in my previous post that I had to change what I had initially planned for tonight. Basically, I had planned for a Grilled Pineapple Oat Crumble, but I slowly realised towards the middle of last month that we’re at the peak of summer here in the Philippines, and it just made no sense whatsoever to be featuring warm/baked desserts in the heat we’re having! Thus I decided to take a cooler route for this month and beat the summer heat with this amazing Spice-roasted Pineapple Nice Cream!

Spice-roasted Pineapple Nice Cream

So what exactly is Nice Cream? Unlike most ice cream recipes, this one doesn’t require an ice cream maker/churner. The trusty food processor can transform any frozen fruits into a whipped dessert in mere minutes. Nice creams are also vegan, dairy-free, and treat-free from artificial flavours, colours, preservatives, and added sugar. Well okay, there is sugar for this particular recipe of mine that I used when making the spice-roasted pineapples, but other than that, I did not add any extra sugar to the nice cream.

Banana-based ice cream may be the original nice cream, but there are endless ways to adapt the classic recipe. Take for example, tonight’s recipe for Spice-roasted Pineapples – bananas are only really added to ensure a creamy custard-like texture, but the other fruit is the star of the show. I didn’t just want to blitz up some frozen pineapples, which is why I went a little bit extra in roasting the pineapples first in a few spices such as cinnamon, cloves, and star anise before freezing them. The result? AMAZING!

Spice-roasted Pineapple Nice Cream Ingredients

PREP TIME 20 MINS* | COOKING TIME 30 MINS | SERVES 6

*Allow for the Spice-roasted Pineapple Chunks to freeze for at least 5 hours or overnight before making the nice cream.

INGREDIENTS

For the spice-roasted pineapple

  • 1 large pineapple, peeled and cut into bite-sized chunks
  • 5 pcs whole cloves
  • 3 pcs star anise
  • 2 cinnamon sticks
  • 2 tbsp brown sugar
  • 1 & 1/2 tbsp Tequila or Vodka (optional)**

For the nice cream

  • Frozen spiced-roasted pineapple
  • Frozen sliced bananas, about 2-3 large bananas
  • 1 tbsp freshly squeezed lemon juice
  • Ginger nut biscuits (optional)***

**Almost every brand of hard liquor – bourbon, whiskey, vodka, gin and rum – is vegan. Nearly all distilled spirits are vegan except for cream-based liqueurs and products that mention honey on the label.

***I used Tesco ginger nut biscuits which are vegan.

METHOD

  1. Spice-roasted Pineapple: Preheat oven to 220C (425F or gas mark 7).
  2. Toss the pineapple, sugar, spices, and everything nice (liquor) in an oven-safe baking dish. Sorry, I could not resist not say that!
  3. Roast in the oven for about 20 minutes. Once done, set aside to completely cool down before placing them in a food-safe zip lock bag together with the peeled and sliced bananas, and into the freezer for at least 5 hours or overnight. Discard the spices! Save a couple of tablespoons of the spice-roasted pineapple in the fridge to serve together with the nice cream.

Spice-roasted Pineapple Nice Cream Process

  1. Nice Cream: Place all the ingredients for the nice cream into a food processor and let it run on the highest speed for about a few minutes until the frozen fruit turns into a loose, crumbly mass.
  2. Stop the processor and push the fruits down. Turn the processor on to high speed once again and repeat this process until you have a very smooth and silky soft nice cream.
  3. You may serve it immediately or if you want a lovely scoop-able nice cream, transfer it into a freezer-friendly container and freeze it for another hour.
  4. Serve, topped with the spice-roasted pineapple, crushed ginger nut biscuits, and enjoy!

Spice-roasted Pineapple Nice Cream

Spice-roasted Pineapple Nice Cream

By all means, feel free to get loose with this recipe and try out other fruits that you can play around with for a guilt-free vegan nice cream to stay cool this summer!

BON APPÉTIT

– Ally xx

myTaste.com

Dragon Fruit & Calamansi Shake

Dragon Fruit & Calamansi Shake

Hello Everyone! Today’s recipe as you can see is a very vibrant one indeed; but colour aside, the dragon fruit (or also known as pitaya) has many health benefits. For starters, it is low in cholesterol and even though the fruit does have small amounts of fat because of the many seeds in the edible part of the fruit, it has little to no unhealthy cholesterol producing fats. Dragon fruits also contain high amounts of vitamin C that provide you a rich balance of nutrients. These are only some of the health benefits that dragon fruits have to offer and you can head on over to Natural Food Benefits for further information.

Pink Dragon Fruit

The Pitaya is the fruit of several cactus species and are originally native to Mexico, and are now cultivated in East Asian, South Asian, and Southeast Asian countries. It is commonly know as the dragon fruit as it traces back to its Asian names, for example: the Thai kaeo mangkon (แก้วมังกร) (dragon crystal), the Vietnamese thanh long (green dragon), and the Chinese huǒ lóng guǒ (fire dragon fruit) or lóng zhū guǒ (dragon pearl fruit) to name a few. The dragon fruit comes in three different colours; a red-skinned fruit with either white or red flesh, or a yellow-skinned fruit with white flesh. With the red-skinned fruit, you can’t tell the colour of the flesh unless you ask the man or lady who sells them at the local markets, otherwise, supermarkets usually label them according to the colour of the flesh.

I cannot remember if I’ve touched on what a calamansi is on a previous blog, but I’ll give a brief description on what it is for those of you who don’t know. The calamansi citrus is like a cross between mandarin oranges and kumquats. The flavour is slightly sweeter than a lime, but has the taste of a sour orange. The fruit is grown throughout Southeast Asia, primarily in the Philippines and Malaysia, and is an ingredient used to flavour dishes and make them taste truly authentic. Other than that, it can be sipped on its own as a refreshing drink.

Dragon Fruit & Calamansi Shake

We bought these brightly coloured fruits in the market 2 weeks ago and we didn’t know what to do with them besides just eating them. Then I remembered that a had a red dragon fruit smoothie when I was back in Sydney and decided to turn these fruits into a drink of my own. I searched for recipes online and found one that had the addition of lime and other ingredients in it. I think at the time that I wanted to make this drink, I didn’t have any of the ingredients in the pantry but I had calamansi; and so I decided to give that a go and combine just the two. It tasted really good! The mild sweetness of the dragon fruit paired wonderfully with the sourness of the calamansi.

Pink Dragon Fruit

PREP TIME 10 MINS | COOKING TIME | SERVES 4

INGREDIENTS

  • 2 red dragon fruits, skins peeled* and cut into chunks
  • 2 cups ice
  • 1/4 cup cold water
  • Juice of 5 calamansi
  • Mint leaves, to garnish

*First slice the fruit into quarters, lengthwise, and then you can peel back its skin easily.

METHOD

  1. Combine all the ingredients, except the mint leaves, into a blender.
  2. Blend until smooth. Pour into a tall glass and garnish with mint leaves.
  3. Serve and enjoy a refreshing drink in the summer sun!

Dragon Fruit & Calamansi Shake

PS: Consumption of significant amounts of red-fleshed dragon fruit may result in a harmless pinkish/reddish colouration of the urine and poop.

BON APPÉTIT

– Ally xx

myTaste.com

Avocado & Date Smoothie

Avocado & Date Smoothie

Hello Everyone! Today’s recipe was inspired by a smoothie drink that I had about a few weeks ago from The Energy Kitchen here in Brunei. I really loved the taste of it and I was surprised by how little ingredients it contained. It was not only rich and flavourful, but it is also healthy indeed. However, the drink was very pricey; if I’m not mistaken I think it was about $9.00, maybe almost $10.00 for a large glass (11oz maybe). Because of that, I decided to then give this smoothie a try with local avocados that cost $4.00/kg; and you get about 5-6 avocados depending on their size per kilo. Dates were probably around $4.00 per 500g and a carton of almond milk was about $5.00. I with all this, I was able to make at least 4 large glasses with these and still had a lot of dates and almond milk leftover for another 2 rounds of this smoothie. It’s definitely much cheaper making it at home!

Avocados have several proven health benefits including an abundance of nutrients such as vitamins B5, B6, C, E, K, potassium (even more than bananas), and small amounts of magnesium, manganese, copper, iron, zinc, phosphorous, etc. Avocados are also loaded with heart-healthy monounsaturated fatty acids, in which the majority of the fat is oleic acid; beneficial in that these acids activate the part of your brain that makes you feel full. In addition, oleic acid has been linked to reduced inflammation and has beneficial effects on genes linked to cancer. To find out more on the health benefits of avocados, visit the Authority Nutrition page.

This drink also doesn’t contain any sugar. Instead they contain dates that are naturally sweet, and not only that, dates are also known to have many health benefits; to name a few, they relieve constipation, intestinal disorders, heart problems, anemia,  sexual dysfunction, diarrhea, abdominal cancer, and many other conditions. Dates are rich in several vitamins, minerals and fibre too, containing oils, calcium, sulfur, iron, potassium, phosphorous, manganese, copper, and magnesium; all of which are beneficial for our health health. To read up more on the health benefits of dates, visit the Organic Facts page.

Pair these two together with about 3/4 cup of almond milk (you can use any other type of milk if you wish, and also add more milk if you want you smoothie to be a little bit thinner), and you’ve got yourself a rich and healthy drink. I didn’t add any ice to this drink so make sure that your milk is cold or place your smoothie in the freezer for about 10 minutes before drinking.

Avocado & Date Smoothie Ingredients

PREP TIME 10 MINS | COOKING TIME | SERVES 4

INGREDIENTS

  • 6 ripe avocados, peeled, pitted, and cut into chunks
  • 1/2 cup dates, pitted and roughly chopped
  • 1/2 cup almond milk (or any other milk)

METHOD

  1. Combine all the ingredients into a blender. Blend until smooth.
  2. Pour into a tall glass and enjoy a healthy smoothie!

Avocado & Date Smoothie

BON APPÉTIT

– Ally xx

myTaste.com

Mango Shake

Mango Shake

Hello Everyone! I’ll be keeping today’s post very simple and straight forward as tomorrow I will be doing a special post for two very loved people in my life. What I like about being back in the tropics around this time of the year is that it’s summer and summertime means MANGOES! Once, someone asked me a question: “If you were to be shipped to a deserted island and you could only take 1 item of food with you, what would you bring?” I thought a while about this and I remembered that my final answer was mangoes. The moment I said it, everyone nodded and agreed that it was a good choice; I could tell that their mouths watered as soon as I said it.

Mango Shake

I love mangoes, especially Philippine mangoes. I’m sorry but Kensington Pride mangoes, which are the ones I’ve been buying from Coles during summertime down under, cannot compare. Today’s recipe is very simple, and is definitely much better than what you get at restaurants. I remember the one that I had at Arabela, it was very watered down, and more on ice than mango.

Mango Shake Ingredients

PREP TIME 10 MINS | COOKING TIME | SERVES 4

INGREDIENTS

  • 4 ripe Philippine mangoes, peeled and cut into chunks
  • 2 cups ice
  • 1/4 cup cold water
  • Mint leaves, to garnish

METHOD

  1. Combine all the ingredients, except the mint leaves, into a blender.
  2. Blend until smooth. Pour into a tall glass and garnish with mint leaves.
  3. Serve and enjoy a refreshing drink in the summer sun!

Mango Shake

BON APPÉTIT

– Ally xx

myTaste.com

Celery & Green Apple Slaw

Celery & Green Apple Slaw

Hello Everyone! The story behind me attempting this recipe is that I always seem to struggle with celery. There are times where I’d buy a whole bunch for a dollar (on special) when the halves weren’t available or if they didn’t have the bags of pre-cut celery sticks. The thing with me and celery is that I only use it when I’m making a bolognese or minestrone soup. I rarely use it for any of my dishes. So half the time it sits in the fridge waiting to be use, and then eventually thrown out because it’s been sitting there for weeks, possibly months. I know, most of you are probably thinking that I could’ve just eat them like that with some sort of dip, but in all honesty, raw celery isn’t quite my thing. Again, another rabbit food moment here.

Celery & Green Apple Slaw

So, I bought a bag of celery sticks last week for a dish that will be posted next week, and before going out to do my weekly groceries, I jumped online and search for a recipe that I could make that included celery – yes, I was determined to not waste my bag of celery! I came across this recipe from Taste and I thought that I’d give this one a go. I know, when I thought about it and how I mentioned that “raw celery isn’t quite my thing”, and here I am attempting a raw celery slaw. Well, I thought it was about time that I gave raw celery a chance and it did not disappoint. Well to be honest I could’t distinctly pick out its taste, maybe because from the crème fraîche dressing, but the crispiness and freshness from both the celery and apple paired with the creamy sweet yet tangy dressing really made the dish exciting to my palette. Why did I not think of this sooner! All those celery sticks that went to waste…

Celery & Green Apple Slaw Ingredients

PREP TIME 20 MINS | COOKING TIME | SERVES 2-3

INGREDIENTS

  • 4 celery sticks, cut into matchsticks
  • 1 large green apple, cut into matchsticks
  • 100g Danish feta cheese, crumbled
  • 1/3 cup walnuts, toasted and coarsely chopped
  • 2 tbsp crème fraîche
  • 2 tbsp freshly squeezed lemon juice
  • 1 & 1/2 tbsp chopped fresh chives
  • Pinch of caster sugar
  • Salt and pepper to taste

METHOD

  1. In a small bowl, whisk the crème fraîche, lemon juice, sugar and chives in a small bowl. Season with a bit of salt and pepper.
  2. Plate up the celery and apple matchsticks in a deep dish. Pour the crème fraîche mixture over the celery and apples, and top with crumbled danish feta and walnuts. Serve!

Celery & Green Apple Slaw

If you want to add some protein or omega-3 to this fresh, light slaw, you can have some chicken on the side, or as what I’ve done is grill some salmon to go with this dish. Season with salt, pepper, and lemon juice, pop in the grill oven for about 5 to 7 minutes (for a thin portion as what I had), and serve!

Celery & Green Apple Slaw with Salmon

Celery & Green Apple Slaw with Salmon

BON APPÉTIT

– Ally xx

myTaste.com

White Chocolate Cheesecake with Mango & Passionfruit (Constructed)

White Chocolate Cheesecake with Mango & Passionfruit

Hello Everyone! Yes I know, it’s only Sunday, but I thought that I’d write up a Sunday Special post to share with everyone. I’ve been resting this past week after what I thought wasn’t such a tiring trip to the Outback, but I think the after effect just came crashing down on me when I got back to Sydney. My body clock hasn’t quite adjusted to my regular sleeping/waking patterns, which kills me because then I feel tired the whole day! Yesterday was somewhat productive but lazy at the same time. Besides an early wake up to send Lydia off at the airport and a gym session with Jialing, I lazed off the whole afternoon/evening. I practically did nothing besides eat and sleep. Hopefully I’ll snap out of this and feel refreshed after the weekend passes – after all, I did not have a weekend for myself as last week I was walking around the base of Uluru and scaling Kata Tjuta (and of course followed by a climb/hike/trek at Kings Canyon on the Monday after that weekend – much tiredness indeed).

Anyway, about a few weeks ago, Lydia asked me to teach her how to make a cake because she wanted to be able to make one for her mother’s birthday when she leaves to go home. She told me she didn’t have an oven though. “Easy!” I said to her as a no-bake cheesecake came into mind. She was a very good student and I am confident that she will be successful in making this for her mother on her birthday!

White Chocolate Cheesecake with Mango & Passionfruit (Constructed)

White Chocolate Cheesecake with Mango & Passionfruit (Deconstructed)

If you’ve been following my blog for a while, or have searched through my archives, you may have seen a post for no-bake mini blueberry cheesecake. So I decided to teach her how to make that but instead with my favourite summer fruit since it’s summertime! I’ve actually made this cake before, 2 years ago I think, when I used to live up in the Lower North Shore together with my old housemate Vanessa. We made this cake together with my friend Edison and Valerie whom we had over for our Annual Easter Dinner. We had a whole leg of lamb and other eats, included this yummy yummy cheesecake. We made a full sized one though, but since I actually only have mini springforms, we decided to make miniature cheesecakes (also easier to eat in small bits and store in a limited space fridge). Before I get onto the recipe, please do take the time to visit food.com where I got the original recipe from.

Besides making whole mini cheesecakes, I also decided to whip up a deconstructed cheesecake and use the stemless wine glasses that I got for free from Coles a while back. At the time, there was a special where if you bought two blocks/tubs of any of the Philadelphia Cream Cheese range, you get a set of 2 stemless wine glasses for free (worth $14.95).

White Chocolate Cheesecake with Mango & Passionfruit Ingredients

PREP TIME 20 MINS* | COOKING TIME  | MAKES 4 CHEESECAKES

*Add 4-5 hours extra (overnight preferably) for chilling time

INGREDIENTS

  • 1 large mango, sliced
  • 2 passionfruit
  • 2 x 250g packets cream cheese, softened
  • 300ml thickened cream, whipped
  • 200g white chocolate chips, melted
  • 100g ginger nut biscuits
  • 60g butter, melted
  • 1/2 cup caster sugar
  • 1/4 cup boiling water
  • 3 tsp gelatin powder

METHOD

  1. Prepare the springform pans by lining the bases with baking paper and greasing the edges with butter. In a food processor, process the ginger nut biscuits until mixture resembles fine breadcrumbs. If you don’t have a food processor handy, add the biscuits into a ziplock bag and use either a metal or wooden spoon to smash the hell out of it! Tip it into a medium sized mixing bowl, add the melted butter a mix until well combined. Press the mixture over the base of the prepared pans. Place in the refrigerator for 20 minutes or until firm.
  2. Next, sprinkle the gelatine powder into a mug and add the boiling water to it. Whisk with a fork until the gelatine powder fully dissolves. Set aside to cool for 15 minutes.
  3. Meanwhile, whip the thickened cream in a small mixing bowl using the electric mixer – be careful as to not over whip the cream otherwise you will end up with a lumpy cheesecake mixture. Set aside. Beat the cream cheese and sugar in a large mixing bowl using the electric mixer until smooth and creamy.
  4. Fold the melted white chocolate and whipped cream into the cheesecake mixture, then, gradually beat in gelatine mixture until combined. Pour the cheesecake mixture into the prepared pans and wrap each with cling film. Place in the fridge for at least 4-5 hours to set (preferably overnight). Top the cheesecakes with the sliced mangoes and passionfruit before serving.

White Chocolate Cheesecake with Mango & Passionfruit (Constructed)

For the deconstructed cheesecake, basically just layer the biscuit base and cheesecake mixture and top with your favourite summer fruits!

White Chocolate Cheesecake with Mango & Passionfruit (Deconstructed)

BON APPÉTIT

– Ally xx

myTaste.com