Ube Champorado

Ube Champorado

Hello Everyone! Everything is about ube these days; ube ice cream, cakes, and desserts and all that. ‘New’ recipes are being developed all the time – new meaning adding an ube twist to already classic favourites. The latest ube trend/craze to come out of this quarantine is of course none other than the overrated Ube Cheese Pandesal.

Ube Champorado

Like this Ube Champorado, it is as good as our favourite original chocolate version. Almost two years ago (just shy of a few days actually), I made the classic version of this champorado using tablea chocolate. In that post, I talked about pairing a sweet rice pudding with dried, salted fish. I remember getting messages from friends when I posted a photo of the dish on IG; all with the same “wow, that’s interesting!” reaction. There are a lot of desserts out there that embrace the salty-sweet combination; salted caramel and salted chocolate being the top two favourite bases to endless dessert options!

This Ube Champorado with dried salted fish is no exception. It adds pops of salty surprises to each spoonful of the sweet ube rice porridge that you take. If the combination is off putting for you, then you could get away with adding a pinch of rock salt into your champorado – but it won’t be the same. For all the ube lovers out there, this is an ideal breakfast, snack, or dessert for any occasion!

Ube Champorado Ingredients

PREP TIME 5 MINS | COOKING TIME 25 MINS | SERVES 6

INGREDIENTS

  • 4 cups filtered water
  • 1 cup (250g) white glutinous rice, rinsed
  • 1 cup ube jam/halaya
  • 1/2 cup coconut milk
  • 1 tsp ube extract
  • Pinch of salt

METHOD

  1. Add the rinsed glutinous rice together with the water in a medium-sized stockpot over medium heat. Bring to a boil and then lower the heat down to a simmer. Cook until the rice is almost tender, about 15 minutes. Stir regularly to avoid scorching and sticking. Add more water if necessary to achieve your desired consistency.
  2. Stir in the ube jam/halaya, ube extract, coconut milk, and season with a pinch of salt. Taste and adjust if needed. Cook, still continuously stirring, until tender and the ube is mixed in well with the rice, a further 10 minutes or so.
  3. Once done, ladle the champorado into individual serving bowls and top with a swirl each of the ube condensada and coconut milk. You may also top them with fried boneless dilis if you’re feeling adventurous.
  4. Enjoy immediately while steaming hot on a chilly and crisp morning!

Ube Champorado

You may use fresh/raw ube for this recipe, however, so using store-bought ube jam/halaya, ube extract, or ube powder is just as good; quick and hassle free as how champorado should be. Having to work with fresh Ube will totally ruin that aspect of a no-fuss champorado for me.

Ube Champorado

BON APPÉTIT

– Ally xx

myTaste.com

Kaya (Malaysian Pandan Coconut Egg Jam) with Fried Mantou

Nyonya-style Kaya (Malaysian Pandan Coconut Egg Jam)

Hello Everyone! Try something new on your morning toast! If you’re looking to change up your breakfast condiment selection from the everyday jams and jellies, try this Pandan Coconut Egg Jam. It will transport you to the tropics with its flavourful, rich, and sweet taste!

Kaya (Malaysian Pandan Coconut Egg Jam) with Fried Mantou

Kaya in the Malay language means “rich”, with reference to the texture of this jam. It is a sweet coconut egg jam that is rich, thick and custard-like in texture, and flavoured with pandan, giving it a fun green colour.

There are two well-known varieties of kaya:

  • Nyonya, which is green in colour
  • Hainanese, which is darker brown in colour and often sweetened with honey

The colour variation depends on the number of eggs, the caramelisation of the sugar, and the amount of pandan leaves used. In the Philippines, a variation of this jam is known as matamís sa báo, but it does not contain eggs and is less thick in texture. In Thailand, it is known as sangkhaya.

Kaya (Malaysian Pandan Coconut Egg Jam) with Fried Mantou

This version of kaya that I will be sharing with you guys tonight is the Nyonya-style one, which gets its aromatic fragrance and natural green colour from the pandan leaf. The idea of treating it as a dip rather than a spread or a filling was inspired from my trip to Thailand a couple years back, in 2013. We (my family and I) were at a roadside stall for dinner and on their menu they had steamed thick-sliced bread with a kaya and condensed milk dip. I decided to recreate this dish to share with you guys tonight, but instead of serving it with steamed bread, I fried some mantou buns for that extra-added crunch on the outer layer while still keeping the inside of the buns soft.

Before we dive into tonight’s recipe, please take the time to check out the original where I drew my inspiration from over on Curious Cuisiniere by Michelle Wong.

Kaya (Malaysian Pandan Coconut Egg Jam) Ingredients

PREP TIME 5 MINS | COOKING TIME 15 MINS | MAKES 1 SMALL JAR

INGREDIENTS

  • 4-5 pandan (screwpine) leaves
  • 200ml coconut milk
  • 4 large free range eggs
  • 1/2 cup coconut sugar

Optional (to serve with)

  • Condensed milk
  • Fried mantou buns

METHOD

  1. Place the pandan leaves together with the coconut milk in a food processor or heavy-duty blender, and blitz/blend for a few minutes until the pandan leaves have been finely puréed.
  2. Pour the blended pandan-infused coconut milk over a fine sieve and into a large bowl. Strain the coconut milk from the pandan leaf pulp, pressing down firmly with the back of a spoon to extract all of the coconut milk from the pulp. Discard the pandan leaf pulp.
  3. In a separate heat-proof bowl, beat together the eggs and sugar, until frothy. Then, add the pandan-infused coconut milk to the egg and sugar mixture.
  4. Create a bain-marie (double-boiler) by pouring some water into a pot that is slightly larger than your heat-proof bowl. Very important, check to see if your bowl can sit on top of the pot without any water touching the bottom of the bowl.
  5. Heat your pot of water over low-medium and bring to a slight simmer. Once slightly simmering, place the bowl with the coconut milk and eggs over it and gently whisk for 10-15 minutes, ensuring no water escapes from the bottom pot. It’s important to keep a low simmer or else the eggs can curdle quickly (refer to notes).
  6. Once done, transfer the kaya to a small serving dish and add just a touch of condensed milk (just enough that it doesn’t become overly sweet) and serve with your choice of steamed or fried bread. Whatever tickles your fancy! Enjoy!

Kaya (Malaysian Pandan Coconut Egg Jam) with Fried Mantou

Transfer the remaining kaya into a sterilised and clean jar. Let it cool before storing in the refrigerator for up to two weeks. Kaya is eaten as a condiment spread on bread or toast, usually as breakfast.

Kaya (Malaysian Pandan Coconut Egg Jam)

Notes:

  • If you don’t have access to fresh pandan leaves, you may be able to find pandan extract which comes in a small bottle or pandan leaf powder, which will work perfectly fine with the recipe.
  • If your eggs curdle during the cooking process, not to fret! Continue to cook for the full 15 minutes, and then transfer the mixture to a blender. Blend until the kaya is smooth.

Growing up in Brunei, Nyonya-style kaya was my go-to choice of spread (together with peanut butter or just butter) on the waffles that you’d get at the local supermarket (Hua Ho) in the snack corner. Their freshly made kaya-filled pancakes, or even the kaya buns on their shelves were also my go-to choice. Also not forgetting the Hainanese kaya-filled cakoi (Chinese youtiao fried dough) from a nearby roadside stall from my workplace that my then workmates and I used to drive to our lunch breaks, and the kaya-buttered toast from a popular Chinese kopitiam known as Chop Jing Chew. These are, if not all, then some of my fondest memories of kaya.

BON APPÉTIT

– Ally xx

myTaste.com

Cayenne Shrimp & Corn Chowder

Cayenne Shrimp & Corn Chowder

Hello Everyone! I’ll keep tonight’s introduction short as I haven’t got much to say really. This Cayenne Shrimp & Corn Chowder is the perfect comfort food for the wintry days, or even just those cold, rainy nights. It’s easy, hearty, spicy, sweet, slightly creamy, incredibly smoky, and packed with tons of flavour!

Cayenne Shrimp & Corn Chowder

Shrimp is a popular choice for any meal of the day. Be sure and get the right sized shrimp for your recipe Medium-size shrimp are best for soups, for example, because they are easier to eat with a spoon. The best part of this dish though is that you can control the heat levels by adding more or less cayenne and/or paprika, to taste. If you ask me though, I’d say the more the better because that smokiness is the true star in this chowder!

As I was cooking, I realised that the dish was turning out to be more on the orange side rather than yellow. Oops! Nevertheless, before we dive into tonight’s recipe, please take the time to check out the original where I drew my inspiration from over on Gimmie Some Oven by Ali.

Cayenne Shrimp & Corn Chowder Ingredients

PREP TIME 20 MINS | COOKING TIME 1 HOUR 25 MINS | SERVES 3-4

INGREDIENTS

  • 500g shrimp, heads removed, peeled, and deveined

For the prawn head soup base

  • Shrimp heads and peels
  • 1.5L water
  • 5 garlic cloves, whole
  • 3 celery stalks, roughly chopped
  • 3 dried bay leaves
  • 2 small red onion, quartered
  • 1/2 tbsp salt
  • 1/2 tbsp whole black peppercorns

For the chowder

  • Shrimp meat
  • 400ml coconut milk
  • 1 bag (200g) frozen corn*, thawed
  • 3 celery stalks, sliced
  • 3 large potatoes, peeled and cut into medium-sized cubes
  • 2-3 garlic cloves, minced
  • 1 small red onion, diced
  • 2 tbsp olive oil
  • 2 tsp cayenne pepper powder
  • 2 tsp smoked paprika powder
  • 1/2 tsp dried thyme
  • 1/2 tsp garlic powder
  • Salt and ground black pepper, to taste
  • Chopped spring onions, to garnish

* Alternatively, you can also use fresh corn or canned corn for this recipe; whichever is readily available for you.

METHOD

  1. Prawn Head Soup Base: Add all the ingredients to a large heavy-bottomed pot. Bring to a boil over high heat. Once boiling, turn the heat down to a slow simmer. Make sure to press down on the heads and peels as it simmers away to extract as much flavour as you can. Leave it to simmer for about 30 to 45 minutes.
  2. Once done, strain the soup base into a large mixing bowl and set aside.
  3. Chowder: In the same heavy-bottomed pot, heat olive oil over medium-high. Add the minced garlic and sauté until golden brown and fragrant, about 30 seconds. Be careful to not burn the garlic. Then add in the diced onions, cooking until they soften, about 1-2 minutes.
  4. Add the sliced celery and potatoes to the pot, together with the spices, herbs and season with ground black pepper. Stir and cook for about a minute before adding in the prawn head soup base to the mixture. Bring to a rapid boil.
  5. Once boiling, turn the heat down to low so that the soup reduces to a slow simmer. Simmer away for 10 to 15 minutes, covered. Slowly add in half of the coconut milk and bring back to a slow simmer. Check and stir occasionally to avoid curdles from forming, cooking for a further 5 to 10 minutes. Taste to check if the chowder needs more seasoning or not.
  6. Add in the prawns and thawed sweet corn. If you’re using fresh corn, add them a little earlier to ensure that they are cooked all the way through. Cook for about 5 minutes and then add in the remaining coconut milk. Turn the heat up to medium-high and bring the chowder up to a rapid boil and cook for a further 5 minutes.
  7. Turn the heat off and equally divide the chowder into individual serving bowls. Top with some freshly chopped green onions and serve immediately while hot. Best with a crusty baguette on the side. Enjoy!

Cayenne Shrimp & Corn Chowder

Cayenne Shrimp & Corn Chowder

BON APPÉTIT

– Ally xx

myTaste.com

Raspberry, Almond, and White Chocolate Bread Pudding with Vanilla Cream Sauce

Raspberry, Almond, and White Chocolate Bread Pudding with Vanilla Cream Sauce

Hello Everyone! I hope everyone had a great weekend celebrating love, be it with your families, friends, or significant others. Tonight I’ll be sharing an elevated version of a classic bread pudding recipe.

Raspberry, Almond, and White Chocolate Bread Pudding with Vanilla Cream Sauce

Bread Pudding is a bread-based dessert that originated in Europe, but popularised in many countries’ cuisines. It is typically made with stale bread, with milk or cream, eggs, butter, and depending whether the pudding is sweet or savoury, a variety of other ingredients.

Raspberry, Almond, and White Chocolate Bread Pudding with Vanilla Cream Sauce

Sweet bread puddings may use sugar or honey, fruits, nuts, vanilla, and spices such as cinnamon and/or nutmeg. The bread is soaked in the liquids together with the other ingredients, baked, and then served with either ice cream or a sauce. Tonight’s recipe will include all of the above, with raspberries, white chocolate, and sliced almonds, topped with a rich vanilla cream sauce.

Raspberry, Almond, and White Chocolate Bread Pudding with Vanilla Cream Sauce Ingredients

PREP TIME 1 HOUR | COOKING TIME 1 HOUR | SERVES 6-8

INGREDIENTS

For the bread pudding

  • 1 loaf wholemeal bread
  • 1 punnet (250g) fresh or frozen raspberries
  • 1 large free range egg
  • 100h mascarpone cheese
  • 2 cups soy milk
  • 1/4 cup white granulated sugar
  • 1 tsp pure vanilla extract
  • 1/4 tsp ground cinnamon
  • 1/4 tsp ground nutmeg
  • Handful of sliced almonds
  • Handful of white chocolate chips

For the raspberry coulis

  • 100g fresh or frozen raspberries
  • 1/4 cup white granulated sugar

For the vanilla cream sauce

  • 100g unsalted butter
  • 200ml heavy cream, or all purpose cream
  • 1/4 cup white granulated sugar
  • 2 tbsp plain flour
  • 1 tsp pure vanilla extract
  • 1/4 tsp salt

METHOD

  1. Bread Pudding: Grease a rectangular baking dish, mine was about 7.5″ x 11″ in size, with the unsalted butter. Cut the bread slices in half diagonally and arrange them into the baking dish. Set aside.
  2. Whisk together the egg, soy milk, sugar, mascarpone cheese, ground cinnamon, and ground nutmeg until well combined. Pour over the bread, making sure to press the bread down to absorb the egg mixture.
  3. Top with crushed raspberries, white chocolate chips, and sliced almonds. Sprinkle an extra tablespoon of sugar on top if you wish. Cover with aluminium foil and let it sit for about an hour before baking.
  4. Preheat oven to 180C (350F or gas mark 4) about 45 minutes into its sitting time. Baked, covered for 30 minutes, and then uncovered for another 30 minutes or until lightly browned and set.

Raspberry, Almond, and White Chocolate Bread Pudding with Vanilla Cream Sauce

  1. Raspberry Coulis: Chuck the raspberries and sugar into a small saucepan and cook over low heat, stirring occasionally to make sure it doesn’t burn on the bottom. It doesn’t take long before the juices start to run and things start to look syrup-y.
  2. After the sauce has simmered for about 10 minutes, it should be just right. Not too thick, not too thin. Optional: If you like your raspberry sauce satiny-smooth, pour the mixture through a fine-mesh strainer. Then use the back of a ladle to push it through, discarding the seeds and reserving the sweet, fruity puree.
  3. Pour on top of the bread pudding and leave to seep.
  4. Vanilla Cream Sauce: Melt butter in a medium-sized saucepan over low heat. Once melted, increase the heat to medium and add the flour. Whisk together for about 10 minutes until it has a nutty aroma, but make sure not to brown the roux.
  5. Add the salt, cream, and sugar, whisking until the mixture becomes thick. Remove from the heat and stir in the vanilla extract. If your sauce is too thick, you can add a few tablespoons of soy milk to loosen the sauce a bit.
  6. Drizzle or pour a generous amount of the vanilla cream sauce over a warm single serving of the raspberry bread pudding and enjoy immediately!

Raspberry, Almond, and White Chocolate Bread Pudding with Vanilla Cream Sauce

Before I end tonight’s post, do check out my Blueberry Bread Pudding recipe that I tackled back in 2017. I also made an all-crust bread pudding with dates from 2014; it’s not up on my blog only because I made it out of the blue one night with leftovers from an afternoon tea party I held when I was still living in Australia.

Raspberry, Almond, and White Chocolate Bread Pudding with Vanilla Cream Sauce

BON APPÉTIT

– Ally xx

myTaste.com

Apple Danish

Apple Danish

Hello Everyone! My sincere apologies for last week’s post being very bland and uninformative like my recent posts from the beginning of this year. Those who have read my post last week will know the reason for the lack of depth. But moving on, I am hopfully back on track and will not disappoint for tonight’s post. I do have a little bit to say at the end of this post so make sure you read all the way to the end, for those interested/curious that is.

So I did mention in last week’s post that I’d be specifically working with Red Delicious Apples for the month because they were on sale at Rustan’s Supermarket. After doing some research, I realised that these apples are not at all recommended for the way I’m working with them, whoops!

Red Delicious Apples are crunchy in texture and mildly sweet in taste. It is apparently the world’s favourite snacking apple and shines through in cool, crisp salads. They are in season basically all year round and no suggested for pies, sauces, baking, and freezing – oops. I totally used them for baking in last week’s recipe and technically tonight’s recipe. I will use them for a sauce and for baking again for the coming recipes as well *face palm* Oh well, but to be honest, I haven’t come across any dire problems with baking or saucing Red Delicious Apples. After doing some research, Honeycrisp, Granny Smith, and Golden Delicious Apples are the best for pies, baking, and making a sauce out of them. I’ll remember this for next time!

Apple Danish Process

I probably made too much filling and crumb topping for this recipe, even though I had initially halved the recipe that I followed by Melanie Dueck over on The Recipe Critic. If you do end up with leftovers, use another pastry sheet to make more Danishes, which was what I should have done but was too impatient to thaw another sheet, or make mini Apple Crumbles out of them! I would have done the latter, but then I still have another sweet apple recipe to do to complete my month of apple for recipes and I can totally use the leftovers for it!

The only reason why I have opted for the glaze to be optional in this recipe is because I don’t have any confectioners’ sugar lying around in my pantry. If you have read my previous post (can’t remember which specific one it was), I mentioned that I have this habit of buying ingredients that I rarely use. Eventually those ingredients end up sitting on the pantry shelf until its expiration date. The same applies to confectioners’ sugar. I rarely bake nowadays, or when I do bake, I never really need to use confectioners’ sugar regularly, and so if I am just going to use it for this recipe, I have decided to leave it out for mine, but if you do happen to have it lying around, go for it! It tastes good with or without anyway! What I did instead was drizzled a bit of the juices from the apple filling on top of the baked Danishes.

Apple Danish Ingredients

PREP TIME 20 MINS | COOKING TIME 25 MINS | SERVES 8 DANISHES

INGREDIENTS

  • 2 puff pastry sheets, thawed

For the apple filling

  • 1 large Red Delicious apples, peeled and diced
  • 25g unsalted butter
  • 1/8 cup water
  • 3 tbsp white granulated sugar
  • 2 tsp cornstarch
  • 1/4 tsp ground cinnamon
  • 1/4 tsp ground nutmeg
  • Pinch of salt

For the crumb topping

  • 1/4 cup plain flour
  • 25g unsalted butter (cold), cut into little cubes
  • 2 tbsp brown sugar
  • 1/4 tsp ground cinnamon
  • Handful of roughly chopped walnuts

For the egg wash

  • 1 large free-range egg
  • 1 tbsp water

Optional: for the glaze

  • 1/4 cup confectioners’ sugar
  • 1 tbsp heavy whipping cream or milk
  • 1/8 tsp vanilla extract

METHOD

  1. Apple Filling: Combine all the apple filling ingredients together, except for the apples, in a medium-sized saucepan. Melt altogether over medium heat and bring to a boil. Boil for about 2 minutes, stirring frequently.
  2. Add the peeled and diced apples into the saucepan and bring back to a boil over medium-high heat. Cook for 5 minutes, stirring often, until the apples have softened, but still holds it shape.
  3. Remove from the heat and set aside to cool.
    Crumb Topping: Meanwhile, mix all the crumb topping ingredients in a small mixing bowl that has been chilled in the freezer for about 10 minutes.
  4. With your fingertips, quickly mix the ingredients together until it looks like rough breadcrumbs. Set aside.

Tip: Pre-chilling your mixing bowl in the freezer helps keep the butter chilled when making the crumb topping. Likewise, if your mixture is too warm, put the bowl into the freezer for 10 to 15 minutes and start again when it has chilled.

  1. Apple Danish: Preheat oven to 200C (400F or gas mark 6). Line a baking sheet with parchment paper (I used foil for mine because I only realised just as I was about to prepare my sheet that I had none left!).
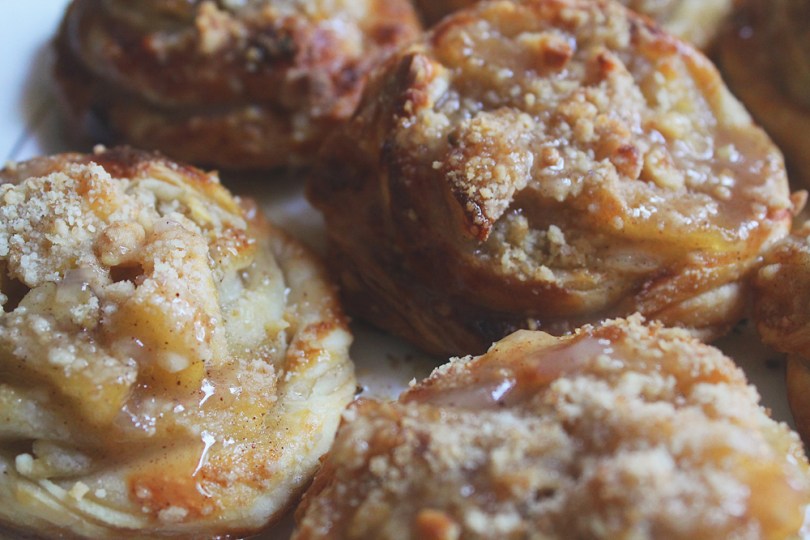
  2. Unfold one thawed puff pastry sheet at a time and roll it out to about 10”x10” sheet. Use a pizza cutter to cut 16 even strips. Connect four strips together by overlapping about a half-inch and pressing it down together. Twist the strip into a ribbon and snail it around itself to create a rose-shaped pastry. Press the end down to the rest of the dough. Repeat for the remaining dough, should make at least 8 pastries.

Apple Danish Process

  1. Place the prepared pastry dough on the parchment-lined baking sheet and press the middle down. Place a spoonful of apple filling in the wells of the pastry.
  2. In a small bowl, combine the egg and water together and brush it over the pastry dough. Sprinkle the crumb topping over the tops of each Danish and then bake for about 16 to 18 minutes or until the edges are golden.
  3. Remove from the oven and leave aside to cool before glazing.
  4. Glaze (Optional): Mix all the glaze ingredients together in a small bowl then drizzle over the warm apple Danishes. Serve immediately and enjoy!

Apple Danish

This is probably not the best time to have a warm dessert in the Philippines as it’s getting hotter by the minute as the Summer season rolls in. But hey! It’s getting cooler in some parts of the world right? So this would be the perfect snack/dessert for it!

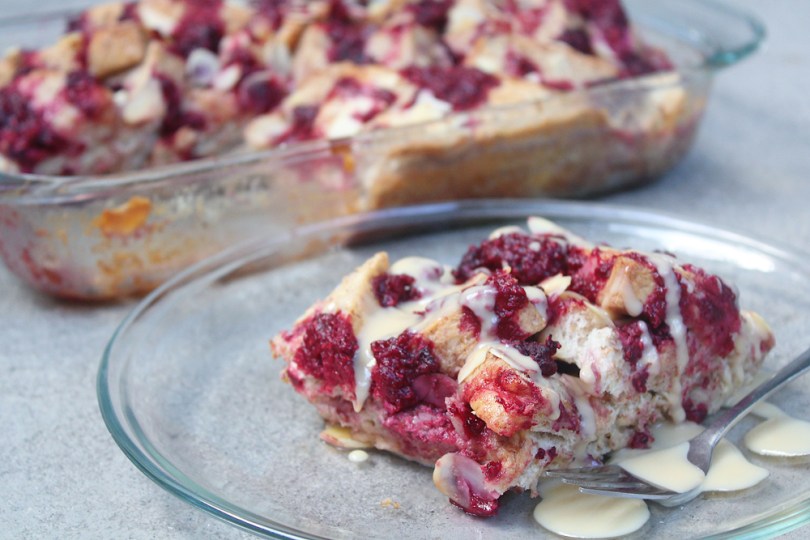
I could have probably plated these delicious Danishes a little better – but I promise that they taste absolutely amazing! Better than they actually look! The flaky and crisp pastry crust, apple pie filling, and crumb topping make them irresistible. In seconds upon placing them on the dining table for our mid-afternoon snack, they were all gone! The three of us (my Mom, my sister, and myself) even fought over who wouldn’t get a third piece since there were only 8 Danishes.

Apple Danish

Before I end tonight’s post I would also just like to say a few things. I didn’t want to say this at the beginning of this post because I didn’t want to start off negatively. I have recovered from my irritable bowel syndrome, but despite that, I haven’t been feeling in the mood to work on my blog since my recovery.

I mean it’s practically normal to have off days – we’re all human after all – but I just can’t shake off the feeling of letting my followers down and letting myself down when it comes to Amcarmen’s Kitchen. I don’t get paid for running this blog, so everything that I do for Amcarmen’s Kitchen is purely for my passion and love for food, and to be able to share it with the few followers I have is just enough for me to continue doing what I love to do.

This is a very reason why I try so hard to stay on top of everything and make sure that I have dishes and recipes lined up in advance so that I can just hit the publish button every Wednesday night without having to stress about editing photographs and writing everything up all on the upload day itself. I probably put too much pressure on myself for this, hence why the sudden lack of determination for the past week.

I know deep down that no one really cares about all this – but I just needed to get this off my chest, even if it just means that I am talking to my blog.

BON APPÉTIT

– Ally xx

myTaste.com

Khao Neoo Mamuang (ข้าวเหนียวมะม่วง) Mango Sticky Rice

Khao Neoo Mamuang (ข้าวเหนียวมะม่วง) Mango Sticky Rice

Hello Everyone! Yes, besides sharing mango recipes on the blog for the month, I’ll also be tackling the fruit with a Thai influence. I mentioned in my post last week that Thai food is one of the many favourite cuisines that I enjoy – and let’s be honest here – I’m in the middle of satisfying my insane cravings for it!

Mango Sticky Rice is a traditional Thai dessert where the main ingredients needed are sticky glutinous rice, canned or fresh coconut milk, palm sugar, and mangoes. Although this dessert originated in Thailand, it is highly consumed throughout the Indo-China region of Southeast Asia such as Laos, Cambodia, and Vietnam. Mango Sticky Rice is usually only eaten during the peak mango season, which is during the summer months of April and May. Notable shops in Bangkok famous for their Mango Sticky Rice will only sell this dessert for 4 months per year from February to June.

Khao Neoo Mamuang (ข้าวเหนียวมะม่วง) Mango Sticky Rice

I can’t remember if the first time I had this dish was during a trip to Bangkok way back when, or at a Thai restaurant when I was still in Brunei – but nonetheless, I remember my Aunt (who is Thai) teaching me how to make this dish a couple of years back. At that time I wasn’t interested in cooking or food, so I didn’t realise then how easy it was to put this dish together and that is really only required the pantry essentials to make. Aside from having to get the mangoes from the market when I wanted to make this dish, I already had sugar, peanuts, coconut milk, and sticky rice at home.

To prepare the dish, the glutinous rice is first soaked in water and then cooked by steaming, or cooked in a rice cooker. I cooked mine over a gas stove together with the sugar and kept a very close eye on it. The coconut milk is heated, without boiling, separately with salt and then added to the cooked glutinous rice to flavour it. Mangoes are then peeled and sliced to serve with the rice, and smothered in more salted coconut milk. The result is just heavenly! If you’re a mango lover like me, then you’re definitely going to fall in love with this exotic Thai dessert.

Khao Neoo Mamuang (ข้าวเหนียวมะม่วง) Mango Sticky Rice

Disclaimer: I do apologise to any of my Thai followers, or any who have just stumbled upon my blog, and this post in particular. I’ve seen so many variations of the spelling for Khao Neoo Mamuang and I’m not sure if I’ve picked the right one! *cheeky grin*

Khao Neoo Mamuang (ข้าวเหนียวมะม่วง) Mango Sticky Rice Ingredients

PREP TIME 1 HOUR | COOKING TIME 30 MINS | SERVES 4-6

INGREDIENTS

  • 2 ripe mangoes, peeled and sliced
  • 1 cup sticky glutinous rice
  • 2 cups water
  • 1/2 cup coconut milk (fresh, canned, or frozen)
  • 2 tbsp white granulated sugar
  • 1/2 tsp salt
  • Roasted peanuts, roughly chopped to garnish

METHOD

  1. Sticky Glutinous Rice: Rinse the sticky glutinous rice and then leave to soak for about an hour. Drain was ready to use.
  2. Transfer the rice to a medium-sized non-stick cooking pot together with the 2 cups of water and the sugar. Bring to a slow simmer over low heat, partially covered with a lid (to leave room for steam to escape).
  3. Once simmering, leave to cook for a further 20 minutes or until the water has been absorbed by the rice. Turn the heat off, but leave the rice in the pot with the lid on tight. Allow it to sit for a further 5 to 10 minutes.
  4. Salted Coconut Sauce: While the rice is cooking away, prepare the salted coconut sauce by adding the coconut milk to a small saucepan together with the salt. Bring to a slow simmer over low heat, about 10 minutes. It is important to heat it slowly to avoid curdling the coconut milk. This happens when it is heated too quickly.
  5. Once done, turn the heat off and set aside. If your rice is already done at this point, then add half of the salted coconut sauce to the rice and give it a good mix. Set aside the other half of the sauce for later.

Tips: Experiment with naturally flavouring the sticky rice for another dept of flavour. I used juices from pandan leaves and ube (purple yam) when tackling this recipe. All you have to do is add these flavourings together before cooking the rice.

  1. Shape the sticky rice into logs and place on a serving plate. Top the rice logs with a slice of ripe mango and roasted peanuts.
  2. Drizzle with the remaining salted coconut sauce or use for dipping.
  3. Serve and enjoy while warm!

Khao Neoo Mamuang (ข้าวเหนียวมะม่วง) Mango Sticky Rice

Mango Sticky Rice is usually served differently with one big serving of rice and mango slices on the side. I decided to plate mine up differently after stumbling upon an Instagram post of Mango Sticky Rice “Sushi” hence why they look like nigiri!

BON APPÉTIT

– Ally xx

myTaste.com

Auguest 2018: Jialing Mew

Mango Pudding with Coconut Sago

Happy Auguest everyone! I’m back for my fourth year running, and I’ll be taking over Amcarmen’s Kitchen with two South-East Asian inspired breakfast recipes this week. For once, Allison has chosen a theme that I could easily get on board with (those of you who suffered through 2016’s vegan Auguest with me know my pain). But thanks to my mom I have been a professional breakfast-eater since 1991, so trust me when I say that THIS is my area of expertise! If you don’t believe me, ask the former breakfast-skippers at my office who were inspired by my morning meals 😉

The great thing about breakfast is that it can be whatever you want it to be: simple or complex, savoury or sweet, hot or cold, vegan food or normal people food… I could go on. So for today’s recipe I’ll be sharing one of my favourite breakfasts to eat during summer weekdays, though it can be enjoyed at any time of the year. I like to prepare this on Sunday so that I (and my boyfriend/colleagues/innocent bystanders) stay safe from my hangriness for the rest of the week.

Throwing it back to 2016 with a vegan (you heard me!) recipe where we start out with…

Boiling coconut milk.

Classic.

Mango Pudding with Coconut Sago

PREP TIME 1 HOUR | COOKING TIME  | SERVES 6

INGREDIENTS

  • 1 cup fresh mango, finely diced
  • 1 can lychees drained, reserve syrup

For the Mango Pudding

  • 2 cups coconut milk
  • 2 cups frozen mango
  • 1/4 cup reserved lychee syrup
  • 2 tsp agar agar powder (check your local Asian supermarket)

For the Coconut Sago

  • 2 & 1/2 cups coconut milk
  • 1/2 cup reserved lychee syrup
  • 1/2 cup tapioca pearls (sago)
  • 1 tsp vanilla
  • Pinch of salt

Optional

  • Coconut flakes
  • Fresh Mango chunks

METHOD

  1. Set aside 6 lychees to garnish. Chop remaining lychees into smaller pieces. Divide chopped mango and lychee between 6 glasses or containers. Set aside.
  2. Mango Pudding: Purée 2 cups frozen mango with 1/4 cup reserved lychee syrup until smooth.
  3. On medium heat in a sauce pan, combine agar agar powder and 2 cups coconut milk, stirring until the mixture boils.
  4. Remove pan from stovetop and stir in the mango purée, making sure the mixture is well combined.
  5. Divide mixture between the 6 glasses, carefully pouring to cover the fruit chunks. Place in refrigerator to set while making the coconut sago.
  6. Coconut Sago: Combine all the ingredients in a sauce pan over low heat, stirring constantly until tapioca pearls have absorbed most of the liquid and doubled in size – approximately half an hour, depending on your stove.
  7. Take the mango pudding out from the fridge and spoon the tapioca into each glass, then top with the remaining whole lychees, and optional coconut flakes and mango chunks.
  8. Serve immediately if you’d like it warm, or return to the fridge to chill for at least an hour for a more summer-appropriate dish!

Mango Pudding with Coconut Sago

Mango Pudding with Coconut Sago

Photo Courtesy & Recipe Copyright © 2018 | jialingmew

Enjoy x

– Jialing

Auguest 2018: Simon Swadling

French Toast with Red Wine Pears

I’ve always loved breakfast, and French toast was actually one of the first things I started making and teaching myself. It’s probably the start of me really getting into food and it becoming my passion – I loved making making either savoury style (parsley and parmesan with bacon) or the more traditional sweet one.

My love of breakfast foods has ended up becoming a family tradition that on long weekends or holidays we will often start off with a fancy brunch/breakfast made by me. This French toast recipe is what I came up with for Mothers day this year, as sweet French toast is my mum’s favourite breakfast. It has some autumnal vibes with the maple and mulled wine flavours, but really the base recipe of the French toast can be paired with any number of different things, so feel free to go off script and try something different!

French Toast with Red Wine Pears

PREP TIME 15 MINS | COOKING TIME 45 MINS | SERVES 4

INGREDIENTS

For the French toast

  • Loaf of Brioche bread (the batter will do enough for 4 large slices)*
  • 2 large free range eggs
  • 3/4 cup full cream milk
  • 2 tbsp brown sugar
  • 1 tsp vanilla extract
  • 1/2 tsp ground cinnamon
  • 1/4 tsp nutmeg, freshly ground
  • Zest of half an orange

For the poached pears

  • 1 cup red wine
  • 1 cup water
  • 2/3 cup caster sugar
  • 1/2 cup orange juice
  • 4 cloves
  • 4 small Corello pears**
  • 1 cinnamon stick

For the maple mascarpone

  • 1 tub (250g) mascarpone
  • Maple syrup, to taste
  • Dry meringue pieces
  • Fresh raspberries, or any other berries that you like

*If your brioche bread hasn’t been pre-cut (which is ideal), then cut the brioche into thick rectangular pieces. This means that you’ll get a crispy outside, custardy outer layer, and still some fluffy brioche in the middle.

**If you can’t get your hands on the small pears, use 2 large pears and serve each slice with half a pear instead.

METHOD

  1. Poached Pears: Combine all the ingredients for the poached pears into a medium-sized saucepan. If the pears aren’t fully covered, then ensure to turn them around every few minutes to get an even colour and even cooking all around. Timing will depend on the ripeness of the pears so simmer until soft when tested with a knife.
  2. Remove the pears, and continue to boil down the poaching liquid until reduced to a syrup-like texture. You may prepare the pears the day before and then warm them through before serving.
  3. Maple Mascarpone: Mix the mascarpone in a bowl to soften and then add about a tablespoon of maple syrup. Adjust to your own personal liking. Set aside in the fridge.
  4. French Toast: Add all the ingredients, except the brioche bread in a shallow dish and mix well until combined.
  5. Heat up a medium-sized frying pan with a knob of butter and a bit of oil on medium heat.
  6. Dip the brioche slice in the egg mixture on each side and allow it to soak a little.
  7. Fry the slice on each side until golden, about 3 to 4 minutes. Repeat for the remaining slices.
  8. Assemble: Cut the pears in half. Place the French toast on a plate with the pears on top. Crumble the meringue over and serve with fresh raspberries, and a scoop of the maple mascarpone.
  9. Finally, drizzle over a bit of the poaching syrup from the pears and enjoy!

French Toast with Red Wine Pears

Photo Courtesy & Recipe Copyright © 2018 | thebeardedpatissier

– Simon (The Bearded Patissier)

myTaste.com

Auguest 2018: Wendy Chok

Rustic Bread: PMS Toast

It’s me Wendy, back for another recipe to share! The last time I was on here I shared a recipe for homemade Rustic Bread and a savoury Pizza Toast brekkie with everyone. This time I will be sharing what I like to call ‘PMS Toast’ which I will explain further in a while. I also shared a little bit about myself, and my love for food, so now I will share about how I know Ally on a personal level.

I met and got to know Ally about 3 years ago through work. She was one of my team members in our Marketing team for an Advertising and Event Management firm that we both worked at. We became very close friends and still even so after having left the company because we have the same level of random craziness, vibe, and of course our love for all things food.

Amcarmen's Kitchen & Peek A Pastry
Peek A Pastry & Amcarmen’s Kitchen

We share a special kind of bond at work and it might be because we spend a lot of time together, at work of course, for a lot of event events, working late at night on occasions, have food together in the office whether breakfast, lunch, snack time or dinner time, and enjoy great food together in celebration for when we’ve successfully finished every event that we’ve worked on. I love our team because we always had each other’s backs and we just simply complement each other well.

I know that Ally wants to pursue her dream to participate in MasterChef Australia and I am using all my power on law of attraction to make it happen. I will see Ally in MasterChef Australia one day and tell my kids or grandkids that “that is my friend!”

Moving on – I am not a sweet tooth but when the time (PMS) comes, nothing is sweet, what is sweet? How do you spell sweet? C-A-L-M is how you spell sweet. When you are cranky and tired, you just crave for something sweet, something sugar loaded and warm. So here I present you two fast and sweet breakfast ideas to hit my spot, and hopefully yours too.

PMS Toast: Cinnamon Everything Toast

PREP TIME 5 MINS | COOKING TIME 10 MINS | SERVES 1

INGREDIENTS

  • 2 slices of homemade Rustic Bread
  • 1 tbsp brown sugar
  • 1 tbsp unsalted butter, at room temperature
  • 1 tsp ground cinnamon (2 teaspoons for me, the cinnamon lover)

METHOD

  1. Place the butter in a small heatproof bowl and melt in the microwave for about 20 seconds. Make sure that it is not too liquidy as you want those buttery chunks on your toast. I like it rustic on this rustic bread.
  2. Mix all the ingredients together and smother it all over the toast.
  3. You can either bake it or toast it on a pan. Bake it at 240C (475F or gas mark 9) for 10 minutes, just enough time for everything to crunch up. If you like it toasted in a pan, face the side, which is smothered by the cinnamon paste down on the pan, and sear it for 2 minutes over medium heat.
  4. Serve and enjoy with a hot cup of coffee for breakfast or even as a nice afternoon snack!

Rustic Bread: PMS Toast

PMS Toast: Butter & Sugar Toast

PREP TIME 5 MINS | COOKING TIME 10 MINS | SERVES 1

INGREDIENTS

  • 2 slices of homemade Rustic Bread
  • 1 tbsp unsalted butter, at room temperature
  • 1 tsp granulated white sugar

METHOD

  1. Smear the butter over the toast and sprinkle the top with white sugar.
  2. Bake it at 240C (475F or gas mark 9) for 10 minutes.
  3. Serve and enjoy with a hot cup of coffee for sweet start to your morning!

Short and sweet, just nice for a woman who is PMS-ing. Men take note!

Rustic Bread: PMS Toast

Before I say goodbye to everyone on Amcarmen’s Kitchen, I would like to thank Ally for giving me this opportunity to write on her well-established blog. I hope that my recipes are not too shabby and please dive in to my rustic way of cooking!

Photo Courtesy & Recipe Copyright © 2018 | peekapastry

– Wendy (Peek A Pastry)

myTaste.com

Auguest 2018: Shazrinah Shazali

Mini Mixed Berry Pancakes

ShefShaz is back again on Amcarmen’s Kitchen and this time I will be sharing a sweet breakfast option for those who love to start their day off on a sweet note – Mini Mixed Berry Pancakes served with Earl Grey Ice Cream and Fresh Fruit.

Mini Mixed Berry Pancakes

Before we dive into the recipe, if you missed my guest post a few days ago, I whipped up some delicious homemade Salmon Fish Cakes for the savoury breakfast eaters! You can also read more about my approach to food and how I know Ally.

Mini Mixed Berry Pancakes Ingredients

PREP TIME 15 MINS | COOKING TIME 10 MINS | MAKES 24 MINI PANCAKES*

*Or 12 regular-sized pancakes

INGREDIENTS

  • 1 & 1/2 cups plain flour
  • 1 & 1/4 cups skimmed milk
  • 57g unsalted butter, melted
  • 1 large free range egg
  • 2 tbsp granulated sugar
  • 1 tbsp baking powder
  • 1 tsp vanilla extract
  • 3/4 tsp salt
  • Frozen mixed berries, or any other kind of fruits

To serve

  • Digestive biscuits, crushed
  • Earl Grey ice cream*
  • Fresh fruits
  • Icing sugar
  • Lemon slices (for a kick of tang)

*Or any other flavoured ice cream that tickles your fancy.

Mini Mixed Berry Pancakes

Mini Mixed Berry Pancakes

METHOD

  1. Preheat oven to 180C (350F or gas mark 4). Grease a 24-hole mini cupcake tray with a bit of butter to prevent the pancake batter from sticking to the tray. Set aside.
  2. In a large bowl, mix all the wet ingredients together until you have a smooth and creamy mixture.
  3. Sift in the dry ingredients and gently fold until just combined. Leave the mixture to rest for about 10 minutes to allow the baking powder to work its magic.
  4. Pour the batter into the tray, filling about 3/4 of the way and drop in your frozen mixed berries on top.
  5. Bake in the oven from about 10 minutes or until a toothpick inserted into the centre of the pancake comes out clean.
  6. Remove from the oven and set aside to cool down for about 5 minutes. Lightly dust with icing sugar and serve with ice cream, crushed digestive biscuits, and fresh fruit of your choice. Enjoy!

Mini Mixed Berry Pancakes

Mini Mixed Berry Pancakes

Before I end, I would like to thank Ally for giving me the opportunity to cook and write for her blog. We had a lot of fun during our cookout session – both the cooking and feeding our dishes to many tummies!

Recipe Copyright © 2018 | shefshaz

BON APPÉTIT

– ShefShaz

myTaste.com