Easy Hummus (without Tahini)

Easy Hummus (without Tahini)

Hello Everyone! Tonight, I will be sharing the recipe for the last and third component of my lunchbox series from the National Pack Your Lunch Day (March 10) collaboration that I organised with my foodie friends over on IG. Here’s a quick and easy recipe for Hummus, without the tahini.

The debate over the origin of hummus dates back to the 13th century. The Greeks like to claim it as their own, but based on historical information, hummus likely originated from ancient Egypt. Regardless of where it’s originally from, hummus is enjoyed by all cultures, not just Greek and Middle Eastern. In the Middle East, hummus is usually eaten as a dip, with pita bread. In the West, it is now produced industrially, and is often served as a snack or an appetiser with crackers.

Easy Hummus (without Tahini)

But before we dive into the recipe, what exactly is tahini?

Tahini is a Middle Eastern paste or sauce made from toasted ground hulled sesame seeds, oil, and sometimes salt. The ground sesame seeds are emulsified with oil to create a smooth and creamy seed butter with a pourable consistency. It can be served by itself, as a dip or used as a major ingredient in hummus.

If tahini is a key ingredient in hummus, can we make hummus without tahini?

The answer is, yes!

Unlike all the other ingredients that go into making hummus, tahini is one where you’re likely to not always have on hand. It’s not cheap either if you manage to find them at your local supermarket, but it’s not commonly found here in the Philippines. You can also make your own at home, but if you’re on the same boat as me and want homemade hummus without the fuss of making your own tahini at home, then this recipe is just as good without it!

Because of the other ingredients that are mixed in the making of hummus, it tastes nothing like chickpeas. Instead, it tastes a little garlicky, smoky, and also tangy because of lemon juice. It’s a smooth, creamy paste that melts in your mouth, and the taste of cumin will linger on your tongue.

Easy Hummus (without Tahini) Ingredients

PREP TIME 5 MINS | COOKING TIME — MINS | SERVES 6-8
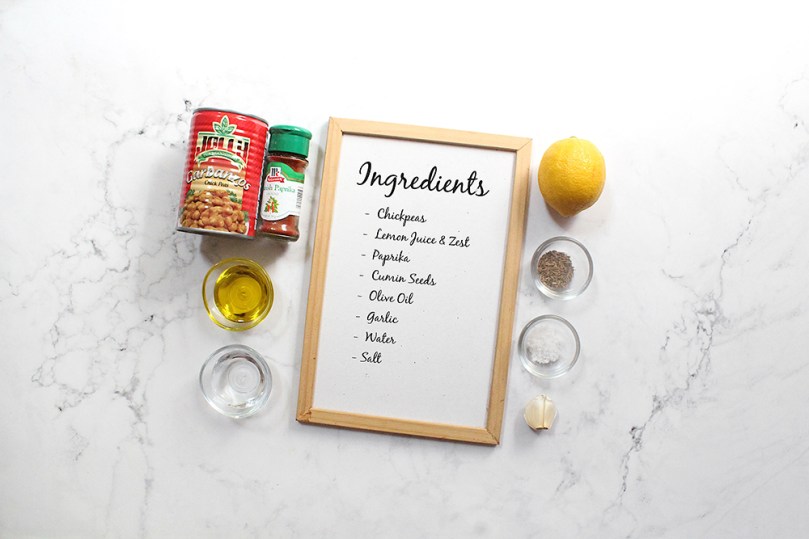
INGREDIENTS

  • 1 can (425g) garbanzo beans (chickpeas), drained and blanched
  • 1 garlic clove, minced
  • 2 to 4 tbsp water
  • 2 tbsp extra virgin olive oil
  • 1 tbsp lemon juice
  • 3/4 tsp toasted ground cumin
  • 1/2 tsp ground paprika
  • 1/4 tsp salt

METHOD

  1. Add all the ingredients into a food processor. Process until smooth and creamy; if needed, you may add additional water to get your desired consistency. You may also add additional spices, and/or seasoning to suit your taste preference.
  2. Transfer to a serving dish and top with more olive oil, toasted cumin seed, and ground paprika.
  3. Serve with your veggies and crackers of choice. I went with carrots and celery, and multi-seed rice crackers. Enjoy!

Easy Hummus (without Tahini)

BON APPÉTIT

– Ally xx

Follow me on my social media accounts:
Facebook: Amcarmen’s Kitchen
Instagram: @amcarmenskitchen
TikTok: @amcarmenskitchen

myTaste.com

Advertisement
Tohu Thoke (Chickpea Tofu Salad)

Tohu Thoke (Chickpea Tofu Salad)

Hello Everyone! This will be the last Burmese recipe that I will be sharing on our Flavours of Southeast Asia journey throughMyanmar for the month of September. Next week we’ll be heading off to one of the remaining three Southeast Asian countries I have yet to cover for the year.

The recipe that I will be sharing tonight is a build on of the recipe for Tohu (Burmese Chickpea Tofu) that I shared last week. We’ll be turning the tohu into a delicious salad known as Tohu Thoke, or in English, Chickpea Tofu Salad. Ever since coming across this recipe, I’ve already made this salad three times this month – yes it’s THAT addicting! Not only does it taste oh-so good, it’s also very easy to put together which makes it ideal for a quick weeknight dinner, provided that you’ve made the chickpea tofu in batches and ahead of time. This salad is also perfect for vegetarians, vegans, and Meatless Mondays.

Tohu Thoke (Chickpea Tofu Salad)

Tohu Thoke is bright, tangy, refreshing, and meant to be eaten cold, therefore perfect for those hot summer days. By mixing both fresh and fried tohu together, you get creamy, silky-smooth, and crispy textures altogether. If you don’t fancy frying, then feel free to skip it. It’s nevertheless delicious with or without the fried aspect or not. Also, the triangle shape for the fried tofu pieces isn’t necessary; cut them into whatever shape you want; same goes for the fresh ones too.

The great thing about this salad is that it gives you the chance to get creative with it. As long as you keep the sour flavours of the tamarind dressing and balance with a hint of sweetness and heat (which is essential to Burmese cuisine), you can bulk up the salad with other vegetables or leafy greens to make it more substantial and a full meal on its own.

Tohu Thoke (Chickpea Tofu Salad) Ingredients

PREP TIME 15 MINS | COOKING TIME 10 MINS | SERVES 4

INGREDIENTS

For the tamarind dressing

  • 5 garlic cloves, finely minced
  • 1 stalk scallion (white part), thinly sliced
  • 2 tbsp tamarind paste
  • 1 tbsp water
  • 4 tsp coconut sugar
  • 2 tsp salt
  • 1 tsp cayenne pepper powder

For the tohu thoke

  • 1 recipe for Tohu (Burmese Chickpea Tofu), fresh and fried pieces
  • 10 cherry tomatoes, halved
  • 3 kaffir lime leaves, thinly sliced
  • 1 red chilli, finely minced
  • Handful of bean sprouts, blanched
  • 3 tbsp sesame oil

To garnish

  • Crispy shallots or garlic
  • Roasted peanuts, crushed
  • Scallions (green part), thinly sliced

METHOD

  1. Dressing: Combine all the ingredients in a small bowl. Mix and adjust the dressing to your taste. Set aside. Extra dressing can keep for up to 1 month in the refrigerator.
  2. Tohu Thoke: Add all the ingredients into a large mixing bowl. Add the tamarind dressing, about a quarter cup for this recipe, and gently toss everything together.
  3. Transfer to a serving plate and top with the garnishes. Serve immediately and enjoy!

Tohu Thoke (Chickpea Tofu Salad)

Tohu Thoke (Chickpea Tofu Salad)

BON APPÉTIT

– Ally xx

myTaste.com

Tohu (Burmese Chickpea Tofu)

Tohu (Burmese Chickpea Tofu)

Hello Everyone! This is probably one of the best food discoveries that I have come across from the many years of researching for Amcarmen’s Kitchen and experimenting in the kitchen.

Tohu, or in English, Burmese Tofu, is made using chickpea (besan) flour, mixed with water, a little salt, and if you want, turmeric powder, mainly to give it a more vibrant yellow colour. The mixture is then heated and stirred constantly, until it reaches a thick and creamy consistency. It is then transferred into a tray and allowed to set.

The end result is matte yellow in colour, jelly-like but firm in consistency, therefore it does not crumble when cut or sliced. It is basically the best of both worlds between silken tofu and egg tofu – you get the silkiness of the silken tofu and firmness from the egg tofu in this Burmese tofu. The best part? It is dairy, egg, and soy-free; perfect for vegetarians, vegan, and/or anyone with soy allergies!

1986

Additionally, chickpea flour is high in protein, fiber, and micronutrients, while being low in carbohydrates and calories. Half a cup of chickpea flour contains an impressive 11 grams of protein, 5 grams of fiber, and nutrients like folate, iron, magnesium, and zinc. Chickpea flour is also heart-healthy, making this Burmese tofu oh-so healthy!

In Myanmar, the tofu can be eaten fresh in a salad, deep fried to make tofu fritters, or sliced very thinly and dried to make crackers for deep frying. It is also used in curries as well for added protein if meat or poultry is unaffordable (especially amongst the poorer population).

I still have some besan flour on hand after making this recipe, so I can definitely say that I will be making more of these delicious Burmese tofu and experimenting them in certain dishes outside of Burmese cuisine!

Tohu (Burmese Chickpea Tofu)

PREP TIME 1 HOUR | COOKING TIME 8 MINS | SERVES 2-3

INGREDIENTS

  • 1 cup chickpea flour (also known as garbanzo bean flour or besan flour)
  • 1 tsp salt
  • 1/4 tsp ground turmeric (optional)
  • 3 cups water, divided
  • Oil

METHOD

  1. Lightly grease an 8-in x 8-in baking dish with a bit of neutral flavoured oil.
  2. Add the chickpea flour in a medium-sized mixing bowl together with the salt and, if using, the ground turmeric as well. Whisk to combine.
  3. Add 1 and a half cups of water to the flour and whisk until smooth.
  4. Add the remaining 1 and a half cups of water into a small saucepan and bring to a boil over high heat.
  5. Once boiling, reduce the heat to medium-high and slowly pour the chickpea flour mixture into the boiling water while continuing to whisk.
  6. Whisk over the heat until the mixture becomes really thick and glossy. This should take about 8 minutes in total.
  7. Once done, immediately pour the mixture into your prepared baking dish and leave it to cool down at room temperature for at least an hour. The longer you let it sit, the more water will drain out of the tofu and therefore firmer in texture.
  8. Cut into your desired shapes and sizes, depending on how you will use it. Enjoy it as it is, deep fried, or use it as a source of protein for other dishes.

Tohu (Burmese Chickpea Tofu)

Stay tuned next week to see what Burmese dish I will make with this Burmese Tofu!

Note: You can store the tofu in an airtight container and in the fridge for up to 3 days.

Tohu (Burmese Chickpea Tofu)

BON APPÉTIT

– Ally xx

myTaste.com

Auguest 2021: Brendon D'Souza

Banana Peel Curry with Coconut Rice & Pickled Red Onion

“When someone cooks with love, the meal deserves to be celebrated. You get dressed, choose a killer playlist, and pour a glass of wine then sit down to share the magic with your loved ones.” — Brendon D’Souza

Auguest 2021: Brendon D'Souza

Hello Everyone! How’s life? It’s Brendon D’Souza from CookWithBrendon.com here. By day I work in sales and around the clock I spend the countless hours we have in lockdown doing my favourite thing – cooking for my loved ones and developing recipes for my blog.

After 6 years at my former blog Brendon The Smiling Chef, I realised there might be a space for online cooking classes and social get-togethers for like-minded foodies. After running a number of free workshops with my colleagues and friends I’m so ready to take it to the next level and open up the classes to the world. Let me know if you would like to join in the fun!

Now more than ever is the perfect time to try and find clever little ways to use up leftover bits and pieces you find in the kitchen. This curry will allow you to do exactly that, and is inspired by the flavours of Laos, Thailand, India, and Australia altogether.

Banana Peel Curry

By no means do I claim to be the creator of this dish. As I’m sure you’ve seen over your socials it gained cult status recently when Nigella Lawson wrote about it in her 2020 TV series and cookbook Cook Eat Repeat. It’s such a great way to transform something that would otherwise be destined for the bin. I was surprised to learn that banana skins are packed full of potassium so I’m hoping it’s doing that extra bit of good for my insides too.

I’ve also taken the liberty to use up some leftovers for this dish including a batch of leftover marinara sauce and some roast sweet potatoes. So you can absolutely feel free to swap out some of the ingredients for others which you may have at hand. Don’t forget to tag #CookWithBrendon so I can see your creations. Let’s cook!

Banana Peel Curry Ingredients

PREP TIME 30 MINS | COOKING TIME 30 MINS | SERVES 2-3

INGREDIENTS

  • 2 ripe bananas
  • 2 medium red onion, sliced
  • 1/2 tbsp castor sugar
  • 1/4 cup rice wine vinegar
  • 1/2 cup basmati or jasmine rice
  • 1 can coconut milk
  • 1 tsp ground cumin
  • 1 tsp ground coriander
  • 1 tsp ground turmeric
  • 1/2 cup canned tomatoes
  • 1/2 tsp brown sugar
  • 1/2 cup diced sweet potato (or use regular potato)
  • 1/2 cup frozen peas (or any other fresh or frozen green veg)
  • 1 bunch coriander

METHOD

Start this recipe 1 hour before serving time.

  1. Banana Peel: Peel the bananas. Slice off the tops and tails.*
  2. Place the banana peels into a large heatproof bowl with 1/2 tbsp salt. Cover with boiling water and leave to soak for 30 mins. This helps to tenderise the skins and they will change in colour from yellow to brown which is totally fine.
  3. Pickled Onion: While the bananas are soaking. Finely slice 1 onion and place into a glass or ceramic bowl with the rice vinegar, castor sugar and 1/2 a tablespoon of salt. Give it a stir and then set aside. Repeat every 10 minutes or so while you’re making the curry and the onions will turn a vibrant pink and tenderise by the time you’re ready.

Banana Peel Curry with Coconut Rice & Pickled Onion

  1. Remove the banana peels from the soaking liquid** and pat dry with a paper towel. Slice the peels finely into batons.
  2. Coconut Rice: Place the rice into a medium heatproof saucepan. Cover with enough cold water to reach 2-cm above the level of the rice, then add the coconut milk. Place over a high heat and bring to the boil. When it is bubbling, immediately turn the heat off and pop on a tight fitting lid and let it sit there***. The rice will continue to absorb any liquid while you prepare the curry.
  3. Banana Peel Curry: Heat a medium saucepan over a low heat. Add 1 tablespoon of sunflower oil, the cumin, coriander powder, and turmeric. Cook, stirring for 1-2 minutes to toast the spices, and then add the marinara sauce****.
  4. Add 1 tablespoon of crushed ginger and the banana skins, and cook, stirring over medium heat for 5 minutes.
  5. Add 1/2 a cup of vegetable stock or water and bring to the boil. Cook for a further 5 minutes or until the banana peels are tender.
  6. Add the sweet potato, frozen peas, coconut milk, and chopped coriander stems, and cook for another 2-3 minutes or until the veggies are cooked through. Finally, add the coconut milk and stir until combined.
  7. Serve with the coconut rice and pickled onion. Enjoy!

Banana Peel Curry with Coconut Rice & Pickled Onion

Notes:

  • *These can be composted. Save the banana flesh for another use (I’m thinking everyone’s favourite lockdown banana bread!).
  • **The minerals found in the banana peels such as potassium, phosphorus and calcium, will leach into the water. You can then use this liquid fertiliser for your plants.
  • ***I use my Mum’s absorption method trick to cook my rice and it works every time!
  • ****I’ve used 1/2 a cup of leftover marinara sauce with onion in it but you could easily substitute for 1 small onion and 1/2 a cup of crushed tomatoes.

Give this recipe a try and if you do be sure to tag #CookWithBrendon in your posts when you do!

I’m trying really hard to grow @cookwithbrendon on Instagram and now TikTok so if you have a second to visit and give both a follow I’d be so grateful.

Banana Peel Curry with Coconut Rice & Pickled Onion

Photo Courtesy & Recipe Copyright © 2021 | Brendon D’Souza (@cookwithbrendon)

BON APPÉTIT

– Brendon D’Souza

myTaste.com

Auguest 2021: Karina Pineda

Ginataang Kalabasa (Squash with Coconut Milk)

“Take off on a food journey that is both healthy and happy.” — Karina Pineda

Auguest 2021: Karina Pineda

Hello Everyone! Karina here again returning for the second time on Amcarmen’s Kitchen! When Allison had invited me to join this year’s Auguest series, she told me that the theme would be Flavours of Southeast Asia. She also gave me the liberty to choose from a list of available countries, and fortunately, the Philippines still had an available slot and I grabbed it immediately. Aside from being Filipino, I’ve always appreciated Philippine cuisine — from the variety of flavours it has to offer, to the culture and history it’s rich in. I want to celebrate my country through my entry.

My chosen dish is Ginataang Kalabasa (Squash with Coconut Milk). I also put a twist to the traditional recipe by adding ground tofu. Following the guidelines, I decided to make something vegetarian to show that Filipino food goes beyond adobong manok, lechon kawali, balut, and other meat dishes. We, Filipinos, actually have a number of equally delicious vegetable meals!

Ginataang Kalabasa (Squash with Coconut Milk) Ingredients

PREP TIME 10 MINS | COOKING TIME 20 MINS | SERVES 2-3

INGREDIENTS

  • 500g kalabasa (squash), cubed
  • 2 to 2 1/2 cups of fresh gata (coconut milk)
  • 1/4 block of firm tofu, ground
  • Garlic cloves, minced
  • Ground black pepper (to taste)
  • Cooking oil

METHOD

  1. Mince the garlic cloves and mash the tofu until it resembles ground meat/tofu scramble.
  2. Sauté the minced garlic cloves in a deep pan until slightly roasted.
  3. Add the kalabasa (squash) cubes and cook for about 2-3 minutes.
  4. Pour the gata (coconut milk) into the pan, and sprinkle with some ground black pepper to taste.
  5. Let it boil until the kalabasa is soft and cooked through, no more than 15 minutes. Stir occasionally and allow the coconut milk to thicken.
  6. While waiting for the mixture to boil, cook the ground tofu in a separate pan until slightly roasted.
  7. Once done, add the cooked ground tofu to the kalabasa and gata.
  8. Transfer the ginataang kalabasa to a serving bowl and enjoy on its own or paired with your favorite ulam (viand)!

Ginataang Kalabasa (Squash with Coconut Milk)

Photo Courtesy & Recipe Copyright © 2021 | Karina Pineda (@wanderlittlegirl)

BON APPÉTIT

– Karina Pineda

myTaste.com

Atchara (Pickled Green Papaya)

Atchara (Pickled Green Papaya)

Hello Everyone! One more day until the end of April, which means that this will be my last recipe from the Philippines on our journey through the Flavours of Southeast Asia. I most definitely had fun tackling healthier alternatives of classic and much loved Pinoy dishes, as well as celebrating Amcarmen’s Kitchen turning seven years old!

Tonight, I’ll be sharing a recipe in response to a challenge that my friend brought up in our exclusive interview. It started off with her asking me if there are any ingredients that I would never cook with on my blog, to which I responded with: raisins, cucumber, and cilantro. She then hit me with a surprise challenge which is to make a dish with at least two of the three ingredients that I listed – something that I would have to like and eat!

To quote her:

“…something that you had previously found to be a negative experience, is going to be turned into a positive experience, so I’m changing your life!”

And here’s my response; no twists or a fancy remake of this side dish, just straight up, humble atchara. Atchara (also spelled achara or atsara) is a pickle made typically out of grated unripe papaya. Other vegetables such as carrots, capsicum (bell pepper), onion, garlic, and ginger are also added to make up this pickle. Raisins may also be added, but are optional.

Atchara (Pickled Green Papaya)

All of these are then mixed together in a solution of vinegar, sugar, and salt. The key is finding the right balance of sourness and sweetness in the pickling solution. It is then placed in airtight jars where it will keep without refrigeration, however once opened it is preferably kept chilled to maintain its flavour. Ideally, you’ll want the atchara to mature for about a week before consuming it, for it to fully develop its flavour. The longer you keep it, the better it tastes. Once opened, you can keep it in the fridge for up to two months.

Atchara is usually served with grilled or fried dishes; I like to have atchara as an accompaniment to fried fish to give it a little more life. Technically it goes well with any meal that is fatty and salty, as the sharpness of the atchara helps cut through that greasy aftertaste in your mouth.

Since the challenge is to make a dish that includes two of the three ingredients that I dislike the most, the atchara that I will be sharing with everyone tonight includes cucumbers and raisins. The Southeast Asian variations of atchara, or as they collectively call it in Indonesia, Malaysia, Singapore, and Brunei, acar, is mainly made of pickling cucumbers together with carrots and shallot, sometimes even daikon. I’ve had this version of acar when I was living in Brunei, and it was actually delicious as an accompaniment to various fried dishes!

Atchara (Pickled Green Papaya) Ingredients

PREP TIME 1 HOUR 30 MINS | COOKING TIME 10 MINS | MAKES 3 JARS*

*I had jars of varying sizes, but if I were to estimate, I think they’d fit into about 3 medium-sized jars.

INGREDIENTS

For the pickle

  • 1 medium unripe papaya, shredded
  • 1 small carrot, sliced
  • 1 small cucumber, sliced
  • 1 small red capsicum, sliced thinly
  • 1 packet (50g) raisins
  • 2 tbsp salt
  • Spring onion stalks

For the pickling solution

  • 1 & 1/2 cups white vinegar
  • 1 cup white granulated sugar
  • 4 garlic cloves, sliced thinly
  • 1 small-sized brown onion, sliced thinly
  • 1 thumb-sized ginger, julienned
  • 1 tbsp whole black peppercorns
  • 1 tsp salt

METHOD

  1. Combine the shredded papaya together with the salt in a medium-sized mixing bowl, setting it aside to sit for about an hour or until the papaya starts to release its liquid. Then place the shredded papaya in a cheesecloth and firmly squeeze to get rid of any excess juices.
  2. Pickling Solution: Meanwhile, in a small-sized saucepan over medium heat, combine the vinegar, sugar, and salt and bring to a simmer. Cook for about 3 to 5 minutes, or until the sugar has completely dissolved. Stir occasionally.
  3. Add the whole black peppercorns ginger, garlic, and onions. Continue to cook for a further 2 to 3 minutes. Once done, set aside to cool down slightly.
  4. Atchara: Combine the shredded papaya together with all the prepared vegetables into a large mixing bowl. Add the warm pickling solution and gently toss to combine. Cover and set aside to completely cool down.
  5. Once cool, transfer the atchara into sterilised jars with tight-fitting lids. You may keep them on the countertop or immediately place them in the fridge for about a week to let the flavours develop before serving.
  6. Serve, cold or at room temperature, with your choice of fried and/or grilled meat/seafood. Enjoy!

1888

The verdict? I definitely loved the pickled cucumbers, in fact I always scoop out for them for every serving. The raisins? I don’t know; there’s just something about them that I don’t like and I can’t explain it. I tried one and after that, I still picked them out.

Atchara (Pickled Green Papaya)

BON APPÉTIT

– Ally xx

myTaste.com