Halloween Special: Creepy Broken Glass Cupcakes!

Halloween Special: Creepy Broken Glass Cupcakes!

Halloween Special: Creepy Broken Glass Cupcakes!

Hello Everyone! Where do I even begin? Well, how about I start off by wishing everyone a Happy Halloween! So one day, probably about a few weeks ago, I was browsing through my Reader page on WordPress and going through some of the recipes of other bloggers/writers that I follow. I came across a recipe over at Easy Baked which, if I can recall, were for some sort of cupcakes all decked up for Halloween. I really loved the bright purple, orange, and green colours that Ruthanne used to decorated her Halloween-inspired baked goodies. It was from there that I followed a link to her Creepy Broken Glass Cupcakes and I knew from that very moment that I had to tackle that recipe.

I haven’t seen anything quite like that before, and I thought it would be a nice, and fun baking activity on a Sunday afternoon (yes, I actually baked this last Sunday only because I knew I would have time to do so during the week leading up to Halloween, nor on Halloween Day). Also, Ruthanne notes that this is not an original idea of hers as she has seen many examples of these cupcakes online, but rather she made it her goal to create this recipe in the easiest way possible with fewer steps.

Halloween Special: Creepy Broken Glass Cupcakes!

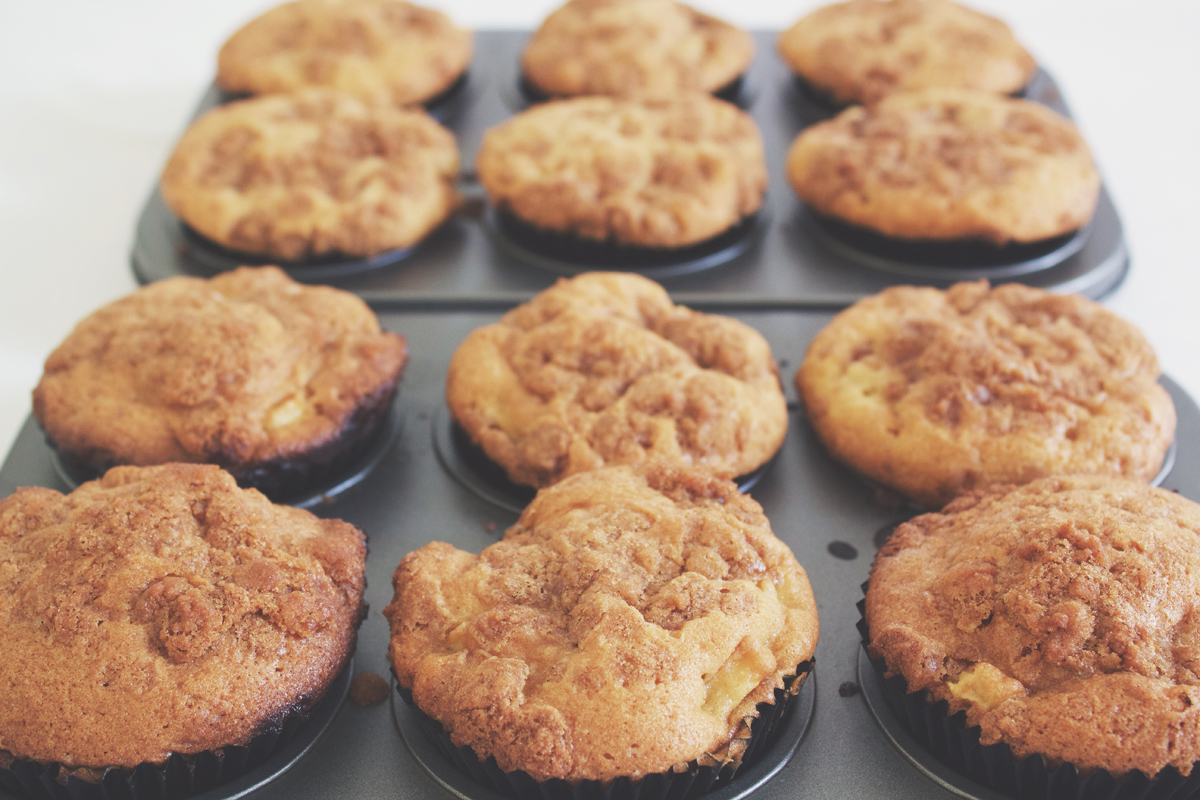
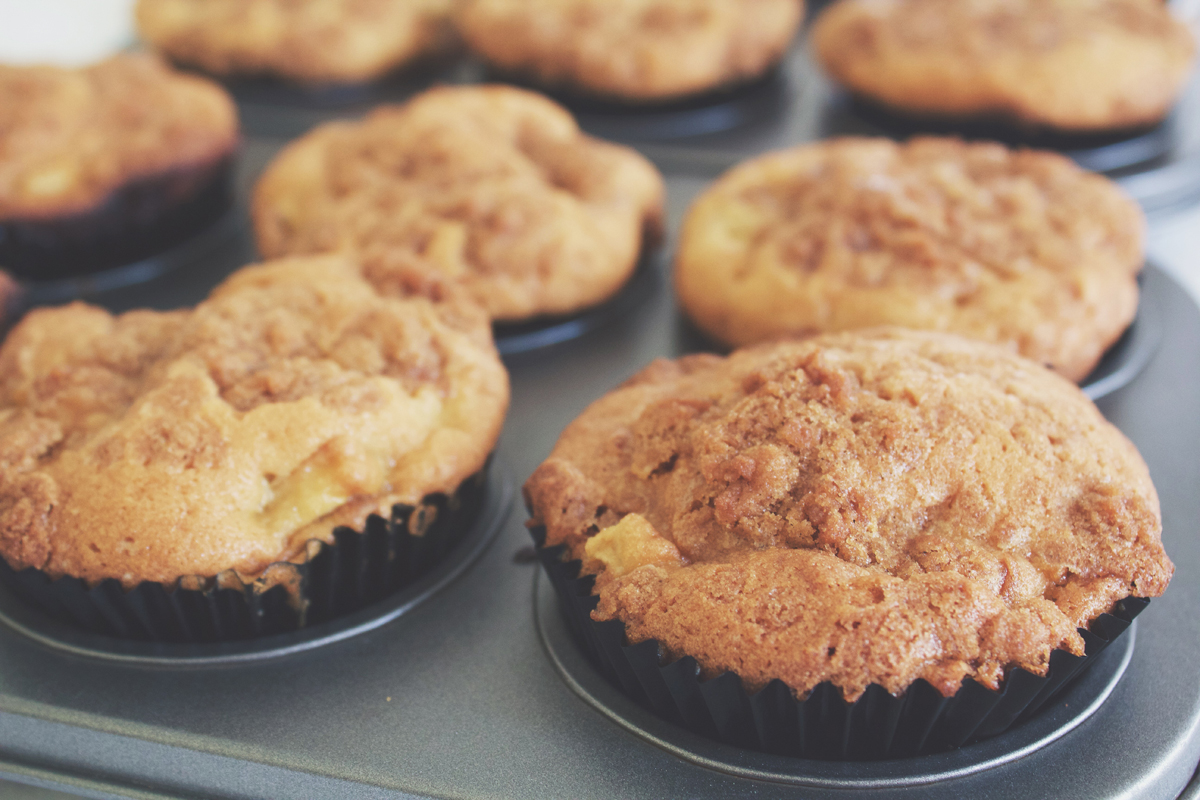
Anyway, this recipe gave me a bit of a headache – well, just the broken glass candy part, and a little bit of the red velvet cupcake as well. Let’s just say that with the red velvet, it did not rise as I had wanted it to or hoped, and it wasn’t very red because of the lack of colouring (I used less because my bottle of red ran out). I had actually attempted to make this recipe 2 weeks ago, but because I was so defeated and tired by the end of the afternoon, I gave up and decided to try it out again the following weekend. At least when I tried that week, I managed to get 50% of the recipe done – the frosting and edible blood. I just kept them in the fridge until the following week when I rebaked my muffins and gave the broken glass candy another go (still was not perfect, but made do with what I had).

Basically, with the glass candy, I couldn’t get the sugar to harden – as in it was mushy as still syrup-like. Apparently, as I read in the comments section of Ruthanne’s blog, another person had the same problem and it was purely because the sugar wasn’t cooked for long enough. So make sure that if you want to try this recipe out, cook it just enough so that you won’t get a mushy mess! But obviously not for too long as it will turn amber in colour which, in this case, is not what you want.

Halloween Special: Creepy Broken Glass Cupcakes! Ingredients

PREP TIME 20 MINS | COOKING TIME 25 MINS | SERVES 12 CUPCAKES
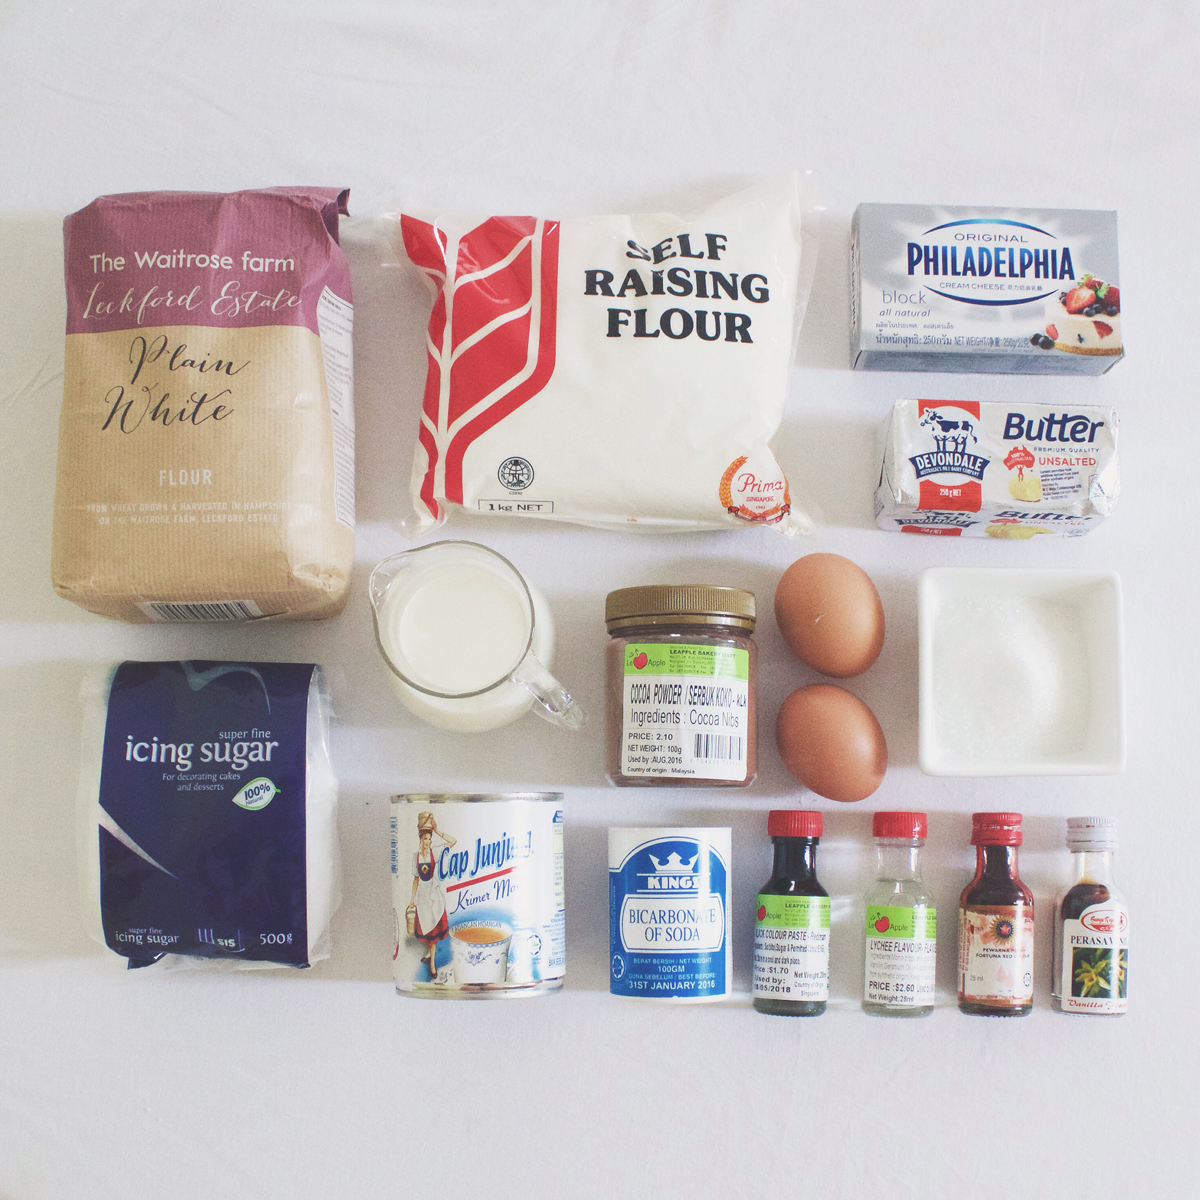
INGREDIENTS

For the cupcake batter

  • 185g butter, at room temperature, plus extra melted, to grease
  • 125ml buttermilk
  • 2 large free range eggs
  • 2/3 cup caster sugar
  • 1/2 cup self-raising flour, sifted
  • 1/4 cup plain flour, sifted
  • 2 tbsp cocoa powder
  • 2 tbsp red food colouring
  • 1/4 tsp baking soda

For the cream cheese frosting

  • 250g cream cheese, at room temperature
  • 60g butter, at room temperature
  • 1/3 cup icing sugar, sifted
  • 1/4 tsp vanilla extract

For the ‘broken glass’

  • 1 cup granulated sugar
  • 1/2 cup light corn syrup
  • 1 tsp clear food flavouring (I used lychee)

For the edible ‘blood’

  • 1 can (395g) sweetened condensed milk
  • 1 tbsp red food colouring
  • 1 tsp clear flavouring (I used lychee)
  • Black food colouring

Halloween Special: Creepy Broken Glass Cupcakes!

Halloween Special: Creepy Broken Glass Cupcakes!

METHOD

A tip before starting off: Make the decorations first, the candy glass and edible blood, as you can keep them in the fridge until just before decorating your cupcakes for your party. They can both keep for several days so you can definitely make them ahead of time.

  1. Broken Glass Candy
    • Cover a baking tray with wax paper and grease it liberally with cooking oil spray, or alternatively you can grease it with some butter if cooking spray is not readily available in your pantry.
    • Place the granulated sugar and corn syrup into a microwave safe bowl and mix them together. Cover the bowl with plastic wrap microwave on high for about 3 minutes. Remove from the microwave and CAREFULLY (beware of the hot steam!) remove the plastic wrap. Stir well and cover again with fresh plastic wrap. Microwave again for another 3 minutes, but check the mixture after about 2 minutes just to make sure that it hasn’t coloured – if you cook the sugar/syrup mixture for too long, it will be amber in colour instead of a nice clear glass you want.
    • CAREFULLY remove the bowl from the microwave and CAREFULLY remove the plastic wrap. The mixture will be very hot and sticky so be cautious as to not touch any of the hot candy! Pour the mixture over the greased wax paper and allow it to sit and harden completely (will take a couple of hours).
    • When the candy has hardened, tap a knife into the ‘glass’ to break it into sharp pieces (do be careful at this point because the pieces are actually quite sharp themselves!), and push the pieces up off the was paper and onto a plate.
    • The glass candy can be kept in a ziplock bag or an airtight container for about a week. Moisture (including the moisture from the frosting on the cupcakes) will eventually start to break the glass candy down.
  2. Edible Blood
    • In a small bowl, add the sweetened condensed milk and mix in the flavouring and red food colouring (a bit at a time) until you get a brilliant red colour. Add a tiny bit of black as the colour can go a long way! Mix and adjust until you get a nice dark red colour.
    • Spoon the ‘blood’ into a ziplock bag and seal tightly. Keep refrigerated until use.
  3. Red Velvet Cake Mix
    • Preheat oven to 180C (350F or gas mark 4). Line a 12 hole muffin pan with black paper cases.
    • Sift the baking soda, cocoa powder, plain flour, self-raising flour into a medium-sized bowl and set aside.
    • Meanwhile in a large bowl, cream the butter and the sugar using an electric handheld mixer. Mix until pale and creamy. Add the eggs and beat on slow speed, making sure that it’s all blended in. Add the flour mixture into egg mixture and gently fold it in. Finally, add in the buttermilk and red food colouring. Mix together.
    • Spoon the batter into the prepared muffin cups, filling them 3/4 of the way and bake in the oven for 20-25 minutes or until cooked through. To check if they are done, insert a toothpick in the centre of the muffin.
    • Once done, remove from the oven and allow to cool down for about 5 minutes, then transfer them out of the muffin pans and onto a wire rack to allow them to cool down completely.
  4. Cream Cheese Frosting
    • Smooth the butter, cream cheese, and vanilla together using an electric handheld mixer. Fold in the icing sugar, and then use the mixer again to beat it until it is light and fluffy.
    • Place the frosting into a ziplock bag and refrigerate until use.
  5. Assembly & Decoration
    • Place some parchment paper on your work surface to protect it from all the red colouring from your edible blood, or alternatively you can use a platter or tray that you will be serving the cupcakes on.
    • Snip off a corner of your ziplock bag of frosting and pipe onto the cooled cupcakes. Press 2 to 3 pieces of the glass candy into the top of each cupcake.
    • Snip off a corner of your ziplock bag of edible blood and drizzle over the top of each cupcake and glass candy, allowing it to drip down the sides of both.
    • Serve the same day after decorating, with plates and forks or else you will have red fingers! Enjoy a bloody delicious dessert and a very Happy Halloween to all my family, friends, and followers!

Cupcakes taste best on the same day, though they may be stored covered tightly at room temperature for 3 days (undecorated) or in the refrigerator for 5 days.

Halloween Special: Creepy Broken Glass Cupcakes!

Once again, a very Happy Bloody Halloween to all my family, friends, and followers! I will be back on Tuesday with a new theme for the month of November so stay tuned!

BON APPÉTIT

– Ally xx

myTaste.com

Breakfast Muffins: Pumpkin, Polenta, and Chilli

Breakfast Muffins: Pumpkin, Polenta, and Chilli

Hello Everyone! I can’t believe we’ve come to an end to Breakfast/Brunch Month, which also means that it’s almost the end of October! Once again, where did the days go? Time flies too quickly. Luckily for you guys, today will not be the last post for October for I have a recipe going up on the 31st for a Halloween Special. I won’t say much about it now but the only thing I will say about it is that it’s gonna get bloody!

So anyway, since today will be my last post for Breakfast/Brunch Month, I’m going to end it with a recipe that is sure to knock you socks off! I’ve not tried this recipe before earlier on this week, but I can assure you that for those of you who like a little bit of spice in your life, these muffins pack a good kick! I had actually planned to bake some Chorizo, Corn, and Chilli Streusel muffins two weeks ago to post for today, but we could not find any chorizo at all that week. So I told my mom that I’ll hold off making the muffins since they weren’t going up on the blog for another week or so during that time, but as the days drew closer and chorizo still could not be found – so maybe I will hold off this recipe for another time when chorizo is available.

Thus, I decided to change my recipe – Pumpkin, Polenta, and Chilli Muffins! I kind of like how it is sort of in theme with fall (for the Northern Hemisphere), and Halloween – the pumpkin aspect of today’s recipe that is. The original recipe for these muffins can be found over on Taste;I didn’t really do anything to alter the recipe, only that I added half of the pepitas into the muffin batter mixture. Other than that, I pretty much just followed this quick and easy recipe.

Breakfast Muffins: Pumpkin, Polenta, and Chilli Ingredients

PREP TIME 15 MINS | COOKING TIME 22-25 MINS | SERVES 12 MUFFINS

INGREDIENTS

  • 500g butternut pumpkin, peeled and cut into small chunks
  • 2 & 1/2 cups self-raising flour
  • 3/4 cup milk
  • 1/2 cup coarse polenta
  • 1/2 cup vegetable oil
  • 1 large free range egg, lightly beaten
  • 2 tbsp fresh coriander leaves, finely chopped
  • 2 tbsp pepitas (pumpkin seeds)
  • 1 tbsp caster sugar
  • 2 tsp dried chilli flakes
  • Ground salt and black pepper, to taste
  • Softened butter, to serve

Breakfast Muffins: Pumpkin, Polenta, and Chilli

Breakfast Muffins: Pumpkin, Polenta, and Chilli

METHOD

  1. Preheat oven to 190C (375F or gas mark 5). Grease a 12 hole muffin pan with either cooking spray or with butter.
  2. Place the pumpkin chunks on a baking tray lined with foil and season with a bit of salt, pepper, and coat with olive oil. Bake in the oven for 15-20 minutes or until tender. Once done, remove from the oven and transfer to a heatproof bowl. Using a fork, mash the pumpkin and set aside to cool.
  3. Meanwhile, combine the self-raising flour, sugar, polenta, chilli flakes, coriander, and half of the pepitas in a bowl. Mix until thoroughly combined and then make a well in the centre.
  4. Add the milk, egg, vegetable oil, and pumpkin into the well and then mix until just combined. Your batter will be very thick which is exactly what you want! Season with a bit of salt and pepper, and the spoon the mixture evenly into the prepared muffin pan. Top with the remaining pepitas.
  5. Bake for 22 to 25 minutes or until golden and firm to touch. Remove from the oven and stand in muffin pan for about 5 minutes before transferring them onto a wire rack to cool down completely.
  6. Serve and enjoy warm or cold with softened butter!

Muffins taste best on the same day, though they may be stored covered tightly at room temperature for 3 days or in the refrigerator for 5 days.

Breakfast Muffins: Pumpkin, Polenta, and Chilli

Breakfast Muffins: Pumpkin, Polenta, and Chilli

BON APPÉTIT

– Ally xx

myTaste.com

Breakfast Muffins: Apple Strudel

Breakfast Muffins: Apple Strudel

Hello Everyone! Oh my! I cannot believe that it’s the last week of October already! My has time gone by so quickly this past month. Anyway, it’s been a while since I last baked muffins for breakfast and only because the last time I made muffins was back in Sydney with my Muffin Making Monday partner Jialing. We made a pizza muffin together one afternoon at her place (the recipe isn’t up on my blog yet), and yes that was the last of our Muffin Making Monday days. Since I left Sydney, we’ve talked about how much we miss baking muffins together and even said that we should still continue it… Over Skype! I don’t know how that’s ever going to work anymore since we’re both independent working women with our busy schedules and time differences.

But anyway! I wasn’t aware that it was a Monday when I baked these babies; only Jialing reminded me of it when she asked me what I was doing that day and I said that I was going to bake some muffins. Today’s recipe can originally be found on All Recipes. The recipe says that it should make 12 muffins, but I ended up with 16, maybe I should’ve filled the muffin cups a bit more because some of them were a bit flat, and some had a nice rise to them. Also, since I ended up with 16 muffins, I ran out of crumbed topping so the muffins weren’t very covered with the brown sugar streusel. Anyway, I’ve edited the recipe a bit so that the proportions match up. These muffins are a little bit on the sweet side, so if you’re someone who doesn’t like sweet things for breakfast, then tune in on Thursday for a savoury brekky muffin 🙂 It involves chorizo and has a bit of a spicy kick to it!

Breakfast Muffins: Apple Strudel Ingredients

PREP TIME 20 MINS | COOKING TIME 20 MINS | SERVES 16 MUFFINS

INGREDIENTS

For the muffin batter

  • 2 cups plain flour
  • 3/4 cup white sugar
  • 110g unsalted butter, softened
  • 2 large apples, peeled and roughly chopped
  • 2 large free range eggs
  • 1 & 1/4 tsp vanilla extract
  • 1 tsp baking powder
  • 1/2 tsp baking soda
  • 1/2 tsp salt

For the brown sugar streusel

  • 1/2 cup packed brown sugar
  • 20g unsalted butter
  • 1 & 1/2 tbsp plain flour
  • 1/4 tsp cinnamon

Breakfast Muffins: Apple Strudel

Breakfast Muffins: Apple Strudel

METHOD

  1. Preheat oven to 190C (375F or gas mark 5). Line a 12 hole muffin pan with paper cases. In a medium-sized bowl, combine the plain flour, baking powder, baking soda, and salt. Set aside.
  2. In a small bowl, mix the brown sugar, cinnamon, and plain flour. Add the butter, and using your fingers, crumb the butter into the sugar mixture. Because Brunei is scorchingly hot, I needed to place the streusel in the freezer to stiffen up a bit.
  3. Using an electric handheld mixer, beat the butter and sugar in a large bowl until smooth. Add in the eggs and vanilla extract and continue to beat until well combined. Add in the apples and stir using a rubber spatula. Gradually stir in the flour mixture.
  4. Spoon the batter into the prepared muffin pan, filling them up to about 3/4 of the way, and top with the brown sugar streusel.
  5. Bake for about 20 minutes or until a toothpick inserted in the centre of a muffin comes out clean. Once down, remove from the oven and set aside to cool for about 5 minutes before removing them from the pan. Cool down completely on a wire rack and then they are ready to eat!

Breakfast Muffins: Apple Strudel

Breakfast Muffins: Apple Strudel

Muffins taste best on the same day, though they may be stored covered tightly at room temperature for 3 days or in the refrigerator for 5 days.

BON APPÉTIT

– Ally xx

myTaste.com

Meat District Co. – Sydney

Meat District Co. – Sydney aims to re-awaken the senses & bring a new kind of dining to the streets of Sydney. Besides pushing their enticing menu over social media platforms such as Facebook and Instagram, Meat District Co. Sydney launched a competition to encourage their guests to eat, relax, and win some vouchers. Besides designing a graphic for both Facebook and Instagram to promote their competition, the other deliverable was to design a simple table menu stand for their restaurant.

Meat District Co. - Sydney Context

Meat District Co. - Sydney Table Menus

Meat District Co. - Sydney #mdcburgerselfie

– Ally xx

Cornflake-crusted French Toast

Cornflake-crusted French Toast

Hello Everyone! I’ve got another french toast recipe with a twist for you again today, but this time there will be no added milo to it. Instead we’re gonna crust our classic french toast with some cornflakes to give it that extra added crunch to an already soggy bread. I came across this idea a couple of months ago back in July when Symmetry Breakfast went viral. They posted a photo of some cornflake-crusted french toast and when I planned for Breakfast/Brunch Month for October, I knew I had to tackle a recipe for that!

I absolutely love their work! If you have been following my Instagram during that month, you would’ve seen that Jialing and I (and Edison) hopped on the #symmetrybreakfast bandwagon for the last remaining week that I was in Sydney. Actually, I might just share the photographs here since I don’t know if I will be posting them on the blog anytime other than now I guess (click on the individual images to view a larger version of them):

Homemade Charred Eggplant & Baby Octopus Shakshuka with Lebanese Bread; Blueberry & Passionfruit Cider French Crêpes with a Honeyed Citrus Creamcheese Filling topped with a Mixed Berry Compte; Orange Sunrise Cocktail Pea and Ham Soup with Stone-baked Pane di Casa and Strawberry & Lime Cider
Potato Hash Crusted Breakfast Quiche with Caramelised Onion, Chorizo, Spinach, and Sunnyside Up Egg with Mixed Leaf Salad and Garlic Butter Bread Beer, Bacon, and Tater Soup (aka “Man Soup”) with Pane di Casa; Russian Earl Grey Tea Fancy Filipino Hotsilog Brekky with Sweet Potato Hash Browns and Brekky Mocktails

L-R: Homemade Charred Eggplant & Baby Octopus Shakshuka with Lebanese Bread; Blueberry & Passionfruit Cider | French Crêpes with a Honeyed Citrus Creamcheese Filling topped with a Mixed Berry Compte; Orange Sunrise Cocktail | Pea and Ham Soup with Stone-baked Pane di Casa and Strawberry & Lime Cider Potato Hash Crusted Breakfast Quiche with Caramelised Onion, Chorizo, Spinach, and Sunnyside Up Egg with Mixed Leaf Salad and Garlic Butter Bread Beer, Bacon, and Tater Soup (aka “Man Soup”) with Pane di Casa; Russian Earl Grey Tea Fancy Filipino Hotsilog Brekky with Sweet Potato Hash Browns and Brekky Mocktails

I know, they’re not quite as symmetrical as the guys from Symmetry Breakfast (we tried to be creative with our symmetry/asymmetry lines), but it still gained a lot of views, likes (especially from Symmetry Breakfast), and new followers! Anyway, yes I realise that I have gone on a bit of a tangent, but I’m pretty sure you enjoyed those photographs (for those who have not seen them that is). So let’s get down to business shall we and get a move on to today’s recipe:

Cornflake-crusted French Toast Ingredients

PREP TIME <5 MINS | COOKING TIME 8-12 MINS | SERVES 2-4*

*Depending if you want one or two slices of french toast per person; recipe is for 4 slices of bread

INGREDIENTS

  • 1 & 1/2 cups of cornflakes, crushed
  • 4 thick slices of bread
  • 1/2 cup milk
  • 1 large free range egg
  • 1 tbsp white sugar
  • 1/2 tbsp vanilla extract
  • 1/4 tsp cinnamon
  • 1/8 tsp ground nutmeg

Optional:

  • Green Kiwi
  • Pineapple
  • Strawberries
  • Honey
  • Powdered sugar
  • Vanilla yoghurt

METHOD

  1. Whisk the eggs together with the milk, sugar, spices, and vanilla extract in a bowl.
  2. Dip both sides of a bread slice to soak up the wet mixture; do not soak it for too long. The dip the soaked sliced bread into the cornflake crumbs and coat.
  3. Place the bread slice into the frying pan and cook until done, 2-3 minutes per side.
  4. Once done, transfer to a plate lined with a paper towel to soak up any excess oils. Repeat for the remaining bread slices.
  5. Top with your favourite toppings, and/or serve with your choice of fruits for a fresh salad on the side. Enjoy!

Cornflake-crusted French Toast

Cornflake-crusted French Toast

BON APPÉTIT

– Ally xx

myTaste.com

Milo French Toast

Milo French Toast

Hello Everyone! Anyway, so it’s week 4 of Breakfast/Brunch month and this week I will be sharing with you my now-favourite french toast recipes. I say ‘now-favourite’ because this is the very first time I’ve attempted these recipes. I’ve had and made french toast before, but the recipes I’ll be sharing with you this week are beyond than that of the classic french toast – they got a certain twist to them that will make you fall in love with french toast all over again.

Today’s recipe is one that I came across on Facebook as I was scrolling through my newsfeed. BuzzFeed Australia posted a video recipe for Milo French Toast. If you love milo and fancy some french toast to go with that, then this recipe was made for you, only that, you get to combine milo together with your french toast – how cool is that? You can top them off simply with some butter and syrup, or you can make it a bit more interesting by topping them off with some of your favourite fruits – I topped mine with some strawberries, crushed pistachios, honey, and a bit of powdered sugar.

I remember growing up, even up until now, my mom would make a classic french toast for breakfast at least once a week. When I came across this recipe and talked to her about it, we decided to try it out. It was a great success in my opinion and I loved it, so did my Mom and sister Angela. Original video recipe can be found on BuzzFeed Australia‘s Facebook page.

Milo French Toast Ingredients

PREP TIME <5 MINS | COOKING TIME 8-12 MINS | SERVES 2-4*

*Depending if you want one or two slices of french toast per person; recipe is for 4 slices of bread

INGREDIENTS

  • 4 thick slices of bread
  • 1/2 cup milk
  • 1/2 cup milo
  • 1 large free range egg
  • 1/2 tbsp vanilla extract

Optional:

  • 1 punnet (250g) strawberries, hulled then halved
  • Handful of pistachios, shelled and lightly crushed
  • Honey
  • Powered sugar

METHOD

  1. Heat a bit of oil in a non-stick frying pan over medium.
  2. Combine the milo, milk, egg, and vanilla extract in a bowl. Mix until well combined.
  3. Dip both sides of a bread slice to soak up the wet mixture; do not soak it for too long.
  4. Place the soaked bread slice into the frying pan and cook until done, about 2-3 minutes per side.
  5. Once done, transfer to a plate lined with a paper towel to soak up any excess oils. Repeat for the remaining bread slices.
  6. Serve up this Aussie twist on a French favourite with some honey and butter if you like, or with some fresh fruits and crushed nuts and enjoy!

This slideshow requires JavaScript.

BON APPÉTIT

– Ally xx

myTaste.com

The Belrose Hotel

The Belrose Hotel will become the destination on Sydney’s North side for a comfortable and quality family dining experience. The Belrose Hotel has long been famous for delicious food and a friendly family feel, and it’s about to get even better. Since they have restyled their services recently, their graphic style plays on the family and food aspect, to promote their re-opening via social media to get across a wider, yet still specific audience – focusing on families living in Sydney’s North.

The Belrose Hotel Context


Examples of graphic works that I have created for Facebook and Instagram:
(Click on the images to see an enlarged version of the graphics)

The Belrose Hotel: Family Friendly The Belrose Hotel: Family Friendly The Belrose Hotel: Happy Hour The Belrose Hotel: Family-friendly Valentine's Day 2015
The Belrose Hotel: Staff Profile The Belrose Hotel: Customer Review The Belrose Hotel: Staff Profile The Belrose Hotel: Customer Review
The Belrose Hotel: Menu The Belrose Hotel: Menu The Belrose Hotel: Menu The Belrose Hotel: Menu

Besides creating weekly content for Facebook and Instagram, I also created Facebook Page Like Ads, below are three examples:

The Belrose Hotel: Facebook Page Like Ad

The Belrose Hotel: Facebook Page Like Ad

The Belrose Hotel: Facebook Page Like Ad

– Ally xx

Kale Smoothie with Almonds, Banana, & Pineapple

Kale Smoothie with Almonds, Banana, & Pineapple

Hello Everyone! I’ve got another brekky smoothie recipe for you today, and some may find this unusual at first, but it actually works! I must admit, I was once cynical about the idea of adding vegetables to a smoothie. That changed when I moved to Australia and saw kale juices/smoothies pop up here and there in many local cafés in and around Sydney. I’d always see my friends with a take away cup of green smoothies that were either made up of kale or spinach included in them. To be honest, I’ve never tried a kale smoothie before and this is the first time I’m making and trying one! I’ve had kale before, and to me, it doesn’t have a distinct taste to it, so I was glad that the non-exsitent kale flavour didn’t shine through in the smoothie. Instead, you can taste the almonds, bananas, and pineapple which was nice. However, after having done some research, kale apparently does have a strong flavour that many might be used to, so when making a green smoothie using kale, you should use strongly flavour fruits such as strawberries or pineapple to help mask the flavour (possibly why I personally could taste the kale because I use pineapple in my green smoothie).

Before I begin with this simple green smoothie recipe, I want to talk to you a little bit about the health benefits of adding kale to your smoothie. Kale helps cut the sweetness of the fruits added, and has more than twice the recommended daily value of calcium to your diet. It is an excellent leafy green to use for detox as it contains cleansing properties. In addition, kale has a lot of vitamins and also contains powerful antioxidants that help protect your immune system and fight against certain cancers. If you want to read more about the health benefits of kale, please click here. Now, you may substitute kale for spinach if kale isn’t readily available where you are; I know that it’s not very cheap to get kale here in Brunei since it’s air-flown in from Australia.

The original recipe can be found over on Real Simple; all I did was again, change the quantities to serve about 3-4 tall glasses. I also decided to substitute the coconut milk for fresh coconut water as most coconut milk that you find here in Brunei are straight out from a tin and have a whole lot of preservatives added to them. You can use coconut water from the shelf if you don’t have fresh coconut water readily available but I personally hate those because they taste very artificial to me. Otherwise, you can also just use water. I read in the comments section of the site as well that someone added almonds to the smoothie for that added protein, so feel free to add your favourite nuts into the mix as well when you make your smoothie!

Kale Smoothie with Almonds, Banana, & Pineapple Ingredients

PREP TIME 5 MINS | COOKING TIME  | SERVES 3-4

INGREDIENTS

  • 2 & 1/2 cups kale, stemmed and roughly chopped
  • 1-2 cups fresh coconut water
  • 1/3 cup almonds
  • 1/2 medium-sized pineapple, chopped
  • 2 ripe bananas, chopped

METHOD

  1. Combine all the ingredients in a blender in this order: bananas, almonds, pineapple, kale, and 1 cup of coconut water. Pulse a couple of times to mix up the ingredients in the blender a bit and then blend on high for about 30 to 60 seconds. Add more coconut water if needed to reach your desired consistency.
  2. Serve immediately and enjoy!

Kale Smoothie with Almonds, Banana, & Pineapple

BON APPÉTIT

– Ally xx

myTaste.com

Gingery Berry & Oat Smoothie

Gingery Berry & Oat Smoothie

Hello Everyone! For this week of breakfast/brunch month, I have some simple brekky smoothies for you that you can easily prepare the night before, whizz it in the blender in the morning, and voilà; you’ve got a quick brekky that you can take with you to go if you really need to. I’ve never really been the type to make my own smoothies at home, not until my second year of uni back in 2012 when my flatmate at that time started making smoothies for the both of us on the weekends. She would always make the same banana and blueberry smoothie with full cream milk, old-fashioned rolled oats, and vanilla yoghurt. Ever since then, I would whip up this easy smoothie whenever I felt like it even after we went our separate ways. I’ve also made a strawberry smoothie with the same ingredients, just taking out the bananas and blueberries, and added mint into the mix; it was a really good smoothie too.

Anyway, I won’t be sharing those two recipes with you this week as I’ve got two completely different (maybe in some way a little bit similar) smoothies for today and Thursday. I decided try new smoothie recipes and for today’s post, I came across a recipe for a Blueberry and Oat Smoothie; now I know this is sounding a little similar to the smoothie that I mentioned above, and that I’m used to making, but what makes this different is the touch of ginger added. I don’t think I’ve had a smoothie with ginger in it before so I thought that I’d give this recipe a try; original recipe can be found over at Real Simple. All I’ve really done was change the quantities to serve 3-4 tall glasses, as well as reducing the amount of sugar.

Gingery Berry & Oat Smoothie Ingredients

PREP TIME 20 MINS | COOKING TIME  | SERVES 4

INGREDIENTS

  • 1 & 1/2 cup frozen blueberries
  • 1 & 1/2 cup water
  • 1 cup creamy vanilla yoghurt
  • 1 cup ice
  • 3/4 cup old-fashioned rolled oats
  • 4 tbsp brown sugar
  • 3/4 tsp fresh ginger, grated

METHOD

  1. Add the oats and water to a blender and leave to soak until the oats have softened, about 15 minutes.
  2. Add the ice, blueberries, yoghurt, brown sugar, and ginger to the blender. Blend until smooth and frothy, about 2-3 minutes.
  3. Serve and enjoy!

Gingery Berry & Oat Smoothie

I’ve read a few of the comments on the site where the original recipe was uploaded, and some said that the oats had a weird texture and made the smoothie grainy and starchy. Some didn’t like the addition of the ginger and made their stomachs upset. So I guess this smoothie is not for everyone, but if you think you’d enjoy all these flavour into one drink, then go ahead and give it a try because it’s definitely delicious! I personally thought that the oats were fine and still gave the smoothie a nice flavour and texture to it; I feel that without it, the smoothie would be quite loose. The ginger, though quite a strong flavour, paired well with the sweet blueberries and helped cut down the sweetness of the smoothie from the added sugar.

BON APPÉTIT

– Ally xx

myTaste.com

Oliving by Hans

Oliving by Hans products are a uniquely delicious combination of the finest meat and olive oil, but also offer guaranteed quality and low fat content. The message that they want to push through on social media is the idea that their products are made with olive oil and less saturated fat than traditional smallgoods, making them a healthier choice to ones diet. My designs have been approved and went live on various social media platforms including Facebook, Instagram, Twitter, and Pinterest.

Oliving by Hans Context


Examples of graphic works that I have created for Facebook and Instagram:
(Click on the images to see an enlarged version of the graphics)

Oliving by Hans: Mozzarella Pizza Oliving by Hans: Bacon High-5 Oliving by Hans: Don't Go Bacon My Heart Oliving by Hans: Happy Australia Day
Oliving by Hans: Party Platter Oliving by Hans: Twiggy Sticks Oliving by Hans: Find Us in the Deli Oliving by Hans: The Hans Revolution Run

Oliving by Hans: Kabana & The Benefits of Olive Oil

Examples of graphic works that I have created for Pinterest:
(Click on the images to see an enlarged version of the graphics)

Oliving by Hans: Kids Pizza Oliving by Hans: Smoked Ham Sandwich Oliving by Hans: Mediterranean Parcels
Oliving by Hans: Roasted Asparagus Oliving by Hans: Mozzarella Pizza Oliving by Hans: Spaghetti Turkey

– Ally xx