Spiced Red Wine Poached Pears

Spiced Red Wine Poached Pears

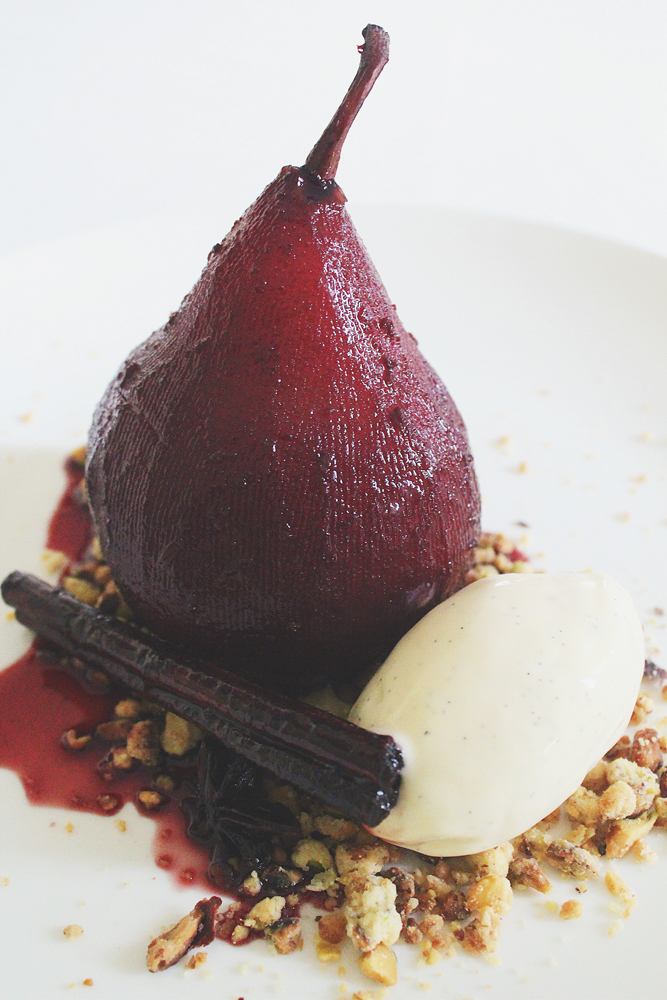
… on a bed of Pistachio Crumble with a Quenelle of Homemade Vanilla Bean Ice Cream drizzled with a Red Wine & Orange Reduction *drools*

Hello Everyone! I’m really bad at this, and I sincerely apologise. I know I said that I would get back on track with Amcarmen’s Kitchen until the end of the year but once again I have fallen slack and behind for God knows how many weeks now. The truth is that I have been super busy towards the end of last month and into early November with a hectic and stressful event that definitely took a toll on my high blood pressure for sure. Though the past 2 weeks have been quiet, I spent most of it recovering and relaxing from that hell of an event.  I worked at least 15 hours a day from 8am until almost midnight on most nights. I’m just glad that it’s all over… For now.

But anyway, the recipe that I will be sharing tonight is one that I actually made waaaaaay back somewhere in June when I was left home alone (my mom and my sister flew out to Singapore to visit my other sister), during a long weekend too, and I had no plans of stepping out of the house unless I had to *cheeky grin*. So why didn’t I upload the recipe for this back then? Simple – it didn’t comply with the theme I had set out to accomplish for this year on Amcarmen’s Kitchen. So then why now? It’s still 2017. Stop asking so many questions! Haha! I amuse myself sometimes. Well, this is actually part of a special recipe that I will be posting (hopefully) next week, which will also most likely be the last recipe for the year unfortunately. I’m going to use the rest of my time before the year ends to plan and prepare recipes for the upcoming year. I already have a theme in mind to tackle for the whole year and I’m already excited for it!

Spiced Red Wine Poached Pears

Moving on, sorry that introduction went on way longer that I thought it would (as always though right?). If I can recall, I decided that I wanted to practice my dessert-making skills, you know to a MasterChef quality level worthy of a place in the competition ONE DAY. I have to say that I’m quite impressed with how this dessert played out in my head, to paper, and to the actual deal. The pears were soft on the outside, but still had a nice bite and a bit of crunch to it on the inside; beautifully spiced and contrasted well to the mild sweetness of the vanilla bean ice cream. And everyone loves pistachios, or at least I hope they do so throw that onto the plate for another added texture to the overall dessert dish.

You may want to get a head start on the ice cream so that it’ll have time to set in the freezer. You can either make it the day before, or early in the morning so that it’s ready for dessert time after a hearty dinner.

Spiced Red Wine Poached Pears Ingredients

PREP TIME 4 HOURS* | COOKING TIME 25-35 MINS | SERVES 6

*Includes the minimum freeze time for the no churn vanilla bean ice cream; see below for the freeze time range

INGREDIENTS

For the spiced red wine poached pears

  • 6 large pears, peeled and keeping the stems intact**
  • 1 bottle (750ml) red wine
  • 3/4 cup white sugar
  • 10 cloves
  • 3-inch cinnamon stick
  • 2 star anise
  • Juice and zest of 1 orange

For the no churn vanilla bean ice cream

  • 2 cups thickened cream
  • 1 can (300g) sweetened condensed milk
  • 1 vanilla bean pod
  • 1 tbsp pure vanilla extract

For the pistachio crumble

  • 1/2 cup roasted and salted pistachios
  • 3/4 cup plain flour
  • 6 tbsp unsalted butter, melted
  • 2 tbsp white sugar
  • 1/2 tsp salt

**Make sure that you use fairly large pears for this recipe. I found that using smaller pears overcook easily as they need a while to absorb that beautiful red wine colour as well as the flavours.

METHOD

  1. No Churn Vanilla Bean Ice Cream: Using a mixer, beat the thickened cream on medium speed until heavy peaks start to form. Add the can of sweetened condensed milk and beat further. Be careful as to not over whip the mixture. Add the vanilla beans into the mixture along with the pure vanilla extract and gently stir it into the ice cream mixture. Place the ice cream mixture into a container and freeze for a minimum of 4 to 6 hours or overnight.
  2. Spiced Red Wine Poached Pears: Add all the ingredients for the poached pears into a large pot or any that’s a suitable size. Cut out a piece of parchment paper and place it directly on the pears so they remain submerged in the liquid, or alternatively you could also use a small plate.
  3. Bring the wine mixture to boil and then turn it down to a simmer and cook until the pears are soft on the outside are still a little crisp in the middle instead of soft all the way through (about 25 minutes); cooking time will however depend on the size of the pears. For softer pears, cook for a further 10 minutes.
  4. Once the pears are cooked through, use a slotted spoon remove the pears and set aside to cool. Keep cooking the liquid until it reduces to a syrup. Then, strain the wine reduction and discard the spices and zest. If you find the sauce too sweet, add some lemon juice to it to cut through some of that sweetness.
  5. Pistachio Crumble: Preheat oven to 180C (350F or gas mark 4) and line a rimmed baking tray with parchment paper. Process the pistachios in a food processor until roughly chopped. Add the flour, sugar, and salt; processing further just until combined. Add the unsalted butter, and continue processing until the mixture is thoroughly combined and forms pea-size crumbs.
  6. Spread the pistachio crumble mixture on the prepared baking tray. Press gently with damp hands, flattening the crumble to about 1/2 inch thick and bake in the preheated oven until the crumble starts to brown at the edges, about 15 minutes.
  7. Remove from oven, and, using a flat spatula to lightly crumble the mixture. Return to oven, and bake until the crumble is golden brown, about 8 to 10 minutes further. Once done, transfer to a wire rack, and set aside to cool on the baking tray completely, about 20 minutes, before roughly crumbling.
  8. Assemble your dessert by spreading the crumble onto the middle of each individual serving plates. Place one pear on top of the crumble and drizzle with the orange and wine reduction syrup. Quenelle the vanilla bean ice cream and place atop the crumble on the side of the pear.
  9. Serve and enjoy!

Spiced Red Wine Poached Pears

BON APPÉTIT

Ps: speaking of desserts – this is completely unrelated by the way, but I just thought I’d share this because it’s hilarious! A week ago or so, my friend asked a question on our whatsapp group chat and the question was: if you were a dessert, what would you be? Without hesitation, my other friend quickly replied “cactus” and to her hasty realisation, she retracted and said “oh I thought you meant desert” and everyone went spiralling down into a pit of undignified laughters – well I couldn’t stop laughing out loud and looking like an insane freak in front of my colleagues at work during that time. God bless her.

– Ally xx

myTaste.com

Strawberry Kiwi Lime Yoghurt Cake

Strawberry Kiwi Lime Yoghurt Cake

Hello Everyone! I know the last two posts have been a bit of a downer; let’s just say I’m starting to feel a little bit better and more of myself this week so I hope that I will be back to my chirpy self soon. That aside, tonight’s recipe is actually one that I made just almost 2 months ago for a very special occasion; my sister’s 23rd birthday last August 23rd! We celebrated her birthday with a yummy all-you-can-eat Korean BBQ dinner at Seoul Garden followed by a surprise visit from a family friend which at that time we had offered to look after their two little boys for a week since their helper had to go back to the Philippines and they couldn’t find anyone else under short notice. Overall it was a fun evening spent with lots of food, cake, and little, but great company!

Happy 23rd Birthday Angela!

The cake that I decided to make for my sister was inspired by a recipe that I found online when I was researching ways that I could incorporate some of the ingredients from my blood pressure friendly list that I compiled at the beginning of the year. This recipe, from that list, features kiwis, strawberries, bananas, and fat-free yoghurt, all of which help lower your blood pressure. This cake is simple and easy to put together, yet is still delicious and guilt-free for when you reach out for a second heap of serving or three (or four)… Or you know the whole cake *cheeky grin* Not that I have done this myself before, you know, have a whole cake for no one else but just me, myself, and I. Anyway, onward with the recipe shall we? But before that, just a quick mention that the original recipe can be found over on SkinnyMs.

Strawberry Kiwi Lime Yoghurt Cake Ingredients

PREP TIME 10 MINS | FREEZING TIME 3 HOURS | SERVES 10-12

INGREDIENTS

For the base

  • 1/4 cup hazelnuts, finely ground
  • 1/4 cup walnuts, finely ground
  • 1 tbsp coconut oil, melted
  • 1 tbsp honey
  • 1 tbsp unsalted butter, melted
  • 1/4 tsp salt
  • Honey graham crackers (enough to make about 1 cup of crumbs)

For the filling

  • 2 punnets (2 x 250g) fresh strawberries, sliced thinly
  • 1 tub (500g) fat free all natural yoghurt
  • 1 large banana, mashed
  • 3 tbsp lime juice
  • 2 tbsp honey

For the topping

  • 2 kiwis, peeled and sliced into thin circles
  • Sliced strawberries (about 2-3 from the punnet)
  • Extra honey graham cracker crumbs (optional)

PS: Please ignore the egg in the ingredient shot, I actually didn’t use it at all even though it was in the original recipe. I decided to go with a no-bake base and therefore omitted the egg from my recipe.

METHOD

  1. Prepare an 8.5-inch springform pan by lining the bases with baking paper and greasing the edges with a little bit of butter. Add all of the base ingredients into a medium-sized mixing bowl and mix until well combined. Press half of the mixture over the base of the prepared pan and set aside in the refrigerator for about 10-15 minutes or until firm.
  2. In a separate medium-sized mixing bowl, combine the mashed banana, yoghurt, honey, and lime juice, whisking well until smooth. Set aside.
  3. Arrange half of the strawberry slices on top of the cooled crust then pour over half of the yoghurt mixture on top of the strawberries in an even layer.
  4. Repeat by adding the remaining half of the base over the top of the yoghurt mixture, arranging the strawberries slices, and the pouring the remaining half of the yoghurt mixture.
  5. Top the cake with the kiwi slices and strawberries slices before placing in freezer for about 3 hours or until completely frozen.
  6. Serve and enjoy! Tip: to cut, hold a knife under hot water for 10 seconds, dry and cut the frozen cake wile the knife is still warm!

Strawberry Kiwi Lime Yoghurt Cake

Strawberry Kiwi Lime Yoghurt Cake

BON APPÉTIT

– Ally xx

myTaste.com

Angel Hair with Beetroot Pesto & Roast Lemon Rosemary Chicken

Angel Hair with Beetroot Pesto & Roast Lemon Rosemary Chicken

Hello Everyone! I know that one of my Mom’s family friends had been asking for this recipe from way back when she showed a picture of this dish to her at the time I put it together (probably back in July); well I’m glad to say that’s it’s finally here and I do apologise for getting it up really late.

I mentioned in my last post that I have a lot of personal and work stuff going on, and things have still been a bit rough – actually to be honest, I don’t think it is as rough as I say it is, but let’s just say my mind has the tendency to drift into a dangerous place which turns my usual cheerful mood to the complete opposite from time to time and I haven’t been able to get out of it since last week. I guess my mood has been making me think that it’s been rough; maybe I should stop listening to Sam Smith’s “Too Good at Goodbyes” on repeat … I can’t get enough of it though because it’s a really good song, but on the other hand, it’s putting a lot of unnecessary thoughts into my head. Well on top of that I guess it doesn’t help that work is getting crazy busy that I can barely keep up with it. Anyway I’m not here to talk about this, so onward with tonight’s recipe!

Angel Hair with Beetroot Pesto & Roast Lemon Rosemary Chicken

As you know, or maybe not depending on if you’ve read my post from the beginning of the year back in January, or if you already know this from your own research and reading, there are nitrates in the juice of beetroots that have been found to bring down one’s high blood pressure within just 24 hours. If you’re not a keen beetroot juice drinker, you can easily add this vegetable to your diet by roasting or steaming the whole root and then add it to a green-packed salad, stir-fry, stew, or in this case, make a nutty and creamy beetroot pesto that’s far from tasting beet-y the way beets do for those who don’t sit well with its taste.

Tonight’s recipe is so much more versatile than just adding it to your favourite pasta. It is a delicious sauce for your salads, pizza, and appetizers to spread on to toast with eggs or dip crudites in for the ultimate seasonal flavour fix! You can pair your Angel Hair Pasta with a delicious and juicy road chicken breast or keep it completely vegetarian. I’m sure there’s a vegan recipe for beetroot pesto as well, just don’t forget to replace your pasta with a vegan-friendly one.

You can find the original recipe that I referred to for this Beetroot Pesto over on Akis Petretzikis.

Beetroot Pesto Ingredients

PREP TIME 15 MINS | COOKING TIME 30 MINS | SERVES 6

INGREDIENTS

For the beetroot pesto sauce

  • 400g whole raw beetroot, washed
  • 3/4 cup walnuts, roughly chopped
  • 1/4 grated parmesan
  • 2-3 garlic cloves, minced
  • 3 tbsp olive oil
  • Ground sea salt and black pepper, to taste
  • Zest from 1 lemon
  • 500g angel hair pasta

For the roast lemon rosemary chicken*

*I’ve linked my recipe for Lemon & Thyme Roast Chicken which is essentially they same except that I replace the thyme with rosemary just because when I went grocery shopping that weekend, they didn’t have fresh thyme on the shelves but had rosemary instead. You can top your pasta with some chicken or keep it meat-free; it’s completely up to you!

METHOD

  1. In a pan of boiling salted water, boil the beetroot for about 15-20 mins or until tender. Drain and leave to cool before peeling (wear clean rubber gloves to peel if you want to avoid beet-stained hands). Reserve about a quarter cup of small cubed beets to garnish on top of your pasta dish.
  2. Roughly chop the beetroots in to small chunks and purée them in a blender for about 30 to 45 seconds.
  3. Add the olive oil, garlic, and season with ground sea salt and black pepper to taste. Continue to blend for another 30 seconds before adding the chopped walnuts and grated parmesan. Blend until smooth and creamy. Set aside.
  4. Cook the angel hair pasta according to packet instructions in a pot of boiling salted water. It should take no longer than two minutes, but I like to slightly undercook my pasta since I will be further cooking it again.
  5. When the pasta is ready, reserve some of the pasta water and drain. Add the pasta back to the pot and stir the beetroot pesto in. Add the pasta water if necessary to make the sauce as creamy as you like. Once coated, turn the heat off and divide equally to individual dishes.
  6. Top the pasta with the grated zest from 1 lemon, extra grated parmesan, more chopped walnuts, and the beetroot cubes. Optional to serve with juicy slices of Roast Lemon Rosemary Chicken. Enjoy!

Angel Hair with Beetroot Pesto & Roast Lemon Rosemary Chicken

BON APPÉTIT

– Ally xx

myTaste.com

Beetroot Brownies with Chocolate Chunk Beet Ice Cream

Beetroot Brownies with Chocolate Chunk Beet Ice Cream

Hello Everyone! Firstly, I’d like to apologise to the moon and back to all my friends and followers for not posting in what seems like (or quite frankly has been) forever! A lot of things have been going on for the past few months, both in my personal and work life that I found it difficult to balance alongside with keeping up with Amcarmen’s Kitchen. The truth is, I haven’t had the time to write, or let’s just say that I did have the time, but I was either using my time unproductively or for something else instead of sitting down and getting back on track with posting. So yes, I am very sorry for the lack of consistency of posting on the blog in the recent months, but I’m planning on getting back on board with this for the remaining 3 months of 2017 (hopefully). It will however be a little scattered in a sense that you won’t see a set theme for the month just because I still have an archive of recipes that never got posted from the previous months.

Beetroot Brownies with Chocolate Chunk Beet Ice Cream

Back in July I started to hero beetroot in my cooking, and I shall continue that for the next two weeks (I think) before I share other recipes that still stick with the theme for 2017 which is Blood Pressure Friendly foods. Before I jump onto the recipe, I’d like to thank my friends Simon Swadling and Jialing Mew for contributing their recipes for this year’s Auguest – and yes, another thing that I did not plan properly for with everything going on so I apologise that I could only round up these amazing two friends for you!

Anyway, so somewhere down the path of whipping up this batch of beetroot brownies, which by the way includes Whittaker’s (New Zealand) Kaitaia Fire Chili Pepper Spice Dark Chocolate, I made the realisation that I basically just made red velvet brownies *cheeky grin* but of course, what makes a nice warm slice of heaven without ice cream? Specifically Chocolate Chunk Beet Ice Cream? Even MORE specifically, chunks of chocolate from Whittaker’s (New Zealand) Hawke’s Bay Black Doris Plum and Roasted Almonds Dark Chocolate? I think I just drooled. Cold ice cream with a kick of spice in it to really heighten the flavours atop a chocolatey, chewy, and moist brownie drizzled with a vibrant beetroot icing glaze? I’ll have the whole batch please thank you very much.

The original recipe to the brownies can be found over on BBC Good Food, and the original recipe to the beetroot ice cream can be found on Vegan Heaven.

PREP TIME 25 MINS | COOKING TIME 45 MINS | SERVES 12 SLICES

Note: Make the ice cream either the day before or a few hours (4-5 hours) to allow for freezing time before baking your brownies.

INGREDIENTS

Beetroot Brownies Ingredients

For the brownies

  • 500g whole raw beetroot, washed
  • 250g dark chocolate (70% cocoa), chopped*
  • 100ml olive oil
  • 3 large free range eggs
  • 1 & 1/4 cup plain flour
  • 3/4 cup granulated sugar
  • 2/3 cup cocoa powder
  • 1/3 cup macadamia nuts, roughly chopped
  • 2 tsp vanilla extract
  • 1 tsp baking powder

For the beetroot icing glaze

  • 1 cup icing sugar
  • 1 tbsp beetroot juice

Chocolate Chunk Beet Ice Cream Ingredients

For the ice cream

  • 500g whole raw beetroot, washed
  • 1 cup thick full fat coconut milk
  • 1/4 cup honey
  • 3 tablespoons chopped dark chocolate (Whittaker’s (New Zealand) Hawke’s Bay Black Doris Plum and Roasted Almonds)
  • 1 piece thumb-sized ginger, grated

*As mentioned earlier, I used Whittaker’s (New Zealand) Kaitaia Fire Chili Pepper Spice Dark Chocolate. But since I only had 100g of this, I used regular dark chocolate for the brownies and added half of the Whittaker’s chocolate to the mix, while the other half sprinkled on top of the baked brownies.

METHOD

  1. Boil the beetroots for both for the brownies and ice cream, in a pan of boiling salted water for 15-20 mins or until tender. Drain and leave to cool before peeling (wear clean rubber gloves to peel if you want to avoid beet-stained hands).
  2. Chocolate Chunk Beet Ice Cream: Roughly chop the cooked beets into small chunks and place them together with the coconut milk, honey, and the grated ginger in a food processor and blend until smooth.
  3. Transfer the beetroot-coconut mixture in a freezer-safe container, stir in the chococalte chunks and freeze for about 4-5 hours, whisking slightly every 20-30 minutes to avoid it getting too icy.
  4. Beetroot Brownies: Preheat oven to 180C (350F or gas mark 4) and grease a 10cm x 25cm baking dish. Chop a third of the cooked beetroots into small cubes and blitz the remainder in a blender or food processor to a paste. Sit the paste in a sieve over a bowl – just until you have collected 1-2 tbsp juice. Save the juice for the icing, and mix the olive oil into the beetroot paste. Set both aside.
  5. Bring a pan of water to a bare simmer and place a heatproof bowl with the chopped chocolate. Lightly stir until the chocolate had melted then set aside to cool slightly.
  6. Use an electric whisk to beat the eggs, sugar, and vanilla together in a large mixing bowl until light, fluffy, and tripled in size. Carefully fold the eggs into the beetroot and olive oil mixture, followed by the melted chocolate. Fold in the flour, cocoa powder, and baking powder, then add macadamia nuts and the chopped beetroot.
  7. Pour the mixture into your prepared baking dish and bake for 20-25 mins. The brownies should still be slightly gooey in the middle. Set aside to allow to cool slightly. While cooling, you can thaw your beetroot ice cream for 5-10 minutes before scooping and serving
  8. Mix enough reserved beetroot juice with the icing sugar to get a runny icing – dilute with water if you need. Remove brownies from the tin, drizzle with the icing and cut into squares.
  9. Enjoy a sinful slice or two, or more (who’s gonna stop you?) with family and/or friends, or you know, just by yourself *cheeky grin*.

Beetroot Brownies with Chocolate Chunk Beet Ice Cream

Beetroot Brownies with Chocolate Chunk Beet Ice Cream

BON APPÉTIT

– Ally xx

myTaste.com

Auguest 2017: Jialing Mew

Curried Lentil & Vegetable Stew

Curried Lentil & Vegetable Stew

Happy Guestember everyone! I’ll be taking over Amcarmen’s kitchen this week, for my third guest appearance. Having lived in Sydney for the past few years, I’ve crossed paths with several people, all with different lifestyles, backgrounds, and interests. Amidst the social and cultural melting pot, I’ve found that food is always a common talking point and a great way to bring people together. And what’s better than food that can be enjoyed by all? I’ve certainly managed to surpass my own expectations this year – not only does my recipe use multiple ingredients from Allison’s high-blood-pressure-lowering list, but it is also gluten-free, dairy-free, and… vegan! (Read about last year’s vegan recipe struggle here MATE YOU GOTTA LINK THIS PART WHERE IT SAYS HERE TO THE RECIPE FROM LAST YEAR PLZ CUZ I DONT KNOW HOW TO DO EET AND ALL THIS TEXT IN RED PLZ REMOVE FROM POST TENKS. Yes, 2017 Jialing can laugh about it now).

[I’m sorry Jialing, I had to share the text in red for the blogging world to see because it’s just too funny!] – Ally xx

Inspired by seasonal ingredients in my kitchen, staples in my pantry, and great people in my life, this dish is something that I hope everyone can enjoy. True to my appetite, my recipe makes a LOT, so it’s best made in the largest pot or pan you can scrounge up, then shared with a small army. Or simply halve the first lot of ingredients for a more regular quantity. Enjoy!

Curried Lentil & Vegetable Stew Ingredients

PREP TIME 10 MINS | COOKING TIME 45-50 MINS | SERVES 12

INGREDIENTS

  • 500g scrubbed potatoes, cubed
  • 500g split lentils
  • 500g sweet potatoes, peeled and cubed
  • 1 can (400g) white beans, drained
  • 2 onions, diced
  • 2 tomatoes, diced
  • 1 bunch kale, roughly chopped
  • 1 head garlic, minced
  • 1 lemon, cut into wedges
  • 3 tbsp hot curry powder (use mild if less heat is preferred)
  • 2 tbsp olive oil
  • 1 tbsp ginger paste
  •  (optional)
  • 2 tsp coriander powder
  • A small handful of dried curry leaves
  • Salt and pepper, to taste

Optional

  • 1 tbsp cornstarch, for slurry
  • 2 tsp chilli powder
  • Lemon and coriander, to garnish

METHOD

  1. In your very large pot over high heat, fry onion in oil until browned. Add garlic and stir until fragrant. Add ginger paste and tomatoes, stirring until tomatoes are soft and start to break down (being careful not to let the garlic burn).
  2. Add curry powder, coriander powder, and chill powder if desired, stirring briefly for a few seconds.
  3. Add potatoes, sweet potatoes and lentils, increase heat to high, and add enough water to the pan to cover the potatoes and lentils. Keep covered until the water boils.
  4. Once the water boils, reduce the heat to low and add lemon wedges, stirring occasionally and topping up water until lentils and potatoes are all cooked through (may take roughly half an hour). Be sure to leave enough liquid to just cover the lentils.
  5. Add curry leaves, then salt and pepper, adjusting to your taste (I usually end up adding about 1 tbsp of salt). At this point, make the optional slurry with cornstarch and 1 tbsp of water, and add to the pan to thicken the gravy.
  6. Add drained white beans to pan, stirring until heated through. Take your pan off the heat.
  7. Toss in the kale, stirring through gently until evenly distributed. Be careful not to spill, as I always do…
  8. Garnish with fresh coriander and lemon. Serve hot with basmati rice or flat bread, chutney or fresh yogurt, or even on its own. Enjoy with friends or family 🙂

Curried Lentil & Vegetable Stew

Curried Lentil & Vegetable Stew

Recipe Copyright © 2017 | jialingmew

BON APPÉTIT

– xx Jialing

myTaste.com

Auguest 2017: Simon Swadling

Blueberry Cheesecake Tarts (Gluten Free)

I met Allison 6 years ago in Sydney, Australia where we studied Design together at The College of Fine Arts. We both had a great passion for the chicken schnitzel sandwiches they sold across the road from COFA (with caramelised carrots of course) as well as food in general. Recently I’ve taken my passion for food and cooking to the next level by starting my own baking business “The Bearded Patissier” selling baked goods to people in my area, cakes, tarts, macarons, and desserts all give me an opportunity to combine my love for good design and art with good food.

June 2015: Graduation DayJune 2015: The Bearded Patissier & Amcarmen’s Kitchen on Graduation Day

Here’s my recipe for gluten free blueberry cheesecakes. Making them in a tart means you have a great ratio of biscuit to cheesecake and I would happily just eat the base by itself too – it makes a great (healthy) gluten free cookie!

Blueberry Cheesecake Tarts (Gluten Free)

PREP TIME 15 MINS | COOKING TIME 1 HOUR 15 MINS* | SERVES 12 TARTS

*Includes a minimum of 1 hour chilling time

INGREDIENTS

For the base

  • 150g almond meal
  • 75g unsalted butter, cubed
  • 40g caster sugar
  • 40g raw sugar
  • 1/4 cup fine rolled oats
  • 1/4 cup shredded coconut
  • 1/2 tbsp cornflour
  • Pinch of ground cinnamon
  • Pinch of salt

For the blueberry and pomegranate jam

  • 2 x 125g punnets fresh blueberries
  • 2 tbsp pomegranate molases
  • 1 tbsp caster sugar
  • 1 tbsp lemon juice

For the cheesecake

  • 250g cream cheese, at room temperature
  • 1 cup thickened cream
  • 1/2 cup syrup from jam (see recipe below)
  • 2 tsp gelatine powder, dissolved in 3 tsp of water
  • 1/4 caster sugar

METHOD

  1. Base: add all the ingredients for the base into a mixer with the paddle attachment.
  2. Mix on a low speed until fine crumbs start to form, and the butter is well combined into the mixture. Continue mixing until larger crumbs start to form, it should look similar to the size of granola, but don’t let it fully combine into a ball of dough.
  3. Press half a tablespoon of the mix into lose bottomed 3-inch tart shells making sure it is an even thickness across the whole tin. The mixture should cover 12 tins. Alternatively you can also make one large cheesecake in a big tin.
  4. Bake in a 160C fan-forced oven for 12-15 minutes until evenly golden in colour.
  5. Allow tarts to cool fully before removing them from their casing. You may have to press them flat a bit after they come out of the oven while they are still hot.
  6. Blueberry and Pomegranate Jam: add all the ingredients into a pan over medium heat. Bring to a simmer and cook for 10-15 minutes until thickened.
  7. Strain out half a cup of the syrup while still warm and add in the gelatine mixture for the cheesecake. Allow to cool slightly and if you want the bits of blueberry in the cheese cake just measure out without straining. Reserve the rest for topping the cheesecake.
  8. Cheesecake: while the blueberry and gelatine mix is cooling, beat the cream cheese and sugar in a bowl until smooth, making sure no lumps are left on the sides of the bowl as these will not mix in later and leave you with lumps in your mix.
  9. Beat in the cream, and then gently fold through the cooled blueberry gelatine syrup.
  10. Spoon tablespoons of the filling into the tart shells and refrigerate for an hour minimum.
  11. Top the cheese cakes with reserved jam and fresh blueberries or flowers. Serve and enjoy!

Blueberry Cheesecake Tarts (Gluten Free)

Blueberry Cheesecake Tarts (Gluten Free)

Recipe Copyright © 2017 | thebeardedpatissier

BON APPÉTIT

– Simon Swadling aka The Bearded Patissier

myTaste.com

Beetroot & White Wine-cured Ocean Trout Tartare

Beetroot & White Wine-cured Ocean Trout Tartare

Hello Everyone! Finally I am (sort of) back on track with things on here and I apologise for falling behind. Things have been starting to build up at work and my quieter days are starting to become a little hectic, but still not full on crazy at least. That’s bound to happen somewhere in October and I am so not looking forward to late nights in the office and puffing up the eye bags then.

So! As always when I say this (but never happens), I’m going to keep tonight’s post short because it’s late and I need sleep. The theme for the month of July on Amcarmen’s Kitchen is BEETROOT! If you remember from my post earlier this year in January, beetroot is one of the 20 foods I listed out that can help lower your blood pressure. People with High Blood Pressure saw significant improvements from drinking beetroot juice. The nitrates found in the juice brought down one’s high blood pressure within just 24 hours. If you’re not too keen on drinking beetroot juice, you can easily roast or steam the whole root and add it to a green-packed salad, stir-fry, or stews.

If I’m being honest, I never really took a liking to the taste of beetroot. For me it always had this aftertaste of eating soil – probably because of it’s earthy flavour to begin with. Anyway, even if I’m not too fond of it, who know, maybe by the end of the month beetroot might be my new favourite vegetable. Tonight’s recipe is a classic with a modern twist to it:

For the beetroot & white wine cure

Beetroot & White Wine-cured Ocean Trout Tartare Ingredients

For the tartare

Beetroot & White Wine-cured Ocean Trout Tartare Ingredients

PREP TIME 20 MINS* | COOKING TIME  | SERVES 2-3

*Please allow 24-36 hours for the curing of the ocean trout before proceeding with the tartare recipe.

INGREDIENTS

For the beetroot & white wine cure

  • 800g smoked ocean trout fillet (skin removed)
  • 100ml white wine
  • 100g salt
  • 100g sugar
  • 1 large beetroot, grated
  • Juice of 1 lemon

For the tartare

  • 800g smoked ocean trout fillet, cured in beetroot and white wine
  • 1 medium-sized free range egg, yolk only
  • 1 small shallot, minced
  • 2 tsp baby capers
  • 1 & 1/2 tsp extra virgin olive oil
  • 1 tsp salmon roe (optional)
  • Cooked beetroot cubes
  • Juice of 1/2 a lemon
  • Zest of 1 lemon
  • Sweet marjoram leaves
  • Ground sea salt and black pepper, to taste
  • Thin wafer, to serve

METHOD

  1. In a medium-sized bowl, mix together the white wine, salt, sugar, lemon juice, and grated beetroot.
  2. If needed, cut your smoked ocean trout fillet into two pieces to fit into a zip lock bag. The bigger the piece, the longer that the flavours will take to infuse into the trout.
  3. Place the trout inside the ziplock bag and pour the beetroot cure mixture into the bag with the trout. Ensure that all edges of the trout are well coated. Seal the bags and place in the fridge. Turn every 12 hours, and then remove from the fridge after 24-36 hours.
  4. Remove from bag, rinsing off cure mixture, and  pat dry with paper towel.
  5. Dice finely and place into a medium-sized bowl together with the minced shallots, olive oil, ground sea salt and black pepper, lemon juice, lemon zest, and sweet marjoram leaves. Toss to combine.
  6. Plate up accordingly, and top the tartare with baby capers, beetroot cubes, sweet marjoram leaves, egg yolk, and salmon roe (optional). Serve with a thin wafer, in my case we served with a spicy wafer for an added kick to the dish. Enjoy!

Beetroot & White Wine-cured Ocean Trout Tartare

Beetroot & White Wine-cured Ocean Trout Tartare

BON APPÉTIT

– Ally xx

myTaste.com

Lemon, Butter & Ginger Tilapia en Papillote

Lemon, Butter & Ginger Tilapia en Papillote

Hello Everyone! Before I begin with tonight’s post I would like to apologise for not getting this post up last week, I actually had it prepared and ready to go – I just needed to edit the pictures for the post. But this time last week I was rushing to get ready and out of the house in an hour after arriving home from work to pick up a few friends and then off to another friend’s house for Raya celebrations. So that night, I didn’t get to go home until about past 11pm and when I was finally ready for bed, it was just past midnight and I had work the next day. I was going to post the next day or at least before the new month but I never got around to doing it until it ended up being Wednesday again. Whoops! Anyway, before we push through, I’d like to take this opportunity to wish all my Muslim family and friends in Brunei and around the world a belated Selmat Hari Raya! Maaf Zahir dan Batin. For those of you who don’t know on Monday (here in Brunei that is) marked the end of the fasting month, also known as Ramadhan.

Tonight’s recipe I will be sharing with you is simple yet flavourful. “En papillote” is French for in parchment, or if in Italian is known as al cartoccio where it is a method of cooking in which the food is put into a folded pouch or parcel of parchment paper and then baked. You can literally put anything into this parcel so feel free to get creative in mixing up flavour combinations that are to your liking. I decided to make a spring onion and ginger oil to serve with the fish just to enhance the flavours a little more, but feel free to omit this as well if you wish.

Lemon, Butter & Ginger Tilapia en Papillote Ingredients

PREP TIME 10 MINS | COOKING TIME 10-12 MINS | SERVES 4

INGREDIENTS

For the en papillote

  • 2 large tilapia fish, scaled and filleted
  • 4 x 10g unsalted butter
  • 2-3 garlic cloves, minced
  • 2-inch sized ginger, peeled and sliced
  • 1 lemon, sliced
  • 4 tsp whole black peppercorns
  • Pinch of ground sea salt, to taste

For the spring onion and ginger oil

  • 4 stalks spring onion, sliced thinly
  • 3 tbsp peanut oil
  • 2 tbsp grated ginger
  • 1/2 tsp salt
  • Asparagus stalks, blanched in salted water
  • Touch of paprika, for garnish

METHOD

  1. Preheat oven to 230C (450F or gas mark 8). Cut 4 pieces of parchment paper, about 25cm in length (or bigger if needed depending on the size of your fillets).
  2. Line a few of the ginger slices on the parchment paper and place 1 fillet on top, adding all the other ingredients. Fold parchment over fish, making small overlapping folds along edges and sealing with a paper clip. Place on rimmed baking sheets. Roast until parchment puffs, 10 to 12 minutes.
  3. While the fish is cooking away you can work on the spring onion and ginger oil. add the spring onions, ginger and salt to a heatproof mortar and pound lightly with the pestle. Heat the oil in a small frying pan until smoking and pour onto the mixture. Once the sizzling stops, combine lightly with the pestle and leave to infuse for a few minutes.
  4. One the fish are done, remove from the oven and transfer the parcels to Carefully cut packets, avoiding escaping steam, and serve.

Lemon, Butter & Ginger Tilapia en Papillote

Lemon, Butter & Ginger Tilapia en Papillote

BON APPÉTIT

– Ally xx

myTaste.com

Sarciadong Tilapia (Tilapia Braised in Sautéed Tomatoes)

Sarciadong Tilapia (Tilapia Braised in Sautéed Tomatoes)

Hello Everyone! I hope everyone had a much better than weekend than I did! I say this because I got called to work on Sunday for an event; it was towards the end of a Saturday work day and I was excitedly looking forward to a do-nothing Sunday when I got a text from my supervisor asking if I was free to work and help out with an event. I sighed when I saw the message, and was tempted to say “no I’m not free because it’s Sunday”. I probably would’ve gotten an earful on the Monday though, so being the ever so star employee (no not really) that I am, I said “yes I’m free”. So there went my only day off. I’m definitely looking forward to this weekend though for the long weekend; 3 days off (including Sunday) and a short start to next week! I’ll definitely be using this time to experiment in the kitchen.

Anyway, that aside, the recipe that I will be sharing with everyone tonight is a classic favourite in the Geronimo household. Ever since I was a little kid, this dish will always somehow make it’s way to the table either for a delicious lunch, or a warm hearty dinner. Sarciado (sar-shee-ah-doh) is a fish dish from the Philippines that predominantly features tomatoes and eggs. The name sarciado in the Tagalog language means cooked with a thick sauce where the word “sarsa” is derived from the Spanish word “salsa” meaning sauce.

It is essentially a combination of two separate dishes: “piniritong isda”(fried fish), and a tomato-scrambled eggs “sarsa” sautéd in a flavour combination of garlic, onions, ginger, and fresh tomatoes. Traditionally, the dish was developed as a way to make leftover fried fish into a whole new dish that is both appetising and hearty. It may seem strange to put fish and eggs together, but trust me, they do go very well together. Having said this though, the dish does not solely rest its fate on leftover fried fish – there’s not stopping you to whip up this dish using a freshly fried fish of any kind really – mackerel, snapper, grouper, or even tilapia works well. For the recipe that I will be sharing tonight, I have chosen to fry up some beautiful fresh saltwater tilapia.

Sarciadong Tilapia (Tilapia Braised in Sautéed Tomatoes) Ingredients

PREP TIME 20 MINS | COOKING TIME 30 MINS | SERVES 4

INGREDIENTS

  • 2 whole tilapia (about 500g each), gutted, scaled, and cleaned
  • 1 cup fish stock*
  • 2-3 garlic cloves, minced
  • 2 medium-sized tomatoes, diced
  • Thumb-sized ginger, peeled and sliced thinly
  • 1 large free range egg, lightly beaten
  • 1 small brown onion, halved and then sliced thinly
  • Ground sea salt and black pepper, to taste
  • Fish sauce, to taste
  • Turmeric powder
  • Spring onions, chopped
  • Vegetable oil, for frying

*I have a lot of fish heads and bones left over from the previous two recipes which can be found here and here, so I decided to drop them into a pot of water together with salt, garlic cloves, whole black peppercorns, ginger slices, and some dried bay leaves. Left to simmer for about 45 minutes to an hour and you’ve got yourself a lovely fish broth. Alternatively you can just use water instead of fish stock.

METHOD

  1. Heat about 1/4 cup of vegetable oil in a large frying pan over medium-high. Season the tilapia fish with ground sea salt, pepper, and rub the turmeric powder into the fish. Fry the fish until golden and cooked through, about 4-5 minutes and then flip the fish over and cook the other side for a further 3-4 minutes. Once done, transfer to a plate lined with a paper towel to soak up any excess oil. (If you are using leftover fish, skip this part and move on to step 2).
  2. Remove some of the oil from the large frying pan, leaving about a tablespoon behind. Bring the heat down to medium and sauté the ginger and minced garlic together until fragrant and golden brown, about a minute. Add the onions in and cook until soft, a further 1-2 minutes.
  3. Add the tomatoes, toss and leave to cook until the tomatoes are soft, about 2-3 minutes. Once soft, add the fish stock (or water) and cook for a further 3-4 minutes until the sauce is brought to a simmer. Season with a bit of fish sauce, adjust to your liking, and ground black pepper.
  4. Place the fish in the pan and cover it with the sauce while leaving it to braise (quickly), about 5 minutes. Pour the egg into the sauce and quickly mix until well combined. Turn the heat off before the egg completely solidifies.
  5. Transfer to a serving dish and top with some chopped spring onions (unlike me where I completely forgot, though optional). Serve immediately with hot steamed rice and enjoy!

Sarciadong Tilapia (Tilapia Braised in Sautéed Tomatoes)

BON APPÉTIT

– Ally xx

myTaste.com

Sweet Gourd Noodles with Tilapia & Egg White Soup

Sweet Gourd Noodles with Tilapia & Egg White Soup

Hello Everyone! I hope that this time around I say that I will keep a post short, that I will actually keep it short *fingers crossed (yet no promises will be made)*. Continuing on with the theme of hero-ing tilapia in all recipes for the month of June, tonight I will be sharing a recipe that I came across last year during a corporate dinner with Ambassadors from a few Southeast Asian countries as we celebrated the Ambassador of Cambodia’s farewell from Brunei. How did a score an invite to a dinner with high-ranking officials? Well, it’s not hard to when your Boss has the connections.

Tangent aside, it was during this dinner that I came across this particular dish that I will be sharing with you guys tonight. I honestly have no clue what the dish is called, as in if there is a special name for it so I do apologise for the blunt name – just calling it as I see it! Anyway, as I recall, the dish didn’t have slices of tilapia in it, I just added it on for extra flavour and protein to the overall dish. I know that the dish doesn’t sound like it packs a lot of flavour to it, well I think it isn’t supposed to anyway. From what I remember, the broth was subtle in taste, and what really shined through was the sweetness of the sponge gourd and a little pop of sour from the goji berries. Honestly, I’m not exactly sure what the egg white does to help the dish as I know it’s rather bland in flavour – maybe to give the broth some texture?

Sweet Gourd Noodles with Tilapia & Egg White Soup

Anyway, I remember really enjoying the dish that night and last weekend I decided to give the dish a go based from the ingredients that I recognised, playing around with flavoring the broth, and of course incorporating tilapia into the overall dish. I’ll be honest and say that I was a bit nervous going blindly into this recipe with having only tried the dish once just shy of a year ago, but it turned out to be a delicious hit!

Sweet Gourd Noodles with Tilapia & Egg White Soup Ingredients

PREP TIME 10 MINS | COOKING TIME 1 HOUR | SERVES 4

INGREDIENTS

  • 750g tilapia, filleted and sliced, heads and bones reserved
  • 1 large sweet gourd, peeled and cut into long thin strips (like noodles)
  • 2 large free range egg whites
  • Handful of dried goji berries

For the fish broth

  • 1L water
  • 3-4 garlic cloves
  • 2-3 dried bay leaves
  • 2 tsp salt
  • 2 tsp whole black peppercorns
  • Reserved tilapia heads and bones
  • 1 tbsp cornstarch + 1 tbsp water

METHOD

  1. Add all the ingredients for the fish broth into a large pot and bring to a boil. Once boiling, bring the heat down to low and allow the broth to slowly simmer for about 30-45 minutes. Once done, strain out the tilapia heads, bones, garlic cloves, peppercorns, bay leaves, and discard.
  2. Meanwhile, soak the goji berries in hot water for about 5 minutes. Drain and then set aside.
  3. Bring the heat back up to high and the broth to a rapid boil. Add the sweet gourd noodles to the broth and cook until tender but still has a slight crunch to it, about 2-3 minutes altogether, or longer if you prefer it soft. Once done, strain and then divide evenly into each single serving deep dish.
  4. Add the fish slices into the broth and quickly blanch until cooked through, about 1-2 minutes. Strain and then divide evenly.
  5. Drizzle the egg whites into the broth a little at a time using a fork to continuously stir into the broth as the egg whites are dropped in. Eggs whites would cook immediately.
  6. Once the eggs whites have been dropped, gradually stir in the cornstarch and water mixture into the broth until the soup is thickened to your desired consistency. Turn the heat off and divide the soup evenly between the individual serving dishes.
  7. Top the dish with the goji berries and a touch of ground black pepper. Serve immediately and enjoy!

Sweet Gourd Noodles with Tilapia & Egg White Soup

BON APPÉTIT

– Ally xx

myTaste.com