The Belrose Hotel

The Belrose Hotel will become the destination on Sydney’s North side for a comfortable and quality family dining experience. The Belrose Hotel has long been famous for delicious food and a friendly family feel, and it’s about to get even better. Since they have restyled their services recently, their graphic style plays on the family and food aspect, to promote their re-opening via social media to get across a wider, yet still specific audience – focusing on families living in Sydney’s North.

The Belrose Hotel Context


Examples of graphic works that I have created for Facebook and Instagram:
(Click on the images to see an enlarged version of the graphics)

The Belrose Hotel: Family Friendly The Belrose Hotel: Family Friendly The Belrose Hotel: Happy Hour The Belrose Hotel: Family-friendly Valentine's Day 2015
The Belrose Hotel: Staff Profile The Belrose Hotel: Customer Review The Belrose Hotel: Staff Profile The Belrose Hotel: Customer Review
The Belrose Hotel: Menu The Belrose Hotel: Menu The Belrose Hotel: Menu The Belrose Hotel: Menu

Besides creating weekly content for Facebook and Instagram, I also created Facebook Page Like Ads, below are three examples:

The Belrose Hotel: Facebook Page Like Ad

The Belrose Hotel: Facebook Page Like Ad

The Belrose Hotel: Facebook Page Like Ad

– Ally xx

Kale Smoothie with Almonds, Banana, & Pineapple

Kale Smoothie with Almonds, Banana, & Pineapple

Hello Everyone! I’ve got another brekky smoothie recipe for you today, and some may find this unusual at first, but it actually works! I must admit, I was once cynical about the idea of adding vegetables to a smoothie. That changed when I moved to Australia and saw kale juices/smoothies pop up here and there in many local cafés in and around Sydney. I’d always see my friends with a take away cup of green smoothies that were either made up of kale or spinach included in them. To be honest, I’ve never tried a kale smoothie before and this is the first time I’m making and trying one! I’ve had kale before, and to me, it doesn’t have a distinct taste to it, so I was glad that the non-exsitent kale flavour didn’t shine through in the smoothie. Instead, you can taste the almonds, bananas, and pineapple which was nice. However, after having done some research, kale apparently does have a strong flavour that many might be used to, so when making a green smoothie using kale, you should use strongly flavour fruits such as strawberries or pineapple to help mask the flavour (possibly why I personally could taste the kale because I use pineapple in my green smoothie).

Before I begin with this simple green smoothie recipe, I want to talk to you a little bit about the health benefits of adding kale to your smoothie. Kale helps cut the sweetness of the fruits added, and has more than twice the recommended daily value of calcium to your diet. It is an excellent leafy green to use for detox as it contains cleansing properties. In addition, kale has a lot of vitamins and also contains powerful antioxidants that help protect your immune system and fight against certain cancers. If you want to read more about the health benefits of kale, please click here. Now, you may substitute kale for spinach if kale isn’t readily available where you are; I know that it’s not very cheap to get kale here in Brunei since it’s air-flown in from Australia.

The original recipe can be found over on Real Simple; all I did was again, change the quantities to serve about 3-4 tall glasses. I also decided to substitute the coconut milk for fresh coconut water as most coconut milk that you find here in Brunei are straight out from a tin and have a whole lot of preservatives added to them. You can use coconut water from the shelf if you don’t have fresh coconut water readily available but I personally hate those because they taste very artificial to me. Otherwise, you can also just use water. I read in the comments section of the site as well that someone added almonds to the smoothie for that added protein, so feel free to add your favourite nuts into the mix as well when you make your smoothie!

Kale Smoothie with Almonds, Banana, & Pineapple Ingredients

PREP TIME 5 MINS | COOKING TIME  | SERVES 3-4

INGREDIENTS

  • 2 & 1/2 cups kale, stemmed and roughly chopped
  • 1-2 cups fresh coconut water
  • 1/3 cup almonds
  • 1/2 medium-sized pineapple, chopped
  • 2 ripe bananas, chopped

METHOD

  1. Combine all the ingredients in a blender in this order: bananas, almonds, pineapple, kale, and 1 cup of coconut water. Pulse a couple of times to mix up the ingredients in the blender a bit and then blend on high for about 30 to 60 seconds. Add more coconut water if needed to reach your desired consistency.
  2. Serve immediately and enjoy!

Kale Smoothie with Almonds, Banana, & Pineapple

BON APPÉTIT

– Ally xx

myTaste.com

Gingery Berry & Oat Smoothie

Gingery Berry & Oat Smoothie

Hello Everyone! For this week of breakfast/brunch month, I have some simple brekky smoothies for you that you can easily prepare the night before, whizz it in the blender in the morning, and voilà; you’ve got a quick brekky that you can take with you to go if you really need to. I’ve never really been the type to make my own smoothies at home, not until my second year of uni back in 2012 when my flatmate at that time started making smoothies for the both of us on the weekends. She would always make the same banana and blueberry smoothie with full cream milk, old-fashioned rolled oats, and vanilla yoghurt. Ever since then, I would whip up this easy smoothie whenever I felt like it even after we went our separate ways. I’ve also made a strawberry smoothie with the same ingredients, just taking out the bananas and blueberries, and added mint into the mix; it was a really good smoothie too.

Anyway, I won’t be sharing those two recipes with you this week as I’ve got two completely different (maybe in some way a little bit similar) smoothies for today and Thursday. I decided try new smoothie recipes and for today’s post, I came across a recipe for a Blueberry and Oat Smoothie; now I know this is sounding a little similar to the smoothie that I mentioned above, and that I’m used to making, but what makes this different is the touch of ginger added. I don’t think I’ve had a smoothie with ginger in it before so I thought that I’d give this recipe a try; original recipe can be found over at Real Simple. All I’ve really done was change the quantities to serve 3-4 tall glasses, as well as reducing the amount of sugar.

Gingery Berry & Oat Smoothie Ingredients

PREP TIME 20 MINS | COOKING TIME  | SERVES 4

INGREDIENTS

  • 1 & 1/2 cup frozen blueberries
  • 1 & 1/2 cup water
  • 1 cup creamy vanilla yoghurt
  • 1 cup ice
  • 3/4 cup old-fashioned rolled oats
  • 4 tbsp brown sugar
  • 3/4 tsp fresh ginger, grated

METHOD

  1. Add the oats and water to a blender and leave to soak until the oats have softened, about 15 minutes.
  2. Add the ice, blueberries, yoghurt, brown sugar, and ginger to the blender. Blend until smooth and frothy, about 2-3 minutes.
  3. Serve and enjoy!

Gingery Berry & Oat Smoothie

I’ve read a few of the comments on the site where the original recipe was uploaded, and some said that the oats had a weird texture and made the smoothie grainy and starchy. Some didn’t like the addition of the ginger and made their stomachs upset. So I guess this smoothie is not for everyone, but if you think you’d enjoy all these flavour into one drink, then go ahead and give it a try because it’s definitely delicious! I personally thought that the oats were fine and still gave the smoothie a nice flavour and texture to it; I feel that without it, the smoothie would be quite loose. The ginger, though quite a strong flavour, paired well with the sweet blueberries and helped cut down the sweetness of the smoothie from the added sugar.

BON APPÉTIT

– Ally xx

myTaste.com

Oliving by Hans

Oliving by Hans products are a uniquely delicious combination of the finest meat and olive oil, but also offer guaranteed quality and low fat content. The message that they want to push through on social media is the idea that their products are made with olive oil and less saturated fat than traditional smallgoods, making them a healthier choice to ones diet. My designs have been approved and went live on various social media platforms including Facebook, Instagram, Twitter, and Pinterest.

Oliving by Hans Context


Examples of graphic works that I have created for Facebook and Instagram:
(Click on the images to see an enlarged version of the graphics)

Oliving by Hans: Mozzarella Pizza Oliving by Hans: Bacon High-5 Oliving by Hans: Don't Go Bacon My Heart Oliving by Hans: Happy Australia Day
Oliving by Hans: Party Platter Oliving by Hans: Twiggy Sticks Oliving by Hans: Find Us in the Deli Oliving by Hans: The Hans Revolution Run

Oliving by Hans: Kabana & The Benefits of Olive Oil

Examples of graphic works that I have created for Pinterest:
(Click on the images to see an enlarged version of the graphics)

Oliving by Hans: Kids Pizza Oliving by Hans: Smoked Ham Sandwich Oliving by Hans: Mediterranean Parcels
Oliving by Hans: Roasted Asparagus Oliving by Hans: Mozzarella Pizza Oliving by Hans: Spaghetti Turkey

– Ally xx

Congee with Minced Pork & Century Egg

Congee with Minced Pork & Century Egg

Hello Everyone! So continuing on with the idea of porridge from Tuesday’s post, I decided to whip up a classic congee dish. The origins of congee are unknown, but several historical accounts have shown that this dish was served during times of famine as a way to stretch the rice supply in order to feed more people. Despite that, congee is one of the traditional Chinese foods that has a history dating back to thousands of years in China. It is now a largely popular dish in many Asian countries and though it has many variations, its base is usually a thick porridge of rice that has been cooked in water or stock for a prolonged time. When it is eaten as a plain rice congee, you often eat it with other side dishes, but when additional ingredients such as meat and other flavourings are added, it can be a meal on its own. Depending on your cultural background, congee is eaten as a substitute for rice, but is known to be primarily eaten for breakfast or late supper. It is also considered suitable for young children or for those who are ill as it is a mild and easily digestible dish.

Now before I go on to the recipe, I thought I’d talk a little bit about what a century egg is. For those of you who don’t know, century egg (also know as a preserved egg), is a Chinese delicacy traditionally made by preserving duck, chicken, or quail eggs, in a mixture of clay, ash, salt, quicklime, and rice hulls for several weeks, or even months. Through this process, the yolk turns dark green to grey in colour, acquiring a creamy consistency and a strong flavour. On the other hand, the egg white becomes jelly-like and translucent, dark brown in colour, and salty in flavour. I know what you’re thinking, sounds disgusting right? I’ll be honest with you, it took me a while to be able to get over its looks and smell. I still don’t love it, but it’s definitely good with congee! To prepare these eggs for the congee, you simply just have to wash off the mixture of clay, ash, salt, quicklime, and rice hulls that cover the egg. I recommend washing it outside as to not clog your sink with all the residue. Tap the eggs on a countertop until covered in cracks, and then peel the shell off.

Preserved Century Egg

As mentioned before, there are many variations in which you can have your congee; plain or dressed up with your favourite ingredients – it’s all up to you really! At breakfast/brunch buffets (that’s when I usually indulge in some yummy congee), you’re given a selection of toppings to accompany your plain congee. I usually go for the whole works which included century egg, fried cha kueh (deep fried dough), crispy fried shallots, spring onion, and some sesame oil.

Congee with Minced Pork & Century Egg Ingredients

PREP TIME 10 MINS | COOKING TIME 45-60 MINS | SERVES 6-8

INGREDIENTS

  • 250g lean minced pork
  • 2.5L homemade or store-bought chicken broth
  • 2 cups rice, uncooked*
  • 2-3 century eggs
  • 2-3 garlic cloves, minced
  • 2-3 shallots, sliced thinly into rings
  • 1 cha kueh**, sliced thinly
  • 1 small bunch spring onions, chopped
  • 1 thumb-szied ginger, peeled and sliced
  • 6 tbsp vegetable oil
  • Fish sauce, to taste
  • Ground salt and black pepper, to taste

*You can also start with cooked rice, adding chicken broth and adjusting the amount of liquid to achieve the desired consistency. Make sure that when the rice has swelled, mash it a bit to help it break down.

**Cha Kueh (You Cha Kueh) is a Chinese deep-fried dough that is chewy yet crispy; a delicious snack that is normally paired with coffee or tea in the mornings or afternoons. There is a certain level of skill and expertise needed to knead the dough to the right consistency, as well as deep-frying techniques, to make the perfect cha kueh. So, if you want, you can make your own cha kueh, or if it’s readily available in stores nearby, then you can just buy it already cooked. I guess croutons can also substitute if both are not an option for you, or you can leave this element out completely. I like to include it in my congee for an added texture of crunch.

METHOD

  1. Bring a large pot of the washed, uncooked  rice and chicken broth to a simmer over medium heat. Once it starts simmering, reduce the heat down to low. Stir occasionally to avoid the rice sticking to the bottom of the pot and burning. Simmer until the rice has softened, broken down, and the mixture is creamy with the consistency of a porridge, about 45 to 60 minutes. If you need to, add more chicken broth to adjust the consistency as it cooks.
  2. While the rice is cooking, you can move on to preparing the minced pork and shallots. In a medium-sized frying pan, heat the vegetable oil over medium-high and add the sliced shallots in. Cook, stirring continuously, until the shallots are golden and crispy; it should take about 5 minutes altogether. If you need to, adjust the heat so that they do not burn. Once done, transfer the shallots to a heatproof bowl.
  3. In the same pan with the oil, add in the slices of cha kueh and fry until golden and crispy, about a minute per side. Transfer to a plate lined with a paper towel to soak up the excess oils.
  4. In the same pan again with about a tablespoon of the oil, fry up the ginger slices until fragrant, then add in the garlic and sauté until golden and fragrant, about 2-3 minutes altogether. Add in the minced pork and season with a bit of salt and black pepper. Give it a good mix, breaking up the pork into small pieces as it cooks, and then leave it until cooked through and browned, about 8-10 minutes.
  5. When the porridge is ready, stir in the pork and season to taste with some fish sauce. Divide the porridge equally into individual-sized bowls and top with the century egg, fried cha kueh, crispy fried shallots, and spring onion. Serve immediately and enjoy!

This slideshow requires JavaScript.

BON APPÉTIT

– Ally xx

myTaste.com

Arroz Caldo (Chicken Rice Porridge)

Arroz Caldo (Chicken Rice Porridge)

Hello Everyone! Today’s recipe is a dish that is quite well-known in the family, and across the Philippines I presume, as the go to dish when someone is feeling under the weather. In our house, you’d know when someone is sick with the flu when you see this dish on the table for everyone to eat; yes that’s right, you don’t have to be the sick one to have a bowl of arroz caldo! However, besides it well-known as the go to dish for the sick, arroz caldo is also a common breakfast dish as it can be quite filling, providing you with the energy that you’d need to last you until lunch time. It can also be a snack (merienda) dish with tokwa’t baboy (a dish composed of boiled pig’s ears and/or pork belly, and fried tofu with a vinegar, soy sauce, and chilli dip on the side).

Arroz Caldo is actually of Chinese origin as it draws resemblance to a type of risotto-like congee. The name of this dish however, was given by the Spaniards due to pronunciation issues. The dish is also similar to other Filipino porridges such as lugaw and goto, the only distinguishing ingredient would be that arroz caldo mainly uses chicken while goto requires the use of tripe, beef, and innards. Lugaw on the other hand, is as plain as it can get.

So I made this dish back when I was in Sydney, a few weeks before I left in early August. I was staying at Marissa’s place for the time I was there and we both fell ill at one point during my stay. I can’t quite remember who fell sick first and who gave who the sickness, but all I remembered was that I made this dish for the both of us. I even told her the story behind this dish and she even made mention that they have a similar Vietnamese dish known as Cháo Ga (also fed to those who were feeling under the weather).

Arroz Caldo (Chicken Rice Porridge) Ingredients

PREP TIME 10 MINS | COOKING TIME 45 MINS | SERVES 4-6

INGREDIENTS

  • 500g chicken mid-wings, washed and cleaned
  • 1.5L water
  • 2 cups rice, uncooked and washed
  • 4 large free range eggs, hard-boiled and sliced
  • 2-3 garlic cloves, minced
  • 1 large brown onion, sliced
  • 1 lemon (or calamansi if available)
  • 1 thumb-sized ginger, julienned
  • 2 tbsp fish sauce
  • 2 tbsp vegetable oil
  • 2 tsp chicken stock powder
  • Ground black pepper to taste
  • Crispy fried shallots
  • Spring onions, sliced

METHOD

  1. Heat the vegetable oil in a large pot over medium-high. Add the ginger and fry until fragrant, then add in the garlic, sautéing until fragrant and golden brown. Then add in the onions and cook until soft, altogether about 2-3 minutes.
  2. Add the chicken mid-wings to the pot and season with the chicken stock powder and ground black pepper. Give it a good mix and cook for about 6-8 minutes or until the outer layer of the chicken starts to brown. Then add in the water and bring to a boil. Once boiling, cook for a further 5 minutes and then scoop out the chicken mid-wings and set aside*.
  3. Add the washed, uncooked rice and mix well, stirring occasionally. Turn the heat down to low-medium and leave it to simmer until the rice is fully cooked (about 30 to 40 minutes). Stir occasionally just to make sure that the rice doesn’t stick to the bottom of the pot. In the last 10 minutes of cooking time, you may return the chicken mid-wings to the pot to heat them up again before serving the dish.
  4. Taste and if the porridge needs a bit more seasoning, add some fish sauce and adjust to your liking.
  5. Divide the porridge into bowls equally and top with the chicken and sliced hard-boiled eggs. Garnish with a pinch of crispy fried shallots, spring onion, and a squeeze of lemon juice (you may add some saffron threads for aroma and colour).
  6. Serve hot and enjoy!

*You don’t usually scoop the chicken out, but because I didn’t want the chicken to become too soft and start breaking apart, so I took them out. The reason is just because I don’t want them to look aesthetically displeasing on the dish for the photograph really. Otherwise, leaving them in until they fall of the bone is what you would like to achieve with this dish.

Arroz Caldo (Chicken Rice Porridge)

Arroz Caldo (Chicken Rice Porridge)

BON APPÉTIT

– Ally xx

myTaste.com

Iku Wholefood

Iku Wholefood believe that nutritious food is essential for good health and vitality: Food that is natural, wholesome, authentic, freshly prepared and tasty. The style of graphic content that they want push through on Facebook and other social media platforms, are Natural & Organic – which as advised from the founder of Iku, a lot of green, and wood textures. This is to conceptually portray the message that all their foods are dairy free, additive free, preservative free, animal free, and free from genetic modification.

Iku Wholefood Context


Examples of graphic works that I have created for Facebook and Instagram:
(Click on the images to see an enlarged version of the graphics)

Iku Wholefood: Myth Iku Wholefood: Fast, Healthy Food Iku Wholefood: Well Being Iku Wholefood: Ken Israel
Iku Wholefood: Breakfast Iku Wholefood: Raw or Cooked? Iku Wholefood: Quotes BW Richardson Iku Wholefood: Beans
Iku Wholefood: Food was created perfectly Iku Wholefood: What's your story? Iku Wholefood: Cold Pressed Juice Iku Wholefood: Balanced Diet

– Ally xx

Breakfast Plate

Breakfast Plate

Hello Everyone! I can’t believe that it’s already October! Where did September go?! So I’m sure all of you are aware that a new month calls for a new theme on the blog for the month of October! Those of you who know me, I am a breakfast/brunch person. I mean, I sometimes skip breakfast when the mornings just get a little too hectic for me; that was during my first few years at uni, but towards the end, I made it a habit to pack my breakfast to uni and/or work and eat it there.

I remember my internship days at Hello Social where I’d always be rushing out in the mornings to catch my bus, which therefore meant that I didn’t have time to sit down and enjoy my breakfast. That was where Muffin Making Mondays with Jialing came in, and when I had run out of muffins to take to work (because we only bake fortnightly), I would pack some fruits and even sometimes a small tupperware of cinnamon toast cereal with one of those small drink cartons of milk. When I’d get to the office, I’d pour the milk over my cereal and enjoy breakfast at my table. There was a time where one of the managers asked me what I was having for breakfast and the thought of me bringing a small carton of milk made her laugh so hard. I told her it was practical 😛 Another time when I was also having cereal, my other manager asked if what I was having was shareable; to his dismay, cereal ain’t shareable! He asked what kind of cereal I brought in and I said cinnamon toast. The other manager said that that was so American of me.

Anyway, I mean, if you didn’t already gather what this month’s theme is from my little story, yes it’s breakfast and brunch month on the blog! For the month of October I will be sharing with you some of my favourite breakfast/brunch recipes! I’ll be kicking off tonight’s post with a dish that I threw together when I was still living in Sydney. I was inspired by a post that I saw on Instagram by Raw Pawpaw Café in Brisbane. I was inspired by their plating of one of their dishes, and decided to plate it up with a few of my favourite ingredients for breakfast. I think most of the preparation of the ingredients in this dish is pretty straight forward, and you can get creative yourself by mixing up the ingredients a bit by adding your own favourite breakfast ingredients!

Breakfast Plate Ingredients

PREP TIME 5 MINS | COOKING TIME 20-22 MINS | SERVES 1

INGREDIENTS

  • 2-3 slices of soy & linseed bread, toasted
  • 2 bacon rashers
  • 2 large free range eggs, at room temperature
  • 1 chorizo sausage, thick slices
  • 1/2 avocado, cut into chunks
  • Bunch of grape vine tomatoes
  • Butter, for spreading
  • Ground salt and black pepper to taste
  • Handful of cup mushrooms, sliced
  • Handful of loose baby spinach leaves
  • Lemon wedges, to serve
  • Olive oil

METHOD

  1. In a small bowl, marinate the avocado chunks with a little bit of olive oil, salt, pepper, and lemon juice. Set aside.
  2. Preheat oven to 200C. Line a baking tray with aluminium foil and toss the grape vine tomatoes in a little bit of olive oil and salt. Roast in the oven fro about 10 minutes, or until the tomatoes have gone soft. Turn the temperature down to about 80-90C just to keep them warm before serving.
  3. Meanwhile, heat a large grill pan over medium high and cook the bacon rashers and chorizo slices, about 3 minutes per side. Once done, transfer to the baking tray and keep warm in the oven.
  4. Add your sliced mushrooms to the same grill pan and cook until browned and softened, about 4-5 minutes altogether. Turn the heat off and transfer to the baking tray and keep warm in the oven.
  5. Place the eggs in a small saucepan, covering the eggs with cold water. Bring to a boil over high heat, and once boiling, reduce the heat down to medium. Simmer gently for about 3 minutes. Remove the saucepan from the heat and using a slotted spoon, transfer to the egg carton.
  6. Plate up accordingly and enjoy your breakfast!

Breakfast Plate

Breakfast Plate

Just a little side note here before I end tonight’s post – I wanted to choose an egg carton that wasn’t grey just so that it doesn’t look dull. I must say it was hard choosing eggs based on the colour carton they come in because most of the non-grey ones were caged eggs (yes, I don’t buy caged eggs). Good thing these eggs that came in the blue carton were free range, and the blue really suited the plating and contrasted the food colours nicely.

BON APPÉTIT

– Ally xx

myTaste.com

Pesang Tilapia (Tilapia in Ginger Stew)

Pesang Tilapia (Tilapia in Ginger Stew)

Hello Everyone! I’m feeling sad, are you? Well, the only reason I’m sad is because Seafood Month has come to an end! I can’t believe the month has flown by so quickly. On the bright side, we get to explore a whole new range of dishes for the month of October! I won’t say yet what I have in store for the blog, so you’ll just have to stay tuned as all will be revealed on Thursday!

Pesang Tilapia (Tilapia in Ginger Stew)

So here we go, on to our last recipe for Seafood Month: Pesang Tilapia! Apparently, frying the fish first is not the traditional method in making Pesang Isda (isda means fish in Tagalog just for those who don’t know), it is actually boiled in the ginger stew until tender, and is actually a much healthier option as opposed to frying the fish. However there are a few pros to frying the fish first, mainly for taste and also technique. Firstly, frying makes the fish and stew taste better, and secondly, frying prevents the fish from flaking, because of its stable texture ,when cooked in the stew for a long time.

I’ve read a couple of recipes online prior to writing this post up, and a few suggestions have come up on what to serve on the side with this dish. One of the most popular is having some miso sauce as a condiment. I usually just have some fish sauce and calamansi mixed together as a condiment. I’ve also tried searching around for recipes that make any mention of serving this dish with some filo-style scrambled eggs but I haven’t seen any. Nonetheless, it actually tastes really good having the scrambled eggs together with the fish!

Pesang Tilapia (Tilapia in Ginger Stew) Ingredients

PREP TIME 5 MINS | COOKING TIME 20-22 MINS | SERVES 4

INGREDIENTS

For the ginger stew

  • 800g whole tilapia fish, scaled, gutted and cleaned*
  • 1L water
  • 2-3 bunches of baby bok choy or pechay, cleaned and ends removed
  • 2-3 garlic cloves, minced
  • 1 brown onion, sliced
  • 1 thumb-sized ginger, peeled and sliced
  • 1/2 cup vegetable oil, for shallow frying
  • Ground salt and black pepper to taste

*Alternatively you can use any other types of fish such as catfish, grouper, mudfish, and/or seabass. I know some people who can’t eat fish if it’s still whole; you can still cook this dish with fish cutlets or fillets.

For the Filipino-style scrambled eggs

  • 3 large free range eggs, beaten
  • 3 small ripe tomatoes, diced
  • 2 garlic cloves, minced
  • 1 brown onion, sliced
  • 2 tbsp vegetable oil
  • 1 tsp black peppercorns
  • Ground salt to taste

METHOD

  1. Heat the vegetable oil in a large frying pan over medium-high. Season the fish by rubbing some salt and black pepper. Once the oil is hot, fry the fish until golden brown. Once browned, flip and fry the other side of the fish, about 6-7 minutes per side. Once done, transfer the fish to a serving dish.
  2. Discard the oil, leaving behind about a tablespoon or two, and in the same pan, fry the ginger slices until fragrant. Add in the garlic and sauté until fragrant and golden brown. Finally, add in the onions and cook until soft, about 2 minutes altogether. Then add the water, whole pepper corns and salt, and bring the stew to a boil.
  3. While the stew is simmering away, move on to making your scrambled eggs. Heat the vegetable oil in a small frying pan over medium-high. Sauté the garlic until fragrant and golden brown. Add in the onions and cook until soft, about 2 minutes. Then add in the tomatoes, salt, and black pepper. Cook until the tomatoes are soft.
  4. Once the tomatoes are soft, pour in the beaten eggs and stir with a spoon, lifting and folding it over from the bottom of the pan, until the eggs are softly set and slightly runny in places. Turn the heat off and leave the eggs for a few seconds to finish cooking. Give a final stir before serving.
  5. Turn the heat off from the ginger stew and add the baby bok choy, leaving to cook for about a minute. Pour the stew over the fried fish and serve immediately with some steamed rice and the scrambled eggs. Enjoy!

Pesang Tilapia (Tilapia in Ginger Stew)

Sautéed Egg for Pesang Tilapia (Tilapia in Ginger Stew)

BON APPÉTIT

– Ally xx

myTaste.com

SHUK North Bondi

Hello Everyone and welcome back to our final Review Sunday for the year! Your read that right, and if you were able to catch my review last Sunday, you would’ve already known that I am stopping Review Sundays for a while. I have pretty much covered all the restaurants and cafés that I have visited over the past few months when I was in Sydney, and I have not been café hopping since I got back to Brunei. Instead of reviews on Sundays, I will be posting some of my design work on the blog.

All that aside, let’s get down to the review! So I’ve been wanting to go to this place for a very long time now and have had many opportunities to visit, but was always shot down for various reasons. The first time I tried to come here was for a brunch outing with Jialing and Yvonne. Yvonne was feeling under the weather at that time and said that she didn’t want to travel so far for brunch. The second time I tried to go there was with Jialing and her boyfriend for lunch; shot down again because he didn’t want to go to a place that has anything to do and/or supports Israel – just some firm beliefs and political issues he has with the country. So for my farewell brunch, I didn’t let anyone tell me otherwise because this would be the very last opportunity I’d have to go to this place. So how I came to know about SHUK was purely by just discovering eating places that I have never been to before. I came across a lot of places, but SHUK really spoke out to me, especially their Isralei Breakfast.

So yes, as mentioned above, I invited a few of my very close friends to come out and have brunch under the beautiful winter sun. Amongst the people who came out to see me were Annie, Daniel, Edison, Greta, Kevin, and Sophia. I know, you’re probably asking, where’s Jialing and Yvonne? Something happened the night before where Jialing couldn’t make it to brunch that morning. Yvonne technically had no excuse, but still ended up waking up late and therefore did not make it to brunch. I did however see her for a bit after brunch.

“The place is unstoppable. It’s Israeli by heart, Mediterranean on paper, Bondi by postcode and very Australian in its multicultural scope.” — Ryan O’Kane in GoodFood.

This café, bakery, and deli draws inspiration from the Hebrew term SHUK, which means marketplace. SHUK is North Bondi’s own marketplace where the freshest produce and dishes offered promises a flavour of Israel mixed with modern favourites for locals and tourists alike. Their menu is directly influenced by Arabic, Turkish, Middle Eastern, and Mediterranean cuisines, and of course is inspired by Israeli dishes that the owners of SHUK grew up with, sharing with us what they’ve learnt from their families back home.

ALL DAY

SHUK: Green Shakshuka
GREEN SHAKSHUKA: Baked eggs, fennel, zucchini , kale, caramelised onion, feta, olives, and sourdough ($16.00) with extra chorizo (+$3.50)

If I ever have the chance to go back again, I would definitely order this dish. It looks like it would taste really good, I mean, of course it tasted good according to my friends who ordered it and didn’t share one bite (I forgive you Kevin). Edison was too far away from me to share, because I know he’d share 🙂 It is also a healthy vegetarian dish if you minus the chorizo add ons on the other dish!

SHUK: Hummus & Lamb
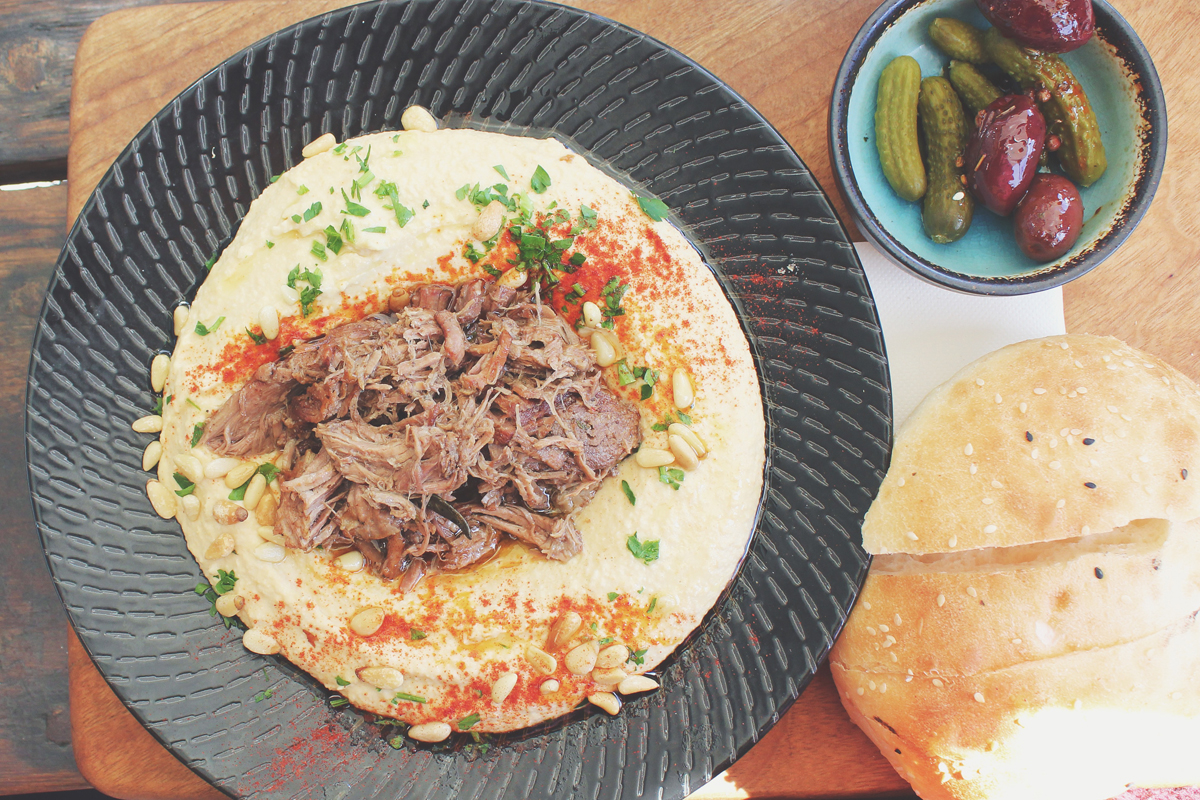
HUMMUS AND LAMB: House made hummus with 8-hour slow cooked lamb, served with pickles, olives, bread, and zhug ($18.00)

This dish that Sophia ordered looked amazing, and even the combination of hummus and slow cooked lamb was hard to resist. On their menu you could have hummus and mushroom as another option, and I remember when Sophia ordered this, she asked our waitress, “I really like lamb, but I also like mushrooms, so I was wondering if I can have the hummus and lamb with mushrooms as well?” The waitress said she’d ask but by the looks of the photograph, I don’t think she got her mushrooms. Anyway, I had a bit of her dish and it was delicious. The lamb was tender and juicy, and the hummus complimented it well. I can’t remember if it was from her dish, or Kevin’s, but I remembered eating the olives from someones dish because they didn’t like it.

BREAKFAST

SHUK: Israeli Breakfast
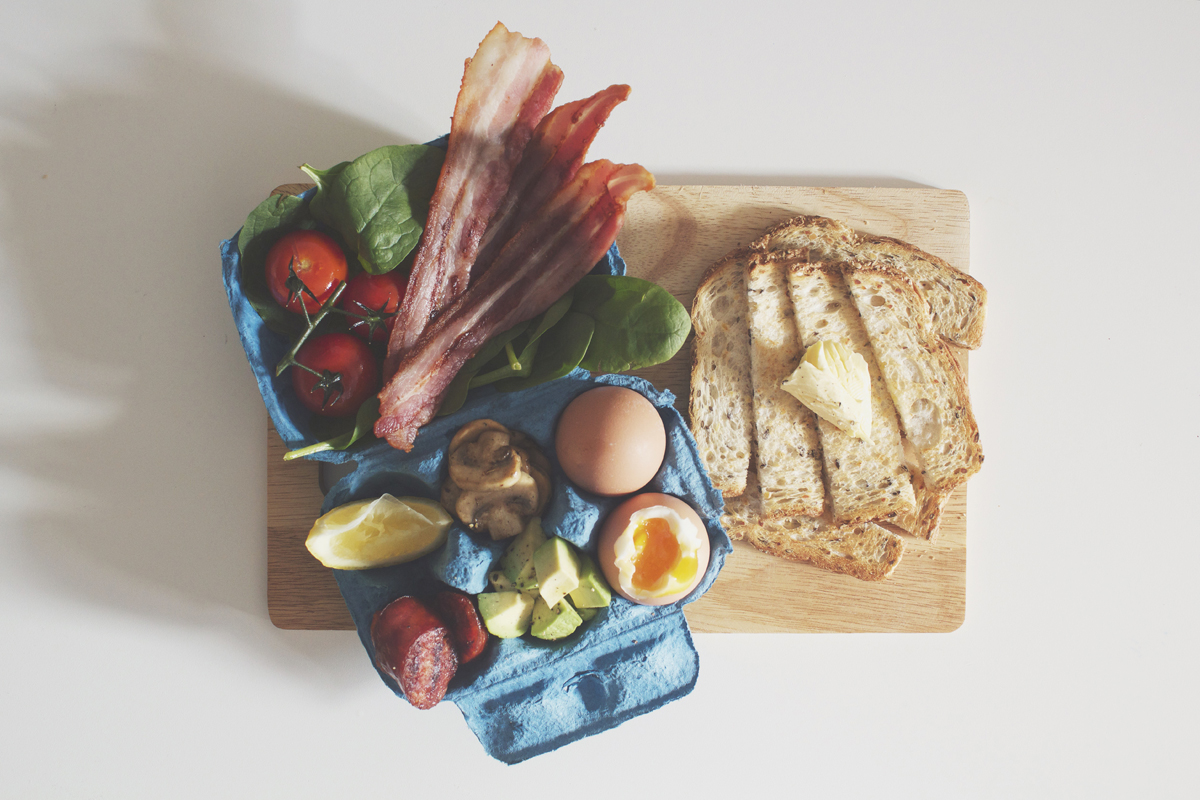
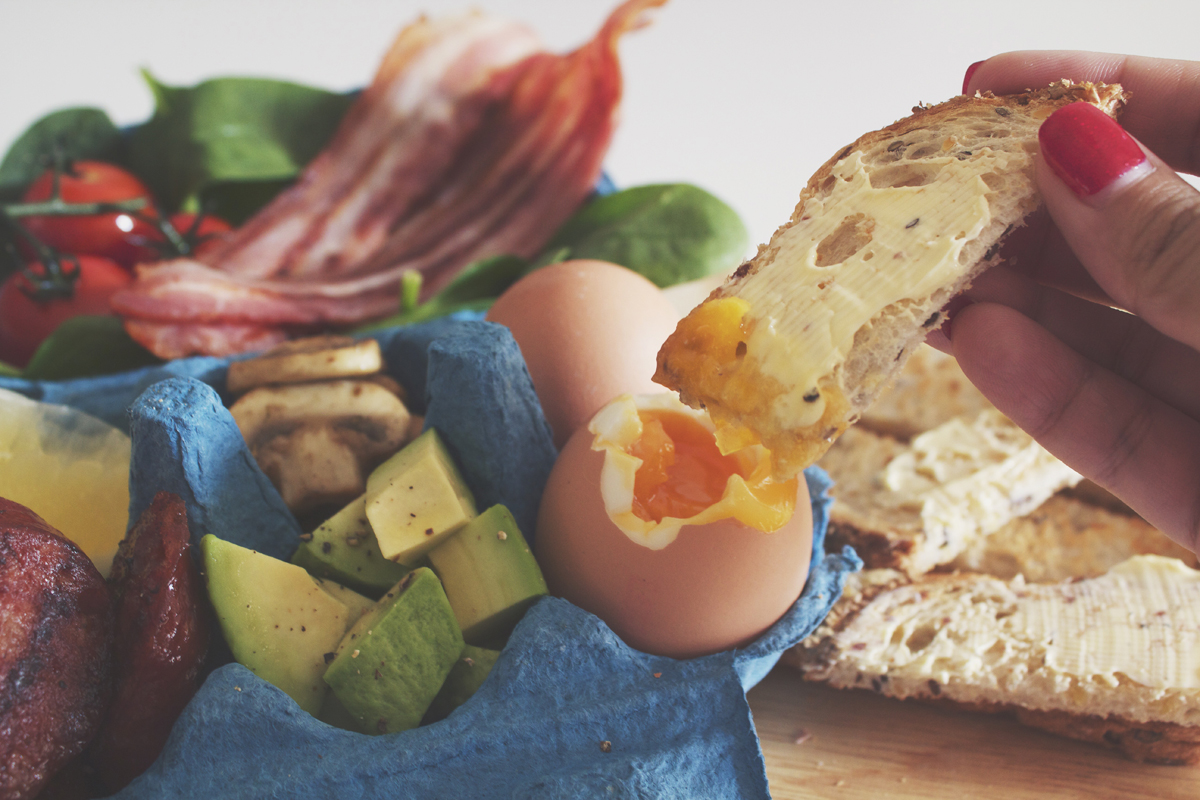
ISRAELI BREAKFAST: 2 eggs of your choice, Israeli salad, olives, labn’e, butter, house jam, avocado, and yoghurt with granola ($21.00)

This was the dish that I ordered. To be honest, even though it look spectacular in front of me, served in a massive pan with little bowls of everything, that was all it was. Don’t get me wrong, it was a bad dish, it’s just that he flavours and everything were average and nothing really blew my socks off. Also, when I got the dish, I felt like something was missing; I had all these spreads but no bread to put it on, so I had to call a waiter and ask for some toast for my dish. I still liked this dish; I only wished it impressed me more.

SHUK: SHUK Porridge
SHUK PORRIDGE: Oats, puffed whole grains, banana, dulce de leche, and roasted nuts ($13.00)

Now I know Daniel to be quite health conscious, so it was no surprise that he’d go for this dish (well except for the fact that it has dulce de leche in it). Daniel was sitting across the table from me so it was hard to want to try a little bit of his dish. From where I was sitting though, he seemed to enjoy his porridge, but I think he was a little bit upset by the fact that he ordered some smoked salmon on the side. Why was he upset? The side was priced at $4.00, and he got a puny bowl of it.

SANDWICHES

SHUK: House Cured Salmon
HOUSE CURED SALMON: House cured salmon with sour cream & dill, pickled cucumber, and spinach on an Israeli roll ($13.00)

I’m surprised that even though Greta sat next to me, I didn’t get to try her roll at all, well only because it’s kind of hard to bite into someones sandwich I guess. I did ask her how her dish was and she said it was very good. She had actually been thinking of going to SHUK for some time as well and thanked me for choosing this place as it then gave her to opportunity to.

SPECIALS

SHUK: SHUK Special

I’m sorry but I completely forgot what this dish was – it was on their specials menu which meant that it wasn’t listed out on their regular menu. A little back story here, so one of my friends, Annie, who came late to the brunch, went inside the café and ordered this dish. When he dish came out, she told us that it was one of the specials that they had for that week. We never asked the waitress who served our table what the specials were, and frankly she didn’t think to mention it to us as well, so I guess it’s no one’s fault. Also, because of that, I didn’t know what dish she ordered, nor did I remember to ask her what dish she ordered. I think she mentioned it, but it’s been more than a month since I was at SHUK, so it has already slipped my mind. So I did have a bite of the burger, I believe it was beef, and one too many sweet potato fries *cheeky grin* The fries, to die for, and the burger patty was tender and juicy.

Overall, I’m actually quite impressed with the food served up at my farewell brunch. It was actually quite a packed Saturday morning when I got there, but I was able to snag a table within 5 minutes of arriving. I’m just glad that they didn’t kick me out of the table because I had to wait a good half hour for the next three people to arrive, and an hour for the rest to come. We basically had the table for an hour before we even started ordering… Oops! Besides that, they can accommodate quite a lot of people in their restaurant, both indoors and outdoors. The service was pretty good, the waiters and waitresses who served our table were quick with requests and food came out very quickly too I might add. I’d give ambience/environment and service a clear 8/10 for our experience that day. I must say that I was quite surprised that the food served was fairly priced, though I’m not sure if I’d pay $21.00 for the Israeli Breakfast, but other than that, the other dishes definitely looked like you got your money’s worth; 8/10. The food looked amazing and some impressed more than others; 8/10.

SHUK is open everyday for breakfast and lunch, and dinners on Friday and Saturday night until 10pm. If I ever find myself in Sydney again, I would definitely hit this place up again and try dishes from their lunch and dinner menu as they look very enticing. As to quote Greta on that day, “you should just keep coming back and leaving so that we’ll have endless farewells.” Thank you Greta! 🙂

SHUK North Bondi
2 Mitchell Street
North Bondi, New South Wales
Australia, 2026

– Ally xx