Breakfast Muffins: Pumpkin, Polenta, and Chilli

Breakfast Muffins: Pumpkin, Polenta, and Chilli

Hello Everyone! I can’t believe we’ve come to an end to Breakfast/Brunch Month, which also means that it’s almost the end of October! Once again, where did the days go? Time flies too quickly. Luckily for you guys, today will not be the last post for October for I have a recipe going up on the 31st for a Halloween Special. I won’t say much about it now but the only thing I will say about it is that it’s gonna get bloody!

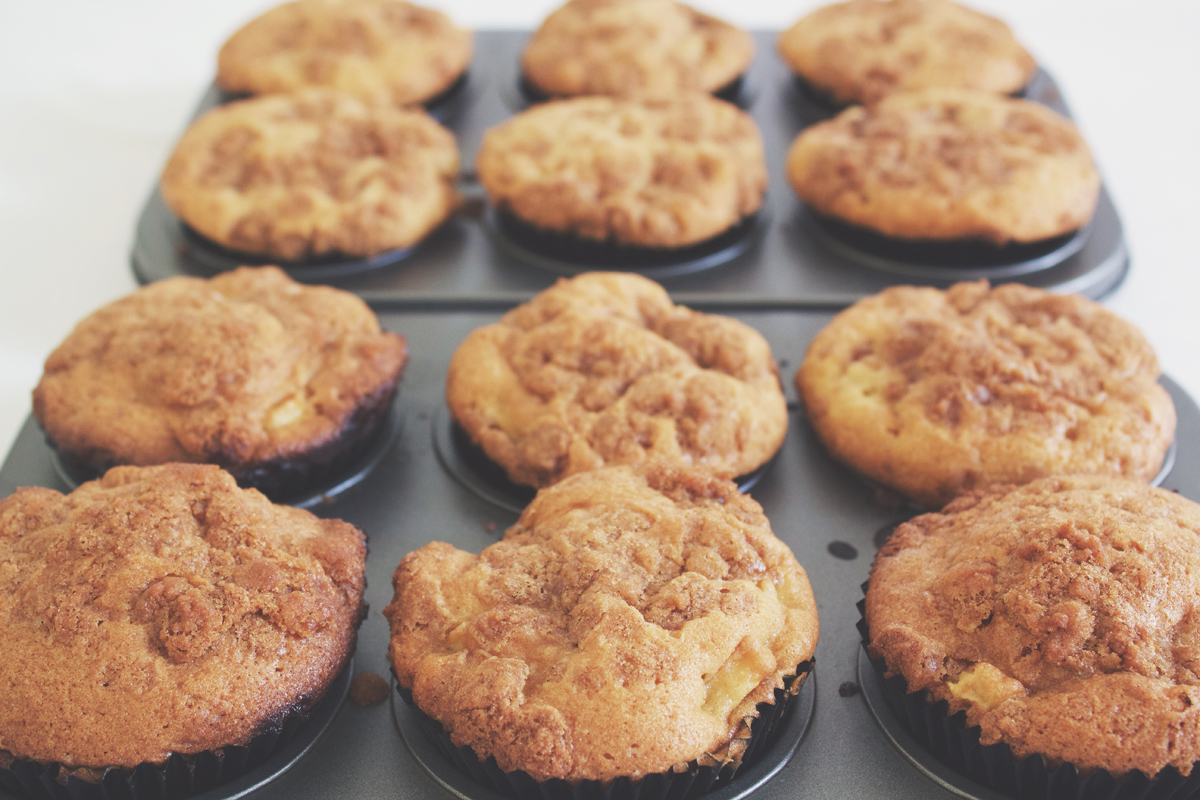
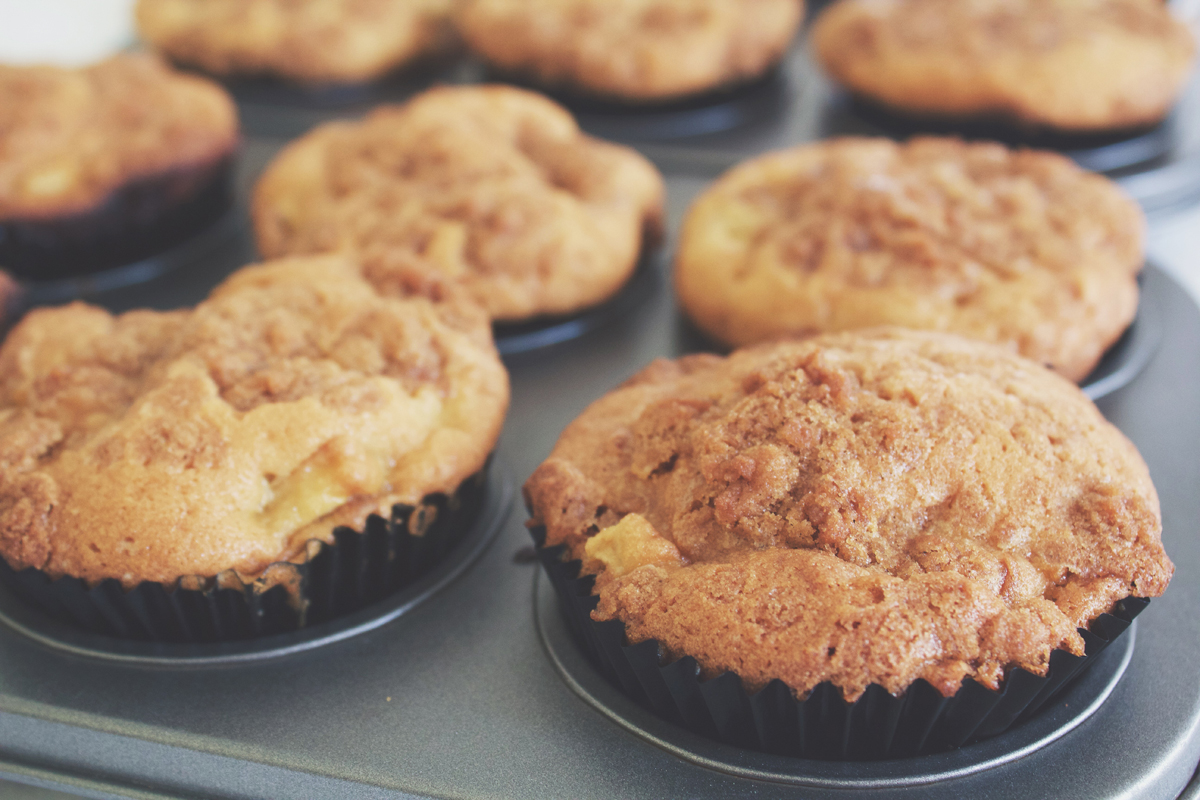
So anyway, since today will be my last post for Breakfast/Brunch Month, I’m going to end it with a recipe that is sure to knock you socks off! I’ve not tried this recipe before earlier on this week, but I can assure you that for those of you who like a little bit of spice in your life, these muffins pack a good kick! I had actually planned to bake some Chorizo, Corn, and Chilli Streusel muffins two weeks ago to post for today, but we could not find any chorizo at all that week. So I told my mom that I’ll hold off making the muffins since they weren’t going up on the blog for another week or so during that time, but as the days drew closer and chorizo still could not be found – so maybe I will hold off this recipe for another time when chorizo is available.

Thus, I decided to change my recipe – Pumpkin, Polenta, and Chilli Muffins! I kind of like how it is sort of in theme with fall (for the Northern Hemisphere), and Halloween – the pumpkin aspect of today’s recipe that is. The original recipe for these muffins can be found over on Taste;I didn’t really do anything to alter the recipe, only that I added half of the pepitas into the muffin batter mixture. Other than that, I pretty much just followed this quick and easy recipe.

Breakfast Muffins: Pumpkin, Polenta, and Chilli Ingredients

PREP TIME 15 MINS | COOKING TIME 22-25 MINS | SERVES 12 MUFFINS

INGREDIENTS

  • 500g butternut pumpkin, peeled and cut into small chunks
  • 2 & 1/2 cups self-raising flour
  • 3/4 cup milk
  • 1/2 cup coarse polenta
  • 1/2 cup vegetable oil
  • 1 large free range egg, lightly beaten
  • 2 tbsp fresh coriander leaves, finely chopped
  • 2 tbsp pepitas (pumpkin seeds)
  • 1 tbsp caster sugar
  • 2 tsp dried chilli flakes
  • Ground salt and black pepper, to taste
  • Softened butter, to serve

Breakfast Muffins: Pumpkin, Polenta, and Chilli

Breakfast Muffins: Pumpkin, Polenta, and Chilli

METHOD

  1. Preheat oven to 190C (375F or gas mark 5). Grease a 12 hole muffin pan with either cooking spray or with butter.
  2. Place the pumpkin chunks on a baking tray lined with foil and season with a bit of salt, pepper, and coat with olive oil. Bake in the oven for 15-20 minutes or until tender. Once done, remove from the oven and transfer to a heatproof bowl. Using a fork, mash the pumpkin and set aside to cool.
  3. Meanwhile, combine the self-raising flour, sugar, polenta, chilli flakes, coriander, and half of the pepitas in a bowl. Mix until thoroughly combined and then make a well in the centre.
  4. Add the milk, egg, vegetable oil, and pumpkin into the well and then mix until just combined. Your batter will be very thick which is exactly what you want! Season with a bit of salt and pepper, and the spoon the mixture evenly into the prepared muffin pan. Top with the remaining pepitas.
  5. Bake for 22 to 25 minutes or until golden and firm to touch. Remove from the oven and stand in muffin pan for about 5 minutes before transferring them onto a wire rack to cool down completely.
  6. Serve and enjoy warm or cold with softened butter!

Muffins taste best on the same day, though they may be stored covered tightly at room temperature for 3 days or in the refrigerator for 5 days.

Breakfast Muffins: Pumpkin, Polenta, and Chilli

Breakfast Muffins: Pumpkin, Polenta, and Chilli

BON APPÉTIT

– Ally xx

myTaste.com

Breakfast Muffins: Apple Strudel

Breakfast Muffins: Apple Strudel

Hello Everyone! Oh my! I cannot believe that it’s the last week of October already! My has time gone by so quickly this past month. Anyway, it’s been a while since I last baked muffins for breakfast and only because the last time I made muffins was back in Sydney with my Muffin Making Monday partner Jialing. We made a pizza muffin together one afternoon at her place (the recipe isn’t up on my blog yet), and yes that was the last of our Muffin Making Monday days. Since I left Sydney, we’ve talked about how much we miss baking muffins together and even said that we should still continue it… Over Skype! I don’t know how that’s ever going to work anymore since we’re both independent working women with our busy schedules and time differences.

But anyway! I wasn’t aware that it was a Monday when I baked these babies; only Jialing reminded me of it when she asked me what I was doing that day and I said that I was going to bake some muffins. Today’s recipe can originally be found on All Recipes. The recipe says that it should make 12 muffins, but I ended up with 16, maybe I should’ve filled the muffin cups a bit more because some of them were a bit flat, and some had a nice rise to them. Also, since I ended up with 16 muffins, I ran out of crumbed topping so the muffins weren’t very covered with the brown sugar streusel. Anyway, I’ve edited the recipe a bit so that the proportions match up. These muffins are a little bit on the sweet side, so if you’re someone who doesn’t like sweet things for breakfast, then tune in on Thursday for a savoury brekky muffin 🙂 It involves chorizo and has a bit of a spicy kick to it!

Breakfast Muffins: Apple Strudel Ingredients

PREP TIME 20 MINS | COOKING TIME 20 MINS | SERVES 16 MUFFINS

INGREDIENTS

For the muffin batter

  • 2 cups plain flour
  • 3/4 cup white sugar
  • 110g unsalted butter, softened
  • 2 large apples, peeled and roughly chopped
  • 2 large free range eggs
  • 1 & 1/4 tsp vanilla extract
  • 1 tsp baking powder
  • 1/2 tsp baking soda
  • 1/2 tsp salt

For the brown sugar streusel

  • 1/2 cup packed brown sugar
  • 20g unsalted butter
  • 1 & 1/2 tbsp plain flour
  • 1/4 tsp cinnamon

Breakfast Muffins: Apple Strudel

Breakfast Muffins: Apple Strudel

METHOD

  1. Preheat oven to 190C (375F or gas mark 5). Line a 12 hole muffin pan with paper cases. In a medium-sized bowl, combine the plain flour, baking powder, baking soda, and salt. Set aside.
  2. In a small bowl, mix the brown sugar, cinnamon, and plain flour. Add the butter, and using your fingers, crumb the butter into the sugar mixture. Because Brunei is scorchingly hot, I needed to place the streusel in the freezer to stiffen up a bit.
  3. Using an electric handheld mixer, beat the butter and sugar in a large bowl until smooth. Add in the eggs and vanilla extract and continue to beat until well combined. Add in the apples and stir using a rubber spatula. Gradually stir in the flour mixture.
  4. Spoon the batter into the prepared muffin pan, filling them up to about 3/4 of the way, and top with the brown sugar streusel.
  5. Bake for about 20 minutes or until a toothpick inserted in the centre of a muffin comes out clean. Once down, remove from the oven and set aside to cool for about 5 minutes before removing them from the pan. Cool down completely on a wire rack and then they are ready to eat!

Breakfast Muffins: Apple Strudel

Breakfast Muffins: Apple Strudel

Muffins taste best on the same day, though they may be stored covered tightly at room temperature for 3 days or in the refrigerator for 5 days.

BON APPÉTIT

– Ally xx

myTaste.com

Cornflake-crusted French Toast

Cornflake-crusted French Toast

Hello Everyone! I’ve got another french toast recipe with a twist for you again today, but this time there will be no added milo to it. Instead we’re gonna crust our classic french toast with some cornflakes to give it that extra added crunch to an already soggy bread. I came across this idea a couple of months ago back in July when Symmetry Breakfast went viral. They posted a photo of some cornflake-crusted french toast and when I planned for Breakfast/Brunch Month for October, I knew I had to tackle a recipe for that!

I absolutely love their work! If you have been following my Instagram during that month, you would’ve seen that Jialing and I (and Edison) hopped on the #symmetrybreakfast bandwagon for the last remaining week that I was in Sydney. Actually, I might just share the photographs here since I don’t know if I will be posting them on the blog anytime other than now I guess (click on the individual images to view a larger version of them):

Homemade Charred Eggplant & Baby Octopus Shakshuka with Lebanese Bread; Blueberry & Passionfruit Cider French Crêpes with a Honeyed Citrus Creamcheese Filling topped with a Mixed Berry Compte; Orange Sunrise Cocktail Pea and Ham Soup with Stone-baked Pane di Casa and Strawberry & Lime Cider
Potato Hash Crusted Breakfast Quiche with Caramelised Onion, Chorizo, Spinach, and Sunnyside Up Egg with Mixed Leaf Salad and Garlic Butter Bread Beer, Bacon, and Tater Soup (aka “Man Soup”) with Pane di Casa; Russian Earl Grey Tea Fancy Filipino Hotsilog Brekky with Sweet Potato Hash Browns and Brekky Mocktails

L-R: Homemade Charred Eggplant & Baby Octopus Shakshuka with Lebanese Bread; Blueberry & Passionfruit Cider | French Crêpes with a Honeyed Citrus Creamcheese Filling topped with a Mixed Berry Compte; Orange Sunrise Cocktail | Pea and Ham Soup with Stone-baked Pane di Casa and Strawberry & Lime Cider Potato Hash Crusted Breakfast Quiche with Caramelised Onion, Chorizo, Spinach, and Sunnyside Up Egg with Mixed Leaf Salad and Garlic Butter Bread Beer, Bacon, and Tater Soup (aka “Man Soup”) with Pane di Casa; Russian Earl Grey Tea Fancy Filipino Hotsilog Brekky with Sweet Potato Hash Browns and Brekky Mocktails

I know, they’re not quite as symmetrical as the guys from Symmetry Breakfast (we tried to be creative with our symmetry/asymmetry lines), but it still gained a lot of views, likes (especially from Symmetry Breakfast), and new followers! Anyway, yes I realise that I have gone on a bit of a tangent, but I’m pretty sure you enjoyed those photographs (for those who have not seen them that is). So let’s get down to business shall we and get a move on to today’s recipe:

Cornflake-crusted French Toast Ingredients

PREP TIME <5 MINS | COOKING TIME 8-12 MINS | SERVES 2-4*

*Depending if you want one or two slices of french toast per person; recipe is for 4 slices of bread

INGREDIENTS

  • 1 & 1/2 cups of cornflakes, crushed
  • 4 thick slices of bread
  • 1/2 cup milk
  • 1 large free range egg
  • 1 tbsp white sugar
  • 1/2 tbsp vanilla extract
  • 1/4 tsp cinnamon
  • 1/8 tsp ground nutmeg

Optional:

  • Green Kiwi
  • Pineapple
  • Strawberries
  • Honey
  • Powdered sugar
  • Vanilla yoghurt

METHOD

  1. Whisk the eggs together with the milk, sugar, spices, and vanilla extract in a bowl.
  2. Dip both sides of a bread slice to soak up the wet mixture; do not soak it for too long. The dip the soaked sliced bread into the cornflake crumbs and coat.
  3. Place the bread slice into the frying pan and cook until done, 2-3 minutes per side.
  4. Once done, transfer to a plate lined with a paper towel to soak up any excess oils. Repeat for the remaining bread slices.
  5. Top with your favourite toppings, and/or serve with your choice of fruits for a fresh salad on the side. Enjoy!

Cornflake-crusted French Toast

Cornflake-crusted French Toast

BON APPÉTIT

– Ally xx

myTaste.com

Milo French Toast

Milo French Toast

Hello Everyone! Anyway, so it’s week 4 of Breakfast/Brunch month and this week I will be sharing with you my now-favourite french toast recipes. I say ‘now-favourite’ because this is the very first time I’ve attempted these recipes. I’ve had and made french toast before, but the recipes I’ll be sharing with you this week are beyond than that of the classic french toast – they got a certain twist to them that will make you fall in love with french toast all over again.

Today’s recipe is one that I came across on Facebook as I was scrolling through my newsfeed. BuzzFeed Australia posted a video recipe for Milo French Toast. If you love milo and fancy some french toast to go with that, then this recipe was made for you, only that, you get to combine milo together with your french toast – how cool is that? You can top them off simply with some butter and syrup, or you can make it a bit more interesting by topping them off with some of your favourite fruits – I topped mine with some strawberries, crushed pistachios, honey, and a bit of powdered sugar.

I remember growing up, even up until now, my mom would make a classic french toast for breakfast at least once a week. When I came across this recipe and talked to her about it, we decided to try it out. It was a great success in my opinion and I loved it, so did my Mom and sister Angela. Original video recipe can be found on BuzzFeed Australia‘s Facebook page.

Milo French Toast Ingredients

PREP TIME <5 MINS | COOKING TIME 8-12 MINS | SERVES 2-4*

*Depending if you want one or two slices of french toast per person; recipe is for 4 slices of bread

INGREDIENTS

  • 4 thick slices of bread
  • 1/2 cup milk
  • 1/2 cup milo
  • 1 large free range egg
  • 1/2 tbsp vanilla extract

Optional:

  • 1 punnet (250g) strawberries, hulled then halved
  • Handful of pistachios, shelled and lightly crushed
  • Honey
  • Powered sugar

METHOD

  1. Heat a bit of oil in a non-stick frying pan over medium.
  2. Combine the milo, milk, egg, and vanilla extract in a bowl. Mix until well combined.
  3. Dip both sides of a bread slice to soak up the wet mixture; do not soak it for too long.
  4. Place the soaked bread slice into the frying pan and cook until done, about 2-3 minutes per side.
  5. Once done, transfer to a plate lined with a paper towel to soak up any excess oils. Repeat for the remaining bread slices.
  6. Serve up this Aussie twist on a French favourite with some honey and butter if you like, or with some fresh fruits and crushed nuts and enjoy!

This slideshow requires JavaScript.

BON APPÉTIT

– Ally xx

myTaste.com

Kale Smoothie with Almonds, Banana, & Pineapple

Kale Smoothie with Almonds, Banana, & Pineapple

Hello Everyone! I’ve got another brekky smoothie recipe for you today, and some may find this unusual at first, but it actually works! I must admit, I was once cynical about the idea of adding vegetables to a smoothie. That changed when I moved to Australia and saw kale juices/smoothies pop up here and there in many local cafés in and around Sydney. I’d always see my friends with a take away cup of green smoothies that were either made up of kale or spinach included in them. To be honest, I’ve never tried a kale smoothie before and this is the first time I’m making and trying one! I’ve had kale before, and to me, it doesn’t have a distinct taste to it, so I was glad that the non-exsitent kale flavour didn’t shine through in the smoothie. Instead, you can taste the almonds, bananas, and pineapple which was nice. However, after having done some research, kale apparently does have a strong flavour that many might be used to, so when making a green smoothie using kale, you should use strongly flavour fruits such as strawberries or pineapple to help mask the flavour (possibly why I personally could taste the kale because I use pineapple in my green smoothie).

Before I begin with this simple green smoothie recipe, I want to talk to you a little bit about the health benefits of adding kale to your smoothie. Kale helps cut the sweetness of the fruits added, and has more than twice the recommended daily value of calcium to your diet. It is an excellent leafy green to use for detox as it contains cleansing properties. In addition, kale has a lot of vitamins and also contains powerful antioxidants that help protect your immune system and fight against certain cancers. If you want to read more about the health benefits of kale, please click here. Now, you may substitute kale for spinach if kale isn’t readily available where you are; I know that it’s not very cheap to get kale here in Brunei since it’s air-flown in from Australia.

The original recipe can be found over on Real Simple; all I did was again, change the quantities to serve about 3-4 tall glasses. I also decided to substitute the coconut milk for fresh coconut water as most coconut milk that you find here in Brunei are straight out from a tin and have a whole lot of preservatives added to them. You can use coconut water from the shelf if you don’t have fresh coconut water readily available but I personally hate those because they taste very artificial to me. Otherwise, you can also just use water. I read in the comments section of the site as well that someone added almonds to the smoothie for that added protein, so feel free to add your favourite nuts into the mix as well when you make your smoothie!

Kale Smoothie with Almonds, Banana, & Pineapple Ingredients

PREP TIME 5 MINS | COOKING TIME  | SERVES 3-4

INGREDIENTS

  • 2 & 1/2 cups kale, stemmed and roughly chopped
  • 1-2 cups fresh coconut water
  • 1/3 cup almonds
  • 1/2 medium-sized pineapple, chopped
  • 2 ripe bananas, chopped

METHOD

  1. Combine all the ingredients in a blender in this order: bananas, almonds, pineapple, kale, and 1 cup of coconut water. Pulse a couple of times to mix up the ingredients in the blender a bit and then blend on high for about 30 to 60 seconds. Add more coconut water if needed to reach your desired consistency.
  2. Serve immediately and enjoy!

Kale Smoothie with Almonds, Banana, & Pineapple

BON APPÉTIT

– Ally xx

myTaste.com

Gingery Berry & Oat Smoothie

Gingery Berry & Oat Smoothie

Hello Everyone! For this week of breakfast/brunch month, I have some simple brekky smoothies for you that you can easily prepare the night before, whizz it in the blender in the morning, and voilà; you’ve got a quick brekky that you can take with you to go if you really need to. I’ve never really been the type to make my own smoothies at home, not until my second year of uni back in 2012 when my flatmate at that time started making smoothies for the both of us on the weekends. She would always make the same banana and blueberry smoothie with full cream milk, old-fashioned rolled oats, and vanilla yoghurt. Ever since then, I would whip up this easy smoothie whenever I felt like it even after we went our separate ways. I’ve also made a strawberry smoothie with the same ingredients, just taking out the bananas and blueberries, and added mint into the mix; it was a really good smoothie too.

Anyway, I won’t be sharing those two recipes with you this week as I’ve got two completely different (maybe in some way a little bit similar) smoothies for today and Thursday. I decided try new smoothie recipes and for today’s post, I came across a recipe for a Blueberry and Oat Smoothie; now I know this is sounding a little similar to the smoothie that I mentioned above, and that I’m used to making, but what makes this different is the touch of ginger added. I don’t think I’ve had a smoothie with ginger in it before so I thought that I’d give this recipe a try; original recipe can be found over at Real Simple. All I’ve really done was change the quantities to serve 3-4 tall glasses, as well as reducing the amount of sugar.

Gingery Berry & Oat Smoothie Ingredients

PREP TIME 20 MINS | COOKING TIME  | SERVES 4

INGREDIENTS

  • 1 & 1/2 cup frozen blueberries
  • 1 & 1/2 cup water
  • 1 cup creamy vanilla yoghurt
  • 1 cup ice
  • 3/4 cup old-fashioned rolled oats
  • 4 tbsp brown sugar
  • 3/4 tsp fresh ginger, grated

METHOD

  1. Add the oats and water to a blender and leave to soak until the oats have softened, about 15 minutes.
  2. Add the ice, blueberries, yoghurt, brown sugar, and ginger to the blender. Blend until smooth and frothy, about 2-3 minutes.
  3. Serve and enjoy!

Gingery Berry & Oat Smoothie

I’ve read a few of the comments on the site where the original recipe was uploaded, and some said that the oats had a weird texture and made the smoothie grainy and starchy. Some didn’t like the addition of the ginger and made their stomachs upset. So I guess this smoothie is not for everyone, but if you think you’d enjoy all these flavour into one drink, then go ahead and give it a try because it’s definitely delicious! I personally thought that the oats were fine and still gave the smoothie a nice flavour and texture to it; I feel that without it, the smoothie would be quite loose. The ginger, though quite a strong flavour, paired well with the sweet blueberries and helped cut down the sweetness of the smoothie from the added sugar.

BON APPÉTIT

– Ally xx

myTaste.com

Congee with Minced Pork & Century Egg

Congee with Minced Pork & Century Egg

Hello Everyone! So continuing on with the idea of porridge from Tuesday’s post, I decided to whip up a classic congee dish. The origins of congee are unknown, but several historical accounts have shown that this dish was served during times of famine as a way to stretch the rice supply in order to feed more people. Despite that, congee is one of the traditional Chinese foods that has a history dating back to thousands of years in China. It is now a largely popular dish in many Asian countries and though it has many variations, its base is usually a thick porridge of rice that has been cooked in water or stock for a prolonged time. When it is eaten as a plain rice congee, you often eat it with other side dishes, but when additional ingredients such as meat and other flavourings are added, it can be a meal on its own. Depending on your cultural background, congee is eaten as a substitute for rice, but is known to be primarily eaten for breakfast or late supper. It is also considered suitable for young children or for those who are ill as it is a mild and easily digestible dish.

Now before I go on to the recipe, I thought I’d talk a little bit about what a century egg is. For those of you who don’t know, century egg (also know as a preserved egg), is a Chinese delicacy traditionally made by preserving duck, chicken, or quail eggs, in a mixture of clay, ash, salt, quicklime, and rice hulls for several weeks, or even months. Through this process, the yolk turns dark green to grey in colour, acquiring a creamy consistency and a strong flavour. On the other hand, the egg white becomes jelly-like and translucent, dark brown in colour, and salty in flavour. I know what you’re thinking, sounds disgusting right? I’ll be honest with you, it took me a while to be able to get over its looks and smell. I still don’t love it, but it’s definitely good with congee! To prepare these eggs for the congee, you simply just have to wash off the mixture of clay, ash, salt, quicklime, and rice hulls that cover the egg. I recommend washing it outside as to not clog your sink with all the residue. Tap the eggs on a countertop until covered in cracks, and then peel the shell off.

Preserved Century Egg

As mentioned before, there are many variations in which you can have your congee; plain or dressed up with your favourite ingredients – it’s all up to you really! At breakfast/brunch buffets (that’s when I usually indulge in some yummy congee), you’re given a selection of toppings to accompany your plain congee. I usually go for the whole works which included century egg, fried cha kueh (deep fried dough), crispy fried shallots, spring onion, and some sesame oil.

Congee with Minced Pork & Century Egg Ingredients

PREP TIME 10 MINS | COOKING TIME 45-60 MINS | SERVES 6-8

INGREDIENTS

  • 250g lean minced pork
  • 2.5L homemade or store-bought chicken broth
  • 2 cups rice, uncooked*
  • 2-3 century eggs
  • 2-3 garlic cloves, minced
  • 2-3 shallots, sliced thinly into rings
  • 1 cha kueh**, sliced thinly
  • 1 small bunch spring onions, chopped
  • 1 thumb-szied ginger, peeled and sliced
  • 6 tbsp vegetable oil
  • Fish sauce, to taste
  • Ground salt and black pepper, to taste

*You can also start with cooked rice, adding chicken broth and adjusting the amount of liquid to achieve the desired consistency. Make sure that when the rice has swelled, mash it a bit to help it break down.

**Cha Kueh (You Cha Kueh) is a Chinese deep-fried dough that is chewy yet crispy; a delicious snack that is normally paired with coffee or tea in the mornings or afternoons. There is a certain level of skill and expertise needed to knead the dough to the right consistency, as well as deep-frying techniques, to make the perfect cha kueh. So, if you want, you can make your own cha kueh, or if it’s readily available in stores nearby, then you can just buy it already cooked. I guess croutons can also substitute if both are not an option for you, or you can leave this element out completely. I like to include it in my congee for an added texture of crunch.

METHOD

  1. Bring a large pot of the washed, uncooked  rice and chicken broth to a simmer over medium heat. Once it starts simmering, reduce the heat down to low. Stir occasionally to avoid the rice sticking to the bottom of the pot and burning. Simmer until the rice has softened, broken down, and the mixture is creamy with the consistency of a porridge, about 45 to 60 minutes. If you need to, add more chicken broth to adjust the consistency as it cooks.
  2. While the rice is cooking, you can move on to preparing the minced pork and shallots. In a medium-sized frying pan, heat the vegetable oil over medium-high and add the sliced shallots in. Cook, stirring continuously, until the shallots are golden and crispy; it should take about 5 minutes altogether. If you need to, adjust the heat so that they do not burn. Once done, transfer the shallots to a heatproof bowl.
  3. In the same pan with the oil, add in the slices of cha kueh and fry until golden and crispy, about a minute per side. Transfer to a plate lined with a paper towel to soak up the excess oils.
  4. In the same pan again with about a tablespoon of the oil, fry up the ginger slices until fragrant, then add in the garlic and sauté until golden and fragrant, about 2-3 minutes altogether. Add in the minced pork and season with a bit of salt and black pepper. Give it a good mix, breaking up the pork into small pieces as it cooks, and then leave it until cooked through and browned, about 8-10 minutes.
  5. When the porridge is ready, stir in the pork and season to taste with some fish sauce. Divide the porridge equally into individual-sized bowls and top with the century egg, fried cha kueh, crispy fried shallots, and spring onion. Serve immediately and enjoy!

This slideshow requires JavaScript.

BON APPÉTIT

– Ally xx

myTaste.com

Arroz Caldo (Chicken Rice Porridge)

Arroz Caldo (Chicken Rice Porridge)

Hello Everyone! Today’s recipe is a dish that is quite well-known in the family, and across the Philippines I presume, as the go to dish when someone is feeling under the weather. In our house, you’d know when someone is sick with the flu when you see this dish on the table for everyone to eat; yes that’s right, you don’t have to be the sick one to have a bowl of arroz caldo! However, besides it well-known as the go to dish for the sick, arroz caldo is also a common breakfast dish as it can be quite filling, providing you with the energy that you’d need to last you until lunch time. It can also be a snack (merienda) dish with tokwa’t baboy (a dish composed of boiled pig’s ears and/or pork belly, and fried tofu with a vinegar, soy sauce, and chilli dip on the side).

Arroz Caldo is actually of Chinese origin as it draws resemblance to a type of risotto-like congee. The name of this dish however, was given by the Spaniards due to pronunciation issues. The dish is also similar to other Filipino porridges such as lugaw and goto, the only distinguishing ingredient would be that arroz caldo mainly uses chicken while goto requires the use of tripe, beef, and innards. Lugaw on the other hand, is as plain as it can get.

So I made this dish back when I was in Sydney, a few weeks before I left in early August. I was staying at Marissa’s place for the time I was there and we both fell ill at one point during my stay. I can’t quite remember who fell sick first and who gave who the sickness, but all I remembered was that I made this dish for the both of us. I even told her the story behind this dish and she even made mention that they have a similar Vietnamese dish known as Cháo Ga (also fed to those who were feeling under the weather).

Arroz Caldo (Chicken Rice Porridge) Ingredients

PREP TIME 10 MINS | COOKING TIME 45 MINS | SERVES 4-6

INGREDIENTS

  • 500g chicken mid-wings, washed and cleaned
  • 1.5L water
  • 2 cups rice, uncooked and washed
  • 4 large free range eggs, hard-boiled and sliced
  • 2-3 garlic cloves, minced
  • 1 large brown onion, sliced
  • 1 lemon (or calamansi if available)
  • 1 thumb-sized ginger, julienned
  • 2 tbsp fish sauce
  • 2 tbsp vegetable oil
  • 2 tsp chicken stock powder
  • Ground black pepper to taste
  • Crispy fried shallots
  • Spring onions, sliced

METHOD

  1. Heat the vegetable oil in a large pot over medium-high. Add the ginger and fry until fragrant, then add in the garlic, sautéing until fragrant and golden brown. Then add in the onions and cook until soft, altogether about 2-3 minutes.
  2. Add the chicken mid-wings to the pot and season with the chicken stock powder and ground black pepper. Give it a good mix and cook for about 6-8 minutes or until the outer layer of the chicken starts to brown. Then add in the water and bring to a boil. Once boiling, cook for a further 5 minutes and then scoop out the chicken mid-wings and set aside*.
  3. Add the washed, uncooked rice and mix well, stirring occasionally. Turn the heat down to low-medium and leave it to simmer until the rice is fully cooked (about 30 to 40 minutes). Stir occasionally just to make sure that the rice doesn’t stick to the bottom of the pot. In the last 10 minutes of cooking time, you may return the chicken mid-wings to the pot to heat them up again before serving the dish.
  4. Taste and if the porridge needs a bit more seasoning, add some fish sauce and adjust to your liking.
  5. Divide the porridge into bowls equally and top with the chicken and sliced hard-boiled eggs. Garnish with a pinch of crispy fried shallots, spring onion, and a squeeze of lemon juice (you may add some saffron threads for aroma and colour).
  6. Serve hot and enjoy!

*You don’t usually scoop the chicken out, but because I didn’t want the chicken to become too soft and start breaking apart, so I took them out. The reason is just because I don’t want them to look aesthetically displeasing on the dish for the photograph really. Otherwise, leaving them in until they fall of the bone is what you would like to achieve with this dish.

Arroz Caldo (Chicken Rice Porridge)

Arroz Caldo (Chicken Rice Porridge)

BON APPÉTIT

– Ally xx

myTaste.com

Iku Wholefood

Iku Wholefood believe that nutritious food is essential for good health and vitality: Food that is natural, wholesome, authentic, freshly prepared and tasty. The style of graphic content that they want push through on Facebook and other social media platforms, are Natural & Organic – which as advised from the founder of Iku, a lot of green, and wood textures. This is to conceptually portray the message that all their foods are dairy free, additive free, preservative free, animal free, and free from genetic modification.

Iku Wholefood Context


Examples of graphic works that I have created for Facebook and Instagram:
(Click on the images to see an enlarged version of the graphics)

Iku Wholefood: Myth Iku Wholefood: Fast, Healthy Food Iku Wholefood: Well Being Iku Wholefood: Ken Israel
Iku Wholefood: Breakfast Iku Wholefood: Raw or Cooked? Iku Wholefood: Quotes BW Richardson Iku Wholefood: Beans
Iku Wholefood: Food was created perfectly Iku Wholefood: What's your story? Iku Wholefood: Cold Pressed Juice Iku Wholefood: Balanced Diet

– Ally xx

Breakfast Plate

Breakfast Plate

Hello Everyone! I can’t believe that it’s already October! Where did September go?! So I’m sure all of you are aware that a new month calls for a new theme on the blog for the month of October! Those of you who know me, I am a breakfast/brunch person. I mean, I sometimes skip breakfast when the mornings just get a little too hectic for me; that was during my first few years at uni, but towards the end, I made it a habit to pack my breakfast to uni and/or work and eat it there.

I remember my internship days at Hello Social where I’d always be rushing out in the mornings to catch my bus, which therefore meant that I didn’t have time to sit down and enjoy my breakfast. That was where Muffin Making Mondays with Jialing came in, and when I had run out of muffins to take to work (because we only bake fortnightly), I would pack some fruits and even sometimes a small tupperware of cinnamon toast cereal with one of those small drink cartons of milk. When I’d get to the office, I’d pour the milk over my cereal and enjoy breakfast at my table. There was a time where one of the managers asked me what I was having for breakfast and the thought of me bringing a small carton of milk made her laugh so hard. I told her it was practical 😛 Another time when I was also having cereal, my other manager asked if what I was having was shareable; to his dismay, cereal ain’t shareable! He asked what kind of cereal I brought in and I said cinnamon toast. The other manager said that that was so American of me.

Anyway, I mean, if you didn’t already gather what this month’s theme is from my little story, yes it’s breakfast and brunch month on the blog! For the month of October I will be sharing with you some of my favourite breakfast/brunch recipes! I’ll be kicking off tonight’s post with a dish that I threw together when I was still living in Sydney. I was inspired by a post that I saw on Instagram by Raw Pawpaw Café in Brisbane. I was inspired by their plating of one of their dishes, and decided to plate it up with a few of my favourite ingredients for breakfast. I think most of the preparation of the ingredients in this dish is pretty straight forward, and you can get creative yourself by mixing up the ingredients a bit by adding your own favourite breakfast ingredients!

Breakfast Plate Ingredients

PREP TIME 5 MINS | COOKING TIME 20-22 MINS | SERVES 1

INGREDIENTS

  • 2-3 slices of soy & linseed bread, toasted
  • 2 bacon rashers
  • 2 large free range eggs, at room temperature
  • 1 chorizo sausage, thick slices
  • 1/2 avocado, cut into chunks
  • Bunch of grape vine tomatoes
  • Butter, for spreading
  • Ground salt and black pepper to taste
  • Handful of cup mushrooms, sliced
  • Handful of loose baby spinach leaves
  • Lemon wedges, to serve
  • Olive oil

METHOD

  1. In a small bowl, marinate the avocado chunks with a little bit of olive oil, salt, pepper, and lemon juice. Set aside.
  2. Preheat oven to 200C. Line a baking tray with aluminium foil and toss the grape vine tomatoes in a little bit of olive oil and salt. Roast in the oven fro about 10 minutes, or until the tomatoes have gone soft. Turn the temperature down to about 80-90C just to keep them warm before serving.
  3. Meanwhile, heat a large grill pan over medium high and cook the bacon rashers and chorizo slices, about 3 minutes per side. Once done, transfer to the baking tray and keep warm in the oven.
  4. Add your sliced mushrooms to the same grill pan and cook until browned and softened, about 4-5 minutes altogether. Turn the heat off and transfer to the baking tray and keep warm in the oven.
  5. Place the eggs in a small saucepan, covering the eggs with cold water. Bring to a boil over high heat, and once boiling, reduce the heat down to medium. Simmer gently for about 3 minutes. Remove the saucepan from the heat and using a slotted spoon, transfer to the egg carton.
  6. Plate up accordingly and enjoy your breakfast!

Breakfast Plate

Breakfast Plate

Just a little side note here before I end tonight’s post – I wanted to choose an egg carton that wasn’t grey just so that it doesn’t look dull. I must say it was hard choosing eggs based on the colour carton they come in because most of the non-grey ones were caged eggs (yes, I don’t buy caged eggs). Good thing these eggs that came in the blue carton were free range, and the blue really suited the plating and contrasted the food colours nicely.

BON APPÉTIT

– Ally xx

myTaste.com