Death by Chocolate Cupcakes

Death by Chocolate Cupcakes

Hello Everyone! It’f finally November which means, other than a new theme on the blog as usual, it is also my birthday month! I’ll be 25 in exactly a week and I’ve got a few get-togethers planned with family, friends, and colleagues. I actually baked these cupcakes last year for my Manager’s birthday. The week before her birthday I shared the leftover red velvet cupcakes that I had baked for halloween with my colleagues. When I offered her the cupcakes, she told me that she didn’t like red velvet, and that chocolate was more her thing. So, my colleagues told me that I should bake her some chocolate cupcakes for her birthday. I’m not sure if she liked them, but my colleagues and I definitely did!

Death by Chocolate Cupcakes

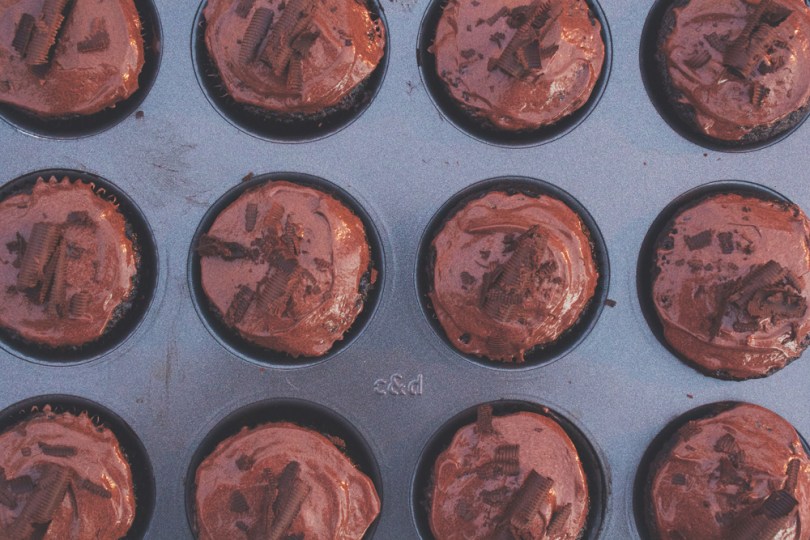
These cupcakes  are not overly sweet, but rather deep and intense in pure chocolate flavour. They are dark chocolate cupcakes with a thick dark chocolate frosting on top and sprinkled with dark chocolate shavings. The mixture of melted chocolate and cocoa powder to make these cupcakes ultra fudgey, rich, and moist. Are you salivating yet? Well, if you aren’t then please go away – if you can’t salivate over fudgey dark chocolate cupcakes then we cannot be friends *cheeky grin*

Today is actually her birthday, and we tried to surprise her today which ended up being a massive fail. Well, it’s hard to surprise someone who already expects a surprise – my colleague was right, we should’ve just not surprised her as that would’ve been the ultimate surprise. She’ll probably get mad at us for forgetting, but then again she’ll definitely know that we didn’t forget and still expect a surprise in some way or another. Maybe that will be the plan for next year?

Anyway, Please take the time to check out the original recipe over on Sally’s Baking Addiction. Anyway, I don’t want to take you guys on a massive tangent so let’s move on to the recipe for tonight!

Death by Chocolate Cupcakes Ingredients

PREP TIME 12 MINS | COOKING TIME 18 MINS | SERVES 12 CUPCAKES
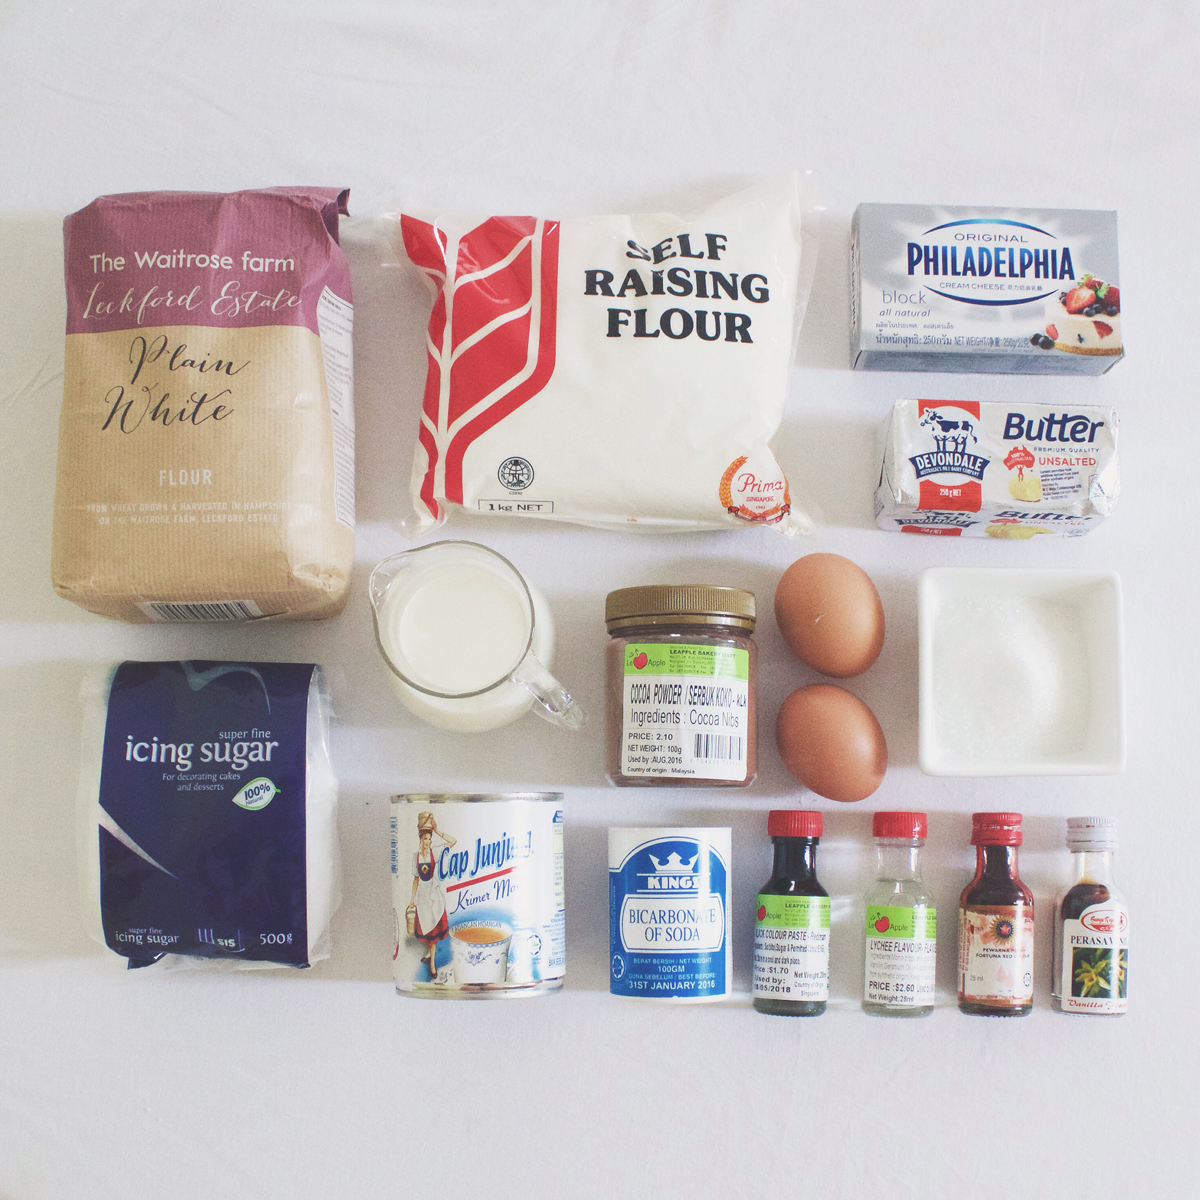
INGREDIENTS

For the dark chocolate cupcakes

  • 3/4 cup (95g) all-purpose flour
  • 1/2 cup buttermilk*
  • 1/2 cup granulated sugar
  • 1/2 cup unsweetened cocoa powder
  • 1/4 cup light brown sugar
  • 115g unsalted butter
  • 60g semi-sweet baking chocolate
  • 2 large eggs, at room temperature**
  • 1 tsp vanilla extract
  • 3/4 tsp baking powder
  • 1/2 tsp baking soda
  • 1/4 tsp salt

For the dark chocolate frosting

  • 2 & 3/4 cup confectioners’ sugar
  • 2/3 cup unsweetened cocoa powder
  • 95ml heavy cream
  • 90g unsalted butter, softened to room temperature
  • 1 tsp vanilla extract

Optional

  • Semi-sweet chocolate chips or shaved dark chocolate for decoration

*Room temperature eggs are required for this recipe. To bring eggs to room temperature quickly, put them in a glass of warm water for 5-10 minutes.

**Buttermilk is required for this recipe. If you do not have buttermilk, make your own by mixing 2 teaspoons white vinegar or lemon juice with 1/2 cup milk. Stir and let sit for 5 minutes.

METHOD

  1. Preheat the oven to 180C (350F or gas mark 4). Line a 12-cup cupcake/muffin pan with cupcake liners and set aside.
  2. For the cupcakes: Melt the butter and chocolate together in the microwave at 30-second intervals, stirring between each time until smooth. Once smooth, set aside to slightly cool. You may also melt the butter and chocolate over low heat on the stovetop.
  3. In a medium-sized bowl, combine the cocoa powder, flour, baking soda, baking powder, and salt together, and then set aside.
  4. In a large bowl, whisk the eggs, sugar, brown sugar, and vanilla together until smooth. Then, add in the cooled butter and chocolate mixture, whisking until smooth. Add half of the flour mixture, then half of the buttermilk. Repeat until everything is added, stirring until just combined; be careful to not over mix otherwise the batter will be very thick like pudding. Fill the cupcake liners about 2/3 of the way full with batter.
  5. Bake for 18 minutes, or until a toothpick inserted into the centre of the cupcake comes out clean. Allow to cool completely before frosting.
  6. For the frosting: Sift the confectioners’ sugar and cocoa powder together to assure there are no lumps, and then set aside.
  7. With a handheld or stand mixer fitted with a paddle attachment, beat the butter on medium speed until creamy – about 2 minutes. Gradually add the sifted sugar and cocoa powder mixture alternately with the heavy cream and vanilla extract. Beat on low speed after each addition. Once all added, beat on high speed until creamy and combined for at least 2 minutes. Add a pinch of salt if frosting is too sweet.
  8. Frost the cooled cupcakes and top with chocolate chips or shaved dark chocolate as desired. Cupcakes stay fresh at room temperature in an airtight container for up to 4 days. Store covered in the refrigerator is desired for up to 1 week.
  9. Share and enjoy amongst family and friends!

Death by Chocolate Cupcakes

Death by Chocolate Cupcakes

BON APPÉTIT

– Ally xx

myTaste.com

Salted Caramel Popcorn Layered Cake

Salted Caramel Popcorn Layered Cake

Hello Everyone! Today is a special day, and that special day is my birthday! For those who want to know, I am 24 years young today, and another year wider, I mean, wiser, but not another year taller unfortunately. It’s been 4 years since I last celebrated my birthday in Brunei with my family, and friends I grew up and went to high school with. It’s been that long because for the past 4 years I’ve spent my birthday’s in Australia, with my friends from uni. I didn’t really plan anything special, I just organised a dinner party at Villa Mauri last Friday night with some friends; exchanging conversations, laughter, and of course, no gathering is complete without some dirty talk! We’ve all not changed one bit 🙂 I’d just like to take this opportunity to thank those who came that night, and also thank everyone else who has greeted me so far. I am so blessed to have family and friends from all over sending love my way. I know, that sounded a bit cheesy.

24th Birthday Celebrations
Birthday with my high school friends at Villa Mauri (November 6th, 2015)

24th Birthday Celebrations
Birthday with my work friends at 
Patisserie (November 9th, 2015)

I baked this cake yesterday afternoon for my birthday dinner tonight with my mom and my sister. Seriously, I cannot stress out how much I hate frosting – it take so bloody long for me to get it perfect. Well, not so much perfect, but for me to get it to cover the cake. I don’t know if I’m doing it wrong or I should blame the climate, but the buttercream is runny to begin with, so I put it in the freezer to stiffen up a bit before I frost. Then when I start frosting, it quickly becomes runny again to the point that I have to keep placing the cake in and out of the freezer multiple times before I can get the frosting to somewhat cover the cake. But anyway, after much frustration on the eve of my birthday, I managed to get a decent looking cake up I guess (so over it right now – so over baking cakes altogether).

Actually, I think I know the reason (maybe not really) why my frosting was runny. I had a look at the ingredients photo that I took and saw that I had icing sugar in it. At first, I thought that that might’ve been the reason, but when I looked at the original recipe, there was no sign of icing sugar. So why did my frosting go wrong?! 😦 Not enough butter?

24th Birthday Celebrations
Birthday with my family at home (November 9th 2015)

Anyway, I’ve been wanting to make a cake like this for a while; as in the whole salted caramel with caramel popcorn on top kind of cake. I was blown away when I came across it over on La Pêche Fraîche – so beautiful and well photographed. So don’t forget to check out the original recipe over on her blog; she has adapted the different components to making this cake from various recipes (all links have been acknowledged below). Plus, her’s looks much more beautiful, and somehow taller than my cake *cries*.

Salted Caramel Popcorn Layered Cake Ingredients

PREP TIME 20 MINS | COOKING TIME 50-55 MINS | SERVES 8-10

INGREDIENTS

For the yellow butter cake (adapted from Joy of Baking)

  • 120g unsalted butter
  • 4 large free range egg yolks
  • 2 & 1/4 cups plain flour
  • 1 cup sugar
  • 3/4 cup milk
  • 2 & 1/4 tsp baking powder
  • 1 & 1/2 tsp vanilla
  • 1/4 tsp salt

For the salted caramel (adapted from FoodSwoon)

  • 30g unsalted butter
  • 1/2 cup sugar
  • 1/4 cup + 2 tbsp heavy cream
  • 2 tbsp water
  • 1 tbsp corn syrup
  • 1/4 tsp salt

For the salted caramel Italian meringue buttercream (adapted from FoodSwoon)

  • 350g unsalted butter, cut into small chunks
  • 4 egg whites
  • 1 cup sugar
  • 1/4 cup water
  • 1 tsp corn syrup
  • Pinch of salt
  • Half of a batch of salted caramel, cooled, the rest reserved for drizzling (see recipe below)

For the salted caramel popcorn (adapted from the Kitchn)

  • Popped popcorn from about 1 & 1/2 bags of popcorn
  • 130 grams unsalted butter
  • 3/4 cup brown sugar
  • 1/4 tsp baking soda
  • Big pinch salt, plus a little for sprinkling

METHOD

  1. Yellow Butter Cake:
    • Preheat oven to 180C (350F or gas mark 4). Grease 2 x 8.5-inch pans with a little bit of butter.
    • In a medium-sized bowl, whisk together the plain flour, baking powder, and salt together. Set aside.
    • In a large bowl, beat the butter and sugar together until light and fluffy, about 4 minutes altogether. Scrape the sides of the bowl, then add the egg yolks in and beat for a further 2 minutes. Add in the milk and vanilla, stirring gently to combine.
    • Add in the dry ingredients all at once, and stir gently until the batter comes together. Divide the batter evenly between your prepared pans and bake in the oven for 20-25 minutes or until a tooth pick inserted into the centre of the cake comes out clean.
    • Set the cakes aside to cool down completely before frosting.
  2. Salted Caramel:
    • Heat the sugar, water, corn syrup and salt together over medium-low in a small saucepan . Whisk at the beginning until they dissolve. Once dissolved, leave the mixture to caramelise into an amber colour.
    • Once amber, remove from the heat and quickly whisk in the butter and cream. Be careful of any splattering that may occur. Whisk until completely smooth.
    • Set aside to cool down before using it.
  3. Salted Caramel Italian Meringue Buttercream:
    • Place the water, sugar, corn syrup, and salt in a small saucepan. Heat on low until it reaches to about 115C/240F.
    • Meanwhile, as your sugar+water mixture is slowly heating up, place the egg whites in a large bowl and start to beat using a handheld electric mixer. Beat the eggs until soft peaks start to form. Then, slowly stream the water+sugar syrup into the egg whites with the mixer still going.
    • Beat the meringue until cooled to about body temperature, and then beat in the butter about 2 tablespoons (30g) at a time. Continue whipping the buttercream until it is silky before adding half of the caramel mixture in.
    • Set aside in the fridge until it is time to frost your cake.
  4. Salted Caramel Popcorn:
    • Preheat oven to 130C (250F or gas mark 1/2) and line a baking tray with parchment paper.
    • Place the popcorn in a big bowl and make sure not to include any unpinned kernels.
    • In a small saucepan, heat the butter, brown sugar, and salt until they begin to caramelise. Whisk well to combine, and then add in the baking soda. Quickly pour the caramel over the popcorn and toss well to coat.
    • Scrape the popcorn  out onto the baking tray and lightly sprinkle with a touch of salt. Bake in the oven for 30 minutes or until the caramel is completely dry and crunchy. Once done, set aside.
  5. Assembly:
    • Stack your cake on a cake stand and frost it with the buttercream. Drizzle the remaining caramel on the edges of the cake and then top the cake with a mountain of caramel popcorn!
    • Serve, share, and enjoy!

Salted Caramel Popcorn Layered Cake

BON APPÉTIT

– Ally xx

myTaste.com

Halloween Special: Creepy Broken Glass Cupcakes!

Halloween Special: Creepy Broken Glass Cupcakes!

Halloween Special: Creepy Broken Glass Cupcakes!

Hello Everyone! Where do I even begin? Well, how about I start off by wishing everyone a Happy Halloween! So one day, probably about a few weeks ago, I was browsing through my Reader page on WordPress and going through some of the recipes of other bloggers/writers that I follow. I came across a recipe over at Easy Baked which, if I can recall, were for some sort of cupcakes all decked up for Halloween. I really loved the bright purple, orange, and green colours that Ruthanne used to decorated her Halloween-inspired baked goodies. It was from there that I followed a link to her Creepy Broken Glass Cupcakes and I knew from that very moment that I had to tackle that recipe.

I haven’t seen anything quite like that before, and I thought it would be a nice, and fun baking activity on a Sunday afternoon (yes, I actually baked this last Sunday only because I knew I would have time to do so during the week leading up to Halloween, nor on Halloween Day). Also, Ruthanne notes that this is not an original idea of hers as she has seen many examples of these cupcakes online, but rather she made it her goal to create this recipe in the easiest way possible with fewer steps.

Halloween Special: Creepy Broken Glass Cupcakes!

Anyway, this recipe gave me a bit of a headache – well, just the broken glass candy part, and a little bit of the red velvet cupcake as well. Let’s just say that with the red velvet, it did not rise as I had wanted it to or hoped, and it wasn’t very red because of the lack of colouring (I used less because my bottle of red ran out). I had actually attempted to make this recipe 2 weeks ago, but because I was so defeated and tired by the end of the afternoon, I gave up and decided to try it out again the following weekend. At least when I tried that week, I managed to get 50% of the recipe done – the frosting and edible blood. I just kept them in the fridge until the following week when I rebaked my muffins and gave the broken glass candy another go (still was not perfect, but made do with what I had).

Basically, with the glass candy, I couldn’t get the sugar to harden – as in it was mushy as still syrup-like. Apparently, as I read in the comments section of Ruthanne’s blog, another person had the same problem and it was purely because the sugar wasn’t cooked for long enough. So make sure that if you want to try this recipe out, cook it just enough so that you won’t get a mushy mess! But obviously not for too long as it will turn amber in colour which, in this case, is not what you want.

Halloween Special: Creepy Broken Glass Cupcakes! Ingredients

PREP TIME 20 MINS | COOKING TIME 25 MINS | SERVES 12 CUPCAKES

INGREDIENTS

For the cupcake batter

  • 185g butter, at room temperature, plus extra melted, to grease
  • 125ml buttermilk
  • 2 large free range eggs
  • 2/3 cup caster sugar
  • 1/2 cup self-raising flour, sifted
  • 1/4 cup plain flour, sifted
  • 2 tbsp cocoa powder
  • 2 tbsp red food colouring
  • 1/4 tsp baking soda

For the cream cheese frosting

  • 250g cream cheese, at room temperature
  • 60g butter, at room temperature
  • 1/3 cup icing sugar, sifted
  • 1/4 tsp vanilla extract

For the ‘broken glass’

  • 1 cup granulated sugar
  • 1/2 cup light corn syrup
  • 1 tsp clear food flavouring (I used lychee)

For the edible ‘blood’

  • 1 can (395g) sweetened condensed milk
  • 1 tbsp red food colouring
  • 1 tsp clear flavouring (I used lychee)
  • Black food colouring

Halloween Special: Creepy Broken Glass Cupcakes!

Halloween Special: Creepy Broken Glass Cupcakes!

METHOD

A tip before starting off: Make the decorations first, the candy glass and edible blood, as you can keep them in the fridge until just before decorating your cupcakes for your party. They can both keep for several days so you can definitely make them ahead of time.

  1. Broken Glass Candy
    • Cover a baking tray with wax paper and grease it liberally with cooking oil spray, or alternatively you can grease it with some butter if cooking spray is not readily available in your pantry.
    • Place the granulated sugar and corn syrup into a microwave safe bowl and mix them together. Cover the bowl with plastic wrap microwave on high for about 3 minutes. Remove from the microwave and CAREFULLY (beware of the hot steam!) remove the plastic wrap. Stir well and cover again with fresh plastic wrap. Microwave again for another 3 minutes, but check the mixture after about 2 minutes just to make sure that it hasn’t coloured – if you cook the sugar/syrup mixture for too long, it will be amber in colour instead of a nice clear glass you want.
    • CAREFULLY remove the bowl from the microwave and CAREFULLY remove the plastic wrap. The mixture will be very hot and sticky so be cautious as to not touch any of the hot candy! Pour the mixture over the greased wax paper and allow it to sit and harden completely (will take a couple of hours).
    • When the candy has hardened, tap a knife into the ‘glass’ to break it into sharp pieces (do be careful at this point because the pieces are actually quite sharp themselves!), and push the pieces up off the was paper and onto a plate.
    • The glass candy can be kept in a ziplock bag or an airtight container for about a week. Moisture (including the moisture from the frosting on the cupcakes) will eventually start to break the glass candy down.
  2. Edible Blood
    • In a small bowl, add the sweetened condensed milk and mix in the flavouring and red food colouring (a bit at a time) until you get a brilliant red colour. Add a tiny bit of black as the colour can go a long way! Mix and adjust until you get a nice dark red colour.
    • Spoon the ‘blood’ into a ziplock bag and seal tightly. Keep refrigerated until use.
  3. Red Velvet Cake Mix
    • Preheat oven to 180C (350F or gas mark 4). Line a 12 hole muffin pan with black paper cases.
    • Sift the baking soda, cocoa powder, plain flour, self-raising flour into a medium-sized bowl and set aside.
    • Meanwhile in a large bowl, cream the butter and the sugar using an electric handheld mixer. Mix until pale and creamy. Add the eggs and beat on slow speed, making sure that it’s all blended in. Add the flour mixture into egg mixture and gently fold it in. Finally, add in the buttermilk and red food colouring. Mix together.
    • Spoon the batter into the prepared muffin cups, filling them 3/4 of the way and bake in the oven for 20-25 minutes or until cooked through. To check if they are done, insert a toothpick in the centre of the muffin.
    • Once done, remove from the oven and allow to cool down for about 5 minutes, then transfer them out of the muffin pans and onto a wire rack to allow them to cool down completely.
  4. Cream Cheese Frosting
    • Smooth the butter, cream cheese, and vanilla together using an electric handheld mixer. Fold in the icing sugar, and then use the mixer again to beat it until it is light and fluffy.
    • Place the frosting into a ziplock bag and refrigerate until use.
  5. Assembly & Decoration
    • Place some parchment paper on your work surface to protect it from all the red colouring from your edible blood, or alternatively you can use a platter or tray that you will be serving the cupcakes on.
    • Snip off a corner of your ziplock bag of frosting and pipe onto the cooled cupcakes. Press 2 to 3 pieces of the glass candy into the top of each cupcake.
    • Snip off a corner of your ziplock bag of edible blood and drizzle over the top of each cupcake and glass candy, allowing it to drip down the sides of both.
    • Serve the same day after decorating, with plates and forks or else you will have red fingers! Enjoy a bloody delicious dessert and a very Happy Halloween to all my family, friends, and followers!

Cupcakes taste best on the same day, though they may be stored covered tightly at room temperature for 3 days (undecorated) or in the refrigerator for 5 days.

Halloween Special: Creepy Broken Glass Cupcakes!

Once again, a very Happy Bloody Halloween to all my family, friends, and followers! I will be back on Tuesday with a new theme for the month of November so stay tuned!

BON APPÉTIT

– Ally xx

myTaste.com

Breakfast Muffins: Pumpkin, Polenta, and Chilli

Breakfast Muffins: Pumpkin, Polenta, and Chilli

Hello Everyone! I can’t believe we’ve come to an end to Breakfast/Brunch Month, which also means that it’s almost the end of October! Once again, where did the days go? Time flies too quickly. Luckily for you guys, today will not be the last post for October for I have a recipe going up on the 31st for a Halloween Special. I won’t say much about it now but the only thing I will say about it is that it’s gonna get bloody!

So anyway, since today will be my last post for Breakfast/Brunch Month, I’m going to end it with a recipe that is sure to knock you socks off! I’ve not tried this recipe before earlier on this week, but I can assure you that for those of you who like a little bit of spice in your life, these muffins pack a good kick! I had actually planned to bake some Chorizo, Corn, and Chilli Streusel muffins two weeks ago to post for today, but we could not find any chorizo at all that week. So I told my mom that I’ll hold off making the muffins since they weren’t going up on the blog for another week or so during that time, but as the days drew closer and chorizo still could not be found – so maybe I will hold off this recipe for another time when chorizo is available.

Thus, I decided to change my recipe – Pumpkin, Polenta, and Chilli Muffins! I kind of like how it is sort of in theme with fall (for the Northern Hemisphere), and Halloween – the pumpkin aspect of today’s recipe that is. The original recipe for these muffins can be found over on Taste;I didn’t really do anything to alter the recipe, only that I added half of the pepitas into the muffin batter mixture. Other than that, I pretty much just followed this quick and easy recipe.

Breakfast Muffins: Pumpkin, Polenta, and Chilli Ingredients

PREP TIME 15 MINS | COOKING TIME 22-25 MINS | SERVES 12 MUFFINS

INGREDIENTS

  • 500g butternut pumpkin, peeled and cut into small chunks
  • 2 & 1/2 cups self-raising flour
  • 3/4 cup milk
  • 1/2 cup coarse polenta
  • 1/2 cup vegetable oil
  • 1 large free range egg, lightly beaten
  • 2 tbsp fresh coriander leaves, finely chopped
  • 2 tbsp pepitas (pumpkin seeds)
  • 1 tbsp caster sugar
  • 2 tsp dried chilli flakes
  • Ground salt and black pepper, to taste
  • Softened butter, to serve

Breakfast Muffins: Pumpkin, Polenta, and Chilli

Breakfast Muffins: Pumpkin, Polenta, and Chilli

METHOD

  1. Preheat oven to 190C (375F or gas mark 5). Grease a 12 hole muffin pan with either cooking spray or with butter.
  2. Place the pumpkin chunks on a baking tray lined with foil and season with a bit of salt, pepper, and coat with olive oil. Bake in the oven for 15-20 minutes or until tender. Once done, remove from the oven and transfer to a heatproof bowl. Using a fork, mash the pumpkin and set aside to cool.
  3. Meanwhile, combine the self-raising flour, sugar, polenta, chilli flakes, coriander, and half of the pepitas in a bowl. Mix until thoroughly combined and then make a well in the centre.
  4. Add the milk, egg, vegetable oil, and pumpkin into the well and then mix until just combined. Your batter will be very thick which is exactly what you want! Season with a bit of salt and pepper, and the spoon the mixture evenly into the prepared muffin pan. Top with the remaining pepitas.
  5. Bake for 22 to 25 minutes or until golden and firm to touch. Remove from the oven and stand in muffin pan for about 5 minutes before transferring them onto a wire rack to cool down completely.
  6. Serve and enjoy warm or cold with softened butter!

Muffins taste best on the same day, though they may be stored covered tightly at room temperature for 3 days or in the refrigerator for 5 days.

Breakfast Muffins: Pumpkin, Polenta, and Chilli

Breakfast Muffins: Pumpkin, Polenta, and Chilli

BON APPÉTIT

– Ally xx

myTaste.com

Breakfast Muffins: Apple Strudel

Breakfast Muffins: Apple Strudel

Hello Everyone! Oh my! I cannot believe that it’s the last week of October already! My has time gone by so quickly this past month. Anyway, it’s been a while since I last baked muffins for breakfast and only because the last time I made muffins was back in Sydney with my Muffin Making Monday partner Jialing. We made a pizza muffin together one afternoon at her place (the recipe isn’t up on my blog yet), and yes that was the last of our Muffin Making Monday days. Since I left Sydney, we’ve talked about how much we miss baking muffins together and even said that we should still continue it… Over Skype! I don’t know how that’s ever going to work anymore since we’re both independent working women with our busy schedules and time differences.

But anyway! I wasn’t aware that it was a Monday when I baked these babies; only Jialing reminded me of it when she asked me what I was doing that day and I said that I was going to bake some muffins. Today’s recipe can originally be found on All Recipes. The recipe says that it should make 12 muffins, but I ended up with 16, maybe I should’ve filled the muffin cups a bit more because some of them were a bit flat, and some had a nice rise to them. Also, since I ended up with 16 muffins, I ran out of crumbed topping so the muffins weren’t very covered with the brown sugar streusel. Anyway, I’ve edited the recipe a bit so that the proportions match up. These muffins are a little bit on the sweet side, so if you’re someone who doesn’t like sweet things for breakfast, then tune in on Thursday for a savoury brekky muffin 🙂 It involves chorizo and has a bit of a spicy kick to it!

Breakfast Muffins: Apple Strudel Ingredients

PREP TIME 20 MINS | COOKING TIME 20 MINS | SERVES 16 MUFFINS

INGREDIENTS

For the muffin batter

  • 2 cups plain flour
  • 3/4 cup white sugar
  • 110g unsalted butter, softened
  • 2 large apples, peeled and roughly chopped
  • 2 large free range eggs
  • 1 & 1/4 tsp vanilla extract
  • 1 tsp baking powder
  • 1/2 tsp baking soda
  • 1/2 tsp salt

For the brown sugar streusel

  • 1/2 cup packed brown sugar
  • 20g unsalted butter
  • 1 & 1/2 tbsp plain flour
  • 1/4 tsp cinnamon

Breakfast Muffins: Apple Strudel

Breakfast Muffins: Apple Strudel

METHOD

  1. Preheat oven to 190C (375F or gas mark 5). Line a 12 hole muffin pan with paper cases. In a medium-sized bowl, combine the plain flour, baking powder, baking soda, and salt. Set aside.
  2. In a small bowl, mix the brown sugar, cinnamon, and plain flour. Add the butter, and using your fingers, crumb the butter into the sugar mixture. Because Brunei is scorchingly hot, I needed to place the streusel in the freezer to stiffen up a bit.
  3. Using an electric handheld mixer, beat the butter and sugar in a large bowl until smooth. Add in the eggs and vanilla extract and continue to beat until well combined. Add in the apples and stir using a rubber spatula. Gradually stir in the flour mixture.
  4. Spoon the batter into the prepared muffin pan, filling them up to about 3/4 of the way, and top with the brown sugar streusel.
  5. Bake for about 20 minutes or until a toothpick inserted in the centre of a muffin comes out clean. Once down, remove from the oven and set aside to cool for about 5 minutes before removing them from the pan. Cool down completely on a wire rack and then they are ready to eat!

Breakfast Muffins: Apple Strudel

Breakfast Muffins: Apple Strudel

Muffins taste best on the same day, though they may be stored covered tightly at room temperature for 3 days or in the refrigerator for 5 days.

BON APPÉTIT

– Ally xx

myTaste.com

Homemade Doggie Treats

Homemade Doggie Treats

Hello Everyone! Hope you had a lovely weekend; I sure did! As hectic as it was, it was pretty great as I got to celebrate my Sister’s 21st Birthday on Sunday with my Mom and close family friends. For those who have been following my blog for a while now will surely say that today’s recipe is a bit odd in a way that it’s not something they’d think I would whip up in the kitchen I guess.

Alas, it’s because today is an important day in the household – it’s Blacky’s 5th non-Birthday! For those of you who don’t know, Blacky is my beloved and well-behaved Mutt. He’s such a character, and a very smart dog I might add! We got him 5 years ago back in 2010 on this day when he was about 2-3 weeks old together with his brother, Browny (yes, we weren’t very creative with names). Unfortunately his brother passed away about 2 years ago because he was poisoned by our neighbours.

Homemade Doggie Treats

Anyway, I realised that for the past 4 years, I’ve never been around to treat my doggie something special for his non-Birthday as usually around this time I’m in my second term of uni in Australia. Now that I get to spend a birthday with him, I thought I’d do something nice for him today and bake him a batch of yummy homemade doggie treats! The original recipe can be found on The Kitchn.

A little note for Vidhya (and for anyone else who skips the recipe part when reading my blog): please scroll down and continue reading, there’s a little story for you at the end as well!

Homemade Doggie Treats Ingredients

PREP TIME 15 MINS | COOKING TIME 20 MINS | MAKES 15 TREATS

INGREDIENTS

  • 1 cup plain wholemeal flour
  • 1/4 cup cold water
  • 1/4 cup melted bacon fat (or unsalted butter)
  • 1/4 cup rolled oats
  • 1 small free range egg
  • Fried bacon bits

METHOD

  1. Preheat the oven to 180C (350F or gas mark 4). Line a baking tray with parchment paper and set aside.
  2. Combine all ingredients in a medium-sized bowl and mix by hand until a dough starts to form. If the dough is still feeling a little bit sticky, add more flour. Likewise, if the dough is too stiff, add more bacon fat, butter, or water.
  3. Roll the dough out onto a floured surface, to a thickness of just under 1/2-inch. This is where you can get creative with your treats; you can cut them into 1×4-inch bars or use various cookie cutters to shape them. I wanted to make the treats bone-shaped but since I didn’t have a cutter, I shaped them each by hand – it took a while but I got there in the end.
  4. Transfer the treats to your prepared baking tray. Bake for approximately 20 minutes or until lightly browned. Once down, turn the heat off, flip the treats, and place back in the oven until the oven cools down (this will further crisp your treats). Remove from the oven and set the treats aside to completely cool.
  5. Treat your beloved doggie with these lovely homemade treats!

Homemade Doggie Treats Process

Homemade Doggie Treats

These doggie treats can be stored in an airtight container at room temperature. With this recipe, I was able to make about 15 doggie treats, and about 5 small discs with the scraps of dough. I tried one of this discs myself and it was neither good nor bad, it just had no taste whatsoever for me personally. At this point, I was a bit scared that I spent all this time making these treats for Blacky just for him to ignore them and not eat them because of their tasteless state. So when I baked them yesterday afternoon, I tried to feed him two of the small discs. He was outside lying down, being lazy. I was able to put one in his mouth, but instead of chewing on it, he dropped it on the floor. I picked it up and tried to feed it to him again, but he did the same thing. I then put the two little discs on his two front paws and went back inside the house.

Five minutes later, I peaked through the window; he hadn’t moved and the treats were still on his paws. I went back outside and tried to feed it to him again and this time he chewed on them, and it was a sort of oh-my-gosh-this-is-actually-so-yum kind of chew. When he was done with the first treat, he looked for the other treat that I had in my other hand. I fed it to him and he was still looking for more after he was done! So really, I knew before hand that he definitely liked his non-Birthday present 🙂

Happy Birthday Blacky
the rain was coming down really heavily and there was a bit of thunder and lightning which was why Blacky looked scared in the photo on the right – my poor baby. He did appreciate his treats though! He’s had 6 of them today alone!

Also before I sign off from tonight’s post, I am aware that it is indeed week 4 and the last week of Auguest for this year; do not fret! Tune in tomorrow and on Friday for my final guest blogger!

BON APPÉTIT

– Ally xx

myTaste.com

Lemon & Blueberry Layer Cake

Lemon & Blueberry Layer Cake

Happy Birthday Angela

Hello Everyone! Today won’t be a Review Sunday as I have a special post for you tonight! Today is my sister, Angela’s, 21st Birthday! I can’t believe that she is my not-so-little sister anymore! How time flies by so quickly. I’m glad that after 4 years of being away, I get to spend today with you! Hope you have the most wonderful of birthdays and hope you like my cake that I made for you! Lots of love, Ate Ally ❤

Lemon & Blueberry Layer Cake

I have never made this cake before, and unlike the original recipe, she uses plain all-purpose flour while I used plain wholemeal flour. The reason? I didn’t have enough plain flour and I didn’t want to go out to the grocers to buy more, plus I still had a brand new pack of wholemeal flour and decided to give that a go! It still tasted great, but the cake was a bit crumbly when I cut into it, but maybe it was because I may have over measured the flour a bit (as Sally says not to in her recipe… Oops)! Check out the original recipe from one of my favourite bakers: Sally’s Baking Addiction.

Lemon & Blueberry Layer Cake Ingredients

PREP TIME 30 MINS | COOKING TIME 30 MINS | SERVES 8-10

INGREDIENTS

For the cake batter

  • 230g unsalted butter, softened to room temperature
  • 4 large free range eggs, at room temperature
  • 3 cups plain wholemeal flour, sifted
  • 1 & 1/2 cups blueberries, fresh or frozen
  • 1 cup buttermilk*
  • 1 cup granulated sugar
  • 1/2 cup light brown sugar
  • 1 tbsp baking powder
  • 1 tbsp wholemeal flour
  • 1 tbsp vanilla extract
  • 1/2 tsp ground sea salt
  • Zest and juice of 3 medium-sized lemons

*Rather than purchasing a whole carton of buttermilk from the store and worrying about what to do with the leftovers before it starts to go bad in the fridge, making your own buttermilk is as simple as 1, 2, 3. Simply measure 1 tbsp of fresh lemon juice (alternatively you can use white vinegar) in a measuring cup and then fill the rest up with full cream milk until you reach 1 full cup. Stir it around, let sit for 5 minutes, and it will be ready to use!

For the zesty cream cheese frosting

  • 1 package (250g) cream cheese, softened
  • 100g unsalted butter, softened
  • 1 & 1/2 cups confectioners’ sugar
  • 1-2 tbsp lemon juice

To decorate

  • Confectioners’ sugar
  • Fresh blueberries
  • Lemon slices and zest

METHOD

  1. Preheat the oven to 180C (about 350F or gas mark 4). With a little bit of butter, grease the bottom and sides of three 8.5-inch cake pans and set aside.
  2. Make the cake batter: Using a electric handheld or stand mixer beat the butter on high until creamy (takes about a minute), then add the granulated and brown sugars. Continue to beat on medium-high speed until creamed, about 2-3 minutes. Add in the eggs and vanilla extract, and beat on medium for a further 2 minutes until the mixture is well combined. Don’t forget to scrape down the sides and bottom of the bowl as needed. Set aside.
  3. In a separate medium-sized bowl, add the wholemeal flour, baking powder, and salt, and toss together. Slowly add the dry ingredients to the wet ingredients and beat on low speed for about 5 seconds, and then add in the buttermilk, lemon juice, and zest. Remove from the mixer and stir lightly until everything is just combined.
  4. Spoon half of the batter evenly into the three prepared cake pans. If using frozen blueberries, do not thaw as they will bleed into your cake batter. Toss the blueberries in about a tablespoon of flour as well – this way they won’t burst inside and turn your cake purple. Divide the blueberries equally between the three cake pans. Top with the remaining batter equally between the three.
  5. Bake the three layers for about 21-26 minutes or until a toothpick inserted in the center comes out clean. Mine took about 30 minutes, and I even left it in the oven for a further 5 minutes with the heat off. Remove from the oven and allow to cool completely before frosting.
  6. Make the frosting: Using an electric handheld mixer, beat the cream cheese and butter in a small bowl until smooth. Then beat in the confectioners’ sugar and a few frozen blueberries.
  7. Assemble: Place one cake layer on a serving plate and spread with about 1/3 cup of frosting. Top with the second layer of cake and again spread with another third of the frosting. Top with the last layer and frost the top and sides of the cake. Decorate with fresh blueberries, lemon slices and zest, and a touch of confectioners’ sugar. Store in the fridge before serving. Enjoy!

Lemon & Blueberry Layer Cake Process

Lemon & Blueberry Layer Cake

BON APPÉTIT

– Ally xx

myTaste.com

Auguest 2015: Brendon D'Souza

Brendon’s Giant Chocolate Chip Cookie

Hi Everyone! It’s Brendon from Brendon The Smiling Chef again with my second delicious dessert post as part of Amcarmen’s Kitchen’s Auguest series. It’s been a pleasure to be able to share my recipes with you, and next week you can visit my website to check out Ally’s mouthwatering recipes for Adobo and Sinigang.

Brendon's Giant Chocolate Chip Cookie

Here in Australia we often take for granted just how lucky we are to have an abundance of fresh, delicious food whenever we want it. On my travels to developing parts of India or Peru I saw firsthand the immense poverty and malnutrition that many people experience in their daily life. With populations on the rise, food is becoming an increasingly scarce and precious commodity. Back home in Sydney I’ve volunteered for a number of years with St. Vincent De Paul Society in their Vinnies Van appeal, providing fresh meals to people less fortunate. I’ve seen their struggle and this is why find it extremely difficult to hear that in the state of New South Wales alone (where I live) we throw away over 1.1 million tonnes of food each year! It’s a ridiculous amount and we really need to be more careful with our food consumption habits if we are to create a sustainable future for the generations to come.

The recipe I’d like to share with you today is part of a collection of recipes I like to call “Up-cycled Food”. The idea is simple – take your leftovers or parts of ingredients you would commonly throw away (such as parsley stalks or vegetable stems to name a few) and turn them into a delicious meal. At the end of my Cookies and Cream recipe from Tuesday’s post, I promised to show you what you can do with your leftover chocolate chip cookie dough. Sometimes I genuinely cannot be bothered to roll out a million tiny balls for individual cookies. Instead I press the dough into a cake tin or slice pan and bake it as one giant choice chip cookie. It still tastes absolutely delicious and much faster to make. You can either use your leftover cookie dough from Tuesday’s recipe (and simply skip straight to step 3) or make some more dough using the recipe below.

Brendon's Giant Chocolate Chip Cookie

PREP TIME 10 MINS | COOKING TIME 20-30 MINS | MAKES 2 GIANT COOKIES

INGREDIENTS

  • 250g unsalted butter, softened
  • 200g dark chocolate, chopped
  • 200g milk chocolate, chopped
  • 1 cup brown sugar
  • 1 cup plain flour
  • 1/4 cup baking powder
  • 1 free range egg
  • 1 tbsp vanilla bean paste (or extract)

METHOD

  1. Pre-heat the oven to 170C (325F or gas mark 3). Grease two 20cm spring form cake tins with butter and line with a disc of baking paper. Place each onto a baking tray and set aside.
  2. Place the butter and sugar and vanilla into the bowl of an electric mixer and beat until fluffy. Alternatively use electric hand beaters. Add the egg and beat until combined. Add the flour, baking powder and salt and stir to form a smooth dough. Add the chopped chocolate stir to combine.
  3. Divide the dough in half and press into each cake tin using your fingertips.
  4. Place the baking tray on the middle shelf of the oven and bake for 20-25 minutes until for a soft, fudgy cookie. Increase cooking time to between 25-30 minutes for a firmer, biscuit-y texture. Remove from the oven and allow to cool.
  5. Cut into wedges and serve. Any leftover ganache from Tuesday’s recipe tastes delicious with these gooey cookies. Simply warm it up then drizzle for a full-on chocolate hit!

That wraps up things for me here at Amcarmen’s Kitchen. It’s been a pleasure to be a part of this Auguest series. You can check out all my cooking and food blogging adventures at Brendon The Smiling Chef. While you’re there check out my Instagram page @brendonthesmilingchef.

Brendon's Giant Chocolate Chip Cookie

Recipe Copyright © 2015 | brendonthesmilingchef

Happy cooking and keep smiling,

Brendon D’Souza 🙂

myTaste.com

Auguest 2015: Brendon D'Souza

Brendon’s Cookies & Cream

Hi Everyone! Hope you’re all having a lovely day wherever you are. My name is Brendon D’Souza and I am a writer and food blogger from Sydney. I’m very honoured to be a part of this Auguest series and have some exciting dessert creations to share with you over the next two posts.

I launched my website Brendon The Smiling Chef in 2012, posting simple recipes that I had cooked for dinner. I developed skills in food styling and photography through internships and writing and editing roles at Green Lifestyle, Grapeshot, Australian Catholics and Youth Food Movement Australia and started to apply these skills to my recipe posts. This year I plan to make a few exciting changes with the website and include a restaurant review section called “Smiling & Dining @” which features reviews that I publish at Zomato While you’re there feel free to check out all my foodie adventures in Instagram at @brendonthesmilingchef.

Brendon's Cookies & Cream

I met Ally a few months ago at a food blogging seminar held in Sydney and she told me all about her passion for exploring cultures through food, which is something that I too love! We caught up a few weeks ago for a fabulous cooking day where she showed me how to make some delicious Filipino recipes (Which you can check out at Brendon The Smiling Chef next week). The recipe that I’m going to share with you today is a bit of an invention that I have drawn from my experiences of growing up here in Australia. Like Ally, I too am a bit of a third-culture foodie. My family are Indian and are originally from the state of Goa which sits on the West Coast of India. Goa is largely influenced by the Portuguese, who colonised the region in around the 16th Century, so our culture, customs and cuisine are surprisingly similar to Europe. I was born in Bahrain and lived there for two years before we migrated to Australia in the mid-nineties.

Growing up in Western Sydney, I was surrounded by a wealth of multicultural diversity and from a young age I was introduced to the cultures and cuisines of the Philippines, Southern America, Malta and Vietnam to name a few. Despite all this I have to admit that as a child I was very embarrassed about being Indian. It’s one of side-effects of growing up in Anglo-Saxon society. I saw myself as different from all the other kids at school. I had black hair, brown skin and brown eyes rather than blonde hair and blue eyes. Now that we’ve all grown up, a lot of my friends have said that they experienced these feelings too! I would cringe when I opened my lunchbox to find the beautiful Goan prawn curry and rice that mum had packed for me. What would the other kids think? We never really ate much Indian food at home when we were younger because my sister and I, being True Blue Aussies, didn’t like the pungent spices used in most of our cooking. They were too hot for our tiny tastebuds to handle. In these instances, six-year-old Brendon would drag a chair to the kitchen and reach for a jar of tomato paste sauce to put together my version of Spaghetti Bolognese; 1 kilogram of beef mince with 1 jar of tomato paste, yes paste (#IcantbelieveIdidthat), stirred through.

Brendon's Cookies & Cream

The 2000’s came along we noticed a number of American food products appearing on the supermarket shelves including Pop Tarts, Oreos, and Krispy Kreme Donuts. My favourite was Hershey’s Cookies ’n’ Creme bar, (or the Mars® counterpart Dove), a dreamy combination of white chocolate with tiny chocolate cookie pieces. It was ever popular among my Filipino friends. They had experienced this delight for years because it was sold in all the Filipino grocery stores. We saw it as a luxury because it was so new! It became one of my favourite flavour combos and, to nine-year-old Brendon’s delight, even started appearing in ice creams and cheesecakes!

I was playing around with the idea of reinventing Cookies and Cream and turning it into a sophisticated dessert. Chocolate chip cookies would definitely feature because who doesn’t love a good chocolate chip cookie? A white chocolate and vanilla bean ganache could represent the Cream and a 70% dark chocolate ganache would balance the sweetness. It had been a while since I’d tried to make macarons from scratch but I thought it would be nice to have some chocolate almond cigars to add another texture and flavour to the dessert. We made up the recipe for these while referring to the Master Adriano Zumbo’s for rough measurements. They weren’t as smooth on top but they made delicious chewy cookies.

Brendon's Cookies & Cream Ingredients

PREP TIME 30 MINS | COOKING TIME 15 MINS | SERVES 2-3

INGREDIENTS

For the white chocolate and vanilla bean ganache

  • 100ml pure cream
  • 200g white chooclate, chopped
  • 1 tbsp vanilla bean paste
  • 1 tsp glucose syrup

For the bitter dark chocolate ganache

  • 100ml pure cream
  • 150g dark chocolate (min. 70% cocoa solids)
  • 1 tsp glucose syrup

For the chocolate almond cigars

  • 1 free range egg white
  • 250g caster sugar
  • 150g almond meal
  • 2 tbsp Dutch process cocoa powder

For the chocolate chip cookies

  • 250g unsalted butter, softened
  • 200g dark chocolate, chopped
  • 200g milk chocolate, chopped
  • 1 cup brown sugar
  • 1 cup plain flour
  • 1/4 cup baking powder
  • 1 free range egg
  • 1 tbsp vanilla bean paste (or extract)

METHOD

Preparation

  1. White chocolate and vanilla bean ganache: Place the cream and white chocolate into a microwave-safe bowl and stir to combine. Heat for 30 seconds on medium then give the bowl a stir with a spatula. Continue to heat and stir the ganache in this way until smooth. Alternatively you can place the chocolate and cream into a heatproof glass bowl set over a pan of simmering water and stir until melted. When smooth, add the vanilla bean paste and the glucose syrup and stir until smooth. Allow to cool completely. Transfer the ganache to a disposable piping bag, seal the end with a rubber band and place in the fridge until cold but pliable.
  2. Bitter chocolate ganache. Place the cream and dark chocolate into a microwave-safe bowl and stir to combine. Heat for 30 seconds on medium then give the bowl a stir with a spatula. Continue to heat and stir the ganache in this way until smooth. Alternatively you can place the chocolate and cream into a heatproof glass bowl set over a pan of simmering water and stir until melted. When smooth, add the glucose syrup and stir until smooth. Allow to cool completely. Transfer the ganache to a disposable piping bag, seal the end with a rubber band and place in the fridge until cold but pliable.

Chocolate Almond Cigars

  1. Pre-heat the oven to 150C (300F or gas mark 2). Line a baking tray with baking paper and set aside.
  2. Place the egg white into a clean stainless steel or glass bowl free from grease or dirt. Whip to soft peaks using clean electric beaters. Add 1 tbsp of castor sugar to the egg whites and beat for 20-30 seconds or until the sugar has dissolved. Continue to add the sugar in this way until you have a glossy meringue. Sprinkle the almond meal and cocoa powder over and fold using a spatula to form a smooth batter.
  3. Transfer the batter to a disposable piping bag, twist the opening to enclose the filling and carefully cut off the tip of the bag to create a hole 2cm in diameter.
  4. Pipe 5cm cigars onto the baking sheet. You will need about 8 for this recipe. Allow them to rest for 10 minutes.
  5. Place the tray on the middle shelf of the oven and bake for 10-15 minutes or until the cigars have risen. Remove the tray from the oven and allow them to cool. When cool, take your piping bag with the white chocolate ganache and pipe a line down half the cigars. Sandwich with another cigar on top.

Brendon's Cookies & Cream

Chocolate Chip Cookies

  1. Place the butter and sugar and vanilla into the bowl of an electric mixer and beat until fluffy. Alternatively use electric hand beaters. Add the egg and beat until combined. Add the flour, baking powder and salt and stir to form a smooth dough. Add the chopped chocolate stir to combine.
  2. Roll out 12 cookies using 2 tsp cookie dough for each. Place them onto the prepared baking tray leaving about 3cm between each cookie for spreading. You will only need a small amount of the dough for the recipe but I’ll show you what you can do with your leftovers in my next recipe. Wrap the leftover dough tightly with cling wrap and place in the fridge.
  3. Place the baking tray on the middle shelf of the oven and bake for 10-15 minutes until the cookies have spread. Remove from the oven and allow to cool.
  4. Crumble 4 of the cookies to form cookie crumbs.

Plate up the dessert

  1. This is where the fun begins. Feel free to let your imagination run wild. Sprinkle the cookie crumbs across 4 serving plates. Pipe some white chocolate ganache onto each of the serving plates. Then rest a cigar along the ganache. Divide the chocolate chip cookies among the plates. Make a 1cm hole in the piping bag with the biter chocolate ganache and pipe them around the plate. Serve.

Ally and I had lots of fun with the plating. Check out our attempts.

Brendon's Cookies & Cream

Brendon's Cookies & Cream

Recipe Copyright © 2015 | brendonthesmilingchef

Happy cooking and keep smiling,

Brendon D’Souza 🙂

myTaste.com

Graduation Day Lemon Curd Cupcakes

Graduation Day Lemon Curd Cupcakes

Hello Everyone! Today is the day! Today is the day that certifies that I am no longer a student, and I am officially unemployed! Today is the day that I receive a piece of paper worth AUD$110,000 of tuition fees to say that I have completed my 4-year Bachelor of Design degree! Today is Graduation Day!

It’s supposed to rain today – great. I have the last time slot which means that instead of a nice sunny graduation day, it’s gonna be dark and cold, if the rain decides to dawn upon my ceremony. Yesterday I kept sneezing, and I know that when that starts to happen, a fever, and eventually a cough and sore throat will follow. Not much luck today as far as I can see, and it’s only 8:45 in the morning as I am writing this paragraph. The good news is, I feel fine so at least I can stop worrying about getting sick – I just hope that the sun pops out for a while, while it’s still bright out in the afternoon before my ceremony at 6:30pm.

UNSW Graduation Day 2015


UNSW Graduation Day 2015

So anyway, it actually stopped raining when I arrived on campus at around 4:15pm – praise the Lord! The cloud didn’t clear up so it was still grey and gloomy. Oh well, at least we weren’t wet from the rain. It got dark really quick though and therefore photos were not as great 😦 All in all, a fun evening seeing friends, and graduating with fellow design mates; a little nerve-wrecking as I kept thinking that I was going to be THAT ONE student who would trip and fall flat on my face. Thank God I didn’t, and neither did anyone else who graduated tonight.

Graduation Day Lemon Curd Cupcakes

I picked to bake tonight’s recipe mainly because of the colours that represent the University of New South Wales, which is Black and Yellow/Gold. Enjoy!

Graduation Day Lemon Curd Cupcakes Ingredients

PREP TIME 20 MINS | COOKING TIME 18-20 MINS | MAKES 12 CUPCAKES

INGREDIENTS

  • 1 & 1/2 cups plain flour
  • 3/4 cup caster sugar
  • 3/4 cup lemon curd
  • 1/2 cup milk
  • 110g unsalted butter, at room temperature
  • 3 tbsp fresh lemon juice
  • 2 large free range eggs
  • 1 & 1/2 tsp baking powder
  • 1 tsp vanilla extract
  • 1/2 tsp salt
  • Icing sugar for dusting
  • Zest of one large lemon

METHOD

  1. Preheat oven to 180C (350F or gas mark 4). Line a 12 hole muffin pan with paper cases and set aside.
  2. Whisk the plain flour, baking powder, and salt together in a medium-sized bowl, and set aside.
  3. In a small bowl, combine the sugar and lemon zest. Rub together with your fingers until fragrant.
  4. Using a hand-held electrical mixer, beat the butter and sugar mixture together until light and fluffy, and lightened in colour (about 8 minutes). Scrape down the sides of the bowl with a rubber spatula in between mixing.
  5. Add the eggs one at at time, beating after each addition. Then add in the vanilla extract.
  6. Add the flour mixture and milk alternately, starting and ending with the flour. Mix until the flour is just incorporated and be careful as to not over mix the batter. Mix in the lemon juice.
  7. Divide batter evenly in prepared cupcake liners, filling each case 2/3 of the way full. Bake the cupcakes for about 18-20 minutes or until a toothpick inserted in the centre of the cake comes out clean. Transfer the pan to a wire cooling rack and cool completely.
  8. Once the cupcakes have completely cooled down, using a knife, cut out a small hole in the centre of the cupcake, about the size of a dime. Carefully remove the centre piece and set aside.
  9. Fill each hole with about 1 teaspoon of lemon curd and dust with a bit of icing sugar.
  10. Share with family and friends, and enjoy!

Graduation Day Lemon Curd Cupcakes Process

Graduation Day Lemon Curd Cupcakes

BON APPÉTIT

– Ally xx

myTaste.com