Taho (Silken Tofu with Syrup & Tapioca Pearls)

Taho (Silken Tofu with Syrup & Tapioca Pearls)

Hello Everyone! So usually a new month on the blog means a new theme as well, but this time around I’ve decided to continue sharing Filipino breakfast favourites as there are so much more to cover than just the –silog dishes!

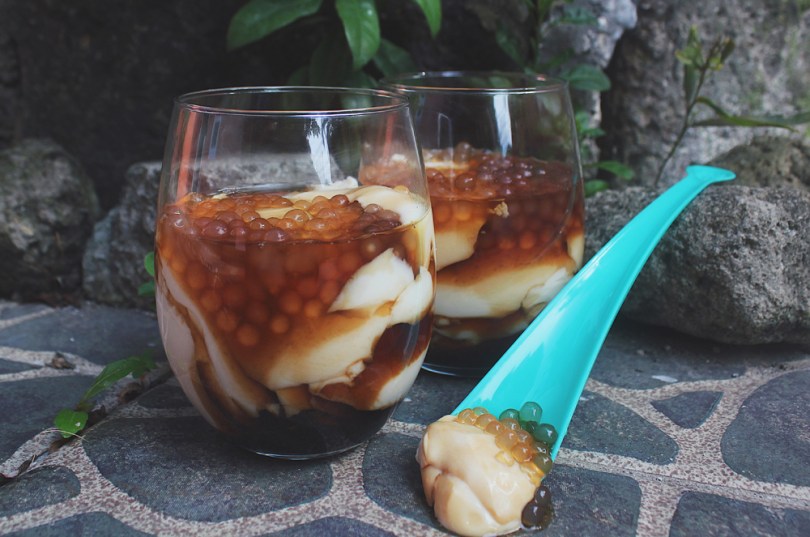
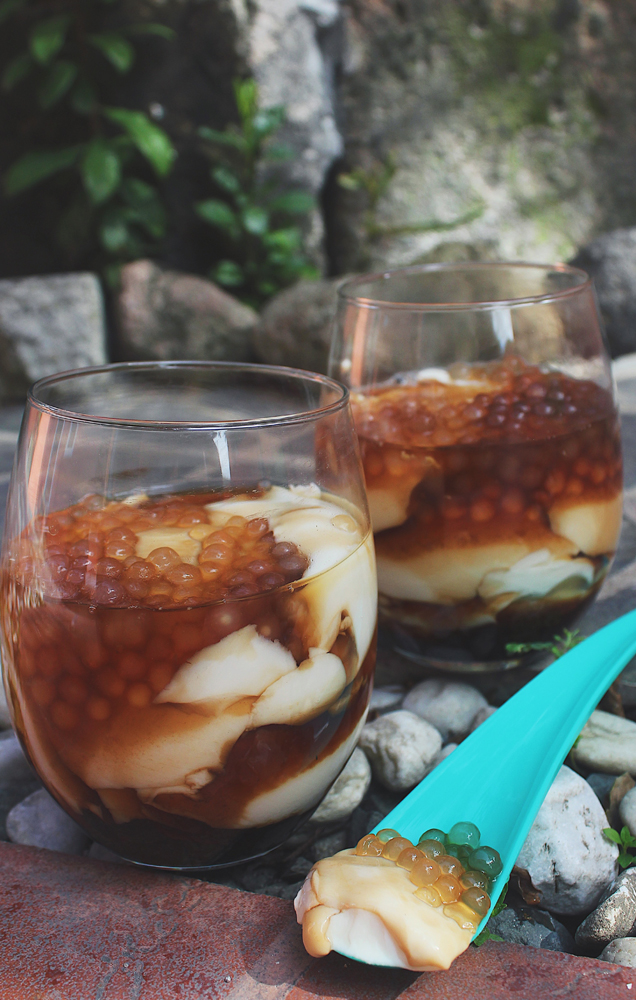
Tonight I will be sharing with you a popular breakfast protein in a cup known as Taho, pronounced tah-ho. It is basically warm bland silken tofu that is sweetened with a caramelised sugar syrup known as arnibal, and is topped with tiny sago (tapioca) pearls. The tofu base is as fine as custard that practically disintegrates into your mouth at every slurp. The arnibal imparts a warm, molasses-like aroma, and addition to the sweetness it brings to lift the tofu, it also gives it an earthy dimension. The sago? Ties the whole cup together by giving it some bite. It is a perfect breakfast to-go that warms your insides, is filling, and has enough sugar to get you through the morning.

Traditionally, taho vendors hawk their product using a yoke-and-bucket system that is hundreds of years old. Two aluminium buckets are suspended from each end of a bamboo pole – one containing the silken tofu, and the other carrying the arnibal, sago, and other necessities like plastic cups, spoons, and the day’s takings. Taho vendors balance their signature contraption on one shoulder and walk the streets in the mornings calling out “tahhoooooo” drawing out the second syllable for as long as their breath can handle.

As easy as it is to get taho from vendors, it is also just as easy to make it at home yourself with either store-bought silken tofu, or by making your own at home with instant or Homemade Soy Milk with a coagulant agent to help aid in the curdling of the soy milk to form taho – in this case, the recipe uses Epsom salt. Original recipe can be found over on Foxy Folksy.

Taho (Silken Tofu with Syrup & Tapioca Pearls)

PREP TIME 5 MINS | COOKING TIME 20 MINS | SERVES 4

INGREDIENTS

For the silken tofu

  • 2 cups unsweetened soy milk, instant or homemade
  • 1/8 cup water
  • 1 tbsp + 1 tsp cornstarch
  • 2 & 1/2 tsp (leveled) Epsom salt

For the arnibal

  • 1 cup brown sugar
  • 1 cup water
  • 1/4 cup small-sized tapioca pearls, uncooked

METHOD

If using store-bought silken tofu, skip ahead to step 6

  1. Taho: In a large cooking pot over the stove, place a heat-proof bowl that is big enough to hold at least 500ml of liquid in it.
  2. Dissolve the cornstarch in 1/8 cup of water in a small bowl. Add the Epsom salt to the mixture and then stir until dissolved.
  3. Pour the mixture into the prepared bowl in the cooking pot. Then slowly pour in the instant/homemade soy milk to the cornstarch and Epsom salt mixture. DO NOT STIR! Once both mixtures are combined, try not to agitate it otherwise it will not curdle smoothly.
  4. Pour boiling water into the pot just enough to be on the same level of the soy milk mixture in the bowl. Cover the pot with the lid wrapped with a clean cloth to absorb the steam and prevent the droplets formed from dripping into the taho mixture.
  5. Turn the heat to medium-low and let the taho cook for about 15 to 20 minutes or until it is firm to the touch but still wiggly. While waiting for the taho to cook, you can prepare the arnibal and tapioca pearls.
  6. Arnibal: Combine equal parts of brown sugar and water in a small pot and bring it to a boil over medium heat. Stir occasionally and let it simmer until it thickens into a syrup, about 7 to 10 minutes.
  7. Tapioca Pearls: In a small pot, bring to a boil about a half litre of water before adding the tapioca pearls in. Leave to cook for about 10 minutes. Cooking time may vary depending on the size of your pearls.
  8. Place a colander or strainer in a bowl or pot and pour the pearls through to separate them from the water. Pour the same water used back into the cooking pot and bring the water to a boil again.
  9. Wash the strained tapioca pearls thoroughly with tap water and then place it back into the pot of boiling water again. Cook further until they become completely translucent ensuring that there are no white spots at the core.
  10. Serve: Using a wide spoon or ladle, make thin scoops of taho and transfer to a glass or mug. Top with the arnibal syrup and tapioca pearls. Enjoy while it’s warm!

Taho (Silken Tofu with Syrup & Tapioca Pearls)

You can find taho vendors almost in every corner – everywhere! There’s usually a vendor just outside the entrance to the weekend market where my Mom and I do our weekly groceries. I also remember coming across a taho vendor on the beach as well. In fact, we have our own taho vendor who comes on his bicycle every morning around 9am yodeling “tahhoooooo” on our street. Occasionally we’d call out to him for a cup (or two) of delicious taho, and since he comes right to our doorstep, we opt to use our own ceramic cups/mugs instead of the plastic cups he usually serves them in – we need to do what we can to reduce plastic waste!

In Baguio City, Strawberry Taho is a big hit where locally grown strawberries from the region are preserved as chunky jam and then added to the bland tofu instead of arnibal. Make you own chucky strawberry jam at home with my Homemade Strawberry Jam to bring the City of Baguio into your kitchen!

BON APPÉTIT

– Ally xx

myTaste.com

Lucban Longsilog

Lucban Longsilog

Hello Everyone! I’ll start of with a question for all of you this morning:

What did you have for breakfast this morning?

When I was still working in Brunei for the past few years, I would kicking off my day with breakfast by 6:30am which is usually either a bowl of oatmeal with fruits, bread with whatever spread was available (most likely peanut butter), pancakes, or instant noodles. Whichever it was for that day, none of these would last me until my noon lunch break. At most, I could only last until about 10:00am (and that’s already pushing it). The rest of the two hours, I usually sit at my desk dreaming of lunch and unfortunately continue to have an unproductive latter part of the morning.

Filipinos and most Asians in general love to eat rice in almost every meal, including breakfast. Rice provides more energy and keeps us full and focused longer – but as a kid, my siblings and I were never brought up on having rice for breakfast. Even having been back in the Philippines for just over two months now, not once did we have rice for breakfast. The –silogs you’ll be seeing for this month on Amcarmen’s Kitchen is actually breakfast for dinner *cheeky grin*

Here’s another question for you, especially to all my kabayans out there:

What’s your favourite type of longganisa?

Lucban Longsilog

The great thing about longganisa is that they come in many variations depending on the province they originate from, but nonetheless are all mouth-watering breakfast delights. Provinces such as Vigan, Lucban, Tuguegarao, Cabanatuan, Alaminos, Cebu, Camlumpit, Bacolod, Pampanga, Guinobatan, and many more boast of their own unique blend of ingredients that is specific to their region that goes into the making of their longganisa. For example, what makes Vigan Longganisa so popular is its garlicky and sour notes that come from the combination of Ilocos sugar cane vinegar (sukang Iloko) and local garlic from Sinait which are both major products of the Vigan province.

I have yet to try all the types of longganisa around the Philippines, but to date, my long-time favourite is most definitely the Lucban Longganisa! They are very popular for their aromatic and garlicky smell! If you happen to visit the province of Lucban, Quezon, you will definitely not miss this longganisa because it is displayed in the markets, and even along the roads in the many parts of the town. The best part? I don’t have to travel all the way to Lucban, or wait for a relative to bring some back as pasalubong – I can now find freshly made ones at our local weekend produce market, and I even spotted some at our local grocers too! Additionally, they’re not that hard to make at home yourself!

Longganisa is definitely a very popular Filipino breakfast staple that is best paired with sinangag (garlicky fried rice), fried egg, and a spicy (optional) vinegar dipping sauce for added taste on the side.

Homemade Lucban Longganisa

(Original recipe from Panlasang Pinoy)

PREP TIME 1 HOUR* | COOKING TIME | MAKES 2 DOZEN SAUSAGES

*Plus 8 to 12 hours of refrigeration time before cooking

INGREDIENTS

  • 1kg ground lean pork belly or shoulder**
  • 1/2 cup cane vinegar
  • 4 tbsp pork fat, cut into small cubes
  • 3 tbsp garlic, minced
  • 7 tsp smoked Spanish paprika
  • 4 tsp rock salt
  • 2 tsp white granulated sugar
  • 1 tsp dried oregano
  • Dried hog casing or sausage casing (about 1-inch in diameter)

**Or you can just buy lean ground pork if you don’t like to grind the meat yourself.

METHOD

  1. Add the ground pork, pork fat, salt, smoked paprika, garlic, oregano, sugar, and vinegar in a large mixing bowl. Mix the ingredients together thoroughly until well combine. Set it aside for about 30 minutes for the flavours to fully develop and infuse into the meat.
  2. Soak the dried hog casing in warm water for about 3 minutes. Tie the first end of the casing and stuff using a funnel or a sausage stuffer with the meat mixture. Make links of longganisa about 2 to 3 inches apart or depending on how long you want your longganisa to be.
  3. Refrigerate for at least 8 to 12 hours before cooking or you can store it in the freezer.

Lucban Longsilog

Lucban Longsilog

PREP TIME 20 MINS | COOKING TIME 30 MINS | SERVES 3

INGREDIENTS

  • 1 dozen homemade or store-bought lonnganisa

To serve with

  • Garlicky fried rice
  • Fried sunny-side up egg
  • Spicy vinegar

METHOD

  1. Heat a medium-sized frying pan over medium-high. Add about a quarter cup of water to the pan together with the longganisa. Bring the water to a boil. Roll the longganisa occasionally and continue to boil until the water in the pan evaporates.
  2. When the water has fully evaporated, let the longganisa fry in its own oil. Continue to fry the longganisa for about 5 minutes while constantly rolling them around to cook evenly on all sides. When the longganisa is slightly crisp on the outside, it’s done!
  3. Serve hot with garlicky fried rice and fried egg – browned and crispy on the edges with a golden liquidy yolk is how I like my fried eggs.

Lucban Longsilog

Before I end today’s post, yes I am fully aware that it’s not a Wednesday night yet, but this recipe was supposed to go up last Wednesday. At the time I was actually back in Brunei for a couple of days to tie up some loose ends. I got home late that night (well okay, at 9pm) but was super exhausted from the events of that day that I just passed out when I hit the sheets. So anyway, I’m getting this up now so that I can get tomorrow’s scheduled post up on time (hopefully).

BON APPÉTIT

– Ally xx

myTaste.com

Beef Tapsilog

Beef Tapsilog

Hello Everyone! First and foremost, I would like apologise for my absence last month. I had a theme all planned out, and even had the dishes ready to post – but life got in the way and disrupted my writing and posting schedule for two weeks. At the beginning of September, I was on a family trip to Singapore and Malaysia for my youngest sister’s graduation – it was a jam-packed week filled with much activities and therefore gifted me with a fever, cough, and flu from over fatigue after the trip.

Alyssa’s Graduation Ceremony – Diploma in Contemporary Music from LASALLE College of the Arts, Singapore

Day Trip to Legoland, Nusajaya, Malaysia

And because of that, I decide to take a small break for September and just start fresh with the theme I had planned out for the month of October! (Details in a bit).

Secondly, before I dive into the theme for this month, I would like to take this opportunity to thank all my friends and fellow foodies who have contributed a recipe or two for my Auguest series on Amcarmen’s Kitchen. I hope that you guys enjoyed both the sweet and savoury breakfast fixes that they have shared with you! If you’d like to participate in next year’s Auguest series, drop me an email and let’s see what we can do!

Thirdly, I just want to put it out there that have some news to share with everyone so stick around until the end of this post (or you can skip ahead and scroll down to read it now).

Moving on, a new month means a new theme and for the month of October, where I will be sharing with you some of my favourite Filipino Breakfast staples! I’m kicking off the theme with few ways you can enjoy a traditional Filipino “silog” breakfast. Silog is a suffix in which the si is short for sinangag (garlic fried rice) while the log is short for itlog (fried egg). For example, Tapsilog is an abbreviation for Beef Tapa, Sinangag, and Itlog. The popular Filipino breakfast dish is a harmonious combination of sweet, sour, salty and umami flavours that sing in every mouthful you take.

Beef Tapsilog

Traditionally, tapa was a means of extending the shelf life of meats and other proteins such as chicken and fish. Beef Tapa is similar to that of Beef Jerky where it is prepared by curing the meat with sea salt and then left to dry directly under the sun for the purpose of preserving the meat.

Nowadays, Beef Tapa is simply marinated and cooked (either grilled, sautéed, or fried). The marinade mixture consists of, but is not limited to: soy sauce for saltiness, calamansi juice for a punch of tang, sugar for sweetness, and garlic for warmth. You can even buy Beef Tapa from grocery stores across the Philippines that have already been marinated for you, either fresh or frozen. Of course, the best way is to do it yourself so that you can adjust the levels of salt, sweet, and tang to your liking, and also know what actually goes into the marinade.

Beef Tapsilog

PREP TIME 15 MINS* | COOKING TIME 20 MINS | SERVES 4

*For ready marinated, store-bought Beef Tapa. If marinating yourself, allow for a minimum of 4-6 hours of marinade time, or 12 hours overnight in the fridge for the flavours to really soak into the meat (maximum 24 hours).

INGREDIENTS

For the Beef Tapa marinade

  • 500g beef sirloin (New York Strip or boneless rib eye), sliced thin against the grain**
  • 1/4 cup freshly squeezed calamansi juice
  • 1/4 cup reduced-sodium soy sauce
  • 6 garlic cloves, finely minced
  • 3 tbsp brown sugar
  • 1/4 tsp freshly ground black pepper

To serve with

  • Garlicky fried rice
  • Fried sunny-side up egg
  • Fresh tomatoes, roughly chopped (optional)
  • Spicy vinegar

**When using beef, it is best to slice against the grain (grain referring to the muscle fibres), as this will result in easier to chew, more tender pieces of beef.

METHOD

  1. Add all the marinade ingredients together in a medium-sized bowl and mix until the brown sugar has dissolved.
  2. Toss in the sliced beef and make sure that it is well coated in the marinade. Cover and leave to marinate in the fridge for at least 4 hours (up to 24 hours).
  3. Strain the beef from the marinade and arrange on a grill pan (you may have to do this in batches depending on the size of your grill pan). Turn the heat up to medium-high and cook the beef until well browned on each side, about 2-4 minutes per side once they start to sizzle aggressively.
  4. Serve hot with garlicky fried rice, fresh tomatoes, a spicy vinegar dip, and fried egg – browned and crispy on the edges with a golden liquidy yolk is how I like my fried eggs.

This dish is all about balance. The contrasting flavours and textures all work together to keep your palate salivating for more. While Tapsilog is most popular for breakfast, it can also be enjoyed at any time of the day, even as an occasional midnight snack after a night of drinking!

Beef Tapsilog

Okay, now down to business – the news. If you have been a frequent follower of my blog for the past few months or so, I’ve vaguely mentioned multiple times of what has been going on in my life that I couldn’t exactly say back then. The time has finally come…

I quit my job back in Brunei.

Or more like, I had finished my two-year contract with them and I decided not to be tied down for another two years (which I had been looking forward to since the beginning of the year). The working environment just became toxic to my mental health. I also felt that I had lost myself – I didn’t know who I was anymore, as a designer. I was either designing for a client who knows nothing about design, or for my supervisor who thinks she’s better than the designer. She would push for her ideas to be realised, but when everyone criticises it, she puts the blame on the designer. When I push for what I want and then praised for a job well done, she would steal the spotlight. There were just so many things wrong with the system, and I decided to put my foot down and just leave altogether.

I grew tired of fighting and standing up for myself amongst vipers with childish and petty attitudes, and to be honest, my mental wellness is so much more important than dealing with these kind of people 6 full days a week for the past 3 years – and I am not going to allow myself to endure another 2 years if I had decided to renew my contract with them.

With that being said – no job in Brunei for me means no valid visa to work there. No valid visa means I can’t stay in Brunei anymore, and so after more or less 26 years, I finally left my home away from home, my birthplace, and have settled for just over two months now back to the motherland – the Philippines.

This is also why for the month of October on Amcarmen’s Kitchen, I have decided to share popular Filipino breakfast staples – something that I have been enjoying and indulging in for the past two months so I hope you enjoy my Filipino Breakfast series for the upcoming month!

To end, apologies for the super long post!

BON APPÉTIT

– Ally xx

myTaste.com

Auguest 2018: Jialing Mew

Waffles with Oven-fried Adobo Flakes

Welcome to part two of my Auguest feature! A few days ago I shared a tried-and-true vegan and gluten-free sweet recipe, and now that I’ve gotten that out of the way, we’re taking a very tasty trip to the other side of the delicious breakfast spectrum. I’m using this second recipe as a chance to make something I love but haven’t tried cooking myself before: adobo flakes! True to form (Allison reminded me that I do this every year… yikes), I left it to the last available minute, but worry not, because it actually worked out better than I expected! I did originally intend to turn this into a Filipino twist on fried chicken and waffles, but the adobo flakes turned out so fantastically that I couldn’t bring myself to make them share the spotlight. Please note that my poor time management was completely unrelated to this decision. However I do still highly recommend the waffle pairing, because I did eat them that way, and let me tell you, it was DIVINE. That isn’t even a word I use regularly, but it does so accurately describe the marriage of the saucy crispy chicken and fluffy golden waffles.

Oh, and I’m pleased to announce that all the liquid-cooking techniques from my past recipes came in very handy for the first part of this recipe.

Waffles with Oven-fried Adobo Flakes

Waffles with Oven-fried Adobo Flakes

PREP TIME 10 MINS* | COOKING TIME 1 HOUR | SERVES 4

*Not including marination time of minimum 2 hours or maximum overnight for a more intense flavour.

INGREDIENTS

For the marinade

  • 1 & 1/2 cups white vinegar
  • 1/4 cup soy sauce
  • 3-4 dried bay leaves
  • 3 red chillis, with just the tops cut off
  • 1 head garlic, lightly crushed to remove skins
  • Generous amount of cracked black pepper
  • 1/2 kg chicken breast fillets (about 2 large breast pieces)
  • 1 can coconut milk
  • Canola oil spray

METHOD

  1. Combine marinade ingredients in a large bowl and marinate chicken for at least 2 hours, or over night to really intensify the flavour.
  2. Transfer marinade and chicken into a pan on medium heat, and cook, uncovered, turning chicken every so often. The vinegar will boil away and smell quite acidic – be prepared!
  3. Preheat oven to 200C (180C fan forced or 400F or gas mark 6), and line a large baking tray with grease proof paper. In the meantime, remove chicken from the pan once cooked through (about 10-15 minutes) and set aside in a large bowl.
  4. Add coconut milk to pan and bring down to a simmer. The sauce will reduce to a thicker consistency after about 15-20 minutes. Once thickened, remove from heat and discard the bay leaves (and chilli if you don’t want to eat it) – the garlic will have fallen apart and any leftover chunks will melt in your mouth.
  5. While the sauce cooks, why not get to work shredding the chicken! I like to grip a piece on one end with tongs and rake a fork through the meat going with the grain, working my way up.
  6. Once the chicken is well shredded, evenly distribute onto the baking tray (I did one breast per batch), and generously spray with canola oil and give the tray a shake to even the coat.
  7. Place into the oven for 10 minutes, then increase the temperature to 220C. If the chicken looks like it’s browning more quickly in certain spots, take it out and redistribute the flakes, then return to oven and bake for another 10minutes.
  8. Now get your waffles ready – I usually make one big batch and keep some in the freezer, then just defrost for a quick breakfast option! Putting them in the oven just after you take out the chicken and toasting them in the residual heat makes them a little bit crispy on the outside – yum!
  9. Once ready, heap a little mountain of of adobo flakes onto your waffles, finishing off with a generous drizzle of sauce, and serve straightaway. You can thank me later.

Waffles with Oven-fried Adobo Flakes

Waffles with Oven-fried Adobo Flakes

Photo Courtesy & Recipe Copyright © 2018 | jialingmew

See you all next August!

– Jialing

myTaste.com

Auguest 2018: Jialing Mew

Mango Pudding with Coconut Sago

Happy Auguest everyone! I’m back for my fourth year running, and I’ll be taking over Amcarmen’s Kitchen with two South-East Asian inspired breakfast recipes this week. For once, Allison has chosen a theme that I could easily get on board with (those of you who suffered through 2016’s vegan Auguest with me know my pain). But thanks to my mom I have been a professional breakfast-eater since 1991, so trust me when I say that THIS is my area of expertise! If you don’t believe me, ask the former breakfast-skippers at my office who were inspired by my morning meals 😉

The great thing about breakfast is that it can be whatever you want it to be: simple or complex, savoury or sweet, hot or cold, vegan food or normal people food… I could go on. So for today’s recipe I’ll be sharing one of my favourite breakfasts to eat during summer weekdays, though it can be enjoyed at any time of the year. I like to prepare this on Sunday so that I (and my boyfriend/colleagues/innocent bystanders) stay safe from my hangriness for the rest of the week.

Throwing it back to 2016 with a vegan (you heard me!) recipe where we start out with…

Boiling coconut milk.

Classic.

Mango Pudding with Coconut Sago

PREP TIME 1 HOUR | COOKING TIME  | SERVES 6

INGREDIENTS

  • 1 cup fresh mango, finely diced
  • 1 can lychees drained, reserve syrup

For the Mango Pudding

  • 2 cups coconut milk
  • 2 cups frozen mango
  • 1/4 cup reserved lychee syrup
  • 2 tsp agar agar powder (check your local Asian supermarket)

For the Coconut Sago

  • 2 & 1/2 cups coconut milk
  • 1/2 cup reserved lychee syrup
  • 1/2 cup tapioca pearls (sago)
  • 1 tsp vanilla
  • Pinch of salt

Optional

  • Coconut flakes
  • Fresh Mango chunks

METHOD

  1. Set aside 6 lychees to garnish. Chop remaining lychees into smaller pieces. Divide chopped mango and lychee between 6 glasses or containers. Set aside.
  2. Mango Pudding: Purée 2 cups frozen mango with 1/4 cup reserved lychee syrup until smooth.
  3. On medium heat in a sauce pan, combine agar agar powder and 2 cups coconut milk, stirring until the mixture boils.
  4. Remove pan from stovetop and stir in the mango purée, making sure the mixture is well combined.
  5. Divide mixture between the 6 glasses, carefully pouring to cover the fruit chunks. Place in refrigerator to set while making the coconut sago.
  6. Coconut Sago: Combine all the ingredients in a sauce pan over low heat, stirring constantly until tapioca pearls have absorbed most of the liquid and doubled in size – approximately half an hour, depending on your stove.
  7. Take the mango pudding out from the fridge and spoon the tapioca into each glass, then top with the remaining whole lychees, and optional coconut flakes and mango chunks.
  8. Serve immediately if you’d like it warm, or return to the fridge to chill for at least an hour for a more summer-appropriate dish!

Mango Pudding with Coconut Sago

Mango Pudding with Coconut Sago

Photo Courtesy & Recipe Copyright © 2018 | jialingmew

Enjoy x

– Jialing

Auguest 2018: Brendon D'Souza

Easy Avo Toasts

Hi Foodies! My name is Brendon D’Souza and I run the Sydney Food and Lifestyle Blog known as Brendon The Smiling Chef. I’m so honoured to be guest-posting here at AMCarmen’s Kitchen once again for the third time since Ally started her Auguest series.

In between running a busy collaborative workspace in the heart of Sydney, and a number of side hustles, I love developing fresh and tasty recipes that you will love to cook. Think comforting winter roasts, colourful salads, decadent desserts and much more!

Easy Avo Toasts

Sydney will forever be known as the home of over-glorified Avocado Toast for breakfast (or “brekkie” as we like to call it), and you will always find a variation of this simple recipe at any cafe or restaurant.

Treat your friends to a gorgeous breakfast feast that’s actually super easy to prepare. This is a great recipe for children to make too!

Easy Avo Toasts

PREP TIME 5 MINS | COOKING TIME — MINS | SERVES 1

INGREDIENTS

  • 2 slices multigrain bread
  • 1 large ripe avocado
  • 2 tsp olive oil

METHOD

  1. Toast the bread to your liking.
  2. Carefully peel the avocado and remove the stone.
  3. Use a spoon to scoop out the flesh and slice.
  4. Drizzle the toast with olive oil and top with the sliced avocado and season with a touch of salt and pepper. Serve and enjoy!

Brendon’s Tips

  • Jazz up your Avo Toast with a selection of your favourite ingredients.
  • Try smoked salmon, crispy bacon, fried eggs, rocket, feta, sliced cucumber, cherry tomatoes, roast beetroot or even fresh berries.

Easy Avo Toasts

Easy Avo Toasts

Check out my Instagram @brendonthesmilingchef to keep up do date with all my adventures.

Photo Courtesy & Recipe Copyright © 2018 | brendonthesmilingchef

Happy cooking and keep smiling,

– Brendon (Brendon The Smiling Chef)

myTaste.com

Auguest 2018: Simon Swadling

French Toast with Red Wine Pears

I’ve always loved breakfast, and French toast was actually one of the first things I started making and teaching myself. It’s probably the start of me really getting into food and it becoming my passion – I loved making making either savoury style (parsley and parmesan with bacon) or the more traditional sweet one.

My love of breakfast foods has ended up becoming a family tradition that on long weekends or holidays we will often start off with a fancy brunch/breakfast made by me. This French toast recipe is what I came up with for Mothers day this year, as sweet French toast is my mum’s favourite breakfast. It has some autumnal vibes with the maple and mulled wine flavours, but really the base recipe of the French toast can be paired with any number of different things, so feel free to go off script and try something different!

French Toast with Red Wine Pears

PREP TIME 15 MINS | COOKING TIME 45 MINS | SERVES 4

INGREDIENTS

For the French toast

  • Loaf of Brioche bread (the batter will do enough for 4 large slices)*
  • 2 large free range eggs
  • 3/4 cup full cream milk
  • 2 tbsp brown sugar
  • 1 tsp vanilla extract
  • 1/2 tsp ground cinnamon
  • 1/4 tsp nutmeg, freshly ground
  • Zest of half an orange

For the poached pears

  • 1 cup red wine
  • 1 cup water
  • 2/3 cup caster sugar
  • 1/2 cup orange juice
  • 4 cloves
  • 4 small Corello pears**
  • 1 cinnamon stick

For the maple mascarpone

  • 1 tub (250g) mascarpone
  • Maple syrup, to taste
  • Dry meringue pieces
  • Fresh raspberries, or any other berries that you like

*If your brioche bread hasn’t been pre-cut (which is ideal), then cut the brioche into thick rectangular pieces. This means that you’ll get a crispy outside, custardy outer layer, and still some fluffy brioche in the middle.

**If you can’t get your hands on the small pears, use 2 large pears and serve each slice with half a pear instead.

METHOD

  1. Poached Pears: Combine all the ingredients for the poached pears into a medium-sized saucepan. If the pears aren’t fully covered, then ensure to turn them around every few minutes to get an even colour and even cooking all around. Timing will depend on the ripeness of the pears so simmer until soft when tested with a knife.
  2. Remove the pears, and continue to boil down the poaching liquid until reduced to a syrup-like texture. You may prepare the pears the day before and then warm them through before serving.
  3. Maple Mascarpone: Mix the mascarpone in a bowl to soften and then add about a tablespoon of maple syrup. Adjust to your own personal liking. Set aside in the fridge.
  4. French Toast: Add all the ingredients, except the brioche bread in a shallow dish and mix well until combined.
  5. Heat up a medium-sized frying pan with a knob of butter and a bit of oil on medium heat.
  6. Dip the brioche slice in the egg mixture on each side and allow it to soak a little.
  7. Fry the slice on each side until golden, about 3 to 4 minutes. Repeat for the remaining slices.
  8. Assemble: Cut the pears in half. Place the French toast on a plate with the pears on top. Crumble the meringue over and serve with fresh raspberries, and a scoop of the maple mascarpone.
  9. Finally, drizzle over a bit of the poaching syrup from the pears and enjoy!

French Toast with Red Wine Pears

Photo Courtesy & Recipe Copyright © 2018 | thebeardedpatissier

– Simon (The Bearded Patissier)

myTaste.com

Auguest 2018: Wendy Chok

Rustic Bread: PMS Toast

It’s me Wendy, back for another recipe to share! The last time I was on here I shared a recipe for homemade Rustic Bread and a savoury Pizza Toast brekkie with everyone. This time I will be sharing what I like to call ‘PMS Toast’ which I will explain further in a while. I also shared a little bit about myself, and my love for food, so now I will share about how I know Ally on a personal level.

I met and got to know Ally about 3 years ago through work. She was one of my team members in our Marketing team for an Advertising and Event Management firm that we both worked at. We became very close friends and still even so after having left the company because we have the same level of random craziness, vibe, and of course our love for all things food.

Amcarmen's Kitchen & Peek A Pastry
Peek A Pastry & Amcarmen’s Kitchen

We share a special kind of bond at work and it might be because we spend a lot of time together, at work of course, for a lot of event events, working late at night on occasions, have food together in the office whether breakfast, lunch, snack time or dinner time, and enjoy great food together in celebration for when we’ve successfully finished every event that we’ve worked on. I love our team because we always had each other’s backs and we just simply complement each other well.

I know that Ally wants to pursue her dream to participate in MasterChef Australia and I am using all my power on law of attraction to make it happen. I will see Ally in MasterChef Australia one day and tell my kids or grandkids that “that is my friend!”

Moving on – I am not a sweet tooth but when the time (PMS) comes, nothing is sweet, what is sweet? How do you spell sweet? C-A-L-M is how you spell sweet. When you are cranky and tired, you just crave for something sweet, something sugar loaded and warm. So here I present you two fast and sweet breakfast ideas to hit my spot, and hopefully yours too.

PMS Toast: Cinnamon Everything Toast

PREP TIME 5 MINS | COOKING TIME 10 MINS | SERVES 1

INGREDIENTS

  • 2 slices of homemade Rustic Bread
  • 1 tbsp brown sugar
  • 1 tbsp unsalted butter, at room temperature
  • 1 tsp ground cinnamon (2 teaspoons for me, the cinnamon lover)

METHOD

  1. Place the butter in a small heatproof bowl and melt in the microwave for about 20 seconds. Make sure that it is not too liquidy as you want those buttery chunks on your toast. I like it rustic on this rustic bread.
  2. Mix all the ingredients together and smother it all over the toast.
  3. You can either bake it or toast it on a pan. Bake it at 240C (475F or gas mark 9) for 10 minutes, just enough time for everything to crunch up. If you like it toasted in a pan, face the side, which is smothered by the cinnamon paste down on the pan, and sear it for 2 minutes over medium heat.
  4. Serve and enjoy with a hot cup of coffee for breakfast or even as a nice afternoon snack!

Rustic Bread: PMS Toast

PMS Toast: Butter & Sugar Toast

PREP TIME 5 MINS | COOKING TIME 10 MINS | SERVES 1

INGREDIENTS

  • 2 slices of homemade Rustic Bread
  • 1 tbsp unsalted butter, at room temperature
  • 1 tsp granulated white sugar

METHOD

  1. Smear the butter over the toast and sprinkle the top with white sugar.
  2. Bake it at 240C (475F or gas mark 9) for 10 minutes.
  3. Serve and enjoy with a hot cup of coffee for sweet start to your morning!

Short and sweet, just nice for a woman who is PMS-ing. Men take note!

Rustic Bread: PMS Toast

Before I say goodbye to everyone on Amcarmen’s Kitchen, I would like to thank Ally for giving me this opportunity to write on her well-established blog. I hope that my recipes are not too shabby and please dive in to my rustic way of cooking!

Photo Courtesy & Recipe Copyright © 2018 | peekapastry

– Wendy (Peek A Pastry)

myTaste.com

Auguest 2018: Wendy Chok

Rustic Bread: Pizza Toast

Hello to all amcarmenskitchen’s readers! I am Wendy, a petite woman in my mid 20s; and of course, I love baking and cooking. For me, spending time in the kitchen is just so therapeutic and satisfying, especially when you get to enjoy the food you’ve made after long hours of preparation. Additionally, I have this motherly instinct to feed people with a lot of food, and whenever someone tells me that the food that I make is delicious and would like to have it again next time around, I feel like I’ve won the title of Brunei’s MasterChef!

I recently started up a blog known as Peek A Pastry, however I haven’t been very active in updating it. I still cook and bake frequently, and have posted a few of my successes in the kitchen over on my Instagram page – @peek.a.pastry. Ally was actually the one who encouraged me to take the first step in opening up a blog, and so I did even though I simply just couldn’t commit to it. After given the opportunity to write down my recipes for Ally’s blog for my guest posts for this month, I got the feel of what it was like to write for a blog and this might very well the kick I need for me to start penning down my recipes and actually write!

Before I share with you my savoury breakfast idea in the form of a Pizza Toast, I’m going to share with you my recipe for Rustic Bread as the base for this toast. Of course, feel free to get store-bought bread too. Note: bake your bread the night before so that you’ll have it ready for a quick brekkie fix the next morning!

Rustic Bread

Rustic Bread: Pizza Toast Method

PREP TIME 2 HOURS 30 MINS* | COOKING TIME 50 MINS | MAKES 1 LOAF

*Allow for an additional 12 hours for dough to rise overnight

INGREDIENTS

  • 3 & 1/3 cups plain flour
  • 1 & 1/4 cups water, at room temperature
  • 2 tsp of salt
  • 1/8 tsp yeast
  • 1/2 cup boiling water (when baking)

METHOD

  1. In a large bowl, mix the plain flour, salt, and yeast together until combined. Slowly add in the room temperature water into the flour mixture until the dough starts to become sticky, just like the texture of slime. It’s okay to have a little bit of lumps in the mixture, but make that it is not too lumpy. Cover the bowl with cling wrap and let it rest at room temperature for about 20 minutes.
  2. After 20 minutes, fold the dough by wetting your hands and scoop them by the edge; palm facing you and fingers under the dough, pull it upwards and flip it across, as if you are helping a baby with his or her napkin. Pull and flip for about 5 times in total for every edge of the dough in the bowl. Set aside and let it rest for a further 20 minutes and repeat this action for another 3 times (four folds in total). Along way, your dough will rise a little, but not too much.
  3. After the fourth and last fold, rest the dough for 12 hours overnight.
  4. After 12 hours the next morning, you will see that your dough has risen and bubbling like crazy! Place a piece of parchment paper over a baking tray and lightly sprinkle a bit of plain flour atop as well as on the dough.
  5. Scrape the edges of the dough with your fingers so they will come out from the bowl easily and onto the parchment paper. Sprinkle some more flour on top of the dough and start to fold again.
  6. Start shaping the dough by cupping the bottom of the dough. Cup and twist until you get a nice round shape. At this point your dough should be feel supple and bouncy. Use your finger and slightly press on the dough and release. It should recover back to its initial shape instantly.
  7. Grease a large clean heatproof bowl and transfer the dough, together with the parchment paper underneath it to the bowl. Cover using a clean kitchen towel and let it rest in the bowl for another 50 minutes before baking it.
  8. Preheat the oven at 230C (450F or gas mark 8), add the boiling water into a small heat-proof bowl and place into the oven. Then place dough in the bowl into the oven and bake for 50 minutes.
  9. Once done, remove the bread from the oven. Remove from the bowl and leave to cool down for at least an hour on an elevated rack before slicing into it. Brush off excessive flour on top.

Rustic Bread: Pizza Toast

Rustic Bread: Pizza Toast

And now your Rustic Bread is ready to be topped with your favourite toppings! Follow the recipe below for a delicious Tuna Chunk Pizza Toast!

Rustic Bread: Pizza Toast

PREP TIME 5 MINS | COOKING TIME 15 MINS | SERVES 3-4

INGREDIENTS

  • Diced red onions
  • Mayonnaise
  • Parmesan cheese
  • Pineapple bits
  • Rustic bread slices
  • Tomato paste
  • Tuna chunks in olive oil (or you can use any tuna you want)
  • Unsalted butter

METHOD

  1. Spread the butter generously at the sides of the bread to give it a crunchy bite.
  2. Smother the tomato paste at the centre of each slice and start rustically building up all your toppings. Put as much as you like – I like to put tuna first then pineapple bits, followed by the diced onions. Season it with Parmesan cheese and finish it off with dollops of mayonnaise here and there. Bake them for about 15 minutes at 240C (475F or gas mark 9).
  3. Once done, serve and enjoy with a hot cup of coffee!

Rustic Bread: Pizza Toast

I am a savory person and I love everything savory. It might be because I’m Hakka (one of the Chinese dialects). Just to give you a little bit of imagination when you bite into this toast, let me paint a picture of it for you. Imagine as you take that first bite into the crunchy edge of the toast before everything else, and then you a change of texture to the chewy and savoury bread. Followed by all of the topping in that single bite; the umami and flaky tuna, the crunchy, spicy and sweet diced onions, the richness of the slightly burnt dollops of mayonnaise that sort of just melt in your mouth, engulfing everything together. Then here come the sweet and juicy pineapples, cutting through all the richness happening in that tiny space. You start over again as you take another bite to experience this rich and salivating moment!

Photo Courtesy & Recipe Copyright © 2018 | peekapastry

– Wendy (Peek A Pastry)

myTaste.com

Auguest 2018: Shazrinah Shazali

Mini Mixed Berry Pancakes

ShefShaz is back again on Amcarmen’s Kitchen and this time I will be sharing a sweet breakfast option for those who love to start their day off on a sweet note – Mini Mixed Berry Pancakes served with Earl Grey Ice Cream and Fresh Fruit.

Mini Mixed Berry Pancakes

Before we dive into the recipe, if you missed my guest post a few days ago, I whipped up some delicious homemade Salmon Fish Cakes for the savoury breakfast eaters! You can also read more about my approach to food and how I know Ally.

Mini Mixed Berry Pancakes Ingredients

PREP TIME 15 MINS | COOKING TIME 10 MINS | MAKES 24 MINI PANCAKES*

*Or 12 regular-sized pancakes

INGREDIENTS

  • 1 & 1/2 cups plain flour
  • 1 & 1/4 cups skimmed milk
  • 57g unsalted butter, melted
  • 1 large free range egg
  • 2 tbsp granulated sugar
  • 1 tbsp baking powder
  • 1 tsp vanilla extract
  • 3/4 tsp salt
  • Frozen mixed berries, or any other kind of fruits

To serve

  • Digestive biscuits, crushed
  • Earl Grey ice cream*
  • Fresh fruits
  • Icing sugar
  • Lemon slices (for a kick of tang)

*Or any other flavoured ice cream that tickles your fancy.

Mini Mixed Berry Pancakes

Mini Mixed Berry Pancakes

METHOD

  1. Preheat oven to 180C (350F or gas mark 4). Grease a 24-hole mini cupcake tray with a bit of butter to prevent the pancake batter from sticking to the tray. Set aside.
  2. In a large bowl, mix all the wet ingredients together until you have a smooth and creamy mixture.
  3. Sift in the dry ingredients and gently fold until just combined. Leave the mixture to rest for about 10 minutes to allow the baking powder to work its magic.
  4. Pour the batter into the tray, filling about 3/4 of the way and drop in your frozen mixed berries on top.
  5. Bake in the oven from about 10 minutes or until a toothpick inserted into the centre of the pancake comes out clean.
  6. Remove from the oven and set aside to cool down for about 5 minutes. Lightly dust with icing sugar and serve with ice cream, crushed digestive biscuits, and fresh fruit of your choice. Enjoy!

Mini Mixed Berry Pancakes

Mini Mixed Berry Pancakes

Before I end, I would like to thank Ally for giving me the opportunity to cook and write for her blog. We had a lot of fun during our cookout session – both the cooking and feeding our dishes to many tummies!

Recipe Copyright © 2018 | shefshaz

BON APPÉTIT

– ShefShaz

myTaste.com