Strawberry & Mascarpone Dessert Pizza

Strawberry & Mascarpone Dessert Pizza

Hello Everyone! For the month of February, I’ll be sharing some sweet dishes to celebrate the month of love! Though in my opinion, I believe love should be celebrated every day. No, I don’t mean that you should buy gifts and whip up something special in the kitchen every single day, but you should always make your significant other feel loved, whether big or small the gesture.

Strawberry & Mascarpone Dessert Pizza

For tonight’s recipe, forget chocolate dipped strawberries. Here’s a dish that takes the classic combination of Strawberries and Chocolates to the next level and is sure to impress your significant other for Valentine’s Day. I originally had a different recipe planned for tonight, but I was inspired by someone special to make this dessert pizza and share it with you guys.

Also, check out this recipe that I made a couple of years back if you wish to try out a different take on a berry dessert pizza: Nutella & Mixed Berries Pizza.

PREP TIME 10 MINS* | COOKING TIME 10 MINS | SERVES 3-4

* When you plan to tackle this recipe, make your dough ahead of time as needs to be refrigerated overnight before using.

INGREDIENTS

  • Classic New York Style Pizza Dough Recipe
  • 2 punnets (600g) fresh strawberries, washed, hulled, and sliced
  • 250g Mascarpone Cheese
  • 1/2 cup balsamic vinegar
  • 1/4 cup nuts, roughly chopped
  • 5 tsp Nutella
  • Handful of fresh basil leaves

METHOD

  1. Preheat oven to 220C (245F or gas mark 7). Place your pizza stone in the oven as well to heat it up.
  2. Roll out your dough to a circle about the same size as your pizza stone on a lightly floured surface as thick or thin as you want. Transfer the rolled-out dough onto a sheet of parchment paper. This will easily help you transfer your pizza onto the preheated stone.
  3. Brush around the edges with a little bit of water, then spread a thick wall of Nutella all the way around the edges. Fold, or roll the edges over the wall of Nutella and seal it in by pressing down on the damp dough to form a stuffed crust.
  4. Carefully remove the pizza stone from the oven. Transfer the dough onto the hot stone and bake in the oven for about 3-4 minutes.
  5. While the pizza is baking, heat the balsamic vinegar in a small non-stick saucepan over medium-high heat. Simmer, continuously stirring to check on the consistency of the glaze, until the vinegar is reduced to a thick sauce, about 5 minutes, Remove from the heat and leave to cool down for a bit.
  6. Remove the pizza from the oven. Spread a thin (or if you are that type, a generous) layer of mascarpone cheese onto the dough and, top with the sliced strawberries and the nuts. Place it back into the oven with the grill setting on and grill for a further 3-4 minutes or until cooked all the way through. It should not take more than 10 minutes in total.
  7. Remove from the oven and top with fresh basil leaves and drizzle with the balsamic reduction. Serve and enjoy immediately!

Strawberry & Mascarpone Dessert Pizza

Strawberry & Mascarpone Dessert Pizza

BON APPÉTIT

– Ally xx

myTaste.com

Fudgy Avocado-Chilli Brownies

Fudgy Avocado-Chilli Brownies

Hello Everyone! Firstly, apologies for not getting this post up last week as originally planned. It has been a crazy hectic week with early days and late nights in the office – even working the weekends ‘til late to meet deadlines for an event that our department/team organised on this day just last week. So because of that, I barely had any time to sit down and comfortably write this post with a stress-free state of mind. Having said that, here I am, back on track again to share a deliciously (healthy?) dessert that’s sure to knock your socks off!

The first time I experienced a Chilli-Chocolate flavour combination was when I was still studying in Sydney for my Bachelor’s of Design Degree. I remember I was at Circular Quay with a friend, and one of the gelato stalls there (can’t remember the name) was having a chocolate gelato fest! I clearly remember the difficulty I had in choosing a chocolate flavour out of the possible 10 or 15 they had available. For those of you who don’t know me, I like my chocolate like how I like my men – dark. Just kidding – I just wanted to say that. I have no particular preferences on skin colour or race when it comes to men. Tangent aside; I’m just not very fond of milk or white chocolate unless I really REALLY crave for it. Well technically I’m not very fond of chocolate altogether unless I really want something chocolatey for dessert.

Fudgy Avocado-Chilli Brownies

Finally getting back to the original story, I remember having doubts on choosing just a regular Dark Chocolate Gelato, or one called Death by Chocolate which was essentially the Dark Chocolate Gelato, but with chilli in it. Me being adventurous to a certain extent (hey we all gotta draw a line somewhere!), I decided to go for the Death by Chocolate since never had I ever, up until that moment of course, tried the pairing of chilli and chocolate before. Boom. My life changed. It was a magical moment. The subtle yet just enough kick of heat that played on my tongue together with the cold creamy gelato that was slightly sweet and slightly bitter at the same time was to die for. It truly did live up to its name – Death by Chocolate. Ever since then, Chilli and Chocolate became my new best friends.

So what about Chocolate and Avocado? How did they also become my new best friends? Well, a couple of years back, when I was still studying abroad, I was out having a weekend (or maybe it was a weekday during the winter holidays) brunch with some of the people/friends I lived with. We went to a place known as Rustic Pearl in Surry Hills. When we were ordering our drinks to start off with, I was super curious about their Chocomolé Smoothie – Chocolate and Guacamole I presumed from its name after reading “with avocado and cocoa.” As usual, I was being my adventurous self and decided to try this foreign-to-me flavour pairing of Avocado and Chocolate. Did it change my life? Why yes. Yes it did. I still can’t quite describe the sensation nor taste of the pairing, but I absolutely love it.

Fudgy Avocado-Chilli Brownies

Therefore, Avocado, Dark Chocolate, and Chilli? Explosive. Every time I want to be adventurous and try something new when it came to gelato flavours, I always say to myself, “no, you need Avocado and Dark Chocolate-Chilli Gelato.” I had been craving brownies for the longest time ever, and this was the perfect opportunity to whip them up and feature them on the blog since it fit with the theme I made it fit with the theme by incorporating avocados into them. These brownies are dense, thick, fudgy, and rich. The frosting though compliments the richness perfectly since it is light in flavour. Yes the frosting tastes like avocado, and no, the brownies do not even if they have avocado mixed into them.

Anyway, apologies for the super long introduction – hope it made up for not posting last week *cheeky grin* but before we pop on over to the recipe below, please do check out the original recipe by Jessica over on How Sweet Eats.

Fudgy Avocado-Chilli Brownies Ingredients

PREP TIME 15 MINS | COOKING TIME 30 MINS | MAKES 12 BROWNIES

INGREDIENTS

For the brownie batter

  • 2 large ripe avocados, peeled, pitted, and mashed
  • 2 large free-range eggs
  • 1-2 red bird’s eye chillies, minced
  • 200g high-quality dark chocolate, melted
  • 50g high-quality dark chocolate, roughly chopped
  • 3/4 cup all-purpose/plain flour
  • 1/2 cup white granulated sugar
  • 1/4 cup unsweetened cocoa powder
  • 3 tbsp extra virgin olive oil
  • 1 tsp vanilla extract
  • 1/2 tsp baking powder
  • 1/4 tsp salt

For to avocado frosting

  • 1 large ripe avocado, peeled, pitted, and mashed
  • 2 & 1/2 cups confectioiner’s sugar
  • 1/4 tsp vanilla extract

METHOD

  1. Preheat oven to 180C (350F or gas mark 4), and generously grease a 9in x 13in baking dish with unsalted butter or non-stick cooking spray.
  2. Fudgy Brownies: Whisk the mashed avocados, melted chocolate, and minced chillies in a large mixing bowl before adding in the white granulated sugar. Whisk again until well combined. Add in the eggs, together with the vanilla extract and mix well.
  3. Sift in the plain flour, cocoa powder, baking powder, and salt into the avocado-chocolate mixture. Mix with a large spoon until JUST combined – be careful as to not overmix the batter.
  4. Stir in the extra virgin olive oil until it is well distributed into the batter and is somewhat smooth in consistency. Gently fold in the chopped chocolate, and then spread onto the prepared baking dish.
  5. Bake for 28-32 minutes, or until the middle has set. You can check this by inserting a toothpick into the centre. If it comes out clean, then the brownies are done. Remove from the oven and set aside for it to completely cool down.
  6. Avocado Frosting: Add the mashed avocado and vanilla extract into a medium-sized mixing bowl. Whisk until combined. Slowly incorporate the confectioner’s sugar into the avocado mixture and whisk until a smooth frosting forms.
  7. Frost the brownies once they have cooled down and top with extra chopped chocolate bits and chilli slices for an added extra kick of heat. Serve and enjoy immediately!
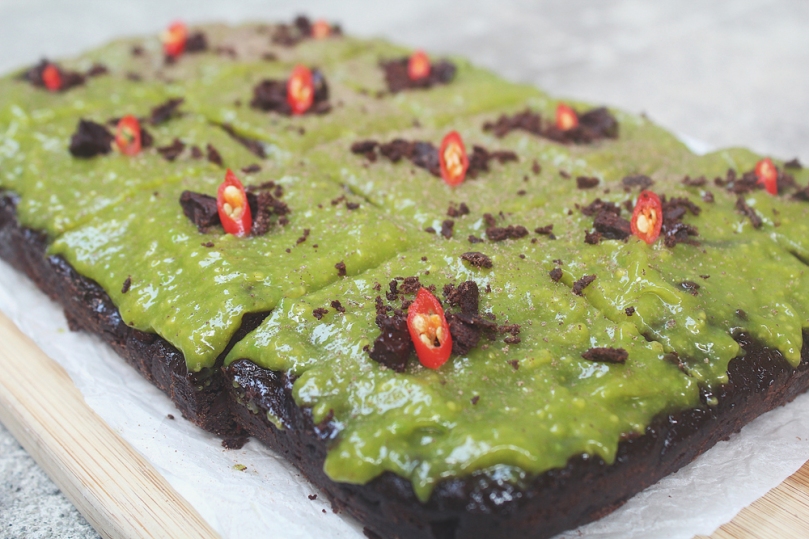
Fudgy Avocado-Chilli Brownies

Tip: If you’re going to pop them in the fridge to eat the next day, and the succeeding days to come, I recommend letting them come back up to room temperature before eating them. They can be even denser and slightly dry after coming out of the fridge.

Fudgy Avocado-Chilli Brownies

BON APPÉTIT

– Ally xx

myTaste.com

Classic Champorado (Chocolate Rice Porridge)

Classic Champorado (Chocolate Rice Porridge)

Hello Everyone! I hope everyone has had a fantabulous week so far and will have a great week ahead with the weekend to look forward to. Tonight I will be sharing a Filipino breakfast staple that is sure to spark some doubts, especially amongst those who aren’t very familiar with this foreign food pairing. Let me explain further.

Champorado, or in English, Chocolate Rice Pudding, is a classic dish found in many homes across the Philippines commonly served for breakfast. Chocolate for breakfast sounds like a heavenly dream doesn’t it? But wait, there’s a catch! Champorado is usually served with a piece of Tuyo, which in English is known as dried salted fish! Chocolate and dried salted fish?! That sounds like a bizarre combination!

Classic Champorado (Chocolate Rice Porridge)

Is it really though? While the sound of pairing chocolate together with fish seems like whoever came up with this combination was stoned, drunk, or suffered a milk mild concussion, let’s look at the flavour profiles instead. Okay before I continue, I would like to take a small shortcut – I had a major laugh fit when proof reading what I wrote above… What even is a milk concussion?!

Anyway, continuing on, there are a lot of impeccable desserts and sweet dishes out there that embrace the salty-sweet combination, and that’s exactly what you get from Champorado and Tuyo. It’s exactly like eating salted chocolate! The dried salted fish, which is shredded and mixed into the Champorado adds pops of salty surprises to each spoonful of the sweet chocolate rice porridge that you take.

Still not convinced? As the say, don’t judge a book by it’s cover if you haven’t tried it yet. Otherwise, you could get away with adding a pinch of rock salt into your Champorado – but it won’t be the same.

Classic Champorado (Chocolate Rice Porridge) Ingredients

PREP TIME 5 MINS | COOKING TIME 25 MINS | SERVES 8

INGREDIENTS

  • 5 pieces tsokolate tablea*
  • 1 cup glutinous rice
  • 6 cups water
  • 3 tbsp brown sugar

Topping choices

  • Cacao nibs
  • Fried tuyo
  • Full cream milk
  • Sweetened condensed milk
  • Other dairy alternatives such as almond milk and/or coconut milk

*Tsokolate tablea, or literally translated to chocolate tablets is dried local cocoa beans roasted for a few hours before being ground to a rich, chocolate-y paste. Sugar, most often muscovado, is then added to the paste before it is shaped into balls or tablets, hence its name. Tsokolate tablea is traditionally used to make Champorado, but other alternatives such as unsweetened cocoa powder or a dark chocolate bar can be used in its place.

METHOD

  1. Pour the water into a large heavy bottom saucepot over medium-high heat and bring to a brisking boil. Add in the tablea chocolate and dissolve. Once dissolved, add in the rice and bring back to a boil.
  2. Once boiling, turn the heat down to reduce to a simmer and stir the rice every 3 minutes or so to prevent it from sticking to the bottom of the pot and burning. Leave uncovered to cook further for another 15 to 20 minutes until the water is absorbed and the rice is cooked through. The consistency should be thick but soft, just like porridge.
  3. Add in the brown sugar and stir to combine until dissolved. Remove from the heat and transfer into individual serving bowls. Top with dairy of choice and fried tuyo (optional for those feeling adventurous).
  4. Serve and enjoy!

Classic Champorado (Chocolate Rice Porridge)

Note: Even after cooking with the heat turned off, the glutinous rice will continue to expand and absorb the liquid, therefore it is important to serve it immediately to avoid dry Champorado.

You may also like to add a bit of chilli to your Champorado. It is not traditionally a spicy dish, but if you want that extra kick to the guts to get you going in the mornings, then go for it! Chocolate and chilli afterall is another classic flavour combination!

BON APPÉTIT

– Ally xx

myTaste.com

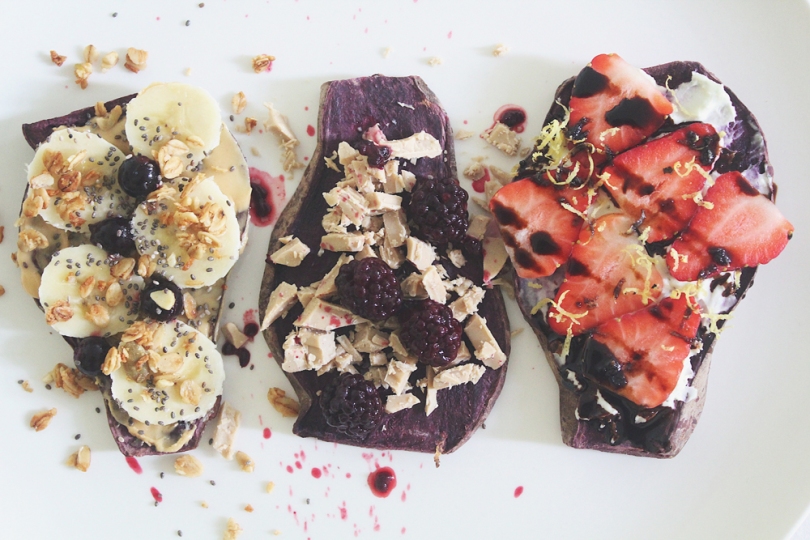
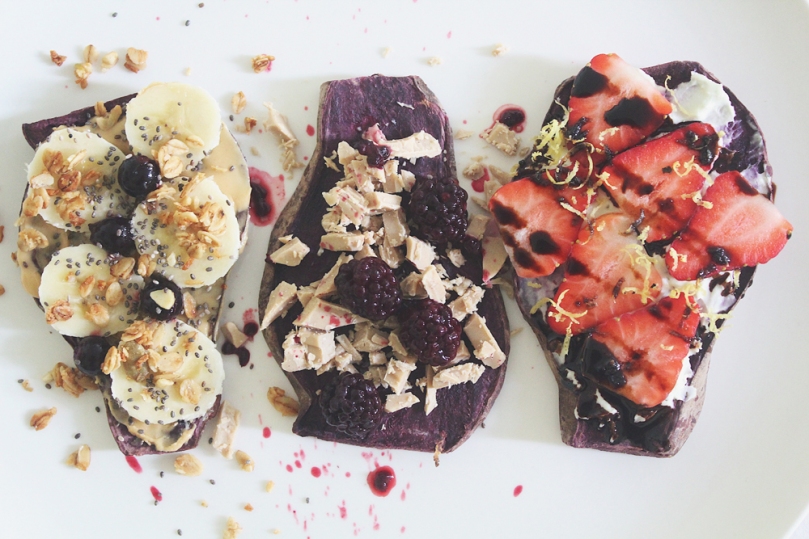
Sweet Purple Sweet Potato Toasts (3 ways)

Sweet Purple Sweet Potato Toasts (3 ways)

Hello everyone! Apologies for not getting this post up last week as it was supposed to – I feel like I’ve been repeating myself in every post so far but yes, things have been hectic. Amongst the hecticness I speak of, my sister also arrived back from Singapore last week. Other than that, nothing exciting has happened over the past week – the week ahead though will definitely be one to remember.

Anyway, I’ll keep tonight’s introduction short and just dive straight into the recipe. To recap, the theme for this month on Amcarmen’s Kitchen is to hero Sweet Potatoes for breakfast! At the beginning of he month, I shared Savoury Orange Sweet Potato Toasts 3 Ways for you, and tonight I’m going to share you a Sweet Purple Sweet Potato Toasts 3 Ways for those who prefer a sweet option rather than savoury to kick start their mornings!

Sweet Purple Sweet Potato Toasts (3 ways)

Preparing your Sweet Potato Toasts

PREP TIME 10 MINS | COOKING TIME 20 MINS* | MAKES 5 SLICES**

*Baking time time will vary depending on the size and thickness of your sweet potato slices.
**Or how-ever-so-many slices you can get from a single sweet potato

INGREDIENTS

  • 1 large purple sweet potato, wash and dried

METHOD

  1. Preheat oven to 180C (350F or gas mark 4). Place a wire rack on a large rimmed baking sheet.
  2. Trim both ends from the sweet potato using a knife and slice them lengthwise into 1/4-inch thick slabs using a knife or mandolin slicer.
  3. Arrange the slabs in a single layer on the wire rack and bake for about 15-20 minutes or until the potatoes are tender, but not fully cooked.
  4. Remove the potatoes from the oven and allow them to cool on wire rack completely before transferring to a storage container. They can be stored in the fridge for up to 4 days.

When it’s go-time simply add the desired number of slices to your toaster and toast away. Setting it on the highest setting takes only one toasting cycle to get them how I like them (warm, bubbly and crispy on the edges). Just be wary that yours may need more or less depending on the toaster that you are using. Adjust to your liking!

Notes/Tips:

    • Look for sweet potatoes that are relatively shaped like a tube so that they’re easier to slice.
    • Don’t remove the skin because fibre in it is good and it helps the slices hold up better during storage.
    • Using a mandolin slicer gives you uniform slices of sweet potatoes, and is easier and safer than using a big knife.
    • Allow them to cool completely after baking before stacking them in a container or they’ll get sweaty and will definitely take longer to toast when you’re ready to eat them.

Now the fun starts – you get to add toppings! The possibilities are pretty much endless but these three are my absolute favourite combinations for a yummy start to my day – the sweet edition!


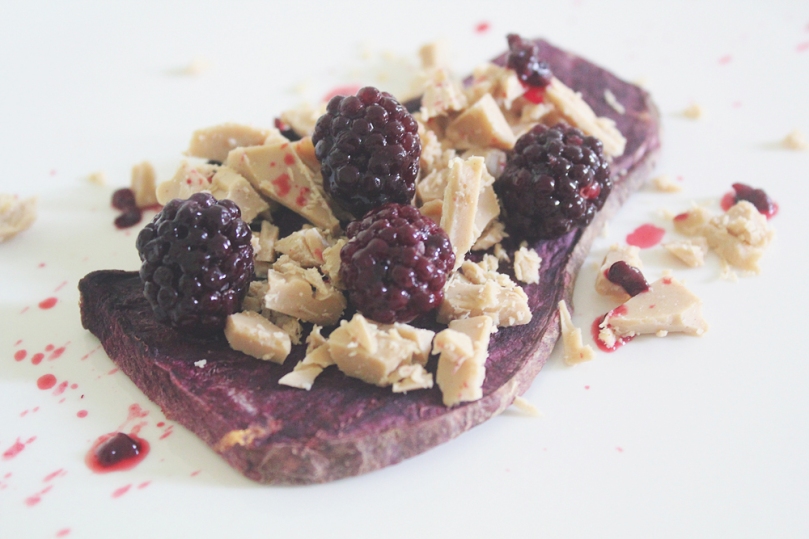
Blackberries & Buttermilk Caramelised White Chocolate

Sweet Purple Sweet Potato Toasts (3 ways): Blackberries & Buttermilk Caramelised White Chocolate

PREP TIME 5 MINS | COOKING TIME 5-10 MINS | SERVES 1

INGREDIENTS

  • Blackberries, fresh or frozen (thawed)
  • Sweet potato slice(s)
  • Whittaker’s West Coast Buttermilk Caramelised White Chocolate (Artisan Collection), roughly chopped

METHOD

  1. Place the sweet potato slices into a toaster and toast on the highest setting until warm, bubbly and crispy on the edges.
  2. Top with the above garnishes and enjoy!

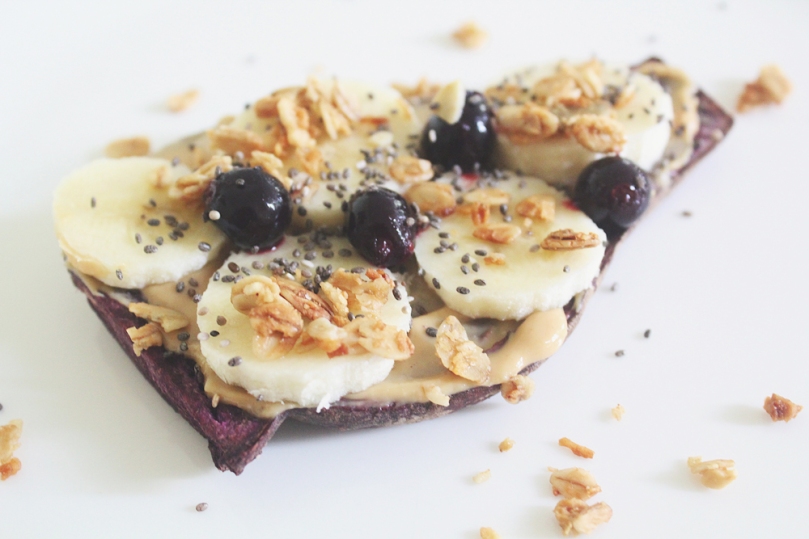
Banana, Blueberries & Peanut Butter

Sweet Purple Sweet Potato Toasts (3 ways): Banana, Blueberries & Peanut Butter

PREP TIME 5 MINS | COOKING TIME 5-10 MINS | SERVES 1

INGREDIENTS

  • Banana slices
  • Blueberries, fresh or frozen (thawed)
  • Chia seeds
  • Granola
  • Peanut butter
  • Sweet potato slice(s)

METHOD

  1. Place the sweet potato slices into a toaster and toast on the highest setting until warm, bubbly and crispy on the edges.
  2. Top with the above garnishes and enjoy!

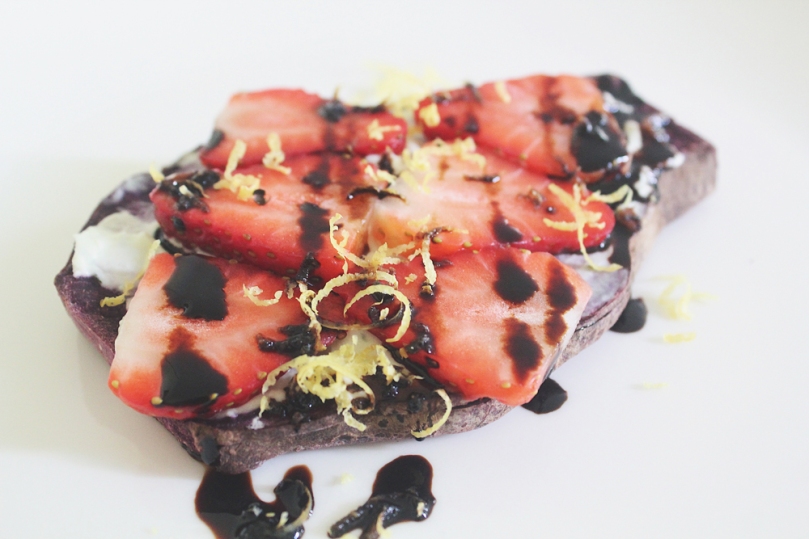
Strawberries & Goats Cheese with Balsamic Reduction

Sweet Purple Sweet Potato Toasts (3 ways):Strawberries & Goats Cheese with Balsamic Reduction

PREP TIME 5 MINS | COOKING TIME 5-10 MINS | SERVES 1

INGREDIENTS

  • Balsamic reduction
  • Goats Cheese
  • Lemon zest
  • Strawberry slices, fresh
  • Sweet potato slice(s)

METHOD

  1. Place the sweet potato slices into a toaster and toast on the highest setting until warm, bubbly and crispy on the edges.
  2. Top with the above garnishes and enjoy!

And there you have it – three simple ways you can make you mornings sweeter, brighter, full of colour, healthier, and energising altogether! I’ll TRY to get the last post for the month up, if not on Wednesday night, then on Thursday night hopefully – fingers crossed!

BON APPÉTIT

– Ally xx

myTaste.com

Dark Chocolate, PB & Banana Smoothie Bowl

Dark Chocolate, PB & Banana Smoothie Bowl

Hello Everyone! First off, apologies as I did say in my last post that I’d get this up within the week where I posted about Amcarmen’s Kitchen turning 4 last week! (Unnecessary) things got in the way which was why I wasn’t able to get this up. So to make up for that, since after this post I still have one more Smoothie Bowl recipe to share with all of you, I’ll ATTEMPT to get that up for you before May rolls in. Bare in mind that I will be flying off once again tomorrow, hence also why this post is going up on a Tuesday instead of my usual Wednesday post schedule, so my attempt may already be void at this point *cheeky grin* but for you guys, I will try my best to.

Moving on, here is tonight’s recipe for a devilishly delicious Dark Chocolate, PB, and Banana Smoothie Bowl! So incase you guys haven’t been following my Instagram pages, I got back from a 5-day business trip to Hong Kong two Sundays ago. I’ve italicised ‘business’ because well, though yes it was for business, it was also sort of a mini-vacation. It was my first time to travel to Hong Kong as well so I made sure that I made the most out of the trip, outside of business hours that is. Though it was a fun trip, both on the business and vacation side to it, I was super exhausted and sleep deprived from the trip when I got back. It’s not that I was out partying every single night until the wee hours of dawn, but rather my roommate/colleague basically kept me up all night. She snores like a helicopter continuously hovering over me and talks in her sleep. I’m a very sensitive sleeper and this for me was just… Pure torture. I probably collectively only slept 8-10 hours during that 5 day trip, and the hard part was, I couldn’t even take naps in between because she snores in her naps too. I’m definitely requesting for separate rooms if I ever have to travel with her again. At least I’ll be travelling by myself to the Philippines tomorrow so I won’t have to worry about a snore fest for the upcoming 5 days (thank God).

Rant over. So Dark Chocolate, PB, and Banana? In a smoothie bowl? For breakfast? Don’t mind if I do! Classic flavour combinations for those who prefer to start their mornings off on a sweet note. Now you may notice that in the ingredients shot below that the jar of peanut butter is missing… So here’s what happened, that day I was making two different smoothie bowls for a Sunday afternoon snack, therefore I took two ingredient shots that day. The jar of peanut butter found it’s way into the other shot (which by the way doesn’t need peanut butter) and I only realised it after I was going through the photographs I took a few days later – silly me! Oh well, so ignore the jar of peanut butter in the next recipe post!

Dark Chocolate, PB & Banana Smoothie Bowl Ingredients

PREP TIME 5 MINS | COOKING TIME  | SERVES 1

INGREDIENTS

For the smoothie mixture

  • 1 cup low-fat milk
  • 1/2 cup yoghurt
  • 60g dark chocolate*
  • 1 large banana
  • 1 tbsp peanut butter
  • 1/2 tbsp cocoa powder

*I used Whittaker’s Marlborough Sea Salt and Caramel Brittle Chocolate for this recipe – super yum with that hint of salt and sweet caramel.

Toppings

  • Bananas – loaded with essential vitamins and minerals such as potassium, calcium, manganese, magnesium, iron, folate, niacin, riboflavin, and B6
  • Granola – contains vitamins, minerals, and other essential nutrients, including, but not limited to, dietary fibres, sodium, potassium, zinc, phosphorus, magnesium, calcium, vitamin C & E, niacin, iron, and thiamin
  • Coco Pops
  • Dark Chocolate
  • Desiccated Coconut

METHOD

  1. Add the milk, peanut butter, cocoa powder, dark chocolate, yoghurt, and banana to a blender and blend until smooth.
  2. Transfer to a bowl and top with sliced bananas, coco pops, desiccated coconut, roughly chopped dark chocolate, and granola. Enjoy as quick and easy breakfast or a filling afternoon snack to get rid of that midday schlump!

Dark Chocolate, PB & Banana Smoothie Bowl

BON APPÉTIT

– Ally xx

myTaste.com

Beetroot Brownies with Chocolate Chunk Beet Ice Cream

Beetroot Brownies with Chocolate Chunk Beet Ice Cream

Hello Everyone! Firstly, I’d like to apologise to the moon and back to all my friends and followers for not posting in what seems like (or quite frankly has been) forever! A lot of things have been going on for the past few months, both in my personal and work life that I found it difficult to balance alongside with keeping up with Amcarmen’s Kitchen. The truth is, I haven’t had the time to write, or let’s just say that I did have the time, but I was either using my time unproductively or for something else instead of sitting down and getting back on track with posting. So yes, I am very sorry for the lack of consistency of posting on the blog in the recent months, but I’m planning on getting back on board with this for the remaining 3 months of 2017 (hopefully). It will however be a little scattered in a sense that you won’t see a set theme for the month just because I still have an archive of recipes that never got posted from the previous months.

Beetroot Brownies with Chocolate Chunk Beet Ice Cream

Back in July I started to hero beetroot in my cooking, and I shall continue that for the next two weeks (I think) before I share other recipes that still stick with the theme for 2017 which is Blood Pressure Friendly foods. Before I jump onto the recipe, I’d like to thank my friends Simon Swadling and Jialing Mew for contributing their recipes for this year’s Auguest – and yes, another thing that I did not plan properly for with everything going on so I apologise that I could only round up these amazing two friends for you!

Anyway, so somewhere down the path of whipping up this batch of beetroot brownies, which by the way includes Whittaker’s (New Zealand) Kaitaia Fire Chili Pepper Spice Dark Chocolate, I made the realisation that I basically just made red velvet brownies *cheeky grin* but of course, what makes a nice warm slice of heaven without ice cream? Specifically Chocolate Chunk Beet Ice Cream? Even MORE specifically, chunks of chocolate from Whittaker’s (New Zealand) Hawke’s Bay Black Doris Plum and Roasted Almonds Dark Chocolate? I think I just drooled. Cold ice cream with a kick of spice in it to really heighten the flavours atop a chocolatey, chewy, and moist brownie drizzled with a vibrant beetroot icing glaze? I’ll have the whole batch please thank you very much.

The original recipe to the brownies can be found over on BBC Good Food, and the original recipe to the beetroot ice cream can be found on Vegan Heaven.

PREP TIME 25 MINS | COOKING TIME 45 MINS | SERVES 12 SLICES

Note: Make the ice cream either the day before or a few hours (4-5 hours) to allow for freezing time before baking your brownies.

INGREDIENTS

Beetroot Brownies Ingredients

For the brownies

  • 500g whole raw beetroot, washed
  • 250g dark chocolate (70% cocoa), chopped*
  • 100ml olive oil
  • 3 large free range eggs
  • 1 & 1/4 cup plain flour
  • 3/4 cup granulated sugar
  • 2/3 cup cocoa powder
  • 1/3 cup macadamia nuts, roughly chopped
  • 2 tsp vanilla extract
  • 1 tsp baking powder

For the beetroot icing glaze

  • 1 cup icing sugar
  • 1 tbsp beetroot juice

Chocolate Chunk Beet Ice Cream Ingredients

For the ice cream

  • 500g whole raw beetroot, washed
  • 1 cup thick full fat coconut milk
  • 1/4 cup honey
  • 3 tablespoons chopped dark chocolate (Whittaker’s (New Zealand) Hawke’s Bay Black Doris Plum and Roasted Almonds)
  • 1 piece thumb-sized ginger, grated

*As mentioned earlier, I used Whittaker’s (New Zealand) Kaitaia Fire Chili Pepper Spice Dark Chocolate. But since I only had 100g of this, I used regular dark chocolate for the brownies and added half of the Whittaker’s chocolate to the mix, while the other half sprinkled on top of the baked brownies.

METHOD

  1. Boil the beetroots for both for the brownies and ice cream, in a pan of boiling salted water for 15-20 mins or until tender. Drain and leave to cool before peeling (wear clean rubber gloves to peel if you want to avoid beet-stained hands).
  2. Chocolate Chunk Beet Ice Cream: Roughly chop the cooked beets into small chunks and place them together with the coconut milk, honey, and the grated ginger in a food processor and blend until smooth.
  3. Transfer the beetroot-coconut mixture in a freezer-safe container, stir in the chococalte chunks and freeze for about 4-5 hours, whisking slightly every 20-30 minutes to avoid it getting too icy.
  4. Beetroot Brownies: Preheat oven to 180C (350F or gas mark 4) and grease a 10cm x 25cm baking dish. Chop a third of the cooked beetroots into small cubes and blitz the remainder in a blender or food processor to a paste. Sit the paste in a sieve over a bowl – just until you have collected 1-2 tbsp juice. Save the juice for the icing, and mix the olive oil into the beetroot paste. Set both aside.
  5. Bring a pan of water to a bare simmer and place a heatproof bowl with the chopped chocolate. Lightly stir until the chocolate had melted then set aside to cool slightly.
  6. Use an electric whisk to beat the eggs, sugar, and vanilla together in a large mixing bowl until light, fluffy, and tripled in size. Carefully fold the eggs into the beetroot and olive oil mixture, followed by the melted chocolate. Fold in the flour, cocoa powder, and baking powder, then add macadamia nuts and the chopped beetroot.
  7. Pour the mixture into your prepared baking dish and bake for 20-25 mins. The brownies should still be slightly gooey in the middle. Set aside to allow to cool slightly. While cooling, you can thaw your beetroot ice cream for 5-10 minutes before scooping and serving
  8. Mix enough reserved beetroot juice with the icing sugar to get a runny icing – dilute with water if you need. Remove brownies from the tin, drizzle with the icing and cut into squares.
  9. Enjoy a sinful slice or two, or more (who’s gonna stop you?) with family and/or friends, or you know, just by yourself *cheeky grin*.

Beetroot Brownies with Chocolate Chunk Beet Ice Cream

Beetroot Brownies with Chocolate Chunk Beet Ice Cream

BON APPÉTIT

– Ally xx

myTaste.com

White Chocolate Snickerdoodle Blondies

White Chocolate Snickerdoodle Blondies

Hello Everyone! Wow! I can’t believe that it’s the last day of November today! Once again, another month managed to slip right under our noses! Christmas is nearing, and in the blink of an eye, it will be 2017! Anyway, I’m not going to give a brief recap of my year just yet – I’ll probably save that for sometime in December – I’ll just give you a recap of my week as it was indeed a busy one! Firstly, I have been home alone for the past 5 nights as my Mom and my sister flew off on Friday to visit the other sibling over in Singapore. Secondly, I had two back-to-back events that I helped with the event decorations for, one was Phantom of the Opera themed (but very minimal/close to none on the decorations that actually resembled anything from Phantom of the Opera), and the other was an Alice and Wonderland/Enchanted Forest themed Staff Appreciation Night. I had loads of fun designing the initial proposal for the decorations, and of course helping with execution of the decorations onsite.

My next task, in terms of event decoration is to propose and present to the client, the theme ‘The Chronicles of Narnia; The Lion, The Witch, and The Wardrobe’ for a corporate 25th Anniversary Dinner coming up in mid-January. The presentation will be on Friday and I’m both excited and nervous at the same time; fingers-crossed that they will like my idea and that they see the underlying meaning of the chosen theme. Other than work, I scored VIP tickets from my Boss to watch Coreyah and JinJo Crew perform at The Rhythm of Korea on Saturday night. It was a free event hosted by the Korean Embassy here in Brunei as a sort of launching of their moving in to their new Embassy which will happen sometime in December if I’m not mistaken – so yes, this was an early celebration for the general public.

White Chocolate Snickerdoodle Blondies

A cross between a chewy blondie and moist butter cake, these blondies are studded with white chocolate chips and ribboned with sweet cinnamon sugar! — Sally’s Baking Addiction

But enough of the long-winded, personal life stories and let’s move on to tonight’s recipe shall we? So, I think you guys can probably tell that this is another recipe followed and adapted from none other than Sally’s Baking Addiction. I honestly think that the theme for this November shouldn’t have been ‘Cooking with Chocolate’ but rather Sally-themed instead haha! Anyway, I don’t actually have much to say for this recipe as it was kind of just a I-need-to-bake-something-for-my-blog-but-what-should-I-bake kind of moment early on the Sunday morning before I went grocery shopping to make sure I had all the ingredients. I came across this recipe while browsing and I thought that it’d be interesting to make.

White Chocolate Snickerdoodle Blondies Ingredients

PREP TIME 15 MINS | COOKING TIME 30-35 MINS | SERVES 12-15 BARS

INGREDIENTS

For the blondies

  • 2 & 1/3 cups plain flour
  • 1 cup white chocolate chips
  • 3/4 cup granulated sugar
  • 3/4 cup packed light brown sugar
  • 3/4 cup unsalted butter, softened to room temperature
  • 2 large free range eggs, room temperature
  • 2 tsp vanilla extract
  • 1 & 1/4 tsp baking powder
  • 1/2 tsp salt

For the cinnamon-sugar filling

  • 1/3 cup granulated sugar
  • 2 tsp ground cinnamon

METHOD

  1. Preheat oven to 180C (350F or gas mark 4). Line a 9×9, 11×7, or 9×13 inch baking pan with parchment paper, leaving enough overhang on the sides to easily pull the blondies out of the pan and cut once done.
  2. Combine the plain flour, baking powder, and salt in a small bowl, then set aside. Beat the unsalted butter on high speed using a hand or stand mixer fitted with a paddle attachment, in a large bowl. Beat for at least 1 minute until creamy, and then add in the granulated and brown sugars, beating for 2 full minutes on high speed until light and fluffy. Scrape down the sides and bottom of bowl when needed.
  3. Beat in the eggs and vanilla on high speed, scraping down the sides and bottom of the bowl as needed. On low speed, beat in dry ingredients until just combined. With a large wooden spoon or rubber spatula, fold in the white chocolate chips.
  4. Spoon half the batter into pan. It will be a relatively thin layer, but try to spread it across the pan evenly. Combine the cinnamon and sugar and sprinkle on top of them bottom layer, reserving 1 tbsp for the top. Spread the remaining batter over top. Some of the cinnamon-sugar will mix into the top layer as you spread it, which is fine. Sprinkle the top with remaining cinnamon-sugar.
  5. For a 9×9 or 11×7 baking pan, bake for 30-35 minutes or until golden brown and a toothpick inserted in the centre comes out clean. For a 9×13, bake 22-26 minutes or until golden brown and toothpick inserted in centre comes out clean. Cool completely for about 1 hour.

White Chocolate Snickerdoodle Blondies

These bars can be made 3 days in advance and kept in an airtight container at room temperature until ready to serve. Bars freeze well, up to 3 months. Simply thaw overnight in the refrigerator and bring to room temperature before serving. Leftover bars can be stored in an airtight container in the refrigerator or at room temperature for up to 1 week.

BON APPÉTIT

– Ally xx

myTaste.com

Double Chocolate Crinkle Cookies

Double Chocolate Crinkle Cookies

Hello Everyone! For those who follow me on my personal social media pages will most definitely know that I’ve probably celebrated my turning of a quarter of a century one too many times that I guess an average person would celebrate their birthday. To quote a friend “[I] only turn 25 once” I think she meant that in a way that I probably had too many celebrations – but of course I’m going to take that as yes, I only turn 25 once so I’m going to go all out and use my birthday as an excuse to eat all the cake and food without feeling guilty *cheeky grin* Okay, so it’s been exactly a week now since I turned 25 so I guess it’s only fair to put a cease to the celebrations and start hitting the gym to burn off all the cake (3 cakes in total to be honest).

That aside, tonight’s recipe that I will be sharing is one that I whipped up last year for Christmas. I baked a batch of soft, chewy Double Chocolate Crinkle Cookies long with some traditional Sugar Cookies to take to the office with me on Boxing Day, to share with my colleagues – I know right. I’m so nice. Anyway, you might realise  in the photos that the cookies may look like they have a hint of red to them – well, I tried adding a little bit of red food colouring (what I had left of it anyway) to make it look like a red velvet crinkle cookie, but I guess I didn’t have enough coloring for it to really shine through.

Double Chocolate Crinkle Cookies IngredientsOh you know – just my little owly friend that also happens to be one of my measuring spoons basking in a bowl of flour mixture.

Anyway! Before I head onto the recipe, please take the time to check out the original over on Sally’s Baking Addiction. I think I have said this before, but nonetheless, I will say it again. Sally’s recipes are definitely spot on and easy to follow. I don’t think that I’ve ever screwed up a recipe of hers when in the kitchen myself. Somewhere in the past, I attempted to bake crinkle cookies after seeing my Aunt post her cookies on her Facebook page. I followed a recipe, not Sally’s of course and they ended being a total FAIL. I was so sad because I had baked them to share with friends – which I did anyway, and I think they were just being nice and said that the cookies were ‘still’ good haha.

Double Chocolate Crinkle Cookies Ingredients

PREP TIME 3 HOURS 30 MINS* | COOKING TIME 10 MINS | SERVES 20 COOKIES

*Includes chilling time – it is highly recommended that you chill the cookie dough for at least 3 hours. The longer, the better! Chilling helps the flavors to develop, prevents spreading, and makes the otherwise sticky cookie dough easy to handle.

INGREDIENTS

  • 1 cup all-purpose flour, levelled
  • 1 cup confectioners’ sugar, for rolling
  • 1/2 cup & 2 tbsp unsweetened cocoa powder
  • 1/2 cup granulated sugar
  • 1/2 cup packed light or dark brown sugar
  • 180g Belgian dark chocolate, roughly chopped
  • 115g unsalted butter, softened to room temperature
  • 1 large free range egg, at room temperature
  • 1 tsp baking soda
  • 1 tsp pure vanilla extract
  • 1/8 teaspoon salt

METHOD

  1. Using a hand-held electric mixer, beat the butter in a large mixing bowl for about 1 minute on medium speed until completely smooth and creamy. Then, add in the granulated sugar and brown sugar, continuing to beat on medium-high speed until fluffy and light in colour. Beat in the egg and vanilla extract on high speed. Scrape down the sides and bottom of the bowl as needed. Set aside.
  2. In a separate medium-sized bowl, whisk the flour, cocoa powder, baking soda, and salt together until combined. On low speed, slowly mix into the wet ingredients until combined. The cookie dough will be quite thick. Switch to high speed and beat in the roughly chopped Belgian chocolate. At this point, the cookie dough will be sticky. Cover dough tightly with aluminum foil or plastic wrap and chill for at least 3 hours and up to 3 days. Chilling is mandatory for this cookie dough.
  3. Remove the cookie dough from the refrigerator and allow it to sit at room temperature for about 20 minutes; if the cookie dough was chilled longer than 3 hours, then let it sit at room temperature for about 30 minutes. This makes the cookie dough easier to scoop and roll.
  4. Preheat oven to 180C (350F or gas mark 4). Line two large baking sheets with parchment paper or silicone baking mats, and then set aside.
  5. Scoop and roll the dough, about 1.5 tbsp of dough each, into balls. Roll each ball generously in the confectioners’ sugar and place them on the prepared baking sheets.
  6. Bake the cookies for about 8-9 minutes. The baked cookies will look extremely soft in the centers when you remove them from the oven. Allow them to cool for 5 minutes on the cookie sheet; they will slightly deflate as you let them cool. Transfer to a cooling rack to cool completely. Once cooled, enjoy and share with family and friends!

Double Chocolate Crinkle Cookies

Double Chocolate Crinkle Cookies

Cookies stay fresh covered at room temperature for up to 1 week. Baked cookies freeze well – up to three months. Unbaked cookie dough balls (that are not coated in confectioners’ sugar) freeze well – up to three months. Coat the frozen cookie dough balls in confectioners’ sugar, then bake for about 10 minutes. No need to thaw them.

BON APPÉTIT

– Ally xx

myTaste.com

Chilli Chocolate & Cinnamon Cake

Chilli Chocolate & Cinnamon Cake

Hello Everyone! Well… Today has been quite an eventful day! For my followers who do not know, today marks my quarter of a century years young! 25 years of achievements and failures has brought me to where I am today.

Round 1 of Birthday Celebrations

My colleagues surprised me with a cake earlier this afternoon – quite funny as the whole morning they kept telling me not to expect anything because they didn’t have a surprise for me, nor did they have cake. By afternoon, my Manager called me to their department, asking me to help her with a design that I had helped her with earlier in the afternoon. Being the gullible person that I am, I went up to her, and that’s when the rest started singing Happy Birthday and brought out the cake (mini tower of cream puffs). So I’d like to take this opportunity to thank everyone in the office who greeted me today – and for the surprise!

Round 2 of Birthday Celebrations

Round 2 of celebrations began earlier tonight as well, with my Mom, Sister, and my Godmother. We had Japanese for dinner and of course, the restaurant staff sang Happy Birthday to me as they brought out the cake that I had baked for myself for my birthday – which is tonight’s recipe! Original recipe can be found over on Dish.

Dense, rich and moist with a little hint of chilli and cinnamon – everything a great chocolate cake should be, and even more delicious when served with candid pepitas. — Claire Aldous.

Chilli Chocolate & Cinnamon Cake Ingredients

PREP TIME 15 MINS | COOKING TIME 20-25 MINS | SERVES 10-12

INGREDIENTS

For the cake:

  • 200g Lindt Chilli Chocolate, roughly chopped
  • 200g unsalted butter, cubed
  • 2 large free range eggs, lightly beaten
  • 1/2 cup caster sugar
  • 2 tbsp plain flour
  • 1 tsp ground cinnamon
  • 1 tsp vanilla extract
  • 1/2 tsp salt
  • 1/4 tsp ground cayenne pepper (optional if you’d like a little more kick to your chilli chocolate cake)

For the glaze:

  • 100g dark chocolate
  • 100ml thickened cream

METHOD

  1. Preheat the oven to 170C (325F or gas mark 3).
  2. Melt the butter and chocolate in a heat-proof bowl in the microwave at 30-second intervals and stirring until the butter and chocolate has melted. Once melted, stir in the sugar and vanilla extract, setting aside to cool for 10 minutes.
  3. Once cooled, gradually stir in the eggs and then fold in the flour, salt, cinnamon, and cayenne pepper. Pour into a buttered cake tin and smoothen the top.
  4. Bake for 20-25 minutes until the centre of the cake is set but not too firm. Once done, transfer to a rack and leave to cool completely in the tin.
  5. While the cake is cooling down, get started on the glaze by melting the dark chocolate in a heat-proof bowl set over a pan of simmering water, stirring occasionally. Do not let the base of the bowl touch the water. Once the chocolate has melted, slowly add in the cream, stirring gently. Remove from the heat.
  6. Transfer the cake to a dish and pour the glass over. Finish with a light dust of confectioners’ sugar and enjoy with family and friends!

Chilli Chocolate & Cinnamon Cake

Chilli Chocolate & Cinnamon Cake

BON APPÉTIT

– Ally xx
myTaste.com

Death by Chocolate Cupcakes

Death by Chocolate Cupcakes

Hello Everyone! It’f finally November which means, other than a new theme on the blog as usual, it is also my birthday month! I’ll be 25 in exactly a week and I’ve got a few get-togethers planned with family, friends, and colleagues. I actually baked these cupcakes last year for my Manager’s birthday. The week before her birthday I shared the leftover red velvet cupcakes that I had baked for halloween with my colleagues. When I offered her the cupcakes, she told me that she didn’t like red velvet, and that chocolate was more her thing. So, my colleagues told me that I should bake her some chocolate cupcakes for her birthday. I’m not sure if she liked them, but my colleagues and I definitely did!

Death by Chocolate Cupcakes

These cupcakes  are not overly sweet, but rather deep and intense in pure chocolate flavour. They are dark chocolate cupcakes with a thick dark chocolate frosting on top and sprinkled with dark chocolate shavings. The mixture of melted chocolate and cocoa powder to make these cupcakes ultra fudgey, rich, and moist. Are you salivating yet? Well, if you aren’t then please go away – if you can’t salivate over fudgey dark chocolate cupcakes then we cannot be friends *cheeky grin*

Today is actually her birthday, and we tried to surprise her today which ended up being a massive fail. Well, it’s hard to surprise someone who already expects a surprise – my colleague was right, we should’ve just not surprised her as that would’ve been the ultimate surprise. She’ll probably get mad at us for forgetting, but then again she’ll definitely know that we didn’t forget and still expect a surprise in some way or another. Maybe that will be the plan for next year?

Anyway, Please take the time to check out the original recipe over on Sally’s Baking Addiction. Anyway, I don’t want to take you guys on a massive tangent so let’s move on to the recipe for tonight!

Death by Chocolate Cupcakes Ingredients

PREP TIME 12 MINS | COOKING TIME 18 MINS | SERVES 12 CUPCAKES

INGREDIENTS

For the dark chocolate cupcakes

  • 3/4 cup (95g) all-purpose flour
  • 1/2 cup buttermilk*
  • 1/2 cup granulated sugar
  • 1/2 cup unsweetened cocoa powder
  • 1/4 cup light brown sugar
  • 115g unsalted butter
  • 60g semi-sweet baking chocolate
  • 2 large eggs, at room temperature**
  • 1 tsp vanilla extract
  • 3/4 tsp baking powder
  • 1/2 tsp baking soda
  • 1/4 tsp salt

For the dark chocolate frosting

  • 2 & 3/4 cup confectioners’ sugar
  • 2/3 cup unsweetened cocoa powder
  • 95ml heavy cream
  • 90g unsalted butter, softened to room temperature
  • 1 tsp vanilla extract

Optional

  • Semi-sweet chocolate chips or shaved dark chocolate for decoration

*Room temperature eggs are required for this recipe. To bring eggs to room temperature quickly, put them in a glass of warm water for 5-10 minutes.

**Buttermilk is required for this recipe. If you do not have buttermilk, make your own by mixing 2 teaspoons white vinegar or lemon juice with 1/2 cup milk. Stir and let sit for 5 minutes.

METHOD

  1. Preheat the oven to 180C (350F or gas mark 4). Line a 12-cup cupcake/muffin pan with cupcake liners and set aside.
  2. For the cupcakes: Melt the butter and chocolate together in the microwave at 30-second intervals, stirring between each time until smooth. Once smooth, set aside to slightly cool. You may also melt the butter and chocolate over low heat on the stovetop.
  3. In a medium-sized bowl, combine the cocoa powder, flour, baking soda, baking powder, and salt together, and then set aside.
  4. In a large bowl, whisk the eggs, sugar, brown sugar, and vanilla together until smooth. Then, add in the cooled butter and chocolate mixture, whisking until smooth. Add half of the flour mixture, then half of the buttermilk. Repeat until everything is added, stirring until just combined; be careful to not over mix otherwise the batter will be very thick like pudding. Fill the cupcake liners about 2/3 of the way full with batter.
  5. Bake for 18 minutes, or until a toothpick inserted into the centre of the cupcake comes out clean. Allow to cool completely before frosting.
  6. For the frosting: Sift the confectioners’ sugar and cocoa powder together to assure there are no lumps, and then set aside.
  7. With a handheld or stand mixer fitted with a paddle attachment, beat the butter on medium speed until creamy – about 2 minutes. Gradually add the sifted sugar and cocoa powder mixture alternately with the heavy cream and vanilla extract. Beat on low speed after each addition. Once all added, beat on high speed until creamy and combined for at least 2 minutes. Add a pinch of salt if frosting is too sweet.
  8. Frost the cooled cupcakes and top with chocolate chips or shaved dark chocolate as desired. Cupcakes stay fresh at room temperature in an airtight container for up to 4 days. Store covered in the refrigerator is desired for up to 1 week.
  9. Share and enjoy amongst family and friends!

Death by Chocolate Cupcakes

Death by Chocolate Cupcakes

BON APPÉTIT

– Ally xx
myTaste.com