Pulut Tai Tai (Blue Glutinous Rice Cakes)

Pulut Tai Tai (Blue Glutinous Rice Cakes)

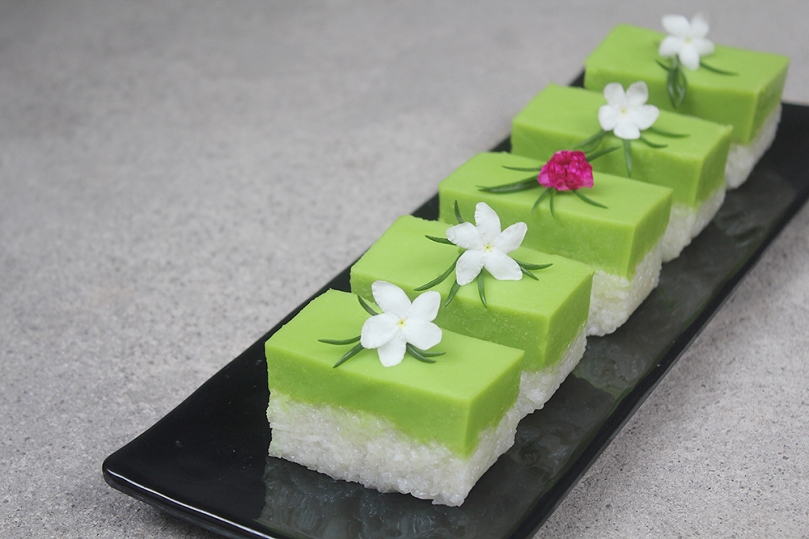
Hello Everyone! Pulut Tai Tai is a Nyonya kuih made of fluffy glutinous rice that is steamed in coconut milk, and tinted with a beautiful natural blue colour from butterfly pea flowers. You can leave it out if you can’t find butterfly pea flowers, as it’s mostly for the colour, but it wouldn’t be as elegant-looking without it.

It is typically served with a coconut-pandan spread where the contrasting colours of green together with the vibrant blue and white of the glutinous rice makes the kuih all the more delightful and pleasing to the eyes of the beholder. In addition to colour, the slight tinge of saltiness of the glutinous rice coupled with the sweetness of the kaya makes this kuih a delight to savour.

Pulut Tai Tai (Blue Glutinous Rice Cakes)

Tai Tai refers to a rich man’s wife who enjoys a life of leisure. It is said that this specific kuih was only served to the wives of rich men back then. This kuih is also known as Pulut Tekan which literally translates to ‘pressed glutinous rice.’

Before we dive into tonight’s recipe, please take the time to check out the original recipe for these Blue Glutinous Rice Cakes over on Bake with Paws by Yeanley.

Before I tackled this recipe, I read that soaking the glutinous rice with the addition of vinegar or lemon juice will reduce the phytic acid found in the grain. It also helps in breaking down the gluten and aids for better absorption of the blue colour from the butterfly pea flowers. Now, while I included lemon in the ingredients shot below, I in fact did not use the lemon at all for one main reason – the addition of acidity to the butterfly pea flower infused water would make it turn violet in colour. Since I am all about sharing blue recipes for this month, that’s definitely not what I want. I found that the glutinous rice absorbed the blue colour well anyway without the need for vinegar or lemon juice.

Pulut Tai Tai (Blue Glutinous Rice Cakes) Ingredients

PREP TIME 20 MINS* | COOKING TIME 30-45 MINS | SERVES 4-6

* Additional 4 hours min. overnight max. for soaking time

INGREDIENTS

  • 2 cups white glutinous rice
  • 1 cup coconut milk
  • 2/3 cups water
  • 3/4 tsp salt
  • 25 pcs dried butterfly pea flowers
  • Banana leaves
  • Pandan (screwpine) leaves
  • Lemon juice (optional)

METHOD

  1. Bring a small saucepan of water and the dried butterfly pea flowers to a boil, over high heat. Let it simmer for a few minutes and then remove from the heat. Cover and leave to steep for 10 minutes before straining. Press down on the flowers to extract the blue colour from the flowers. Set aside to cool.
  2. Wash the glutinous rice until the water is clear. Soak 1/3 of the glutinous rice with the blue-infused water and the remaining 2/3 in water. Soak for at least 4 hours or overnight. After 4 hours or the next day, drain them both separately.
  3. Prepare your steamer by lining with clean banana leaves. Light grease with a touch of coconut oil and top with pandan leaves followed by the glutinous rice; blue rice on one side and white on the other.
  4. Mix the coconut milk and salt together. Pour half of the coconut milk mixture over the rice and mix well. Steam over high heat for 20 minutes. After 20 minutes, remove from the steam and fluff the rice. Add the remaining coconut milk mixture and then return it to the steamer to cook for a further 10 to 15 minutes.
  5. Line a square pan with banana leaves and lightly grease with coconut oil. Transfer the cooked rice to the pan, alternating between the white and the blue rice. Level the surface and cover with more banana leaves. Place another pan on top of it and weigh it down with heavy objects to compress the rice. Set aside to cool.
  6. Cut into small rectangular pieces and serve with some homemade Nyonya-style kaya. Enjoy it as a mid-afternoon snack!

This kuih can be kept for a couple of days if stored in the refrigerator. Before consuming it again, steam or heat it in a preheated oven at 70C for 10 minutes to soften it.

Pulut Tai Tai (Blue Glutinous Rice Cakes)

PS: Before I end tonight’s post, let’s see if a particular someone actually reads my blog from start to finish *cheeky grin* I would like to take this opportunity to wish a special person in my life, a Happy Birthday! I hope you like the little gift I had sent to you earlier this afternoon. I wish you an abundance of happiness, good health, peace, and prosperity in life. To many more birthdays and hopefully I can spend them all with you by your side!

BON APPÉTIT

– Ally xx

myTaste.com

Advertisement
Black Sticky Rice with Grilled Mango & Blue Coconut Sauce

Black Sticky Rice with Grilled Mango & Blue Coconut Sauce

The combination of mango and black sticky rice is fairly common in Thailand. Black sticky rice, a delicious whole-grain alternative to white rice, is purplish black in colour and has a chewy texture. It is naturally sweet, contains fibre, and is loaded with antioxidants, which makes this dessert all the more healthy and guilt-free to eat!

Black Sticky Rice with Grilled Mango & Blue Coconut Sauce

The black sticky rice is served alongside sliced mango, and a sauce of sweet and salty coconut milk is usually added. I had initially decided to purée the mango, but when I took a photo of the final plate up, I wasn’t happy with how it aesthetically turned out. So the following week, I thought of serving it with fresh mango on the side. It wasn’t until an idea popped into mind when I thought back to my Grilled Pineapple Dessert – I thought, why not grill the mango to further enhance its flavour?

Before we dive into tonight’s recipe, please take the time to check out the original recipe where I drew my inspiration from over on Breakfast With Flowers by Katja. This was where I took the inspiration from into making the coconut sauce for this dish blue by simmering and steeping dried butterfly pea flowers in the coconut milk.

Black Sticky Rice with Grilled Mango & Blue Coconut Sauce Ingredients

PREP TIME 10 MINS* | COOKING TIME 45 MINS | SERVES 6

* Plus 4 hours (or overnight) to soak the rice

INGREDIENTS

For the black sticky rice

  • 2 cups black glutinous rice, pre-soaked
  • 4 & 1/2 cups water
  • Pinch of salt

For the blue coconut sauce

  • 200ml coconut milk
  • 1 tbsp loose dried butterfly pea flowers
  • 2 tbsp white granulated sugar
  • 1/2 tsp salt

To serve with

  • Grilled Mango
  • Shredded fresh coconut
  • Cornflakes (optional)

METHOD

  1. Black Sticky Rice: Wash the black glutinous soaked rice well in several changes of cold water and then drain thoroughly.
  2. Place the rice together with the 4 & 1/2 cups of water and salt in a rice cooker. Let it work its magic. Optional: If available, you can cook the rice with a pandan leaf for fragrance.
  3. Alternatively, you may use a heavy pot with a tight-fitting lid. Bring to a vigorous boil over high heat. Cover, then reduce heat to maintain a gentle simmer and cook until the rice is tender (but still a little chewy in the center) and the liquid is absorbed, about 45 to 50 minutes. Remove from heat and let it stand, covered, for 10 minutes.
  4. Blue Coconut Sauce: While the rice is cooking prepare your coconut sauce. Add the dried butterfly pea flowers to a small saucepan together with the coconut milk, sugar, and salt.
  5. Gently heat on medium-low for about 10 minutes or until you get the hue of blue that you want infused into the coconut milk.
  6. Once done, remove from the heat and strain out the butterfly pea flowers. Press on the flowers to extract more colour out of them.
  7. Serve the black sticky rice together with grilled mango, and shredded fresh coconut. Top the rice with the blue coconut sauce and sprinkle with some crushed cornflakes for that extra added crunch. Enjoy as a warm dessert!

Black Sticky Rice with Grilled Mango & Blue Coconut Sauce

BON APPÉTIT

– Ally xx

myTaste.com

No-churn Cookie Monster Ice Cream

No-churn Cookie Monster Ice Cream

Hello Everyone! Do you have a toddler in front of the TV right now totally hypnotised by Sesame Street? Do you hear the phrase “C is for cookie” at least once a day? Then your kid is probably a true Cookie Monster fan. Well, I don’t have kids of my own (yet) and I was never really a fan of Sesame Street when growing up.

No-churn Cookie Monster Ice Cream

Despite that, I wanted to share a recipe with everyone that screams the colour blue, and when doing some research one fine weekend, Cookie Monster desserts flooded Pinterest and Google Images. So embrace your little one’s love by adding some Cookie Monster fun to this dessert. This super simple kid-friendly No-churn Cookie Monster Ice Cream is loaded with Oreo cookies and chocolate chip cookies that make for a great combo. In just a few minutes time, you can have this fun cookie-loaded ice cream in your freezer. Plus the recipe only needs cookies, sweetened condensed milk, cream, and vanilla. Super simple.

Before we dive into tonight’s recipe, please take the time to check out the original where I drew my inspiration from over on Baking Beauty by Krystle.

No-churn Cookie Monster Ice Cream Ingredients

PREP TIME 4 HOURS* | COOKING TIME | SERVES 6-8

* For freezing time, minimum 4 hours or up to 24 hours.

INGREDIENTS

  • 2 cups (500ml) all purpose cream, chilled
  • 1 can (218g) sweetened condensed milk
  • 2 tbsp vanilla extract
  • 1/2 to 1 tsp blue food colouring, may need more or less for your desired shade of blue
  • Chocolate chip cookies (such as Chips Ahoy), roughly chopped
  • Chocolate sandwich cookies (such as Oreos), roughly chopped

METHOD

  1. In a chilled medium-sized mixing bowl, whip the all purpose cream using an electrical hand-held mixer until soft peaks start to form.
  2. Add the sweetened condensed milk together with the blue food colouring and vanilla. Continue to whip to soft peaks, it should be fluffy and mousse-like.
  3. Gently fold in half of the chopped cookies and transfer to an airtight container. Sprinkle the tops with the remaining cookies and freeze for 4 hours or up to 24 hours. Let sit at room temperature for about 15-20 minutes before scooping and serving. Enjoy!

Store-bought cookies work really well with this recipe as their crunchy texture stands up to the ice cream. You may also make your own homemade cookies, just make sure they’re super crunchy.

No-churn Cookie Monster Ice Cream

BON APPÉTIT

– Ally xx

myTaste.com

Auguest 2020: Mhyre Virtudazo

Celestial Ice Buko

“If I can make it from scratch, I will make it from scratch. I also try to cook with whole foods as much as possible and eat more vegetables/plant-based meals at least once a week.” — Mhyre Virtudazo

Auguest 2020: Mhyre Virtudazo

When Allison told me her plans for Auguest 2020 and asked if I wanted to be one of her guest contributors, I was immediately onboard! I didn’t hesitate and said yes in a heartbeat! I was very thrilled to hear about this month’s theme which is RAINBOW COLORS!! 🌈 How could I say no to that? I was just so excited that I volunteered to share a recipe for a blue-colored dish.

Fast forward to a couple of months before August, I realized that there’s a challenge to the color I chose. I wanted my dish to represent me. I wanted it to be completely plant-based. I’m trying to incorporate more vegetables and other plant-based products to my meals. I love meat and will not go vegan but this is my way of lessening my carbon footprint. I’ve also been trying to make more Filipino dishes so that’s another thing. The trickiest part is I don’t typically find blue-colored food attractive. I mean I won’t eat blue soup but I can eat a blue dessert.

Celestial Ice Buko

So… I had to come up with a Filipino dish that’s plant-based and visually appealing for my taste. Most importantly, I wanted to consider Allison’s readers and IG followers. I wasn’t only creating this for myself but also I’d like for you guys to try and enjoy what I’ll be sharing.

One afternoon, I was brainstorming by myself (LOL) when I heard an ice cream vendor pass by my house. So I thought, why not dessert? What about ice cream? I can make it blue by using butterfly pea flowers! But then I couldn’t imagine eating blue ice cream cone. I kept on making a list of possible ingredients then I wrote coconut milk on my notebook. That’s when the idea hit me—ice buko! Why not? I mean it brings me happy childhood memories and it meets my complicated requirements! Oh, and I just found out that there’s a Wikipedia entry for it! Haha! Most of all, I could eat it even if it’s colored blue!

I hope you try the recipe. I like how smooth and creamy the texture is even without condensed milk! You’ll also be amazed with how it turns out visually from making it to the final result! It freezes into a soft blue just like the color of the sky while the swirls of white are coconut milk and macapuno strings that look like clouds.

Celestial Ice Buko Ingredients

PREP TIME 10 MINS | COOKING TIME 10 MINS | MAKES 4 ICE LOLLIES

Freezing time: 4 hours

INGREDIENTS

  • 2 cups coconut milk
  • 2 cups of water
  • 2/3 cup white sugar (two 1/3 cups)
  • 1/2 cup macapuno strings (syrup must be drained)
  • 1/4 cup dried butterfly pea flowers
  • 1 tbsp cornstarch (two 1/2 tbsp)

METHOD

  1. In a pot, heat coconut milk and sugar in low heat.
  2. Make slurry using the coconut milk from the pot and some cornstarch. Combine it with the rest of the liquid in the pot.
  3. Stir the liquid gently until sugar has been fully dissolved. Be careful not to bring it to a boil.
  4. Add the dried blue pea flowers. Mix until all the flowers are soaked in coconut milk.
  5. Turn off heat and cover the pot. Steep for 8-10 minutes. Remove the flowers.
  6. Wait for the liquid to cool.
  7. Put a few spoons of macapuno strings in each mold. Pour the liquid, put the lolly holder on top and freeze for about 4 hours.
  8. Admire your beautiful Celestial Ice Buko before devouring them! Enjoy!

Celestial Ice Buko

Here are some conclusions/tips/notes for making this Celestial Ice Buko:

  • Traditional ice buko has red beans. I didn’t include them because it might not go well with the butterfly pea tea. But feel free to experiment!
  • Instead of red beans, I tried rice crispies and loved it! Wanna try it, too? It pretty much follows step 6 but you freeze a teaspoon of rice crispies and a tablespoon of blue liquid first for 30 minutes. The rice crispies will float if you put a large amount of liquid. They will also stick to the lolly holder if you quickly fill the mold up.
  • I wanted to dip my ice buko in melted white chocolate first and then sprinkle it with rice crispies. However, I read on the package that it had dairy in it so I scrapped my plan. If you’re okay with a not so 100% vegan dessert then go ahead and enjoy your ice buko with white chocolate casing. I bet it’s going to be yummy!
  • Another thing you can try is freezing 3/4 coconut milk-blue pea flower mixture in the mold for 2 hours. Fill up the rest of the mold with butterfly pea tea and freeze for another 2 hours. When it freezes, it will have different layers of sky blue and indigo. Just like the galaxy!
  • For another galaxy-looking option, sprinkle blue, pink and purple colored sugar on your ice buko.
  • No ice lolly molds? No worries! You may use paper cups and popsicle sticks. I also made a batch with them. I doubled the quantity and was able to make 11 pieces!
  • Freezing time may vary depending on your freezer. It took overnight for my ice buko to fully solidify in one of the refrigerators I used. (Back story: I made this recipe 8 times in 4 different houses. Therefore, I’ve tried 4 different refrigerators. 😅)

Celestial Ice Buko

Photo Courtesy & Recipe Copyright © 2020 | Mhyre Virtudazo (@acupofjasminerice)

BON APPÉTIT

– Mhyre Virtudazo

myTaste.com

Auguest 2020: Simon Swadling

Salted Coconut & Rum Pineapple Upside-down Cake

“I love making food that makes people smile, or brings them joy, whether it’s a fancy beautiful patisserie creation, or a simple but delicious cake.” — Simon Swadling

Auguest 2020: Simon Swadling

This easy Salted Coconut & Rum Pineapple Upside-down Cake is loaded down with the flavours of the Caribbean islands and the tropics. Sweet caramelised pineapple slices lay perfectly on top of this light and fluffy coconut-infused yellow cake for a summer treat like no other. It is a play on a piña colada, which is a sweet cocktail made with rum, cream of coconut or coconut milk, and pineapple juice, usually served either blended or shaken with ice.

Salted Coconut & Rum Pineapple Upside-down Cake Ingredients

PREP TIME 20 MINS | COOKING TIME 1 HOUR 20 MINS | SERVES 8-10

INGREDIENTS

For the caramelised pineapple

  • 1/2 a pineapple
  • 20g butter
  • 3/4 cup sugar
  • 1/4 cup cream

For the cake batter

  • 150g butter
  • 100g almond meal
  • 100g all-purpose flour
  • 50g desiccated coconut
  • 3 large free-range eggs
  • 3/4 cup sugar
  • 1 tbsp golden syrup
  • 1 tbsp rum
  • 1 tbsp sour cream
  • 1 & 1/2 tsp baking powder
  • 1 tsp salt
  • 1 tsp vanilla extract

METHOD

  1. Preheat the oven to 160C (325F or gas mark 3). Grease and line an 8” (20.5 cm) round cake tin with parchment paper.
  2. Caramelised Pineapple: Peel and core the pineapple. Cut into 1cm thick slices and then thirds.
  3. In a heavy-based frying pan (do not use a non-stick pan!), add the sugar and cook on medium heat until it melts and begins to caramelise. Stir to avoid burning ‘hot spots’.
  4. When the caramel is golden brown, mix in the butter and then cream, being careful not to burn the caramel.
  5. Add in the pineapple sliced and cook until soft and semi transparent, about 10 to 15 minutes.
  6. Cake Batter: Add all the dry ingredients into a food processor and blitz to combine. Next, add in the butter and pulse until it is blended into the flour mixture.
  7. In a separate bowl, combine all the wet ingredients together and whisk. Slowly pour into the processor and pulse until combined and smooth.
  8. Layer the petals of pineapple at the bottom of your cake tin in an aesthetic pattern, adding a little bit of the caramel. Top with the cake batter.
  9. Bake for 55 minutes, or until done. You can tell when it’s done by piercing the middle of the cake with a skewer and it comes out clean. If not, bake further.
  10. Remove the cake from the oven and cool on a wire rack for about 20 minutes.
  11. Serve: Invert the slightly cooled cake onto a cake stand or serving plate. Some of the juices from the topping will seep over the sides – that’s okay.
  12. You can slice and serve the cake warm, or cool the cake down completely at room temperature before slicing and serving. Enjoy!

Salted Coconut & Rum Pineapple Upside-down Cake

Salted Coconut & Rum Pineapple Upside-down Cake

Photo Courtesy & Recipe Copyright © 2020 | Simon Swadling (@thebeardedpatissier)

BON APPÉTIT

– Simon Swadling

myTaste.com

Buko Pandan Ice Cream (No-Churn)

Buko Pandan Ice Cream (No-Churn)

Hello Everyone! A traditional Buko Pandan Salad is made with gulaman (jelly) cubes, tropical palm fruits, and shredded young coconut in sweetened cream. It is rich, creamy, and loaded with pandan flavour – a classic Filipino dessert that is a definite crowd favourite. You can check out my very out-dated recipe for it that I tackled back in 2015 by clicking here.

Buko Pandan Ice Cream (No-Churn)

Tonight however, I won’t be sharing with you another Buko Pandan Salad recipe. I thought you might want to enjoy its delicious flavours with a twist. I’ll be turning the traditional salad into an ice cream that can be enjoyed as both a snack or dessert. It’s rich, creamy, full of coconut flavour, and with an intense pandan taste using fresh screwpine leaves. If you don’t have access to fresh pandan leaves, you may also use pandan extract for this – just skip ahead to step 3 in the recipe below!

The process of homemade, no-churn ice cream is super simple. It’s just a matter of whipping together heavy cream, condensed milk, and adding in your choice of flavour/s. Seriously, the hardest part is waiting for the mixture to freeze! The ice cream comes out rich, creamy, and so much better than store-bought with far fewer ingredients. Oh, and did I mention that it’s a lot cheaper too?

Seriously, you’ll be craving for this all year long, especially during the hot summer days!

Buko Pandan Ice Cream (No-Churn) Ingredients

PREP TIME 4 HOURS* | COOKING TIME | SERVES 4-6

*For freezing time, minimum 4 hours or up to 24 hours.

INGREDIENTS

For the ice cream

  • 8-10 pandan leaves
  • 1 can (300g) sweetened condensed milk
  • 1 cup (250ml) all purpose cream
  • 3/4 cup (200ml) thick coconut milk/cream
  • Green buko pandan food colouring/flavouring (optional)

To serve with (optional)

  • Buko pandan jelly
  • Cornflakes
  • Lychees
  • Shredded coconut meat

METHOD

  1. Place the pandan leaves together with the all purpose cream and coconut milk in a food processor or heavy-duty blender, and blitz/blend for a few minutes until the pandan leaves have been finely puréed.
  2. Pour the blended pandan-infused cream and coconut milk over a fine sieve and into a chilled large mixing bowl. Strain the cream mixture from the pandan leaf pulp, pressing down firmly with the back of a spoon to extract all of the liquid from the pulp. Discard the pandan leaf pulp.
  3. Whip the pandan-infused cream using an electrical hand-held mixer until soft peaks start to form. Add the sweetened condensed milk. You may also add a dash of vanilla extract at this point. Continue to whip to soft peaks, it should be fluffy and mousse-like.
  4. Pour into an airtight container and freeze for 4 hours or up to 24 hours. Check the mixture every 30 minutes and mix (“churn”) using a spoon to avoid it turning into granita (coarse flavoured ice).
  5. Let sit at room temperature for about 15 minutes before scooping and serving as it is or with other elements such as fresh coconut meat, buko pandan jelly, other fruits of choice, and crushed cornflakes for that extra added crunch. Enjoy!

Buko Pandan Ice Cream (No-Churn)

Buko Pandan Ice Cream (No-Churn)

BON APPÉTIT

– Ally xx

myTaste.com

Ondeh-Ondeh (Glutinous Rice Balls with Coconut Sugar Filling)

Ondeh-Ondeh (Glutinous Rice Balls with Coconut Sugar Filling)

Hello Everyone! In Singapore, Malaysia, and even in Brunei, Ondeh-Ondeh refers to a glutinous rice ball kuih (sweet snack or dessert). In Indonesia they call it Klepon. There are two versions of Ondeh-Ondeh. One is made with just plain glutinous rice flour and scented with pandan (screwpine) juice, while the other has a little sweet potato added to the dough.

Ondeh-Ondeh (Glutinous Rice Balls with Coconut Sugar Filling)

Ondeh-Ondeh is made with fresh pandan juice and glutinous rice flour rolled in freshly grated coconut with a little surprise on the inside. The surprise makes these balls of Ondeh-Ondeh oh so fun to eat! Its pandan-flavoured skin wraps semi-melted gula melaka (palm sugar) that would burst upon the first bite, like sweet little bombs as the sweetness explodes in the mouth. The slightly salted grated coconut further enhances the deliciousness of this kuih.

Before we dive into tonight’s recipe, please take the time to check out the original where I drew my inspiration from over on Rasa Malaysia by Bee.

Ondeh-Ondeh (Glutinous Rice Balls with Coconut Sugar Filling) Ingredients

PREP TIME 30 MINS | COOKING TIME 5-10 MINS | MAKES 12-14 BALLS

INGREDIENTS

  • 10 pandan leaves
  • 2 cups glutinous rice flour*
  • 1 cup water
  • 100g freshly grated coconut**
  • Coconut sugar***
  • Pinch of salt

* Using only glutinous rice flour will make the ondeh-ondeh rather soft in texture. Although some do enjoy such consistency, tapioca flour may be added to the dough to make it slightly firmer. You may also substitute tapioca flour with corn flour.

** If you are using desiccated coconut for this recipe, add 1 tablespoon of water and half a teaspoon of salt to half a cup of desiccated coconut. Mix well and steam the mixture for 15 to 20 minutes. The reason for steaming is because you want to achieve a fluffier/softer texture, similar to freshly grated coconut.

*** The amazing taste of ondeh-ondeh comes from the gula melaka, a special palm sugar which has a toffee taste to it. You may substitute this for brown sugar, coconut sugar, or other sweeteners if gula melaka isn’t available. That will, however, change the traditional taste of the ondeh-ondeh.

METHOD

  1. Pandan Juice: Place the pandan leaves together with the water in a food processor or heavy-duty blender, and blitz/blend for a few minutes until the pandan leaves have been finely puréed.
  2. Pour the blended pandan-infused water over a fine sieve and into a small bowl. Strain the liquid from the pandan leaf pulp, pressing down firmly with the back of a spoon to extract all of the juice from the pulp. Discard the pandan leaf pulp.
  3. Dough: In a large mixing bowl, combine the glutinous rice flour with the extracted pandan juice and lightly knead to form a smooth dough. Cover the dough and set aside for about 15 minutes to rest.
  4. Ondeh-Ondeh Balls: Bring a large pot of water to rolling boil. Pinch a thumb-sized piece of dough and flatten lightly and thinly. Fill the centre of the dough with about half a teaspoon of coconut sugar. Roll it in your palms to form a smooth ball and then place each ball on a baking tray lined with lightly greased cling film. Repeat until all the dough is used up.
  5. Bring a large pot of water to a rapid boil. Carefully drop each ball into the boiling water. Do not overcrowd the pot. You may need to work in batches depending on how many balls you managed to make with the dough.
  6. When they float to the surface, remove them with a slotted spoon and shake off the excess water. Coat the ondeh-ondeh balls with the slightly salted grated coconut and serve immediately. Enjoy!

Ondeh-Ondeh (Glutinous Rice Balls with Coconut Sugar Filling)

Notes:

Why does the dough crack?
The dough is too dry. Add some water and knead the dough again. Work in batches and store the dough in a bowl with a piece of damp cloth over it to prevent it from getting dry.

Why does the Ondeh-Ondeh burst while boiling?
Sometimes, the dough may crack during the cooking process. This is due to the thinness of the dough. However, remember not to make the dough too thick either. Wrap it closely around the palm sugar to prevent air from getting in. Otherwise it will burst during the cooking process.

Why did the palm sugar not melt?
The ondeh-ondeh wasn’t cooked long enough. To ensure that the pal sugar has fully melted, simmer them over low heat for another 5 to 10 minutes once they start to float. Also, the trick is to shave the palm sugar with a knife or mandoline or simply chop them into small chunks. This way, they would melt faster. Larger chunks may not melt as quickly as smaller pieces.

How long can ondeh-ondeh last for?
Cooked ondeh-ondeh with grated coconut will only last a day because grated coconut spoils easily. If you would want to prepare them in advance, you may refrigerate shaped ondeh-ondeh for up to 5 days covered with plastic wrap. Shaped ondeh-ondeh can also be frozen for up to 6 months if kept in an airtight container or freezer bag. Simply boil refrigerated or frozen ondeh-ondeh before coating them with shredded coconut.

Ondeh-Ondeh (Glutinous Rice Balls with Coconut Sugar Filling)

Before tackling this recipe, I read up on a few different ones online and gathered that on average, these Ondeh-Ondeh Balls take about 10 minutes to cook. I made mine slightly bigger than those in the recipes I looked at, but no way did it take 15 or 30 minutes to fully cook through. It was already way past the 1-hour mark and the balls were still rock hard. At first, I didn’t know where I went wrong… and then it hit me. I was using rice flour instead of glutinous rice flour. What a rookie mistake *facepalm* Nonetheless, after I got around to picking up some glutinous rice flour from the grocers and tackled the recipe again, it was a success!

BON APPÉTIT

– Ally xx

myTaste.com

Seri Muka Kuih

Seri Muka Kuih

Hello Everyone! Our last recipe for the month of June is an amazing Malaysian and Nyonya kuih made of glutinous rice, coconut milk, sugar, and pandan leaves. Kuihs (or kuehs) are common snacks of the Hokkien, Teochew and Peranakan cuisine.The terminology is actually a general description for bite-size pastries/nibbles. These traditional delights come in many different forms and are either sweet or savoury snacks/desserts.

Seri Muka literally translates to beautiful face in Malay. It is a two-layered cake that consists of a glutinous rice layer steamed with coconut milk and topped off with a sweet and silky smooth pandan custard layer (hence the green colour). It’s heady with the flavour of coconut milk, a key ingredient used to impart a creamy taste when cooking the glutinous rice and making the custard layer.

Seri Muka Kuih

My fondest memory of Seri Muka would have to be during the festive season of the Islamic New Year. These pretty faces, alongside other kuihs of course, were served at almost every Malay household I would visit during that time of the year. The soft, sticky rice underneath with just a hint of saltiness pairs so deliciously with the decadently sweet pandan custard on top.

Before we dive into tonight’s recipe, please take the time to check out the original where I drew my inspiration from over on Rasa Malaysia by Bee. Seri Muka can also be found in the Indonesian province of South Kalimantan, and is also known as Kuih Putri Salat in Singapore.

Seri Muka Kuih Ingredients

PREP TIME 35 MINS | COOKING TIME 50 MINS | MAKES 14-16 SLICES

INGREDIENTS

For the bottom layer

  • 1 & 1/3 cups glutinous rice, soaked in water for 30 minutes
  • 1 cup thin coconut milk (1/2 cup coconut milk plus 1/2 cup water)
  • 2 pandan leaves
  • 1 tsp salt

For the top layer

  • 1 cup thick coconut milk (or coconut cream)
  • 1/2 cup pandan juice*
  • 1/2 cup white granulated sugar
  • 2 large free-range eggs
  • 2 large free range egg yolks
  • 5 tbsp all purpose flour
  • 2 tbsp cornstarch

*For the pandan juice

  • 8-10 pandan leaves
  • 1/2 cup water

METHOD

  1. Bottom Layer: In a large mixing bowl, combine all the ingredients needed, except for the pandan leaves, to make the bottom layer. Evenly spread onto a lightly greased 8in x 11in rectangular baking dish and add the in pandan leaves, making sure that they are submerged in the rice mixture. Steam over high heat for 20 minutes. Meanwhile, prepare the pandan juice for the top layer.
  2. Pandan Juice: Place the pandan leaves together with the water in a food processor or heavy-duty blender, and blitz/blend for a few minutes until the pandan leaves have been finely puréed.
  3. Pour the blended pandan-infused water over a fine sieve and into a small bowl. Strain the liquid from the pandan leaf pulp, pressing down firmly with the back of a spoon to extract all of the juice from the pulp. Discard the pandan leaf pulp.
  4. Top Layer: Mix all the remaining ingredients for the top layer in a medium-sized heatproof bowl until well combined.
  5. Create a bain-marie (double-boiler) by pouring some water into a pot that is slightly larger than your heat-proof bowl. Very important, check to see if your bowl can sit on top of the pot without any water touching the bottom of the bowl.
  6. Heat your pot of water over low-medium and bring to a slight simmer. Once slightly simmering, place the bowl with the pandan, coconut milk, and egg mixture over it. Cook until the mixture thickens slight, but is still runny enough to pour, about 8-10 minutes.
  7. Seri Muka Kuih: Once the rice layer is done, discard the pandan leaves. Stir and flatten the rice with the back of a spoon, making sure that it is compact. Using a fine sieve, strain the pandan, coconut milk, and egg mixture over the cooked rice. Return to the steamer and steam over medium heat for 30 minutes.
  8. Remove from the steamer once done and leave aside to completely cool down before cutting them into diamond or rectangular-shaped bite-size pieces. Serve with a hot cup of coffee or tea for a lovely mid-afternoon snack. Enjoy!

Seri Muka Kuih

Seri Muka Kuih

BON APPÉTIT

– Ally xx

myTaste.com

Salted Sweet Corn Ice Cream (No-churn)

Salted Sweet Corn Ice Cream (No-churn)

Hello Everyone! Earlier on the beginning of this month we’ve been experiencing dangerously high heat indexes, to the high 40s and I think even 50 degrees celsius in some cities in the provinces. The scorching weather we’ve been experiencing has left me craving for something sweet and something cold to beat the heat! Something like Salted Sweet Corn Ice Cream!

Central Coast, NSW (July 2011)

I remember when I was still studying in Australia for my Bachelor’s Degree in Design; I went on a weekend away trip up north to the country with my friend to visit her family. We stopped over… Somewhere (I can’t remember where) and ended up having Cold Stone Ice Cream at the beach in the dead winter. So there’s really no excuse to only have ice cream during the summery days! *cheeky grin* Also, I just realised that the photo above was taken almost 9 years ago (July 2011)!

Mini tangent aside, you can still whip this up even though we’re now entering the rainy season here in the Philippines; I mean we still have relatively hot and humid days in between the rainy days anyway.

This Salted Sweet Corn Ice Cream is sweet, summery, and creamy with that perfect hint of salt for that classic sweet-and-salty buttered corn at the backyard cookout kind of flavour. Perfect for a quick quarantine dessert! The great thing about it is that you don’t need an ice cream churner for this recipe, and most may already be readily available in your pantry. If not, be sure to pick them up on your next grocery run.

Salted Sweet Corn Ice Cream (No-churn)

It’s common for many to not associate or equate corn to something sweet, but rather used in savoury meals. But in Southeast Asia, specifically in Malaysia, Singapore, and the Philippines, corn is widely used in various desserts, most especially in ice cream.

Before we dive into tonight’s recipe, please take the time to check out the original where I drew my inspiration from over on My Recipes by Stacey Ballis.

Salted Sweet Corn Ice Cream (No-churn) Ingredients

PREP TIME 4 HOURS* | COOKING TIME | SERVES 4-6

*For freezing time, minimum 4 hours or up to 24 hours.

INGREDIENTS

  • 1 bag (200g) frozen corn**, thawed, quickly blanched, and roughly chopped
  • 1 can (218g) sweetened condensed milk
  • 1 cup (250ml) all purpose cream
  • 1 tsp vanilla extract
  • Pinch of salt
  • Yellow food colouring (optional)

** Alternatively, you can use fresh corn or canned corn as well for this recipe. Whichever is readily available.

Note:

When selecting fresh corn, look for plump ears with tight, green husks that feel cool and a little bit moist in your hand. Note that the natural sugars in sweet corn start converting into starch the minute it’s picked so buy the freshest ears you can find and be sure to use them within a day or two of bringing them home.

METHOD

  1. In a chilled medium-sized mixing bowl, whip the all purpose cream using an electrical hand-held mixer until soft peaks start to form.
  2. Add the sweetened condensed milk and continue to whip to soft peaks, it should be fluffy and mousse-like. Add the corn together with the vanilla extract and pinch of salt. Gently fold through and then, using a stick blender, blitz the mixture to break down the corn kernels.
  3. Pass the mixture through a sieve to get rid of the corn fibres to get a smooth-textured ice cream. Pour into an airtight container and freeze for 4 hours or up to 24 hours. Let sit at room temperature for about 15-20 minutes before scooping and serving on a hot summer’s day!

It’s excellent garnished with caramel sauce (and/or caramel popcorn), nut of choice or cornflakes for an added element of crunch! Enjoy!

Salted Sweet Corn Ice Cream (No-churn)

So before I end tonight’s post, I just want to share the little mishaps I had when making this ice cream. Firstly, I wanted to add just a hint of yellow food colouring to give a mixture a slight tint. I was slowly tipping the bottle over and nothing came out. I shook the bottle a bit, and only a tiny drop came out. I shook it again and then… boom. I think a teaspoon or more of it spilled out. Now it looks like the kind of ice cream you’d get from the stores that are 90% food colouring/flavouring *le sigh*.

Secondly, after freezing the ice cream mixture overnight, I was super excited to dig into it the next day. To my dismay, the ice cream was way too salty for my liking. It was really unpleasant to eat. On top of that, the ice cream tasted nothing like sweet corn at all. The corn kernels that were added to the mixture were hard and frozen. I was basically eating salty ice cream with cold chunks of corn that barely taste like corn. I was so disappointed.

I decided to try and fix this without having to throw out the first batch I made, all I needed was more cream, which I had to wait to get a week later on my fortnightly grocery run. I took the batch of ice cream out of the freezer and just let it sit on the countertop for about half an hour until it melted back into cream. Then I whipped the new all purpose cream in a chilled bowl until soft peaks started to form and then added the melted ice cream to the bowl. This definitely made the cream mixture less salty, but still hits just right. This also made the colour of the ice cream less intense.

Salted Sweet Corn Ice Cream (No-churn)

After adding the cream and melted ice cream together, I whipped it further and then got my stick blender out to blitz the corn into the cream mixture. This basically ensures that the corn flavour is mixed into the cream and also solved the issue of having icy chunks of corn. And violà! Fixed.

BON APPÉTIT

– Ally xx

myTaste.com

Grilled Pineapple Dessert

Grilled Pineapple Dessert

Hello Everyone! Pineapples are packed with nutrients, antioxidants and other helpful compounds, such as enzymes that can fight inflammation and disease. They are especially rich in vitamin C, which is essential for growth and development, a healthy immune system, and aiding the absorption of iron from the diet.

Firing up the barbie tonight? This may be one of the most delicious ways to eat a pineapple! Try this Grilled Pineapple Dessert for a healthy alternative that’s fast and tasty. The tequila adds a tart flavour to balance the natural sweetness of the pineapple, and the sugar from the caramel. You may also substitute the tequila out for rum instead, or whatever bevvy tickles your taste buds.

Grilled Pineapple Dessert

There was no doubt that I wanted to buy a whole tub of ice cream to pair with this dessert, especially after all the summer heat we’ve been experiencing. But given the circumstances of Enhanced Community Quarantine, my priorities were focused elsewhere. Considering the capacity of my freezer, I first made sure that it was full of seafood that would last us until our next grocery trip, which is every two weeks now to limit the time I spend outdoors amidst the on-going pandemic.

But by all means, feel free to get creative by serving it with ice cream for a warm (and cold at the same time), sweet, tart, and creamy dessert. Take it to another level by topping the dessert off with nuts or granola to add a fun crunch to it!

Grilled Pineapple Dessert

PREP TIME 10 MINS | COOKING TIME 20 MINS | SERVES 2-3

INGREDIENTS

For the grilled pineapple

  • 1 medium-sized pineapple
  • 1 shot tequila (or rum)
  • 2 tsp ground cinnamon
  • 2 tsp ground nutmeg

Optional:

For the vegan caramel sauce

  • 1 cup raw sugar
  • 1/2 cup soy milk
  • 60g unsalted margarine
  • 1 tbsp vanilla extract
  • 1 tsp salt (or to taste)

To garnish/serve with

  • Fresh mint leaves
  • Handful of granola
  • Ice cream (flavour of choice)
  • Nuts of choice, roughly chopped

METHOD

  1. Prepare Pineapple: Remove the leafy crown with a sharp knife and cut a thin slice from the base. Slice the skin away from top to bottom, removing any brown eyes as you go.
  2. If you have a pineapple corer at home, use this before cutting your pineapple into rounds. Otherwise, cut the pineapple into 6-8 rounds, and like me, use a round cookie cutter to cut the cores out of each round.
  3. Set aside on a plate and coat with the ground cinnamon and nutmeg. Optional, spike the pineapple rounds with a shot of tequila.
  4. Vegan Caramel Sauce: Combine all the ingredients in a small saucepan and simmer over low heat, whisking constantly or until thickened and no longer watery, about 6 to 9 minutes. Keep in mind that the caramel thickens more as it cools.
  5. Grilled Pineapple: Preheat grill pan over high heat. Slightly oil the grill and then carefully place each round into the pan. Cook until grill marks form, about 4 to 5 minutes per side. Once done, remove from the pan and transfer to a serving dish.
  6. Serve: Top with a squeeze of fresh lime juice, drizzle with the vegan caramel sauce, and sprinkle with fresh mint. Serve with ice cream flavour of choice topped with some roughly chopped nuts for some crunch, if desired. Enjoy!

Grilled Pineapple Dessert

Notes:

  • You may also opt to drizzle the pineapple slices with homemade salted caramel sauce instead.
  • Any homemade caramel sauce can easily be made ahead; great served warm, at room temperature or chilled with refrigeration. Refrigerate in an airtight container for up to 2 weeks. You can warm it slightly to make it more drizzle-able before use.

Grilled Pineapple Dessert

BON APPÉTIT

– Ally xx

myTaste.com