Spicy Kimchi Quinoa Bowls

Spicy Kimchi Quinoa Bowls

Hello Everyone! Wow! I can’t believe that we’ve reached the end of Cooking with Quinoa month, and with that, I can’t believe that September will be ending in a couple of days! Now that we’re approaching October soon, I can’t believe that we’re already into the 10th month of the year — which also means that I will have been working in my current company as a Creative Design Executive for a year already. *sigh* Time is flying by in the blink of an eye. I don’t know why, but the introduction to this blog post is feeling very overemotional *cheeky grin* and I guess I will stop here.

I’ve saved the best recipe for last! Well actually, now that I think of it, I think the best recipe for this month was the very first that I posted in the beginning of the month with my take on a Californian-inspired Quinoa Salad. I still consider tonight’s a recipe one of the best as it is a creative and healthy take on a classic kimchi fried rice recipe — and you guessed it! Quinoa will be replacing the rice in this recipe. I was going to try an attempt to make my own Kimchi at home, but I forgot why I didn’t try to DIY it since it’s actually super easy to do — I guess the reason was because I saw a shelf of ready-made kimchi at the supermarket and just could not resist to pick up a jar to speed up my time in the kitchen for that day  *cheeky grin* The original idea for this recipe can be found over on Simply Quinoa.

Spicy Kimchi Quinoa Bowls

For those of you who do not know, kimchi is a traditional Korean dish that uses the process of fermentation to pickle and preserve fresh vegetables. The spicy, crunchy, cabbage-based vegetable mixture has a texture similar to sauerkraut but boasts much bolder flavours thanks to garlic and spicy seasonings. This process of pickling and preserving fresh vegetables was originally developed in 7th Century Korea as a means of storing vegetables during cold winters. Though of Korean origin, the dish has been steadily — if not, slowly — gaining recognition beyond the boundaries of its native country. Fermentation in general has been shown to increase the nutritional properties of food. Kimchi specifically has been linked to anti-obesity effects, and might help treat atopic dermatitis and even lower cholesterol. Other than that, the dish’s health benefits are in large part attributable to its high probiotic content (i.e. good-for-you bacteria), and it is also loaded with fibre and vitamins A, B, and C. Spicier varieties also get a boost from capsaicin, a component of hot peppers that’s been shown to improve metabolism.

Spicy Kimchi Quinoa Bowls Ingredients

PREP TIME 5 MINS | COOKING TIME 10 MINS | SERVES 2

INGREDIENTS

  • 2 cups cooked tri-colour quinoa, cooled
  • 2 cups kale, finely chopped
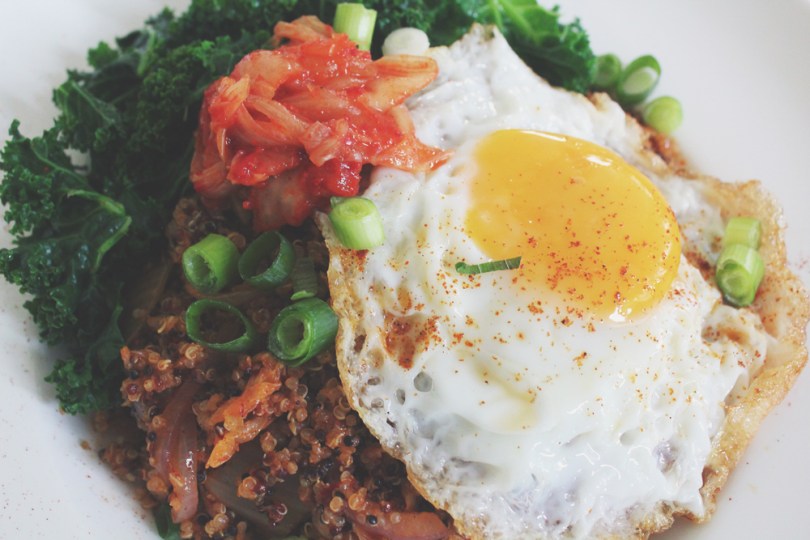
  • 1 cup kimchi, chopped
  • 3-4 garlic cloves, minced
  • 2 large free range eggs
  • 2 tsp gluten-free tamari
  • 2 tsp kimchi “juice” (the liquid from the jar)
  • 2 tsp toasted sesame oil
  • 1/2 tsp freshly grated ginger

Optional

  • 1/4 cup sliced green onions, for garnish
  • 1 tsp hot sauce
  • Fresh ground black pepper, for garnish

METHOD

  1. Heat about a tablespoon of olive oil in a large frying pan over medium-high. Add the grated ginger and garlic and sauté for until golden and fragrant, about a minute.
  2. Add the quinoa and kimchi and cook until just lightly heated through, about 2 – 3 minutes. Stir in kimchi juice, tamari, and hot sauce if using, then turn the heat down to low and stir occasionally while you prepare the other ingredients.
  3. In a separate frying pan, cook the eggs on low until the whites have cooked through but the yolks are still runny, about 3 – 5 minutes. Set aside.
  4. Steam the kale in a separate pot for 30 – 60 seconds until soft. Set aside.
  5. Transfer the kimchi-quinoa mixture and kale to two separate serving bowls evenly and top it off with a sunny side up egg each. Garnish with some green onions and fresh ground black pepper if using. If you fancy, top with more kimchi.
  6. Serve and enjoy!

Spicy Kimchi Quinoa Bowls

BON APPÉTIT

– Ally xx

myTaste.com

Quinoa Minestone Soup with Kale Pesto

Quinoa Minestrone Soup with Kale Pesto

Hello Everyone! Week 2 of cooking with quinoa is here and I’ve got a classic recipe with a twist. For those of you who don’t know, minestrone soup is a thick soup of Italian origin made with vegetables that range from, but are not limited to, beans, onions, celery, carrots, and tomatoes. Often, rice or pasta is added to the soup to bulk it up with some carbs. There is no set recipe for minestrone, since it is usually made out of whatever vegetables are in season. It can be vegetarian, contain meat, or contain a meat-based broth.

I’ve made this soup a couple of times before in the past, and is featured in the Mediterranean section of my blog – but today, I’m going to add a little twist to a traditional minestrone soup. I’m switching out the pasta that I would normally add to my soup, with quinoa. Using quinoa in place of pasta adds extra protein and makes this soup gluten free! In addition to using quinoa for this soup, I’m topping it off with some kale pesto as well to give the dish a touch of freshness – and of course, if you have any extra leftover, you can totally whip up another dish just by mixing it through some freshly cooked pasta! Top it of with some grilled chicken or seared tiger prawns for a complete lunch or dinner. The original recipe for this dish can be found over on Taste Australia.

Quinoa Minestone Soup with Kale Pesto Ingredients

PREP TIME 10 MINS | COOKING TIME 20 MINS | SERVES 4

INGREDIENTS

For the soup

  • 1 can (400g) cannellini beans, drained and rinsed
  • 1 can (410g) Italian chopped tomatoes
  • 150g bacon, diced
  • 4 cups chicken stock
  • 1/3 cup tri-coloured quinoa, rinsed
  • 3-4 garlic cloves, minced
  • 1 celery stick, sliced
  • 1 dried bay leaf
  • 1 large brown onion, coarsely chopped
  • 1 medium-sized carrot, peeled and cut into small chunks
  • 1 medium-sized zucchini, cut into small chunks

For the kale pesto

  • 2 & 1/2 cups kale leaves, shredded
  • 1/4 cup grated parmesan
  • 1 small garlic clove, halved
  • 1 tbsp extra virgin olive oil
  • 1 tbsp lemon juice
  • 1 tbsp water

METHOD

  1. For the Soup: Heat the extra virgin olive oil in a large pot over medium-low heat. Add the bacon bits and cook, stirring, for 3-4 minutes or until browned. Remove from the pot and set aside.
  2. Turn the heat up to high and then add in the garlic. Sauté until golden brown and fragrant, about a minute or so. Then add in the onions and cooking, stirring, until soft, about 2 minutes.
  3. Add in the carrot and celery, together with the bay leaf, and cook, covered, stirring occasionally, for about 4 minutes or until soft.
  4. Next, add in the chicken stock and canned chopped tomatoes to the pot. Bring to the boil.
  5. Once boiling, reduce the heat down to medium-low and then stir in the quinoa. Simmer, stirring occasionally, for 5 minutes.
  6. Stir in zucchini. Cook, stirring occasionally, for 5 minutes, and then add in the cannellini beans. Cook, stirring occasionally, for 2 minutes or until the quinoa and zucchini are tender. Season with a touch of ground salt and pepper.
  7. For the Kale Pesto: Add the kale leaves, parmesan cheese, and garlic into a food processor and process until finely chopped. Combine the juice, oil, and water in a jug, and slowly stream the juice mixture into the kale mixture until well combined. Season.
  8. Divide soup among four equal bowls and top with the kale pesto and extra parmesan if you wish.
  9. Serve and enjoy!

Quinoa Minestone Soup with Kale Pesto

Quinoa Minestone Soup with Kale Pesto

BON APPÉTIT

– Ally xx

myTaste.com

Risoni al Ratatouille

Risoni al Ratatouille

Risoni al Ratatouille

Hello Everyone! Today is the last day of Pasta Month; sad to be ending as I actually have a whole lot more pasta dishes that I want to try out, but also happy to move onto a new theme for next month! Just a heads up though – the likelihood of a theme not happening is quite possible. I did have a theme in mind, and I’ve already prepared and cooked two dishes for it in advanced, the only problem is getting two more made for next month’s theme is quite unlikely. I say this because I am heading off to the Philippines on Saturday for about a month! Because of that, I probably won’t have time to cook. I also will not be sure if I will have Internet connection during my stay there so the likelihood of me uploading content for the month of July might not happen as well. So I guess I’ll just see how it goes – if posting on my blog is a problem, then you can follow me over on Instagram @amcarmenskitchen to follow my food journey while I am in the Philippines – I’ll make sure to keep that up to speed 🙂

Anyway, so okay, the dish is not quite a Ratatouille (I just thought naming it for this post would make it sounds fancier than it looks, hehe) – more like it’s inspired by some of the vegetables used to make a ratatouille *cheeky grin* but nonetheless, it still tastes pretty good for something that I just “whipped up” with the ingredients lying in the fridge and the pantry. You can bulk this dish up by adding meat or seafood if you wish, but I decided to keep this dish vegetarian.

Risoni al Ratatouille Ingredients

PREP TIME 10 MINS | COOKING TIME 15 MINS | SERVES 6

INGREDIENTS

  • 500g risoni, or other shaped pasta
  • 3-4 garlic cloves, minced
  • 2-3 red bird’s eye chilies, sliced
  • 2 medium-szied Lebanese eggplants, sliced into 1-inch thick chunks and then quartered
  • 1 medium-sized zucchini, sliced into 1-inch thick chunks and then quartered
  • 1 onion, diced
  • 1 punnet (125g) cherry tomato medley, sliced
  • 1/2 bunch asparagus, woody ends snapped off and cut into thirds
  • 1 tbsp baby capers, washed and drained
  • Freshly squeezed lemon juice from 1 lemon
  • Ground sea salt and black pepper, to taste
  • Handful of grated parmesan cheese
  • Olive oil

METHOD

  1. Bring a large pot of salted water to a boil. Once boiling, add in the risoni pasta and cook according to packet instructions or until al dente (mine was about 11 minutes).
  2. While your pasta is cooking away, heat some olive oil in a large frying pan. Sauté the garlic and chilies until golden brown and fragrant, about a minute, and then add in the onions, cooking until soft for another minute or two.
  3. Add in the asparagus, together with the zucchini and eggplant, cooking until soft for about 6-7 minutes. Season with a bit of ground salt and black pepper. Add in the cherry tomatoes and leave to cook for a further 4-5 minutes. Lastly, add in the capers and then turn the heat off.
  4. Once the risoni is done, drain, and then return to the pot. Add in the stir-fried veggies to the pot with the risoni and then give it a good mix.
  5. Divide the risoni equally into 6 portions and then top with a generous handful of  grate parmesan cheese and some ground black pepper. Serve immediately and enjoy!

Risoni al Ratatouille

BON APPÉTIT

– Ally xx

myTaste.com

Trine Boscaiola

Trine Boscaiola

Trine Boscaiola

Hello Everyone! It’s week 3 of Pasta Month and I’ve got a few things to say before we dive into the recipe. I apologise in advance that what I am about to say has nothing to do with the upcoming recipe – it’s more me telling you about my day/week and upcoming week. So if you don’t want to read this part, you can skip onto the recipe 🙂 Anyway, so last week Friday I had a nice dinner with my colleagues and then we ended the night escaping from a hostage-themed escape room and we did pretty well I must say! We escaped within an hour and one minute – which from what I remember is 14 minutes earlier than the set time limit hooray! Hostage is one of their new rooms, and the other is The Ring-themed *OMG* which I really want to try out with my friends, but I know I will probably regret it later on.

On Sunday, I also spent the afternoon with different colleagues and we watched The Conjuring 2 – which I don’t know whether it was a huge mistake or not haha. I didn’t think I was that scared from the movie, but I only knew that I was definitely scared when I could barely sleep that night. The image of Valak kept appearing in my head in the dark room – but I was definitely fine the next day/night. We then had dinner and said our goodbyes. Today, a few colleagues of mine headed over to the KFM studio to do a voice recording – basically just getting us to wish everyone “Selamat Hari Raya” for the upcoming festivities next month. It was actually quite fun in the end even though I had to convince just one colleague that I did not want to do the script in Malay because they’d all probably laugh at my pronunciation and intonation.

And that’s all I have for you – OH I almost forgot! Tomorrow morning I’ll be flying of to Singapore again for a couple of days. Taking a small break from work to do some shopping, eating, and meeting up with friends – it going to be a great weekend ahead!

Trine Boscaiola Ingredients

PREP TIME 5 MINS | COOKING TIME 10-15 MINS | SERVES 5

INGREDIENTS

  • 500g trine (curly fettuccine) pasta, or any other pasta shape
  • 250g rindless bacon rashers, thinly sliced
  • 1 punnet (250g) brown mushrooms, thinly sliced
  • 40g unsalted butter
  • 300ml thickened cream
  • 1/3 cup parmesan cheese
  • 5 spring onion stalks, chopped
  • Ground salt and black pepper, to taste
  • Olive oil

METHOD

  1. Bring a large pot of salted water to a boil. Cook the trine pasta according to packet instructions or until al dente.
  2. While the pasta is cooking away, heat about 1 tablespoon of olive oil in a large frying pan over medium-high. Cook the bacon until slightly browned and then remove from the pan. Add in the unsalted butter and then the mushrooms and cook for about 3-4 minutes or until soft. Then add in the pale parts of the chipped spring onion.
  3. Add in the cream together with about a cup of the pasta water and parmesan cheese. Turn the heat down to low and bring the mixture to a low simmer.
  4. Once the pasta is done, drain and then transfer the pasta to the cream mixture together with the fried bacon bits. Turn the heat back up to medium-high and then give it a good mix. Top with the remaining spring onions and then turn the heat off.
  5. Season with salt and pepper and toss until well combined. Divide the pasta among serving dishes and top with extra parmesan. Serve and enjoy!

Trine Boscaiola

Trine Boscaiola

BON APPÉTIT

– Ally xx

myTaste.com

Spaghetti al Nero di Seppia con Calamari e Vongole

Spaghetti al Nero di Seppia con Calamari e Vongole

Spaghetti al Nero di Seppia con Calamari e Vongole

Hello Everyone! It’s week 2 of Pasta Month and let me tell you a little story (don’t I always? *cheeky grin*) before I move on to the recipe. The first time I had squid ink pasta was in an Italian Restaurant when I was studying in Sydney. If I’m not mistaken, the restaurant is called Pizza e Birra on Crown Street in the suburb of Surry Hills. I was having a fancy dinner night out with my flatmate at that time and squid ink pasta was on their specials menu. I was a bit hesitant at first because I obviously hadn’t tried it before and to be honest, I was a bit put off knowing that the colour of the pasta would be black (yes, at that time my palette wasn’t quite as sophisticated as it is right now). To my surprise, the squid ink pasta tasted like any normal pasta – it was just that the colour that was different to me. I’ve had my fair share of squid ink pastas, both in Australia, and here in Brunei. I decided to combine my favourite flavours from both experiences to put up this dish to share with you guys.

I’ve never made fresh squid ink pasta at home, and only because I have no idea where to source squid ink from besides from the ink sacs of fresh squids/cuttle fish. I did some reading online and found that you can actually buy bottled squid ink, but you definitely won’t find them in stores here in Brunei. Heck they don’t even have store bought squid ink pasta here! So how did I manage to source mine? Well, if you’re a regular follower/reader of my blog, you’ll know that I was in Singapore a couple of months back. I was shopping for groceries with my friends for a dinner party that night and I was flabbergasted by all the produce and products found in that grocery store. I was supposed to be focused on grabbing the ingredients I needed to cook my dish for that night, but instead I wandered off, going from aisle to aisle, looking at anything and everything. I found myself in the pasta aisle and that where I came across store bought squid ink pasta. You had no idea how excited and in shock I was when I saw it – because I had no idea that you could buy it on the shelves; and without any hesitation at all, I bought myself a pack to bring back here to Brunei. I know, I know – I’m crazy right? Haha. My next mission will be tomato squid ink pasta from scratch, and I’ll definitely share it on my blog whenever I get around to trying it out! For now, here’s one recipe you can do for your squid ink pasta:

Spaghetti al Nero di Seppia con Calamari e Vongole Ingredients

PREP TIME 10 MINS | COOKING TIME 10-15 MINS | SERVES 5

INGREDIENTS

  • 1 pack (500g) squid ink pasta*
  • 1 pack (250g) cherry tomato medley, halved
  • 1 fish bouillon cube, dissolved in 2/3 cup of boiling water
  • 250g baby clam meat
  • 4 red bird’s eye chillies, sliced
  • 2 large squids, cleaned and cut into pieces
  • 1 lemon, wedged
  • 1/2 bulb garlic, minced
  • Olive Oil
  • Parsley, roughly chopped

*Fresh homemade squid ink pasta or store bought is fine for this recipe

METHOD

  1. Lightly score the inner surface of the squid, or alternatively, cut into rings. Set aside.
  2. Bring a large pot of salted water to a boil. Cook the squid ink spaghetti according to packet instructions or until al dente.
  3. While the pasta is cooking away, heat about 2 tablespoons of olive oil in a large frying pan over medium-high. Sauté the minced garlic and chillies together until golden brown and fragrant.
  4. Add the clam meat, juice of half a lemon, and a pinch of ground black pepper. Give it a good mix before adding the fish bouillon stock. Turn the heat down to low and leave to simmer for about 3-4 minutes. Add in the calamari when the pasta is almost done.
  5. Once the pasta is done, drain and then transfer to the calamari and clam mixture. Turn the heat back up to medium-high and then give it a good mix. Top with the chopped parsley and then turn the heat off.
  6. Serve immediately with a lemon wedge. Enjoy!

Spaghetti al Nero di Seppia con Calamari e Vongole

Spaghetti al Nero di Seppia con Calamari e Vongole

BON APPÉTIT

– Ally xx

myTaste.com

Salsa Verde

Salsa Verde

Salsa Verde

Hello Everyone! A new month means a new theme on the blog – and I’m sorry to start off on a negative note but I had plans to do a month-full of recipes that emphasise mangoes as the hero of the dish since it’s been in season for a while now here in Brunei. However, if you’re a regular reader on my blog, you’ll know that I have been working for the past 4 Sunday’s (which is basically my only time to enjoy myself in the kitchen), and because of that, I haven’t actually prepared any dishes for the theme that I had planned for my blog. I also haven’t been cooking any other dishes since my last free Sunday back in April, and so I decided that for this month, there will be no theme for the blog. Do not fret though! I will still be posting recipes, but they will be recipes that I have cooked up in the past – some taking us back towards the end of last year – that I didn’t get around to posting or fitting into a theme every month.

Tonight, I will be sharing with you, a recipe that I came across when I was exploring the Sydney Fish Markets for the nth time. Most of the fresh seafood stores there provide mini recipe cards to encourage the public to purchase their fresh catch. Every time I visited, I would always grab a recipe card, and one of the recipes that I was interested in was for Seared Tuna with Salsa Verde – and that’s what I’ll be sharing with you today, a recipe for an easy, simple, yet yummy Salsa Verde with pan-fried salmon in my case, but it’s completely up to you on what type of fish you’d like to pair it with!

For those of you who don’t know, Salsa Verde literally just means green sauce that contains mainly herbs, common in Italian, French, German, Spanish, and Mexican cuisines, each with their own twists and variants. The recipe that I will be sharing tonight gears more towards Mexican  where it is typically made up of puréed cooked or raw tomatillos, with jalapeños or other chili peppers, white onion, cilantro, and sometimes lime to enhance the taste. Salsa verde can range in spiciness from mild to mouth-searing. It may be served warm or cold, as a condiment – a dip for tortilla chips and served with tacos, or paired with grilled pork, grilled meats, and even fish.

Salsa Verde Ingredients

PREP TIME 10 MINS | COOKING TIME — MINS | SERVES 250ml

INGREDIENTS

  • 1/2 cup grapeseed oil
  • 1 bunch basil leaves
  • 1 bunch flat-leaf parsley leaves
  • 7 anchovy fillets
  • 4 garlic cloves
  • 2 tbsp baby capers in brine, rinsed
  • Juice of 1 lemon

METHOD

  1. Combine all the ingredients in a food processor or blender and process until smooth.
  2. Serve and enjoy as a condiment with your choice of dish (a dip for tortilla chips and served with tacos, or paired with grilled pork, grilled meats, and even fish). This recipe makes enough sauce to fill about a 250ml sized jar and can be kept in the fridge for up to a week.

Salsa Verde

Salsa Verde with Pan-fried Salmon

BON APPÉTIT

– Ally xx

myTaste.com

Roast Barbecued Chicken

Roast Barbecued Chicken

Roast Barbecued Chicken

Hello Everyone! As of today I have been working 24 days straight – 3 Sundays of work, and another to look forward to this weekend. I cannot wait for a public holiday coming up next week, and then two Sundays off before I head back into another 2 Sundays of work towards the end of May. I know, I shouldn’t be complaining since I only work for about 2-3 hours on Sundays, but I guess it’s the fact that I have to get up early and do work in humid and ventilation-challenged areas makes it a depressing start to the ONLY weekend I have. Yeap, this is my life now. Anyway! Sorry to start off all moody and what nots; I have been feeling a little burnt out and just not in the mood these past couple of days – I’m hoping that I can change that with a little bit of rest… Hopefully.

Tonight’s recipe is one that I have been hesitant of sharing on my blog because it’s my Mom’s special barbecue marinade recipe. We finally came around to a decision to share it on the blog, and so I will be sharing her ever so deliciously finger-licking good marinade for a whole roast chicken. We usually fire up the barbecue for this recipe, but recently we have been roasting the meat in the oven for a healthier option to charcoal-barbecued chicken. You can also use this marinade for pork or lamb. I once brought some yummy pork bellies to a barbecue party that my colleague hosted a few months back. It was a great hit amongst my other colleagues and so I believe that they’ll be overly happy to know that I am posting the recipe for my Mom’s special barbecue marinade on the blog.

Roast Barbecued Chicken Ingredients

PREP TIME 20* MINS | COOKING TIME 1 HOUR 35 MINS | SERVES 6

*plus 4-6 hours of marination, or preferably overnight

INGREDIENTS

  • 2kg whole chicken, washed and cleaned thoroughly
  • 1 bulb garlic, peeled and crushed
  • 1 tbsp brown sugar
  • 1 heaped tbsp hot & spicy UFC Banana Catsup
  • 1 heaped tbsp light soy sauce
  • 1 heaped tbsp oyster sauce
  • Ground salt and black pepper, to taste
  • Juice of 5 calamansi
  • Cooking twine

METHOD

  1. Combine all the ingredients in a large mixing bowl. Mix well until combined. Coat your chicken in the marinade and then leave in the fridge to marinate for about 4-6 hours (or preferably overnight). Remove chicken from the fridge 45-60 minutes before roasting to bring it back to room temperature.
  2. Preheat oven to 230C (450F or gas mark 8). Line a baking tray with aluminium foil and place a rack above it.
  3. Start by making a loop with the twine and fastening it around the stub of the neck. Bring it around the sides and tie a knot at the cavity, then pull it tight around the breast. Now, loop the twine around the drumsticks and tie another knot, tightening it until the legs cross.
  4. Place the chicken on the rack and into the preheated oven for 10-15 minutes. The lower the heat down to 175C (350F or gas mark 4) and continue roasting for an hour and 20 minutes more until cooked all the way through.
  5. Once done, remove the oven and set aside to rest for about 10 minutes before serving. Enjoy!

Roast Barbecued Chicken

Roast Barbecued Chicken

BON APPÉTIT

– Ally xx

myTaste.com

Butterflied Buffalo Roast Chicken

Butterflied Buffalo Roast Chicken

Butterflied Buffalo Roast Chicken

Hello Everyone! Wow, I cannot even begin to tell you guys how mentally and physically drained I am right now – well, if I am to talk about today in particular, it’s probably not from having worked for 17 days straight already with Sunday breaks, but because I probably had (not even) too much to drink. I said not even because I know that what I had a few hours ago was not my maximum capacity, but I’m feeling tipsy and sleepy already. My boss called for a “brainstorming” session after work hours which actually turned out to be a chill session with dumplings and beers (red wine for me because I’m sophisticated and classy af) haha!

Anyway, all that aside that the fact that I have to work this coming Sunday again, tonight’s recipe is a favourite of mine – I mean, who doesn’t like buffalo chicken?! We can’t be friends if you don’t like it; I’m serious. I served mine with a simple kale and roasted chickpea salad with crumbled blue cheese on top. Buffalo chicken goes well with anything blue cheese! Be sure to check out the original recipe over on Food.com; the original recipe calls to actually brush the sauce mixture onto the chicken, but I marinated the chicken in the sauce mixture instead to absorb all the yummy flavours into the flesh.

Butterflied Buffalo Roast Chicken

PREP TIME 20 MINS* | COOKING TIME 1 HOUR 35 MINS | SERVES 6

*plus 4-6 hours of marination, or preferably overnight

INGREDIENTS

  • 2kg butterflied whole chicken, washed and cleaned thoroughly
  • 2 tbsp unsalted butter, melted and cooled
  • 1 – 1 & 1/2 tbsp tabasco sauce (or more if you like a good punch)
  • 1 tbsp red wine vinegar
  • 1/2 bulb garlic, minced
  • 2 tsp ground smoked paprika
  • Ground salt and black pepper, to taste

METHOD

  1. Combine all the ingredients, except for the butter, in a large mixing bowl. Mix well until combined. Coat your chicken in the marinade and then leave in the fridge to marinate for about 4-6 hours (or preferably overnight). Remove chicken from the fridge 45-60 minutes before roasting to bring it back to room temperature.
  2. Preheat oven to 230C (450F or gas mark 8). Line a baking tray with aluminium foil and place a rack above it.
  3. Place the chicken on the rack and into the preheated oven for 10-15 minutes. The lower the heat down to 175C (350F or gas mark 4) and continue roasting for an hour and 20 minutes more. Baste the chicken with a little bit of butter at every 20 minute intervals.
  4. Once done, remove the oven and set aside to rest for about 10 minutes before serving. Enjoy!

Butterflied Buffalo Roast Chicke

Butterflied Buffalo Roast Chicken with Salad

Butterflied Buffalo Roast Chicken with Salad

BON APPÉTIT

– Ally xx

myTaste.com

Honey-Roasted Chicken

Honey-Roasted Chicken

Honey-Roasted Chicken

Hello Everyone! Before I begin with this post, I just want to say that I just realised that two Sunday’s ago was quite possibly the last Sunday that I had off and I probably won’t see another relaxed Sunday at home until the beginning of June. Yes, you read that right! Last Sunday I got up at the wee hours of 3:55am to get ready for work. WORK! Last Sunday we kicked off our month-long sporting event with a 2km and 10km Run that started at around 7am. Our team had to be there by 5am to help set up, prepare, and do a lot more things in order to ensure a smooth event. I was also event photographer that morning so I was constantly moving here and there for a good 5 hours. Though it wasn’t a whole day/night event, it was still tiring – I mean, getting up at 4 in the morning is tiring enough especially when I couldn’t sleep well the few hours before. Anyway, so this Friday will be another opening ceremony, this time for Badminton, and then on Sunday again for Basketball.

Besides my 7-day working months from now until June, I’m thrilled to say that my blog will be turning 2 years old on Saturday! I’ll be posting a recipe up on that day to celebrate 2 years of not giving up on this blog – which I believe is a first! I’ve started up many blogs before (but mainly diary-style) and so far I’ve been able to keep up with this one! I won’t say anymore and save the rest of my tangents for Saturday’s post. Anyway, it’s week 2 of delicious yummy roast chicken and I’ve got a classic recipe to share with you. To be honest, whenI first came across this recipe, I found it weird how it had a hint of ground cinnamon and turmeric in it which in my opinion dominated the honey flavour just a bit. I’ll admit that I much preferred the taste of last week’s roast, but this one is alright too. You can eat it with a whole load of roast veggies and fresh greens, or steamed rice. Don’t forget to check out the original recipe over on SBS.

Honey-Roasted Chicken Ingredients

PREP TIME 10 MINS* | COOKING TIME 1 HOUR 35 MINS | SERVES 6

*plus 4-6 hours of marination, or preferably overnight

INGREDIENTS

  • 2kg whole chicken, washed and cleaned thoroughly
  • 8 tbsp honey
  • 3 tbsp light soy sauce
  • 3 tbsp olive oil
  • 2 tbsp freshly squeezed lime juice
  • 1 & 1/2 tsp ground cinnamon
  • 1 & 1/2 tsp ground tumeric
  • Thumb-sized ginger, minced
  • Butter, for basting
  • Ground salt and black pepper, to taste
  • Assorted veggies, for roasting
  • Cooking twine

METHOD

  1. Combine all the ingredients, except for the butter, in a large mixing bowl. Mix well until combined. Coat your chicken in the marinade and then leave in the fridge to marinate for about 4-6 hours (or preferably overnight). Remove chicken from the fridge 45-60 minutes before roasting to bring it back to room temperature.
  2. Preheat oven to 230C (450F or gas mark 8). Line a baking tray with aluminium foil and place a rack above it.
  3. Start by making a loop with the twine and fastening it around the stub of the neck. Bring it around the sides and tie a knot at the cavity, then pull it tight around the breast. Now, loop the twine around the drumsticks and tie another knot, tightening it until the legs cross.
  4. Place the chicken on the rack and into the preheated oven for 10-15 minutes. The lover the heat down to 175C (350F or gas mark 4) and continue roasting for an hour and 20 minutes more. Baste the chicken with a little bit of butter at every 20 minute intervals.
  5. Once done, remove the oven and set aside to rest for about 10 minutes before serving with seasonal roast veggies, or steamed rice. Enjoy!

Honey-Roasted Chicken

BON APPÉTIT

– Ally xx

myTaste.com

Chilli, Paprika, Tarragon, & Worcestershire Roast Chicken

Chilli, Paprika, Tarragon, & Worcestershire Roast Chicken

Chilli, Paprika, Tarragon, & Worcestershire Roast Chicken

Hello Everyone! A new month means a new theme on the blog! If you have been following my blog on a weekly basis, you’ll probably know that two months ago I did a series on Healthy Eating, Salad Edition. During that time, I always paired my salads with a yummy roast chicken on the side. So for this month, I thought I’d share with you 4 different marinade recipes that are sure to bring your love for roast chicken to another level!

Tonight, I’ll be sharing a recipe that I kind of just threw together in a few minutes only with the items that I had in my fridge and pantry at that time. I was about to head over to a friend’s house, and I promised that I would cook something for him while he used my face as a canvas to practice his make-up skills. I had no idea what to bring over because I know that he is quite a healthy person. So I decided to roast some chicken breast fillets for us. The chicken I had to buy though because I don’t really eat the breast parts, so I walked over to the grocers and got a fillet each for the two of us. Then when I got home, I basically grabbed some herbs, spices, and basically whatever else I could find that I knew would/could make a nice flavour combination. I didn’t even use any measurements for this as well, I just dabbed in a whole lot of Worcestershire sauce, olive oil, chilli, paprika, and the works. I initially used fresh thyme leaves at the time since that was what I had in the fridge.

Chilli, Paprika, Tarragon, & Worcestershire Roast Chicken Ingredients

To be honest, I wasn’t sure what this would taste like. When we had these breasts fillets (after only having marinated them for about an hour or so), it was simply delicious! My friend really loved it and wanted to grab the recipe off from me too. I remember how he had a hard time trying to pronounce Worcestershire, so he ended up calling it the “Wot-shit-shit” sauce. When he went to the grocers one time, he called me up to ask which section was the sauce shelved at and I told him to ask one of the staff. He didn’t want to only because he didn’t want to ask “excuse me, where is you wot-shit-shit sauce?” Haha! Ever since then, I’ve made this recipe a couple of times for dinner gatherings with friends when I was still living in Sydney – and I’ve also made it for myself to pair with my salads. This was the first time that I had made it for my family and they too love it. I switch out the fresh thyme for fresh tarragon only because the grocers had that instead of thyme – but it tastes just as good!

Chilli, Paprika, Tarragon, & Worcestershire Roast Chicken Ingredients

PREP TIME 10 MINS* | COOKING TIME 1 HOUR 35 MINS | SERVES 6

*plus 4-6 hours of marination, or preferably overnight

INGREDIENTS

  • 2kg whole chicken, washed and cleaned thoroughly
  • 4-5 sprigs of fresh tarragon
  • 1/2 bulb garlic, minced
  • 3 tbsp olive oil
  • 2 tbsp Worcestershire sauce
  • 2 tsp chilli flakes
  • 2 tsp smoked paprika
  • Juice of 1 lemon
  • Butter for basting
  • Cooking twine

METHOD

  1. Combine all the ingredients, except for the butter, in a large mixing bowl. Mix well until combined. Coat your chicken in the marinade and then leave in the fridge to marinate for about 4-6 hours (or preferably overnight). Remove chicken from the fridge 45-60 minutes before roasting to bring it back to room temperature.
  2. Preheat oven to 230C (450F or gas mark 8). Line a baking tray with aluminium foil and place a rack above it.
  3. Start by making a loop with the twine and fastening it around the stub of the neck. Bring it around the sides and tie a knot at the cavity, then pull it tight around the breast. Now, loop the twine around the drumsticks and tie another knot, tightening it until the legs cross.
  4. Place the chicken on the rack and into the preheated oven for 10-15 minutes. The lover the heat down to 175C (350F or gas mark 4) and continue roasting for an hour and 20 minutes more. Baste the chicken with a little bit of butter at every 20 minute intervals.
  5. Once done, remove the oven and set aside to rest for about 10 minutes before serving. Enjoy!

Chilli, Paprika, Tarragon, & Worcestershire Roast Chicken

BON APPÉTIT

– Ally xx

myTaste.com