Garlic Butter Flame Clams

Garlic Butter Flame Clams


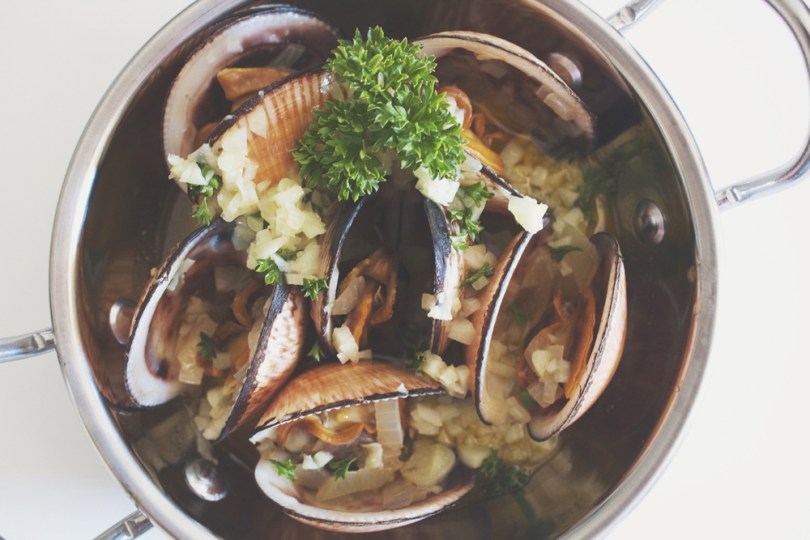
Hello Everyone! So I made these clams a while ago when I was still in Sydney; I was shopping around the Sydney Fish Markets one day with some friends and came across these lovely clams. I remember the lady who was assisting me as I was choosing the clams; I wanted to pick out the pretty looking ones, the ones that had nice brown and white patterns on their shells as opposed to the ones that we all white (which were the ones the lady was putting in the bag for me). When she wasn’t looking, I’d replace the ones she put in my bag for the ones I picked – I know, I’m insane. Anyway, so without the lady noticing what I did, I got about a dozen of the ones that I picked.

Garlic Butter Flame Clams

I think I was too excited to get home and start cooking with these clams that I completely forgot to shop for the extra ingredients to accompany the clams. Well, to be honest, I didn’t even have a dish in mind when I bought them; also, I was too lazy to go out again to buy more ingredients so I scavenged the fridge and pantry to see what I had to turn these clams into a delectable dish for dinner that night. I had an unopened bottle of white wine that I was definitely going to use for the clams, and then I kind of just envisioned garlic butter clams when I saw the butter in the fridge, and onions and garlic in the pantry. I even had a small bunch of afro parsley to decorate with and add some green to the dish. In the end, I had everything that I needed which made me even happier.

Garlic Butter Flame Clams Ingredients

I’m about to go off on a slight tangent here so if you do not wish to read this non-related part, you can skip ahead 🙂 Anyway, I was just about to say Wow, I actually wrote quite a bit today considering I’m not well today (you can read more about it below after the recipe). My brain is a little bit all over the place now as it’s difficult for me to concentrate on writing when I’m feeling sick. But yes, I guess the whole point of this paragraph is me realising that I’ve written a fair amount even though I keep writing and stopping every 5 minutes.

Garlic Butter Flame Clams Ingredients

PREP TIME 5 MINS | COOKING TIME 6-8 MINS | SERVES 2

INGREDIENTS

  • 1 dozen flame clams, washed and cleaned
  • 1/4 cup white wine
  • 3-4 garlic cloves, minced
  • 1 medium-sized brown onion, diced
  • 3 heaped tbsp unsalted butter
  • Bunch of afro parsley
  • Pinch of sea salt

METHOD

  1. Heat a medium-sized frying pan (preferably with a lid) over medium-high. Melt the butter and then sauté the garlic in the butter until fragrant. Add in the onions and cook until soft, about 2 minutes.
  2. Once cooked, add in the white wine with a pinch of sea salt and leave to cook for about 2-3 minutes, allowing the alcohol to evaporate a bit from the sauce.
  3. Add in your clams and cover your frying pan with the lid to allow the flame clams to steam-cook for about 3-4 minutes.
  4. Transfer to a serving dish and garnish with a bit of afro parsley. Serve immediately and enjoy!

Garlic Butter Flame Clams

Garlic Butter Flame Clams

BON APPÉTIT

– Ally xx

PS: I actually had this written out at the beginning of the blog post, but I thought it was a bit dismal to begin with so if you’ve made it all the way to the end of the post, here’s a little story for you. I’m feeling a little bit under the weather today; I could sense a sore throat coming down on me last night before I went to bed and then woke up this morning not feeling too well. Let’s just say that have a terrible and painful cough that has somehow disabled me from speaking. I took what was supposed to be a 10-15 minute turned 1 hour nap and woke up slightly feverish. I only knew it was going to get worse from here and I know that because what I have now is just the starting point of a full blown sickness that is to last for another couple of days, probably all the way to the weekend *sad face* Hope everyone is having a better start to the week than I am and see you’ll again with another post on Thursday!

myTaste.com

Butter Prawns with Egg Floss

Butter Prawns with Egg Floss

Hello Everyone! Today’s recipe is one of my favourite dishes that I simply cannot resist whenever I see it available on the menu of any restaurant that I go to. To be perfectly honest, it’s not about the prawns (or sometimes chicken) that makes me crave for this dish, but for the yummy egg floss that accompanies the protein. The egg floss is buttery, crispy, and a touch salty. I’m not quite sure as to how to explain it’s flavour besides what I have just said because when you think about it, it’s just fried in butter and oil, and topped over the protein that’s stir-fried in all the other flavours. Nonetheless, I love it.

Butter Prawns with Egg Floss Ingredients

I’ve not seen this dish in Asian restaurants around Sydney, and I don’t particularly know why since it’s quite popular in Chinese restaurants here. I guess that sort of explains my cravings for them whenever I’m back in Brunei. Since I have a confused and inexplicable love for this dish, I thought I’d give it a go and make it at home. I’ve never made this dish before, and to be honest, I can’t get the egg floss as thin and as crispy without browning them too much, as those in the restaurants, but I think I’ve pretty much nailed the dish in terms of its taste.

Butter Prawns with Egg Floss Ingredients

PREP TIME 10 MINS | COOKING TIME 15 MINS | SERVES 4

INGREDIENTS

  • 500g prawns, shelled and deveined
  • 50g unsalted butter
  • 3 egg yolks, beaten
  • 2-3 garlic cloves, minced
  • 2-3 sprigs curry leaves
  • 2 red bird’s eye chillies, sliced
  • 3 tbsp vegetable oil
  • Ground salt and black pepper to taste

METHOD

  1. Heat the butter and oil in a medium-sized frying pan or wok over medium-high. Season the beaten egg yolks with a bit of salt.
  2. Continuously swirl the oil quickly in one direction and then add the beaten egg yolks in slowly from a height. Continue swirling until the oil is foamy and the egg is crispy, about 3-4 minutes. Remove the heat and transfer the egg floss to a sieve to drain out any excess oils. Set aside.
  3. Heat a bit more oil in the same frying pan and sauté the chillies, curry leaves, and garlic together until fragrant.
  4. Add in the prawns and season with a bit of ground salt and black pepper. Toss and leave to cook, about 6-8 minutes.
  5. Once the prawns are cooked through, transfer to a serving dish and top with the egg floss.
  6. Serve immediately with steamed rice and enjoy!

Butter Prawns with Egg Floss

Butter Prawns with Egg Floss

BON APPÉTIT

– Ally xx

myTaste.com

Chorizo-stuffed Squid

Chorizo-stuffed Squid

Hello Everyone! When I think of squid, I think of a bowl of perfectly cooked, melt in the mouth salt and pepper squid from Jamie’s Italian in Sydney. Yes! To this date, Jamie’s Italian is by far the best place that serves up a killer salt and pepper squid. However, that’s not what I will be making today as you can already tell from the title of this post. I wanted to try something different with squid as whenever I have it, it’s either calamari, salt and pepper squid, or as my Mom would make at home, adoring pusit or ginataang pusit. Stuffed squid is not something new, but it’s definitely a first for me to try it out.

Chorizo-stuffed Squid

I don’t have a long-winded back story for you today, so this will definitely be a short one 🙂 Also, I didn’t intentionally choose to include chorizo as a sidekick ingredient for this weeks seafood recipes, but I did intentionally plan to work with cephalopods for the week. Anyway, the original recipe for these stuffed squids can be found on the Australian Good Food & Travel Guide.

Chorizo-stuffed Squid Ingredients

PREP TIME 15 MINS | COOKING TIME 15-20 MINS | SERVES 4

INGREDIENTS

  • 4 large squids, washed, cleaned and tentacles removed
  • 2-3 garlic cloves, minced
  • 2 chorizo sausages, diced
  • 1 spanish red onion, diced
  • 2 tbsp bread crumbs
  • 2 tbsp pine nuts, toasted
  • 1 tsp thyme
  • Ground salt and black pepper
  • Olive Oil

METHOD

  1. In a medium-sized frying pan, heat the olive oil over medium-high and sauté the garlic until golden brown and fragrant. Add in the onions and cook until soft, about 2 minutes.
  2. Add the diced chorizo and cook until it starts to brown, stirring occasionally. Follow with the bread crumbs, pine nuts, and thyme. Stir and season with salt and pepper to taste before taking off heat and allowing to cool.
  3. Once cool, stuff the squid with the chorizo mixture. Take care not to overfill as there is a tendency for the squid to break during cooking. Secure top with a toothpick and refrigerate until ready to cook.
  4. Heat some olive oil in a shallow pan over medium-high. Add the squid to the pan and cook for 4 minutes on each side, depending on the size of your squid (less time for smaller, more for bigger).
  5. Fry up the tentacles for a few minutes until cooked through.
  6. Serve and enjoy!

Chorizo-stuffed Squid

BON APPÉTIT

– Ally xx

myTaste.com

Octopus & Chorizo Salad

Octopus & Chorizo Salad

Hello Everyone! It’s the second week of Seafood Month and I’ve got something that is very simple to make, but quite possibly not commonly seen here in Brunei. I say that because for instance, I don’t exactly know where you can get fresh octopus from here in Brunei; I’ve not seen it in the markets around here before. Now you’re probably thinking, then where the heck did I get fresh octopus from for tonight’s recipe? Well, I made this dish when I was back in Sydney because I knew wouldn’t be able to cook this up when I got to Brunei. Plus, I really like this dish so I made sure I ate a satisfying amount of it before I went into deprivation.

Octopus & Chorizo Salad

I came across this recipe when I was at the Sydney Fish Market, I can’t remember who I was with, but we went seafood shopping. Just at the entrance of Peter’s Seafood, and the one a little bit further down the building near the fruits and veggie store (I forgot what the name of the market is called), there are these little recipe flyers that you can pick up for free. I think I took one of every recipe that they had 😛 So they had a recipe for Octopus and Chorizo Salad that I just had to try out! If you manage to get your hands on some baby octopus, I highly recommend you try this recipe out! It’s definitely a favourite of mine 🙂

Octopus & Chorizo Salad Ingredients

PREP TIME 5 MINS* | COOKING TIME 6-8 MINS | SERVES 4

*Add 1-2 hours extra for marination time

INGREDIENTS

For the octopus marinade

  • 400g baby octopus, washed and cleaned
  • 1 lemon, juiced
  • 2-3 garlic cloves, minced
  • 3 tbsp olive oil

For the salad

  • 1 bag (200g) mixed salad leaves
  • 2 chorizo sausage, sliced
  • 1 lemon, juiced
  • 1/2 cup pitted kalamata olives, sliced
  • 1/2 cup sundried tomatoes, sliced

METHOD

  1. Combine all the ingredients needed to marinate the baby octopus in a medium-sized bowl. Set aside to marinate for about 1-2 hours or preferably, overnight. Before frying the baby octopi, make sure you pat dry them first.
  2. Heat a little bit of vegetable oil in a medium-sized frying pan over medium-high, and fry the chorizo slices until golden brown. Remove from the heat and set aside on a plate lined with a paper towel to soak up any extra oils.
  3. In the same frying pan, add the baby octopi in batches, and fry until it is cooked through, about 3-4 minutes. Remove from the heat and allow to rest for about 5 minutes. Repeat with the remaining octopi.
  4. Combine all the other ingredients for the salad in a large bowl together with the chorizo slices and baby octopi. Toss together and drizzle with a little bit of the sundried tomato oil.
  5. Serve and enjoy!

Octopus & Chorizo Salad

Octopus & Chorizo Salad

BON APPÉTIT

– Ally xx

myTaste.com

Pan-fried Salmon Bellies

Pan-fried Salmon Bellies

Hello Everyone! Today I’ll be keeping it short as I don’t really have an elaborate story to tell for this recipe. I basically came across these beautifully cut, extra large salmon bellies when I was doing my monthly grocery trip to Paddy’s Market back when I was in Sydney. Salmon was already a favourite fish of mine, and salmon BELLY is THE favourite part of mine. To fully understand how much I love salmon belly, I can eat it all day every day, until of course that is, if I get sick from the amount of good fats I’m consuming!

Pan-fried Salmon Bellies

Anyway, so as I was saying, while I was at the seafood market looking for some prawns and shellfish, I came across these bellies and they looked too good to pass up! They were a bit pricier than the ones that you kind find at the Sydney Fish Market, but these were fresher and handled with care when it came to cutting them. Other places that sold salmon belly cuts had bones in them and looked like they were a week old – I didn’t mind spending about 10 bucks a kilo more for a much better quality cut.

I couldn’t think of any way that I could cook these bellies so I did a bit of research online on ways to cook salmon bellies. The most popular way of cooking it was by baking it, but I didn’t want to bake them to be honest just because I know I wouldn’t like the texture of the fatty bits. Then I got to thinking about why I liked salmon belly in the first place – it was because I liked how my Mom used to cook a salmon portion back whenI was in Brunei, by pan-frying it until the skin is super crispy and the little bit of fat at the end of the portion was crispy on the outside, but then melted in the mouth when you ate it.

Pan-fried Salmon Bellies Ingredients

So that’s how I decided to prepare my salmon bellies for you guys tonight, by simply pan-frying them and then topping them off with a simple soy sauce mixture to slightly coat it with a bit of flavour – nothing too intense to mask the goodness of the salmon belly. Okay, I know I said it’d be a short introduction, but I kind of said that before I even knew what I was going to talk about – I was going to say that I wasn’t in the mood to write anything, but I guess we know now that that wasn’t the truth! 😛

Pan-fried Salmon Bellies Ingredients

PREP TIME 5 MINS | COOKING TIME 5-7 MINS | SERVES 2

INGREDIENTS

  • 250g salmon bellies, washed and pat-dried
  • 2 red bird’s eye chillies, sliced
  • 2 stalks of spring onion, sliced
  • 3 tbsp vegetable oil
  • 2 tbsp dark soy sauce
  • Ground salt and black pepper
  • Lemon wedge
  • Thumb-sized piece of ginger, julienned

METHOD

  1. Heat the vegetable oil in a large frying pan over medium-high. Season the salmon bellies with a bit of ground salt and black pepper. If your salmon bellies are too long to fit into your frying pan, you may cut them in half.
  2. Place into the pan, skin-side down and cook for about 2 minutes. Turn it over and cook for a further minute. Remove from the heat and set aside onto a serving plate.
  3. Add in the ginger and chillies to the pan and sauté until fragrant, about a minute. Turn the heat off and then add in the soy sauce together with the spring onions. Pour over the top of the salmon bellies and squeeze a bit of lemon juice on top.
  4. Best served with some steamed jasmine rice. Enjoy!

Pan-fried Salmon Bellies

BON APPÉTIT

– Ally xx

myTaste.com

Yeniköy Café and Restaurant

Yeniköy Café and Restaurant

Hello Everyone and welcome back to an all new Review Sunday! I have a quick review for you tonight on the blog, and when I say quick I mean that I will only be covering 3 dishes from this place. I was supposed to go back to this place a few more times to try out their lunch and dinner menu, but I didn’t get to before I left Sydney. Hopefully the dishes I cover today will make you want to give this place a try if you haven’t already paid them a visit. The dishes I will be showing you today are quite simple, but packed with flavour, and I really felt like I was in a different place – Turkey? I’m not sure since I’ve not been. If you want to check out their menu a little bit than what I will be showing you today, click here.

Yeniköy Café and Restaurant

If I remember clearly, Jialing, Yvonne, and I were being indecisive on WhatsApp the night before – well, I wouldn’t say indecisive, more like I wanted to go to a certain place (SHUK to be exact in North Bondi), but Yvonne didn’t want to go too far off from the city because she was sick that day. Then we couldn’t agree on a time because again, BRUNCH at 10am was too early for Yvonne, so we finally came to a compromise to meet at 11am instead so that we wouldn’t miss out on Yeniköy’s breakfast menu.

Anyway! I came across Yeniköy by simply just walking along King Street in Newtown – don’t know when it was or why I was in Newtown in the first place (quite possibly to eat anyway). Also, did you know that Yeniköy is Turkish for “new village” which is a pretty fitting name for a café and restaurant to be residing in  the hip streets of Newtown. I think I walked past Yeniköy a number of times, but had never actually gone in until this brunch of ours. I was quite intrigued by this place, not by the food at first, but the ambience of the place as I quickly glanced through the huge glass windows – “wood furniture, stone panelling, lanterns, and Edison light globes”, Besides that of course, I was intrigued by their menu that’s Turkish with a Modern Australian twist to mix it up a bit.

Even though we all ordered a dish each, we shared everything together so that we could get a little taste of each other’s dishes – I mean, it’s a common thing that we do whenever we eat out tougher anyway 🙂

BREAKFAST MENU

Yeniköy Café and Restaurant - KIYMALI GÖZLEME
KIYMALI GÖZLEME: Beef mince and vegetables gözleme with side vegetables ($13.00)

For those of you who don’t know what a gözleme is, it is basically a savoury traditional Turkish flatbread that is filled with various meat (minced beef, chopped lamb, fresh or smoked seafood, sucuk, pastirma), vegetables (spinach, zucchini, eggplant, leek, chard, various peppers, onion, scallion, shallot, garlic), or a combination of both, and/or cheeses, then sealed and cooked over a griddle. The flatbread is made of hand-rolled dough that is lightly brushed with butter and eggs.

This was the dish that I ordered and wished I had all to myself because it was pretty amazing. I’ve had gözleme before, but only at the Glebe Markets, and those tasted pretty great too. The beef mince filling tasted really good and the flatbread was nice a crisp. The “salad” on the side was a bit disappointing though because it was just a mixed leaf salad with cherry tomatoes and cucumber (which I personally don’t like). I guess that doesn’t matter anyway since the gözleme was the highlight of the dish!

Yeniköy Café and Restaurant - SUCUK BRUSCHETTA
SUCUK BRUSCHETTA: Turkish sausages, tomatoes and eggs on a toasted Turkish bread, topped with melted mozzarella cheese and pomegranate molasses, and served with rocket and side vegetables ($17.00)

This was Yvonne’s dish, and I can’t remember if she liked it or not, but I remember that the only thing I really liked on this plate was the scrambled eggs – light, fluffy, and well seasoned. Again, the side vegetables weren’t anything special, and I don’t know, neither was the bruschetta to be honest. I’m actually not a fan of bread that has been toasted until crisp because then it just becomes too dry for me and too hard to chew, especially the crust – which was what this bruschetta was. I like my bread soft. But hey, the dish wasn’t a bad dish at all, it’s just my personal preference, or I guess, me being picky.

Yeniköy Café and Restaurant - TURKISH SUCUK AND CHEESE PIDE
TURKISH SUCUK AND CHEESE PIDE: Traditional Turkish lamb and beef mince sucuk and cheese pide with a crack egg ($14.00)

Jialing ordered this dish, and before I start, I’m going to tell you a story. So, I can’t exactly remember where or when, but on a different occasion to this, I saw ‘Pide’ on the menu and ordered it, unsure really on how to pronounce the word. So when I ordered it, I pointed at it and hesitantly said to the waitress, “can I have the… pide (pie-duh)“. She knew I was struggling to pronounce it, and she said, “one pide (pee-deh), yeap”. So I told this to Jialing and Yvonne when we saw Pide on the menu. I told them that it’s pronounced pee-deh but Jialing insisted that it was pie-duh because one of our mutual friends said so. To end our not-quite dispute over the word, Yvonne told me to say pie-duh to the waitress and see if she would correct me – I wasn’t going to make a fool out of myself again so when the waitress came over to take our orders, I said pee-deh, but Yvonne butted in and said pretty loudly with an exclamation mark PIE-DUH! I started laughing and so did the waitress, and she said it’s pronounced pee-deh.

Anyway, so now that you know how to pronounce pide (pee-deh), on to the actual dish – it was good, but again nothing really that special to be honest.

To be perfectly honest, I was a little underwhelmed with the dishes that we had at Yeniköy, but obviously, this is just one person’s opinion. I really wished I had gone back for lunch and/or dinner because the dishes that those menus looked more enticing than what we had. All in all, we had a good time because even though the food was mediocre for us, it wasn’t bad at all. We shared a lot of laughs and remembered this day as “the time that Yvonne was sick” (a little inside joke between the three of us), and overall just enjoyed each other’s company in a very nice café on King Street. Ambience and service is a sure 10 out of 10, food a 7 maybe because I still enjoyed the food and their other menus looked great too. Value for money, maybe a 7 too – it’s not overly priced, breakfast that is, not sure about the lunch and dinner menu.

Yeniköy Café and Restaurant
480 King Street
Newtown, New South Wales
Australia, 2042

– Ally xx

Belly Bao - BAONANA SPLIT

Belly Bao

Hello Everyone! Finally I’m back with an all new Review Sunday (on a Monday – sorry about that) on the blog! I had a pretty hectic day yesterday and didn’t get around to finishing this post. I spent yesterday morning hanging out with my sister, the afternoon with a fellow food-loving friend, Miao, over some cold drinks and cake, then went to indulge in the not-as-amazing-as-I-thought-it’d-be fireworks display for Singapore’s 50th National Day (might I add also, being sardined between sweaty, wet, and smelly people; it was so gross). Then ended the night meeting Alex, talking about anything and everything while we strolled around the area and eventually made our way to have some food.

So onwards with the review – I’ve only ever been to this place once, but have heard many things about it before it even started shaking up the Sydney scene permanently. I think, that is if I am not mistaken, Belly Bao first started dishing out these buns at various market stalls across Sydney about a year ago. I managed to visit a stall at the Paddington Markets on a Sunday afternoon before the found permanent residency at the GoodGod Small Club in the Sydney CBD.

Belly Bao

So the first and not quite last, but won’t be back in a while kind of thing, time I visited the club was with my friend Marissa on a Thursday, maybe Friday night after she had finished her work. We got to the place at around 6:30pm and the place was already packed. The line to order food was not too long, but a good 20-30minute wait, so while Marissa was lining up to order food, I went around the club quite possibly 7-8 times to look for a seat, and occasionally approach people that looked like they were about to be done, asking if I could have their seats when they were done. Thank goodness I was able to snag a seat for a two just as Marissa was about to be next in line to order the food. So yes, if you do plan on visiting on a Friday or Saturday night, be prepared to hunt down seats for a while and battle the noise a bit (well it is a club after all).

BELLY BAOS

Belly Bao - SLOW BRAISED PORK BELLY
SLOW BRAISED PORK BELLY: Pickled mustard greens, coriander, crushed peanuts, and kewpie mayo ($6.50)

The braised pork belly was well cooked – tender, juicy, and packed with flavour. However, I was not a fan of the pickled mustard greens and the coriander. I was able to look past these because it was actual a delicious bao overall. Perhaps a little bit more kewpie mayo or a spoonful of the stock that the belly was braised it would have been nice as it did feel a bit dry with the steamed bun.

Belly Bao - CRACKLING ROAST PORK BELLY
CRACKLING ROAST PORK BELLY: Crackling, pickled radish, coriander, and kewpie mayo ($6.50)

Though I did not have this bao when I was at the club, I did have this when I visited their Paddington Market stall before they opened permanently at GoodGod. Like the first bao, this was also as delicious as the first – tender, juicy pork belly with a nice crispy crackling skin.

Belly Bao - SOFT SHELL CRAB
SOFT SHELL CRAB: Watercress, chilli aïoli, and lemon vinaigrette ($7.50)

Now, I love a good soft shell crab, however I was kind of disappointed with this bao just because the soft shell crab wasn’t as crispy as it could be. It had a bit of a crunch, which I’m guessing came from the shell of the crab anyway, and it was a bit chewy more than crispy. Although I really wanted to love it, it was a sad let down. If it had been the crispy soft shell crab aI hoped it’d be, it would’ve been a great bao especially paired with the chilli aïoli and lemon vinaigrette!

SIDES & SNACKS

Belly Bao - Belly Bao spicy half chicken
SIDES & SNACKS: Belly Bao spicy half chicken ($15.00)

Beside the baos, we also got a couple of sides and we didn’t need to think twice about getting some fried chicken; I mean, who doesn’t like fried chicken? Or better yet, spicy fried chicken? Absolutely delicious, crispy skin on the outside, and tender, juicy meat on in the inside. It wasn’t really that spicy to be honest, but it’s alright for someone who can’t take spicy I guess. Or if you don’t do spicy at all you can just opt to have the non-spicy chicken 🙂

Belly Bao - Sweet potato fries drizzled with chilli aïoli
SIDES & SNACKS: Sweet potato fries drizzled with chilli aïoli ($7.00)

You can honestly never go wrong with sweet potato fries, NEVER. This was a pretty hefty order though and I don’t think we even finished them because we were too full in the end to down them all. The fries weren’t very crispy to be honest which was a shame, but were still nevertheless oh so good. For some reason though, I found their chilli aïoli super spicy – even more spicy than the spicy chicken so not sure what happened there!

DESSERT BAOS

Belly Bao - BAONANA SPLIT
BAONANA SPLIT: Golden fried bao with vanilla ice cream, fresh banana slices, salted peanuts, drizzled with Nutella ($6.50)

Before I begin, I just want to say that I wished they did more desserts for their menu because their golden fried baos are heaven on earth. Maybe they could consider changing up the dessert menu once in a while like how other places change up their dessert flavours once every two weeks. That may just very well attract me towards the place even more! Anyway, I can’t really fault this dessert because I love banana and Nutella, and everything else paired with it. If I had to nitpick this dessert, I just wished that the Nutella was a bit more like a sauce 🙂

Belly Bao - STRAWBELLY BAO
STRAWBELLY BAO: Golden fried bao with vanilla ice cream, fresh strawberry slices, drizzled with condensed milk ($6.50)

From the two desserts, this was the once I actually ordered while Marissa had the first. I’m glad this was the one I ended up because I loved the strawberries and condensed milk drizzle over the whole dessert. It was delicious indeed!

NON-ALCOHOLIC QUENCHERS

Belly Bao - CHERRY MELON POP & GG ICE TEA(LEFT) CHERRY MELON POP: Freshly juiced watermelon & green apple popped sweet with Fee Brothers Cherry Bitters ($9.00)

(RIGHT) GG ICE TEA: Our classic house-brewed ice tea with fresh mint ($9.00)

Overall, I wouldn’t say that the food is really outstanding, but it’s a pretty good interpretation of traditional Taiwanese street food, “not how grandma remembers it”, or as one has questioned, is bao the new taco? They’re definitely a little more than just average, but would probably not score it more than a 7 out of 10; I just didn’t feel any fireworks as I had a bite of my slow braised pork belly bao. The dessert bao though I feel were on an entirely different level to the savoury baos, and so if I were to score the savoury and sweet separately, I’d give the dessert a higher ranking. Other than that, I suppose that the baos are a good value for money. One of these babies, plus a side or two, with dessert filled me up real good, each bao only setting you back about $6.50 on average. I believe that Belly Bao could have chosen a better place to locate their residency – something more in line with the history of how they started out would have been a much more enjoyable scene I believe. I was imagining a quirky café on the corner of a suburban street that isn’t too far away from the city, like perhaps Bronte or Coogee, with some outdoor seating. I was a bit disappointed to hear that they’ve teamed up with a club scene which feels like the complete opposite of what their food is about I guess; then again this is just my opinion. I’d give the ambience a 4 out of 10, possibly 5 if I am being generous – but yeah, dark, noisy, super packed, not quite the way I want to enjoy these delicious baos.

Belly Bao
53-55 Liverpool Street
Sydney, New South Wales
Australia, 2000

– Ally xx

Minty Pea & Ham Soup

Minty Pea & Ham Soup

Hello Everyone! I’ll keep today’s story short today just because I don’t have much to tell or write about for this recipe. However, I do just want to say that this was supposed to be a recipe for Pea and Watercress Soup, but for some reason I could not find watercress anywhere even if I did see them on the shelves two/three weeks ago when I didn’t need them. I had all the ingredients ready from grocery shopping two days ago, except the watercress. Maybe they’re not in season hence the lack of? Well I just did a Google search after writing that sentence and it appears that watercress is a late spring, early summer vegetable in Australia, available from October to December. Oh well. Anyway, so when I went to the shops yesterday morning as a last resort and could not find watercress, I decided to change my soup menu for today and bought a pack of ham for a pea and ham soup instead! I guess no harm done, but such hassles to find what could not be found.

Minty Pea & Ham Soup

I completely forgot that I had mint leaves in the fridge hence why not pictured in the ingredients shots. I think I wanted to use the mint leaves for the recipe with the watercress soup, but it completely slipped my mind when I had to change the menu. Also, at that time I couldn’t find my bottle of thickened cream when I rummaged the fridge; I found it in the end though, at the very back of the fridge…

Minty Pea & Ham Soup Ingredients

PREP TIME 10 MINS | COOKING TIME 30 MINS | SERVES 3-5

INGREDIENTS

  • 2 cups frozen green peas
  • 2 cups chicken broth
  • 1 pack (300g) shredded ham
  • 2-3 garlic cloves, minced
  • 1 large potato, peeled and cut into chunks
  • 1 small red onion, diced
  • 1 small carrot, peeled and cut into chunks
  • 1/2 bunch mint leaves
  • Ground salt and black pepper to taste
  • Thickened cream

METHOD

  1. Heat a little bit of cooking oil in a large pot over medium-high. Add the shredded ham and fry until browned (about 5 minutes). Remove from the pot and set aside.
  2. Add a little bit more cooking oil and sauté the garlic until golden brown and fragrant. Then add in the onions and cook until soft. Add in the carrots and potatoes, and season with a bit of salt and black pepper. Leave to cook for about 5 minutes.
  3. Add in the chicken broth and bring to a boil. Once boiling, let it cook for a further 5 minutes before adding the green peas in together with half of the fried shredded ham. Bring the heat down to low and let it simmer for a further 10 minutes or until the vegetables are tender.
  4. Turn the heat off, and throw in the mint leaves. Then, using a stick blender, blend the ham and vegetables together with the liquid in the cooking pot until smooth.
  5. Divide the soup equally into serving bowls (3 large bowls, or 4-5 small bowls) and top with the remain shredded ham, a dollop of thickened cream, and mint leaves. Serve immediately with some toasted bread.

Minty Pea & Ham Soup

BON APPÉTIT

– Ally xx

myTaste.com

Hearty Chicken Chipotle Soup

Hearty Chicken Chipotle Soup

Hello Everyone! Another week, another soup on the blog today! Just three more soupy recipes to go until the end of Winter Warmer Month, and gosh until the end of July as well! I can’t believe time has flown by that fast! It’s making me said because that basically means that I have about 2 weeks left in this beautiful city that I have called home for the past 4 and a half years. It’ll be heartbreaking to leave, but it’s time that I get my career life together and make that transition from uni life to a professional working life.

Hearty Chicken Chipotle Soup

Anyway, enough about how my life is and will be for the next few weeks/months/years, let’s get onto today’s recipe shall we? If you’ve read my previous blog post on my Moroccan Pumpkin Soup, you might remember me going on about how I can’t believe that they don’t sell chipotle peppers in any of the big grocery stores here in Sydney. Well, when I was out doing a quick shopping run at a with my friend Marissa (basically just buying extra ingredients to go with our dinner for that day), I tried my luck to see if the Asian store that we went to sold chipotle peppers. To my surprise, they did, canned and in adobo sauce as well! My reaction was sort of like a what the *bleep* is this for real kind of reaction. I even said to myself that I should’ve popped by this store before I went all Moroccan on my pumpkin soup, and this was honestly like 2 day after I had posted my pumpkin soup recipe. Since they had them in store, and only 4 cans remaining, I decided to buy a can and figure out ow I can use them for another recipe seeing as I practically went cuckoo trying to find these peppers.

Hearty Chicken Chipotle Soup Ingredients

Today I had actually scheduled a recipe for Cauliflower and Stilton Soup, but instead, seeing as I had the chipotle peppers, I decided to do a Hearty Chipotle Chicken Soup. The soup that I made is the exact definition of a Winter Warmer Soup; it had a nice kick to it from the chipotle peppers, and a lovely sweetness to it from the corn, while the beans and the chicken meat bulked the soup up. You can find the original recipe on Taste of Home. I’ve tweaked the method a bit as well as some of the ingredients for my recipe.

For the chicken broth, I bought 2 chicken carcasses from the butcher and boiled it together with some bay leaves, sea salt, black peppercorns, and ginger for about 45 minutes to an hour to get the flavour into the broth. I then shredded the meat from the carcasses and used them to bulk my soup up instead of using chicken breasts as the original recipe used. I also used fresh field grown gourmet tomatoes and roasted them over the gas stove to give it that flame-roasted flavour to them for my soup. Yes I probably picked the most time consuming way to make this soup, but it was all worth it in the end I believe. I completely forgot to deseed the chipotle peppers, as the original recipe stated, before adding them to the soup, but I’m glad I didn’t because, though it gave the soup a good kick, it wasn’t as spicy as I thought it be. If I had deseeded them, I don’t think they give the heat that I had with this dish.

Hearty Chicken Chipotle Soup Ingredients

PREP TIME 10 MINS | COOKING TIME 1 HOUR 20 MINS | SERVES 3-4

INGREDIENTS

  • 3 cups chicken broth
  • 3 small field grown gourmet tomatoes, flame-roasted and cut into chunks
  • 2-3 dried bay leaves
  • 2 large chicken carcasses, washed and cleaned thoroughly
  • 2 chipotle peppers in adobo sauce, sliced or minced
  • 2 ears of corn, cut from the cob
  • 2-3 garlic cloves, minced
  • 1 small red onion, diced
  • 1 can (400g) cannellini beans, drained
  • 2 tsp adobo sauce (from the chipotle peppers)
  • Fresh cilantro or coriander
  • Ground salt and black pepper to taste
  • Thickened cream or sour cream
  • Thumb-sized ginger, sliced
  • Whole black peppercorns

METHOD

  1. Add the chicken carcasses together with the bay leaves, ginger, salt, and whole black peppercorns, to a large pot with enough water to cover the chicken. Boil for about 45 minutes to an hour over medium-high heat. Remove the chicken carcasses from the broth and set aside to cool. Strain the broth into a bowl and discard the bay leaves, ginger, and peppercorns. Set aside for later.
  2. Once the chicken carcasses have cooled down, pull the meat from the chicken carcasses and shred to small pieces. Set aside.
  3. Heat the same pot over medium-high with a little bit of cooking oil. Sauté the garlic until golden brown and fragrant. Then add in the onions and cook until soft. Add in the shredded chicken pieces and season with a bit of salt and pepper. Give it a good mix and follow with the adobo sauce, chipotle peppers, cannellini beans, sweet corn, and tomatoes to the chicken mixture. Give it a good mix and let it cook further for about 5-6 minutes before adding the chicken broth in.
  4. Bring to a boil. Once boiling, bring the heat down to medium-low and let the soup simmer away for a further 10-15 minutes to ensure all the flavours blend together.
  5. Divide the soup equally into serving bowls (3 large bowls, or 4 small bowls) and top with a dollop of whipped thickened cream and fresh cilantro. Serve immediately and enjoy!

Hearty Chicken Chipotle Soup

Anyway, before I end this post, I would just like to share my experiences of how I’ve heard other people try to pronounce chipotle (chee-poat-lay). The very best, and even I still remember until now even if it’s been just about 2 years ago, I’ve heard chip-poh-lah-tay from Jack Harries (jacksgap) on YouTube when he was doing a chilli challenge with Jamie Oliver, also note the way they say jalapeño, jah-lah-pee-nose instead of HAH-lah-pen-yose.

BON APPÉTIT

– Ally xx

myTaste.com

Cayenne Crab & Corn Bisque

Cayenne Crab & Corn Bisque

Hello Everyone! We’ve made it halfway through Winter Warmer Month and today I’ve got something for spicy and seafood lovers out there. Well, I mean maybe not all seafood lovers will fancy this just because I know some people who do love seafood, but can’t do crabs because of its taste/texture, or even prawns because of the way it looks. Anyway, if you like spicy, crab, and sweet corn in a nice creamy soup, then this recipe is for you!

Cayenne Crab & Corn Bisque Ingredients

A bisque is basically a soup of French origin from a crustacean-based broth (either from lobster, crab, shrimp, or crayfish) that is smooth, creamy, and highly seasoned. Traditionally, you would extract the flavour from imperfect crustaceans that are not good enough to sell at markets. In an authentic bisque, the shells are ground to a fine paste and added to thicken the soup. Seafood bisques are traditionally served in a low two-handled cup on a saucer or in a mug. However, not all bisques contain seafood. Bisque is also sometimes used to refer to cream-based soups in which pre-cooked ingredients such as squash, tomato, mushroom, and red pepper are puréed or processed in a food processor.

Anyway, two days ago I went to the Sydney Fish Markets with my roommate Marissa (from Maiyummy) and her friend Rachel to indulge in delectable seafood plates from the barbecue and grill place, as well as purchasing some fresh seafood for our own cooking. I bought some live flame clams and blue swimmer crabs for this particular recipe. Actually, I hadn’t planned on making a seafood bisque for Winter Warmer Month, but as soon as I knew that I was going to make a trip to the fish market, I had to do a seafood soup of some sort! Anyway, enough talk and let get to the menu shall we? You can find the original recipe over on All Recipes; I changed the order of the method and the seasonings but it still worked out fine.

Cayenne Crab & Corn Bisque Ingredients

PREP TIME 10 MINS | COOKING TIME 45 MINS | SERVES 4-6

INGREDIENTS

  • 450g fresh crabmeat (I got mine from blue swimmer crabs)
  • 2 ears of corn, cut from the cob
  • 2-3 garlic cloves, minced
  • 2 dried bay leaves
  • 1 small-sized onion, diced
  • 1 cup chicken broth*
  • 1/2 cup milk
  • 1/2 cup thickened cream
  • 2 tbsp unsalted butter
  • 1 tbsp plain flour
  • 1 & 1/2 tsp cayenne pepper powder
  • Ground salt and black pepper to taste

*I made my own by combining chicken carcasses, salt, pepper, bay leaves, and a bit of ginger in a pot of water and boiled it for about 45 minutes to an hour, otherwise store bought broth, or a chicken cube/powder with water will do the trick as well.

METHOD

  1. Wash and clean the crabs thoroughly and place in a steamer and steam for about 20 minutes. Once done, remove from the steamer and set aside to cool. If you’ve purchased crab flesh in a jar, then you can skip this step altogether.
  2. Melt the butter in a large pot over medium-high heat, be careful as to not brown/burn the butter. Add the garlic and sauté for about a minute or two before adding the the onions and cooking them until soft.
  3. Add in the corn kernels followed by the bay leaves, cayenne pepper, salt, and black pepper. Mix around and cook for about a minute or two before adding the chicken broth in with the mixture.
  4. Bring the broth to a boil and leave to simmer for about 10 minutes. Remove 1 cup of the soup and set aside.
  5. Reduce the heat to medium-low and pour in the thickened cream. Using a stick blender, blend the corn together with the liquid in the cooking pot until smooth. Turn the heat up to medium-high once again and return the unblended soup to the cooking pot and mix well.
  6. In a small bowl, stir together the flour and milk. Slowly and constantly stir the mixture into the simmering soup. Stir in crabmeat (leaving a few pieces behind to decorate with) and cook until warmed through, about 5 minutes.
  7. Divide the soup equally into serving bowls (4 large bowls, or 6 small bowls) and top with some crabmeat, corn, cayenne pepper, and fresh afro parsley.

Cayenne Crab & Corn Bisque

Cayenne Crab & Corn Bisque

BON APPÉTIT

– Ally xx

myTaste.com