Spicy Chai & Banana Cinnamon Smoothie

Spicy Chai & Banana Cinnamon Smoothie

Hello Everyone! We’re kicking off the Year on Amcarmen’s Kitchen, and for the month of February, with sumptuous recipes that pays tribute to one of the most popular health foods on Earth. Known, as the Banana, the curved yellow fruit is one of the most widely consumed fruits in the world for good reason. Other than its ability to aid in regulating blood pressure due to the amount of potassium present in bananas, they are also known for helping with asthma, reducing the risk of developing childhood leukemia and help combat cancer, reducing the risk of cardiovascular disease, lower blood glucose levels and improve blood sugar, and many more health benefits that can be found over on Medical News Today.

I stumbled upon tonight’s recipe while I was browsing through Pinterest, in search for creative and innovative recipes to test out myself for the upcoming year for Amcarmen’s Kitchen. What initially attracted me to this recipe is the idea of adding chai tea leaves to an already delicious Banana & Cinnamon Smoothie. The original recipe can be found over on Gimme Some Oven, where the author Ali talked about why choose between having tea or a smoothie when you can have both? A brilliant idea by the way as my Banana & Cinnamon Smoothie definitely amped up in taste and flavour with the addition of Spicy Chai tea leaves from Twinings. Our local grocers didn’t have regular chai tea so I had to go for the spicy chai – nonetheless it was just as flavoursome as regular chai with an added kick to it to really boost the overall taste of the smoothie. I’m definitely keeping this recipe up my sleeve whenever I feel like a hit of protein to my breakfast/brunch mornings.

Spicy Chai & Banana Cinnamon Smoothie Ingredients

PREP TIME 5 MINS | COOKING TIME  | SERVES 3

INGREDIENTS

  • 2 large bananas, peeled and broken into thirds or quarters
  • 1 cup milk
  • 1/2 cup plain yoghurt
  • 1 tsp vanilla extract
  • 1/4 tsp ground cinnamon
  • 1 tea bag Twinings Spicy Chai tea leaves

Optional:

  • 1 tsp maple syrup (if you’d like a sweeter smoothie)

Note: Feel free to make this smoothie completely vegan-friendly by substituting the milk out for almond milk and omitting the plain yoghurt out by adding an extra quarter cup of almond milk.

METHOD

  1. Add all the ingredients to a blender and pulse until smooth.
  2. Serve immediately, topped with a few extra slices of banana if desired and some ground cinnamon.

Spicy Chai & Banana Cinnamon Smoothie

BON APPÉTIT

– Ally xx

myTaste.com

High Blood Pressure (Hypertension)

Health Tip: High Blood Pressure (Hypertension)

Hello Everyone! I am back on Amcarmen’s Kitchen for the year and I would just like to take this opportunity to wish everyone a belated Happy New Year and a Happy Chinese New Year to all my Chinese Family, Friends, and Followers! May the Year of the Golden Rooster bring you and your family your family Happiness that comes from within, the best of Luck to keep you pushing, and Peace in all days of this New Year. Gong Xi Fa Cai! 恭喜發財!

Now, before I move on to this evening’s post, I just want to clarify to those who haven’t read or been following my blog last month – I did mention that I would be taking a break from Amcarmen’s Kitchen due to the fact that I had a hectic schedule for the past few weeks, preventing me from having the energy to be in the kitchen on my only day off for the month of January. When the New Year kicked in, I had been staying a little later in the office every night to expedite the completion of the many design collaterals needed for the 19th Consumer Fair that happened just last week from the 18th to the 22nd of January 2017. Right after the Consumer Fair, we had family friends visiting us for 5 days, and then I had a Car Launching Event to manager alongside another colleague just 2 days ago. I haven’t had a good night’s sleep since the start of the year and I still haven’t been able to have a good rest as the inevitable post-Consumer Fair virus decided to kick in. I am currently, and slowly recovering from a blocked nose, an itchy throat, and a migraine as I am writing this post. Thank goodness for the long weekend ahead, otherwise I wouldn’t be seeing myself recovering for the next week or so.

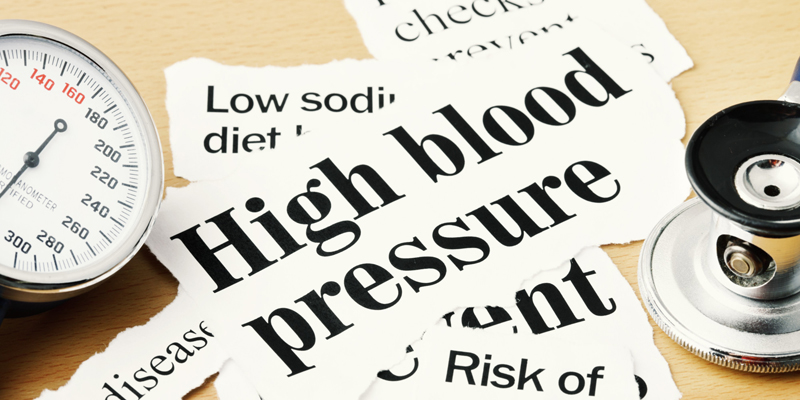
Now, all that aside, let’s get onto tonight’s post! Tonight will be something different, but it will serve as the ultimate guideline for the year to come. As you can see from the title, the main focus of this post is to target High Blood Pressure, or also known as, Hypertension. In my recent trip to the Philippines, back in the middle of 2016, I underwent a health check as part of my requirement to process my employment permit to work in Brunei. It was then that I found that I suffer from high blood pressure. I admit that when I found out about this, I was feeling a little bit depressed; and whilst I was still in the Philippines back then awaiting for the approval of my employment visa, I sat down and started researching on hypertension and what foods to eat/avoid to help regulate blood pressure levels. Ever since I found out about my blood pressure levels being exceedingly high, I have also made changes to the food I eat, and have tried to become more active in my lifestyle habits.

High Blood Pressure, or Hypertension, is a serious health problem, where over time it causes blood vessel damage that can lead to heart disease, kidney disease, stroke, and other health problems. Hypertension is sometimes known as the silent killer because there are no real symptoms to detect whether or not you are prone High Blood Pressure. If you don’t get your blood pressure checked regularly, hypertension could go unnoticed, and untreated, for years.

Your diet plays a big role in whether you have high or normal blood pressure. Dietary recommendations for lowering blood pressure include reducing your intake of fat, sodium, and alcohol. It is also suggested that you eat more foods that are rich in potassium, calcium, and magnesium. In general, you should eat more high-fibre, low-sodium, low-fat protein sources, whole grains, and plenty of fruits and vegetables. Here are 20 foods & drinks that you should include in your daily diet to help prevent, lower, or control your high blood pressure naturally without the need for medication:

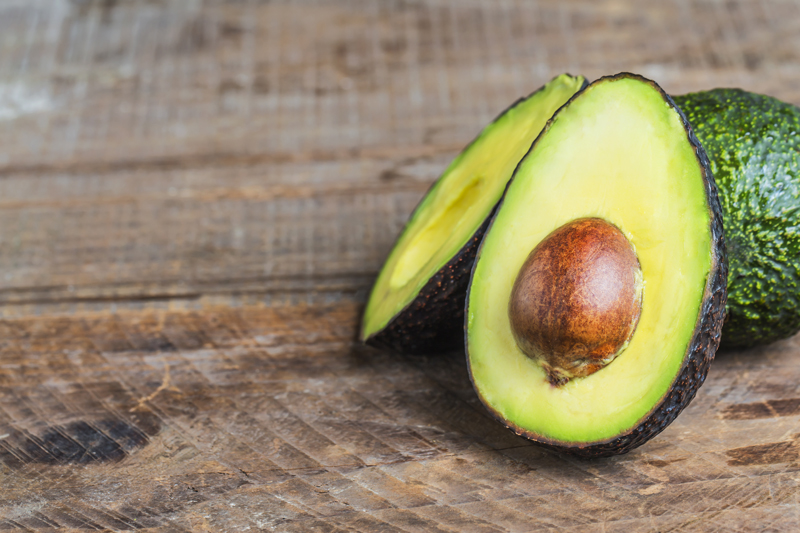
1. Avocado – All you need is about half a medium-sized avocado everyday as it provides 1% of the calcium, 5% of the magnesium, and 10% of the potassium that you need daily. The dark green flesh just under an avocado’s brittle skin contains large amounts of disease-fighting compounds.

High Blood Pressure (Hypertension): Avocados


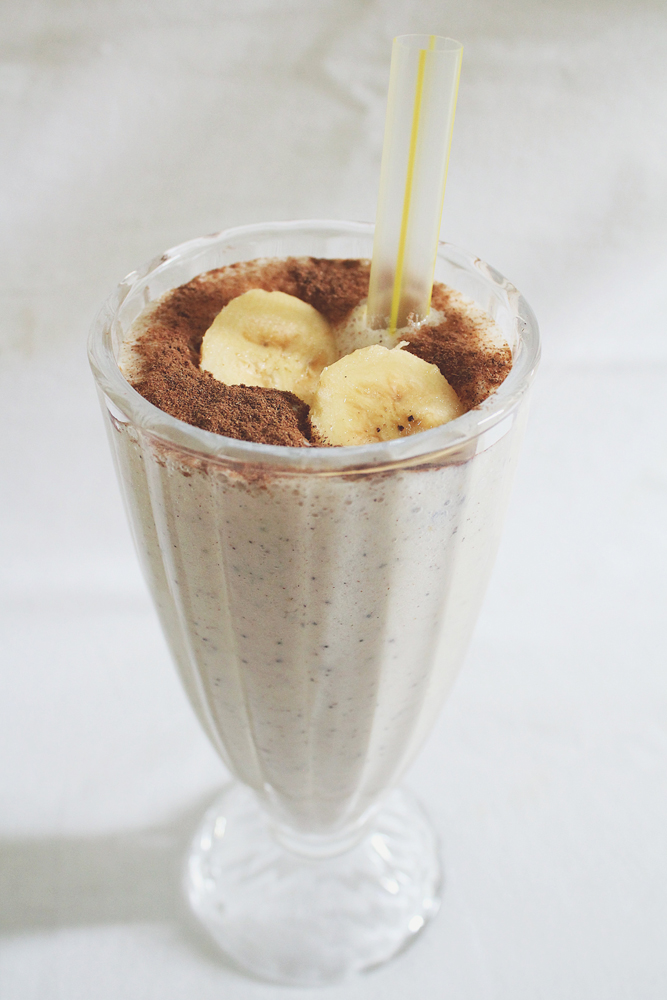
2. Bananas – Slice a banana into your breakfast cereal or oatmeal, or take one to work everyday for a quick, easy, and inexpensive snack. One medium-sized banana provides 1% of the calcium, 8% of the magnesium, and 12% of the potassium you need daily.

High Blood Pressure (Hypertension): Bananas


3. Beets – People with High Blood Pressure saw significant improvements from drinking beetroot juice. The nitrates found in the juice brought down one’s high blood pressure within just 24 hours. If you’re not too keen on drinking beetroot juice, you can easily roast or steam the whole root and add it to a green-packed salad, stir-fry, or stews.

High Blood Pressure (Hypertension): Beets


4. Berries – Blueberries especially, are rich in natural compounds where when consumed, is known to prevent hypertension and reduce high blood pressure. Blueberries, raspberries, and strawberries are easy to add to your diet; put them in your cereal every morning or keep some in the freezer for a quick and healthy dessert.

High Blood Pressure (Hypertension): Berries


5. Broccoli – This cruciferous vegetable is a famous source of cancer-fighting nutrients. One cup of cooked broccoli provides 6% of the calcium, 8% of the magnesium, and 14% of the potassium you need everyday.

High Blood Pressure (Hypertension): Broccoli


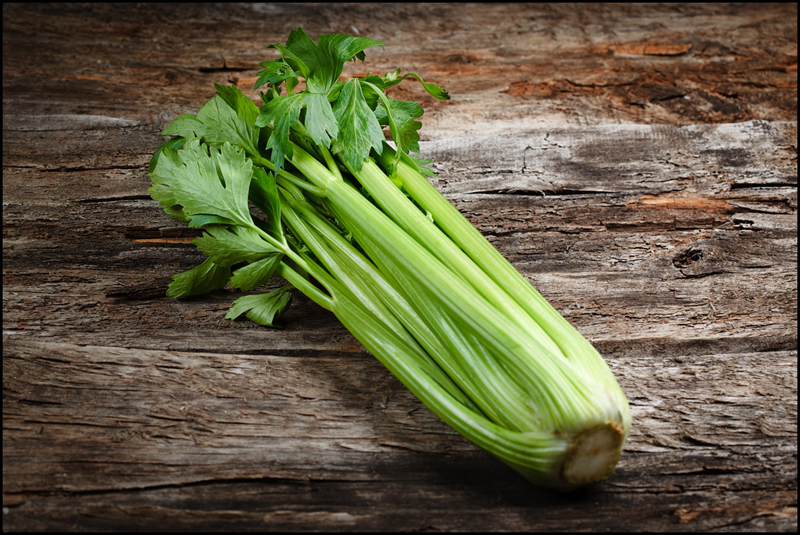
6. Celery – To lower mild cases of high blood pressure, one would eat about a cup of chopped celery daily. You should begin to see results after only a week or two. Celery contains a chemical that smoothes the muscles lining blood vessels, which increases vessel diameter and allows for easier blood flow at lower pressures.

High Blood Pressure (Hypertension): Celery


7. Fat-free Plain Yogurt – Cool and creamy, yogurt is a star ingredient in mineral-rich breakfasts, sauces and salad dressings, and even in entrée dishes. You can control the fat and nutrient content by making your own yogurt at home for your high blood pressure diet. Here’s a recipe to making your own yogurt at home.

High Blood Pressure (Hypertension): Fat-free Plain Yoghurt


8. Hibiscus Tea – Hibiscus tea has been a traditional remedy for high blood pressure and one that must be used continuously to maintain its positive results. Look specifically for tea made from Hibiscus sabdariffa. It is generally made from the flowers and fruit of the plant.

High Blood Pressure (Hypertension): Hibiscus Tea


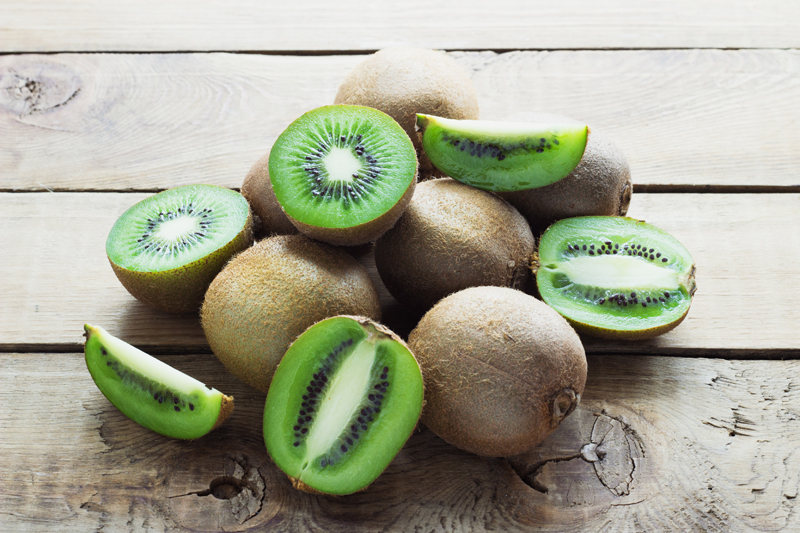
9. Kiwi – Kiwis contain more vitamin C than a same-size serving of orange slices. One kiwifruit provides 2% of the calcium, 7% of the magnesium, and 9% of the potassium you need every day.

High Blood Pressure (Hypertension): Kiwis


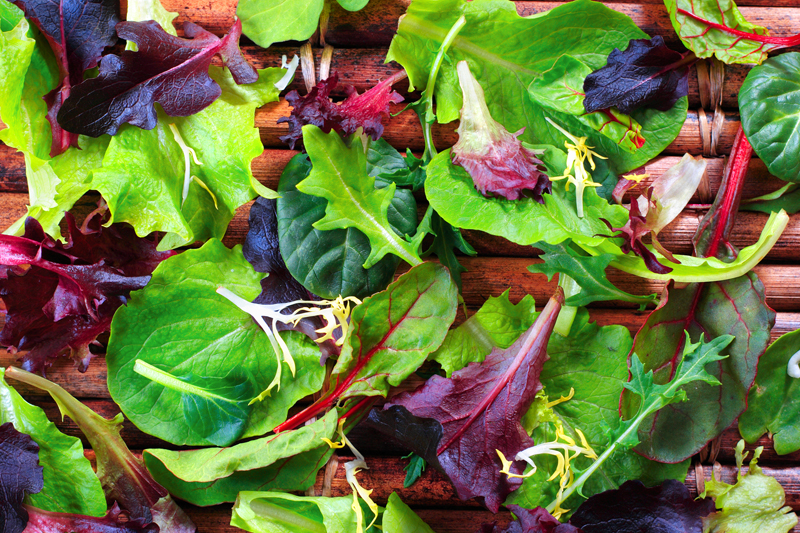
10. Leafy Greens – Leafy greens such as romaine lettuce, arugula (rocket), kale, turnip greens, collard greens, and spinach are high in potassium. This allows your kidneys to get rid of more sodium through your urine, which lowers your blood pressure. Stray away from canned vegetables though as they contain high amounts of sodium; instead, opt for frozen vegetables as they contain as many nutrients as fresh vegetables and are easy to store.

High Blood Pressure (Hypertension): Leafy Greens


11. Oatmeal – Oatmeal for your breakfast is a great way to charge up for the day. It is high-fibre, low-fat, and low-sodium, which is essentially just what you need to help lower your blood pressure. On its own, oatmeal can be bland; however, you should refrain from adding too much sugar. Instead, add fresh or frozen berries (see point 4) to sweeten it up, and maybe just a touch of honey.

High Blood Pressure (Hypertension): Oatmeal


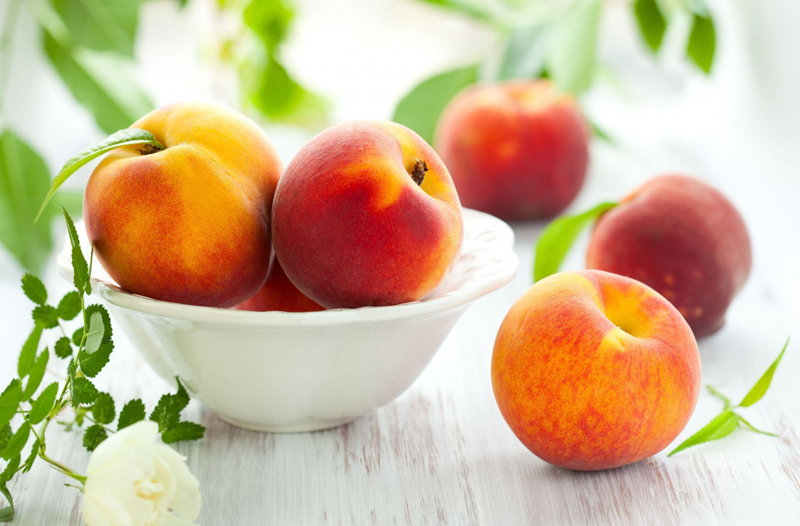
12. Peaches & Nectarines – Frozen unsweetened peach slices are a great alternative to fresh peaches and nectarines on a high blood pressure diet. Just defrost ahead of time or, for smoothies, simply toss in the blender. One medium peach or nectarine provides 1% of the calcium, 3% of the magnesium, and 8% of the potassium you need every day.

High Blood Pressure (Hypertension): Peaches & Nectarines


13. Pomegranate Juice – The pomegranate has been revered as the “fruit of life.” One of its remarkable powers is to improve cardiovascular health. If you drink pomegranate juice to naturally lower your blood pressure, be sure your juice has no added sugars.

High Blood Pressure (Hypertension): Pomegranate Juice


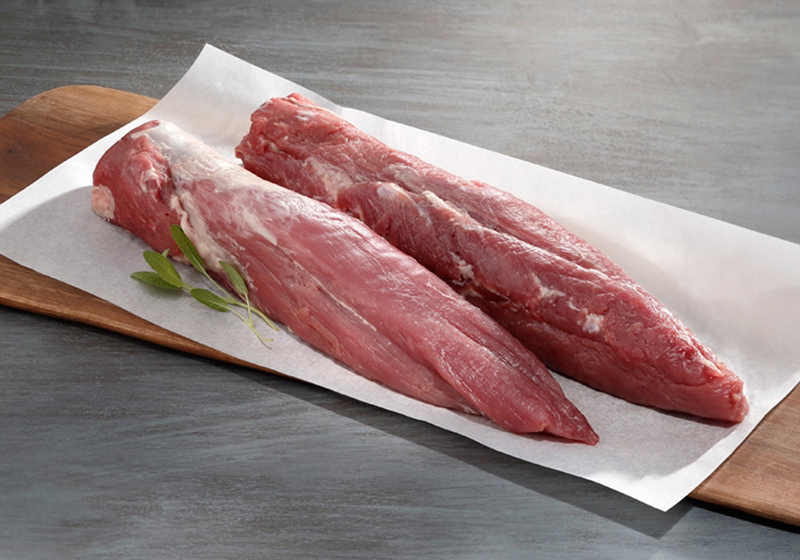
14. Pork Tenderloin – Meat lover’s can now rejoice! You’re probably wondering how pork even made it onto this list, well just 85 grams (3 oz) of pork tenderloin provide 6% of the magnesium and 15% of the potassium you need every day. This lean cut provides plenty of meaty flavour and satisfaction without the overload of saturated fat found in fattier types of beef and pork.

High Blood Pressure (Hypertension): Pork Tenderloin


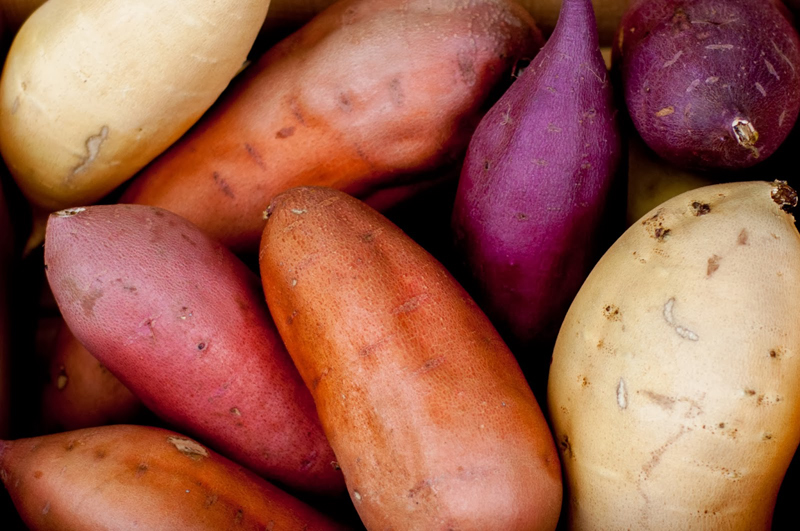
15. Potatoes & Sweet Potatoes – Potatoes and sweet potatoes are high in potassium and magnesium, two minerals that can help to lower your blood pressure. One medium sweet potato with the skin provides 4% of the calcium, 8% of the magnesium (7% without the skin), and 15% of the potassium (10% without the skin) you need every day. Bake several sweet potatoes at one time so you’ll have a ready supply for quick smoothies and other recipes.

High Blood Pressure (Hypertension): Potatoes & Sweet Potatoes


16. Quinoa – This high-protein whole grain has a mild yet nutty flavour, contains a variety of health-protecting nutrients along with an impressive amount of magnesium, and cooks in less than half the time it takes to make brown rice. A half-cup of cooked quinoa provides 1.5% of the calcium, 15% of the magnesium, and 4.5% of the potassium you need every day. Quinoa is gluten free, making it a great option if you’re gluten intolerant or have celiac disease. The most widely available quinoa is a golden beige color, but red and black varieties are also available and worth a try for your high blood pressure diet.

High Blood Pressure (Hypertension): Quinoa


17. Red Capsicum – One cup of raw red capsicum provides 1% of the calcium, 4% of the magnesium, and 9% of the potassium you need every day.

High Blood Pressure (Hypertension): Red Capsicum


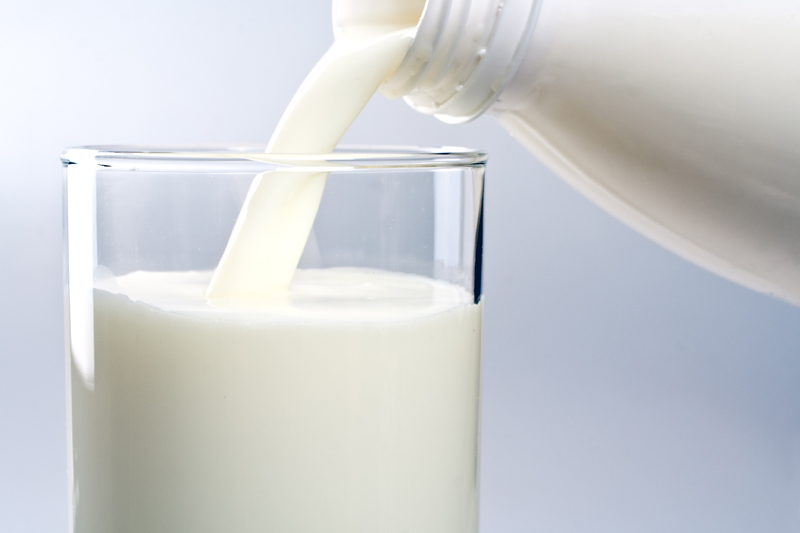
18. Skim Milk – Skim milk is an excellent source of calcium and is low in fat. These are both important elements of a diet for lowering blood pressure. Swap out your higher-fat milk for skim milk. If you’re not a fan of milk altogether, then eat more low-fat or nonfat yoghurt. Just make sure to avoid yoghurt that is high in sugar.

High Blood Pressure (Hypertension): Skim Milk


19. Tilapia – This mild white fish is available year-round in supermarkets and fish stores, fresh or as frozen fillets. You can roast it, bake it, and sauté it, flavor it with a variety of seasonings, and even top it with mineral-rich kiwi-avocado salsa (see points 1 and 9). Just 133 grams (4 oz) of tilapia provides 8% of the magnesium and 8% of the potassium you need every day.

High Blood Pressure (Hypertension): Tilapia


20. White Beans – And last but not least, you can use this comfort food in side dishes, soups, and entrées. As a meatless source of protein, it’s a great choice for vegetarians. One cup of white beans provides 13% of the calcium, 30% of the magnesium, and 24% of the potassium you need every day.

High Blood Pressure (Hypertension): White Beans

Of course there are other factors that help control, lower, or prevent high blood pressure such as exercising regularly and keeping an eye on your waistline, but I won’t be going into too much detail on those aspects. Just always remember that eating foods that are rich in minerals is better than taking supplements.

So yes, earlier above I made mention that this list will serve as the ultimate guideline to the monthly themes on Amcarmen’s Kitchen – each month I will pick a certain food to cook with from the list above and dish up meals highlighting the chosen ingredient. For example, I have chosen to focus on Bananas for the month of February. Stay tuned as Amcarmen’s Kitchen will be back with some exciting recipes starting this Wednesday!

Cheers!

*Note: All imagery used in this blog post do not belong to me, they have been sourced from Google Images and Freepik. Likewise, information gathered for this post has been sourced from Dr. David Williams, Eating Well, Health Line & Prevention.

– Ally xx

Raw Gingerbread Balls

Raw Gingerbread Balls

Hello Everyone! 2016 is coming to a close real soon and I would just like to take this opportunity to be thankful for what the past year has brought, not only for me, but for my family and my friends as well. Inevitably, life if not always perfect, it has its ups and downs, and for all the times where I felt down or put down but others, I can only say that – as cliché as this sounds – it has made me become a stronger person. I have been thrown under the bus countless of times by people around me and have had people say bad things about me behind my back – to all these people, you can go shove it where the sun don’t shine. You’ve made me realise how easy it can be for me to just shut you out because I don’t need that kind of toxicity in my life. Arrivederci.

Well, that escalated quickly haha! From being thankful to talking about the poisonous people is my life. Anyway, this will be the last recipe that I will be sharing on Amcarmen’s Kitchen for the year 2016. I hope that all my family, friends, and followers have had a good read and have cooked up a storm in their own kitchens with my recipes. Don’t forget to use the hashtag #amcarmensrecipes when you create a dish from my blog so I can share them on all my social media mediums. I will be back in February with a whole new concept to my recipes so please stay tuned! Yes, I will be taking a break in January as I have quite a full plate with work for the month and I might be able to spend time in the kitchen. I will also be planning content for Amcarmen’s Kitchen during my time off to ensure that everything runs smoothly for the upcoming year! Look out though for a post coming in mid-January as an introduction and hint to the recipes ahead for 2017!

Since Christmas passed not to long ago, I decided whip up these tasty raw vegan gingerbread balls as part of my ball-balls theme for December to keep with the Christmas-spirit.The only slight change I made to this recipe was replacing the buckwheat groats with more almonds just because I have no clue where to find buckwheat groats here in Brunei! Before we jump into the recipe for tonight, please check out the original recipe from Amanda over on Rawmanda.

Raw Gingerbread Balls Ingredients

PREP TIME 10 MINS | COOKING TIME  | SERVES 15 BALLS

INGREDIENTS

  • 1 & 1/4 cup pitted dates, roughly chopped
  • 3/4 cup gluten-free rolled oats
  • 1/4 cup almond meal
  • 1/4 cup buckwheat groats*
  • 3/4 cup gluten-free rolled oats
  • 1 tbsp ground cinnamon
  • 1 tsp ground ginger
  • 1/2 tsp nutmeg
  • 1/4 tsp ground cloves
  • 1/4 tsp vanilla extract

Optional

  • 1 tbsp coconut sugar

*If you’re like me and can’t seem to find buckwheat groats at your local grocers, you can substitute 1/4 cup of buckwheat groats for 3 tablespoons of almond flour. Alternatively, for nut-free balls, you can substitute 1/4 cup of almond meal for 1/4 cup + 1 tablespoon of buckwheat groats.

METHOD

  1. Place all the ingredients, except for the coconut sugar and dates in a high-speed blender or food processor until you get a flour-like consistency from the ingredients.
  2. Add half of the dates into the blender/food processor and pulse until well combined. Then add in the remaining dates until you have a uniform dough formed.
  3. Scoop the dough out of the blender/food processor, at about a tablespoon in size, and roll it into a ball (or flatten with a rolling pin and use a cookie cutter to make desired shapes). Repeat for the remaining dough. Optional: Roll the balls into coconut sugar or sprinkle on top of cookies.
  4. Share and enjoy as a light snack. Store the gingerbread balls or cookies in an air-tight container at room temperature for a 2-3 days or in the refrigerator for a week.

Raw Gingerbread Balls

BON APPÉTIT
– Ally xx

myTaste.com

Buffalo Cauliflower & Quinoa "Meatballs"

Buffalo Cauliflower & Quinoa “Meatballs”

Hello Everyone! Before I begin, I would like to check in with everyone and see if you all were able to guess the theme for this month. I’m pretty sure that by this post, you’ll have an idea of a recurring theme, but nevertheless, I will share it with you guys right here, right now! Drumroll please!

BALL BALLS! Yes, you read that right, ball balls, and here is a little back story to the name – so there was one day, back when I was still living in Australia for my university studies, my then roommate and I were talking about Christmas I guess, well I actually don’t remember the root of our conversation but it was more like I misunderstood, or I didn’t quite hear the pronunciation of the word “baubles” when my roommate had said it. At that time, I assumed that she said “ball balls” and that, that was what those round Christmas ornaments were called. Fast forward to another time, I was correct by someone (sorry I can’t remember who) that it was actually baubles and not ball balls. I was so disappointed at the time because I thought ball balls was such an epic name to call these Christmas ornament. Just recently, and when I say recently I mean like about a year ago or so, Jialing shared with me a folder name in their office server and it was titled BALL BALLS, to which I replied to her “SEE I TOLD YOU THEY ARE CALLED BALL BALLS!” I was just overly excited at the fact that I wasn’t the only dumb one to call them ball balls.

Buffalo Cauliflower & Quinoa "Meatballs"

Jialing has been quite helpful this year in a way that she has helped me with some blog themes for this year. At first, she asked me what the theme of my blog would be for the month of December, and we both came up with the idea of doing ball-shaped food as we recalled our “ball balls” story. So, as I do not have a backstory for this particular recipe since I just came across it while browsing through Pinterest, I will just get right in to the recipe. Before you do, check out the original recipe by Erin over on The Almond Eater.

“Add a spicy kick to meatless meatballs with these vegan Buffalo Cauliflower Quinoa Meatballs. With simple ingredients, like cauliflower, quinoa, garlic, and breadcrumbs, they’re sure to be a hit for the whole family!” — Erin, The Almond Eater.

Buffalo Cauliflower & Quinoa "Meatballs" Ingredients

Buffalo Cauliflower & Quinoa "Meatballs"

PREP TIME 30 MINS | COOKING TIME 40 MINS | SERVES 24 BALLS

INGREDIENTS

For the cauliflower quinoa ‘meatballs’

  • 1 cauliflower head, roughly chopped
  • 1 cup quinoa
  • 3/4 cup breadcrumbs
  • 2 garlic cloves, minced
  • 1-2 tbsp flour (whole wheat, all purpose or oat)
  • 1/2 tsp dried oregano

For the buffalo sauce

  • 1/2 cup hot sauce
  • 60g unsalted butter
  • 1 garlic clove, minced
  • 1/4 tsp chilli flakes

For the blue cheese-yoghurt dip

  • 3/4 cup greek yoghurt
  • 1/4 cup blue cheese, crumbled
  • 1 garlic clove, minced
  • 2 tbsp mayonnaise
  • 1 tbsp milk
  • Juice of 1/2 a lemon
  • Ground salt and pepper, to taste

METHOD

  1. Preheat oven to 190C (375F or gas mark 5). Line a baking tray with aluminium foil and set aside.
  2. Cook the quinoa in a small sauce pot according to the packet instructions (about 12-15 minutes). While the quinoa is cooking away, steam or boil the cauliflower in a separate medium-sized pot at the same time until they are tender (about 15 minutes).
  3. Meanwhile, prepare the buffalo sauce by melting the unsalted butter in a heat-proof bowl, in the microwave (or over a stove as well). Once melted, stir in the hot sauce, minced garlic, and chilli powder. Set aside.
  4. Combine the yoghurt, blue cheese, mayonnaise, garlic, milk, and lemon juice in a medium-szied bowl and whisk together until combined but still chunky. Season with salt and pepper. Cover and refrigerate until ready to serve.
  5. Once the quinoa is done cooking, turn the heat off and set aside. Once the cauliflower is done cooking as well, drain (if boiled) and place half the cauliflower, along with the minced garlic, into the food processor or blender and pulse for about 10-15 seconds. Remove and transfer the cauliflower into a large bowl before adding the second half of cauliflower to the food processor/blender and repeat the process.
  6. Stir in the cooked quinoa, breadcrumbs, dried oregano, and half of the buffalo sauce together with the cauliflower and then place the bowl in the refrigerator for 10-15 minutes, allowing everything to cool off a bit.
  7. After 15 minutes, remove from the refrigerator and, using your hands, form the mixture into golf ball-sized balls (or smaller, depending on your preferred size), placing the balls directly onto the prepared baking tray. If the mixture is too wet, add additional flour, 1 tablespoon at a time as needed.
  8. Drizzle about a tablespoon of olive oil over the balls and bake for 15-20 minutes and golden brown and crispy on the outside.
  9. Once done, remove from the oven, Pour a small amount of the rest of the buffalo sauce over the top of each ball, making sure they all get covered with the sauce but without drowning them otherwise they will get soggy.
  10. Serve with the blue cheese-yoghurt dip and share with family and friends!

Buffalo Cauliflower & Quinoa "Meatballs"

Buffalo Cauliflower & Quinoa "Meatballs"

Buffalo Cauliflower & Quinoa "Meatballs"

BON APPÉTIT

– Ally xx

myTaste.com

Cranberry Vanilla Energy Bites

Cranberry Vanilla Energy Bites

Hello Everyone! Hopefully tonight’s recipe will be able to get your brains going to have a guess on what the theme for December on Amcarmen’s Kitchen is. Like I said in the previous post, it may be obvious to some after this, or maybe you’ll have to wait until next week to make the connections. My best friend Jialing actually planted the idea in my head, and when I came up with the final theme, even she was excited to know that I’d be doing this for December. I’ll give you guys a slight clue – it definitely is Christmas-related.

Cranberry Vanilla Energy Bites

Anyway, I’m going to keep tonight’s post short and only because I don’t have a long-winded back story to tell about who I came across these energy bites in the past and here I am having a go at my own version – because that isn’t the case here. I merely just browsed the World Wide Web in search for recipes that I could try out specifically for this month’s theme. I came across this recipe on Pinterest a while back, and I thought I’d give this one a go seeing as it is simple (that’s right, only 5 ingredients!) to make and deliciously energising indeed! Just a heads up, they may be a bit too sweet for some who are intolerant to anything sweet because of the dates, but nonetheless, they are pretty darn good! Check out the original recipe by Danae over on Recipe Runner.

Cranberry Vanilla Energy Bites Ingredients

PREP TIME 15 MINS | COOKING TIME  | MAKES 12 BALLS

INGREDIENTS

  • 1/2 cup dried cranberries (unsweetened if you want them to be paleo)
  • 1/2 cup medjool dates (about 6-7 dates), roughly chopped
  • 1/2 cup raw almonds (or almond meal)
  • 1/2 cup raw cashews
  • 1/2 teaspoon vanilla extract
  • Pinch of salt

METHOD

  1. Using a high-speed blender or a food processor, pulse the almonds and cashews and almonds until they are finely ground, but be careful as to not turn them into nut butter.
  2. Add in all the remaining ingredients to the blender or food processor and blend/pulse until everything starts to come together. When needed, scrape down the sides of the blender or food processor several times, and then add up to 2 tablespoons of water to the blended mixture. You may need to remove the mixture from the blender or food processor and place it into a bowl, mashing it together with your hands or a spatula.
  3. Form the mixture into approximately 12 balls at about a tablespoon each.
  4. Store the energy bites in an airtight container in the refrigerator or freezer. Enjoy as a snack when you feel that afternoon slump starting to kick in!

Cranberry Vanilla Energy Bites

Cranberry Vanilla Energy Bites

BON APPÉTIT

– Ally xx

myTaste.com

Svenska Köttbullar (Swedish Meatballs)

Svenska Köttbullar (Swedish Meatballs)

Hello Everyone! We’re finally into the last month for 2016! Gosh how time flies by so quickly! Anyway, I won’t go into another sentimental tangent on how the year is almost up and all that jazz, and I’ll just get right into it! Like I said on Instagram, I won’t reveal what the theme for December will be for Amcarmen’s Kitchen – instead I will have you guys guess what the theme is. You don’t have to guess right away, and I think the theme will only be a little more clear by the second or third week.

Svenska Köttbullar (Swedish Meatballs)

So, I first came across this dish, not through my travels to Sweden, but through the many adventures I’ve had when, as stereotypical as this will sound, visiting IKEA. Yes, IKEA – whether it was when I was still living in Australia, or travelling through Singapore, you’d definitely see me at their food court for either lunch, or dinner, depending on the time of day I visited there, with a plate of köttbullar. If you were to ask ten different Swedes about making köttbullar, you will most indefinitely get ten different answers. Sure they would be similar in some way or another, but most Swedes will have their own way of making köttbullar and so everyone will use a bit more or a bit less of this or that ingredient. Apparently, köttbullar is Sweden’s national dish, which some do question as it is not a particular exciting dish that speaks for the whole Swedish cuisine. Nonetheless, I think most real Swedes would agree that these meatballs are pretty good.

Svenska Köttbullar (Swedish Meatballs)

I can’t get over how deliciously amazing the gravy that accompanied my meatballs were. I think I probably ate half of it by the time every element for the dish was done, and I definitely drowned my balls in the gravy after. In southern Sweden many people prefer their ground meat with a little more fat, but the further north you go, the less pork you will find in the meatball mixture. However, bread or crumbs allowed to swell in milk are as important as the lingonberries on the side. They give Swedish meatballs their special soft consistency. I had some leftover herbed focaccia bread lying in the fridge from the week before and so I decided to cut them up into about 1cm cubes, drizzle them with a bit of olive oil and then toast them in the oven until browned and crisp. I then added the toasted bread into a food processor and pulsed until crumbed. Before we dive into the recipe, please check out the original recipe for Classic Swedish Meatballs over on BBC Good Food.

Also, you may notice that once you go through to the recipe that I mentioned about ‘blanching’ the balls before browning them. The reason why I decided to blanch the balls first is to maintain it’s round shape and therefore I shall not encounter a lifetime of sadness when it come to browning them after. I cannot express how much sadness I’ve experienced when making meatballs. Every time I fry them, the go flat on one side, and of course, when I try to flip them, they somehow get ruined, and when that happens, my day is ruined.

Svenska Köttbullar (Swedish Meatballs) Ingredients

Svenska Köttbullar (Swedish Meatballs)

PREP TIME 15 MINS | COOKING TIME 20 MINS | MAKES 20 MEATBALLS*

*My balls were about slightly smaller than a ping pong ball and I managed to make 20 of them. You could probably make 30-35 balls if they are slightly smaller than mine.

INGREDIENTS

For the meatballs

  • 400g lean pork mince
  • 1/3 cup bread crumbs
  • 1 large free range egg, beaten
  • 1 small brown onion, finely chopped
  • 1 tbsp finely chopped parsley, plus extra to serve
  • Ground salt and black pepper, to taste

For the gravy

  • 3 cups beef or pork stock**
  • 50g unsalted butter
  • 3 tbsp plain flour
  • Ground salt and black pepper, to taste

Optional to serve

  • Chunky mashed potatoes
  • 2-4 tbsp of Lingonberry (otherwise red currant, raspberry, or cranberry jelly), less or more to taste

**I made my own pork stock by boiling a few pork bones with black peppercorns, salt, and dried bay leaves.

METHOD

  1. In a large bowl, combine all the ingredients for the meatballs and mix until well incorporated. Then, form the pork mince mixture into meatballs to the size that you want.
  2. Bring a large pot of salted water to a boil and the drop each meatball in one by one and ‘blanch’ for about a minute to a minute and a half before removing them from the pot. You may need to do this in batches if your pot is not big enough. Once removed, drain.
  3. Heat a large frying pan with about 2 tbsp of olive oil over medium-high. Add in the meatballs and brown all over, about 5 minutes altogether. Again, you may need to do this in batches. Once browned, transfer to a dish lined with a paper towels to absorb any excess oil from the meatballs.
  4. To make the sauce/gravy, first make a roux by heating the butter in the same frying pan on medium heat until melted and slightly browned. Then, slowly whisk in the flour, stirring until smooth. Continue to stir for several minutes as this allows the flour mixture to cook, until the roux is the colour of coffee-with-cream.
  5. When the roux has cooked to a lovely shade of light brown, slowly add the stock to the roux, stirring as you add the stock. The stock will sputter at first and the roux may seize up, but keep adding the stock slowly and keep stirring. Eventually the sauce will loosen and become silky.
  6. Serve the meatballs on a bed of chunky mashed potatoes, topped with the gravy and an optional of lingonberry on the side. Enjoy with family and friends!

Svenska Köttbullar (Swedish Meatballs)

Svenska Köttbullar (Swedish Meatballs)

BON APPÉTIT

– Ally xx

myTaste.com

White Chocolate Snickerdoodle Blondies

White Chocolate Snickerdoodle Blondies

Hello Everyone! Wow! I can’t believe that it’s the last day of November today! Once again, another month managed to slip right under our noses! Christmas is nearing, and in the blink of an eye, it will be 2017! Anyway, I’m not going to give a brief recap of my year just yet – I’ll probably save that for sometime in December – I’ll just give you a recap of my week as it was indeed a busy one! Firstly, I have been home alone for the past 5 nights as my Mom and my sister flew off on Friday to visit the other sibling over in Singapore. Secondly, I had two back-to-back events that I helped with the event decorations for, one was Phantom of the Opera themed (but very minimal/close to none on the decorations that actually resembled anything from Phantom of the Opera), and the other was an Alice and Wonderland/Enchanted Forest themed Staff Appreciation Night. I had loads of fun designing the initial proposal for the decorations, and of course helping with execution of the decorations onsite.

My next task, in terms of event decoration is to propose and present to the client, the theme ‘The Chronicles of Narnia; The Lion, The Witch, and The Wardrobe’ for a corporate 25th Anniversary Dinner coming up in mid-January. The presentation will be on Friday and I’m both excited and nervous at the same time; fingers-crossed that they will like my idea and that they see the underlying meaning of the chosen theme. Other than work, I scored VIP tickets from my Boss to watch Coreyah and JinJo Crew perform at The Rhythm of Korea on Saturday night. It was a free event hosted by the Korean Embassy here in Brunei as a sort of launching of their moving in to their new Embassy which will happen sometime in December if I’m not mistaken – so yes, this was an early celebration for the general public.

White Chocolate Snickerdoodle Blondies

A cross between a chewy blondie and moist butter cake, these blondies are studded with white chocolate chips and ribboned with sweet cinnamon sugar! — Sally’s Baking Addiction

But enough of the long-winded, personal life stories and let’s move on to tonight’s recipe shall we? So, I think you guys can probably tell that this is another recipe followed and adapted from none other than Sally’s Baking Addiction. I honestly think that the theme for this November shouldn’t have been ‘Cooking with Chocolate’ but rather Sally-themed instead haha! Anyway, I don’t actually have much to say for this recipe as it was kind of just a I-need-to-bake-something-for-my-blog-but-what-should-I-bake kind of moment early on the Sunday morning before I went grocery shopping to make sure I had all the ingredients. I came across this recipe while browsing and I thought that it’d be interesting to make.

White Chocolate Snickerdoodle Blondies Ingredients

PREP TIME 15 MINS | COOKING TIME 30-35 MINS | SERVES 12-15 BARS

INGREDIENTS

For the blondies

  • 2 & 1/3 cups plain flour
  • 1 cup white chocolate chips
  • 3/4 cup granulated sugar
  • 3/4 cup packed light brown sugar
  • 3/4 cup unsalted butter, softened to room temperature
  • 2 large free range eggs, room temperature
  • 2 tsp vanilla extract
  • 1 & 1/4 tsp baking powder
  • 1/2 tsp salt

For the cinnamon-sugar filling

  • 1/3 cup granulated sugar
  • 2 tsp ground cinnamon

METHOD

  1. Preheat oven to 180C (350F or gas mark 4). Line a 9×9, 11×7, or 9×13 inch baking pan with parchment paper, leaving enough overhang on the sides to easily pull the blondies out of the pan and cut once done.
  2. Combine the plain flour, baking powder, and salt in a small bowl, then set aside. Beat the unsalted butter on high speed using a hand or stand mixer fitted with a paddle attachment, in a large bowl. Beat for at least 1 minute until creamy, and then add in the granulated and brown sugars, beating for 2 full minutes on high speed until light and fluffy. Scrape down the sides and bottom of bowl when needed.
  3. Beat in the eggs and vanilla on high speed, scraping down the sides and bottom of the bowl as needed. On low speed, beat in dry ingredients until just combined. With a large wooden spoon or rubber spatula, fold in the white chocolate chips.
  4. Spoon half the batter into pan. It will be a relatively thin layer, but try to spread it across the pan evenly. Combine the cinnamon and sugar and sprinkle on top of them bottom layer, reserving 1 tbsp for the top. Spread the remaining batter over top. Some of the cinnamon-sugar will mix into the top layer as you spread it, which is fine. Sprinkle the top with remaining cinnamon-sugar.
  5. For a 9×9 or 11×7 baking pan, bake for 30-35 minutes or until golden brown and a toothpick inserted in the centre comes out clean. For a 9×13, bake 22-26 minutes or until golden brown and toothpick inserted in centre comes out clean. Cool completely for about 1 hour.

White Chocolate Snickerdoodle Blondies

These bars can be made 3 days in advance and kept in an airtight container at room temperature until ready to serve. Bars freeze well, up to 3 months. Simply thaw overnight in the refrigerator and bring to room temperature before serving. Leftover bars can be stored in an airtight container in the refrigerator or at room temperature for up to 1 week.

BON APPÉTIT

– Ally xx

myTaste.com

White Chocolate & Macadamia Red Velvet Cookies

White Chocolate & Macadamia Red Velvet Cookies

Hello Everyone! I don’t think I ever mentioned it in the past 3 posts for the month of November, but I’m pretty sure that most of you who follow my blog are smart little ducklings and have already probably figured out that the theme for Amcarmen’s Kitchen this month is all about Procrastibaking – well, really, not really. The theme isn’t just centred around baking, but it is most definitely about baking with… CHOCOLATE! How did I come up with this month’s theme you ask (well if you didn’t ask then read ahead hehe), I wanted to bake a Chocolate cake for my birthday this month, and I had two chocolate-linked recipes sitting in my archives waiting to be post up on my blog, and so… Baking with Chocolate came into play!

Or you could probably just say that I’ve been lazy and haven’t been in the mood to cook on Sundays for the past few weeks – which is partially true. It’s not that I was being lazy – it was more like I wanted to have a Sunday to myself doing whatever I want, meaning doing nothing actually *cheeky grin* instead of slaving away in the hot kitchen the whole afternoon. I’ve probably mentioned this in a post before, but for those of you who don’t know, I work 6 days a week from 8am to 5pm. By Sunday, all I want to do is just sit back and do nothing, however, if I did do that, I wouldn’t be able to keep up with Amcarmen’s Kitchen any longer.

White Chocolate & Macadamia Red Velvet Cookies

Anyway, enough of my rants, let’s move on to tonight’s recipe – an adaptation from none other than my favourite baker out there, Sally’s Baking Addiction. You can find the original recipe for these cookies over on her blog. If you went over to visit her blog, you’d notice that they are actually Red Velvet Chocolate Chip Cookies, but I decided to do a little twist and use white chocolate chips instead and pair them with macadamia nuts! The perfect combination in my opinion! I’d like to take this opportunity to share a recipe by a friend of mine, also known as Brendon The Smiling Chef, for his “I Love You This Much” Giant Red Velvet Cookie. I remember the time we met up and cooked together for my Auguest series last year, Brendon baked a Giant Chocolate Chip Cookie from the left over cookie dough he had from his “Cookies & Cream” inspired dessert. I think I might bake a Giant Cookie for next week actually!

White Chocolate & Macadamia Red Velvet Cookies Ingredients

White Chocolate & Macadamia Red Velvet Cookies

PREP TIME 1 HOUR 10 MINS* | COOKING TIME 10 MINS | SERVES 18 COOKIES

*Includes chilling time

INGREDIENTS

  • 1 & 1/2 cups + 1 tbsp plain flour, spooned and leveled
  • 1 cup semi-sweet white chocolate chips (plus a few extra for after baking)
  • 3/4 cup packed light (or dark) brown sugar
  • 1/2 cup raw macadamia nuts, roughly chopped
  • 1/4 cup granulated sugar
  • 1/4 cup unsweetened natural cocoa powder
  • 115g unsalted butter, softened to room temperature
  • 1 large free range egg, room temperature
  • 1 & 1/2 tbsp red food colouring
  • 1 tbsp milk
  • 2 tsp vanilla extract
  • 1 tsp baking soda
  • 1/4 tsp salt

METHOD

  1. In a medium-sized bowl, whisk together the flour, cocoa powder, baking soda, and salt together until incorporated well. Set aside.
  2. In a large bowl, beat the softened butter using a handheld or stand mixer with a paddle attachment on high speed until creamy, about 1 minute. When necessary, scrape down the sides and the bottom of the bowl. Add in the brown and granulated sugar, beating until combined and creamy, about another minute. Then, beat in the egg, milk, and vanilla extract, scraping down the sides and bottom of the bowl as needed. Once mixed, add the food colouring and beat until combined.
  3. Turn the mixer off and pour the dry ingredients into the wet ingredients. Turn the mixer on and slow beat on low speed until a very soft dough is formed. Beat in more food colouring if you’d like the dough to be a brighter red.
  4. Add in the white chocolate chips, and roughly chopped macadamia nuts and use a spatula to combine with the dough mixture. At this point, the dough will be sticky.
  5. Cover the dough tightly with aluminum foil or plastic wrap and chill for at least 1 hour (and up to 3 days). Chilling is mandatory.
  6. Preheat the oven to 180C (350F or gas mark 4) (177°C). Line two large baking trays with parchment paper or silicone baking mats and set aside.
  7. Scoop about 1 and 1/2 tablespoons of dough and roll into a ball, as pictured above. Place 9 balls onto each baking sheet and bake each batch for about10-11 minutes. The cookies may have only spread slightly and that’s ok. Simply press down on the warm cookies to slightly flatten and form crinkles. Stick a few chocolate chips into the tops of the warm cookies (optional and only for looks).
  8. Allow the cookies to cool on the cookie sheet for 5 minutes before transferring to a wire rack to cool down completely. Enjoy and share with family and friends!

White Chocolate & Macadamia Red Velvet Cookies

White Chocolate & Macadamia Red Velvet Cookies

BON APPÉTIT

– Ally xx

myTaste.com

Double Chocolate Crinkle Cookies

Double Chocolate Crinkle Cookies

Hello Everyone! For those who follow me on my personal social media pages will most definitely know that I’ve probably celebrated my turning of a quarter of a century one too many times that I guess an average person would celebrate their birthday. To quote a friend “[I] only turn 25 once” I think she meant that in a way that I probably had too many celebrations – but of course I’m going to take that as yes, I only turn 25 once so I’m going to go all out and use my birthday as an excuse to eat all the cake and food without feeling guilty *cheeky grin* Okay, so it’s been exactly a week now since I turned 25 so I guess it’s only fair to put a cease to the celebrations and start hitting the gym to burn off all the cake (3 cakes in total to be honest).

That aside, tonight’s recipe that I will be sharing is one that I whipped up last year for Christmas. I baked a batch of soft, chewy Double Chocolate Crinkle Cookies long with some traditional Sugar Cookies to take to the office with me on Boxing Day, to share with my colleagues – I know right. I’m so nice. Anyway, you might realise  in the photos that the cookies may look like they have a hint of red to them – well, I tried adding a little bit of red food colouring (what I had left of it anyway) to make it look like a red velvet crinkle cookie, but I guess I didn’t have enough coloring for it to really shine through.

Double Chocolate Crinkle Cookies IngredientsOh you know – just my little owly friend that also happens to be one of my measuring spoons basking in a bowl of flour mixture.

Anyway! Before I head onto the recipe, please take the time to check out the original over on Sally’s Baking Addiction. I think I have said this before, but nonetheless, I will say it again. Sally’s recipes are definitely spot on and easy to follow. I don’t think that I’ve ever screwed up a recipe of hers when in the kitchen myself. Somewhere in the past, I attempted to bake crinkle cookies after seeing my Aunt post her cookies on her Facebook page. I followed a recipe, not Sally’s of course and they ended being a total FAIL. I was so sad because I had baked them to share with friends – which I did anyway, and I think they were just being nice and said that the cookies were ‘still’ good haha.

Double Chocolate Crinkle Cookies Ingredients

PREP TIME 3 HOURS 30 MINS* | COOKING TIME 10 MINS | SERVES 20 COOKIES

*Includes chilling time – it is highly recommended that you chill the cookie dough for at least 3 hours. The longer, the better! Chilling helps the flavors to develop, prevents spreading, and makes the otherwise sticky cookie dough easy to handle.

INGREDIENTS

  • 1 cup all-purpose flour, levelled
  • 1 cup confectioners’ sugar, for rolling
  • 1/2 cup & 2 tbsp unsweetened cocoa powder
  • 1/2 cup granulated sugar
  • 1/2 cup packed light or dark brown sugar
  • 180g Belgian dark chocolate, roughly chopped
  • 115g unsalted butter, softened to room temperature
  • 1 large free range egg, at room temperature
  • 1 tsp baking soda
  • 1 tsp pure vanilla extract
  • 1/8 teaspoon salt

METHOD

  1. Using a hand-held electric mixer, beat the butter in a large mixing bowl for about 1 minute on medium speed until completely smooth and creamy. Then, add in the granulated sugar and brown sugar, continuing to beat on medium-high speed until fluffy and light in colour. Beat in the egg and vanilla extract on high speed. Scrape down the sides and bottom of the bowl as needed. Set aside.
  2. In a separate medium-sized bowl, whisk the flour, cocoa powder, baking soda, and salt together until combined. On low speed, slowly mix into the wet ingredients until combined. The cookie dough will be quite thick. Switch to high speed and beat in the roughly chopped Belgian chocolate. At this point, the cookie dough will be sticky. Cover dough tightly with aluminum foil or plastic wrap and chill for at least 3 hours and up to 3 days. Chilling is mandatory for this cookie dough.
  3. Remove the cookie dough from the refrigerator and allow it to sit at room temperature for about 20 minutes; if the cookie dough was chilled longer than 3 hours, then let it sit at room temperature for about 30 minutes. This makes the cookie dough easier to scoop and roll.
  4. Preheat oven to 180C (350F or gas mark 4). Line two large baking sheets with parchment paper or silicone baking mats, and then set aside.
  5. Scoop and roll the dough, about 1.5 tbsp of dough each, into balls. Roll each ball generously in the confectioners’ sugar and place them on the prepared baking sheets.
  6. Bake the cookies for about 8-9 minutes. The baked cookies will look extremely soft in the centers when you remove them from the oven. Allow them to cool for 5 minutes on the cookie sheet; they will slightly deflate as you let them cool. Transfer to a cooling rack to cool completely. Once cooled, enjoy and share with family and friends!

Double Chocolate Crinkle Cookies

Double Chocolate Crinkle Cookies

Cookies stay fresh covered at room temperature for up to 1 week. Baked cookies freeze well – up to three months. Unbaked cookie dough balls (that are not coated in confectioners’ sugar) freeze well – up to three months. Coat the frozen cookie dough balls in confectioners’ sugar, then bake for about 10 minutes. No need to thaw them.

BON APPÉTIT

– Ally xx

myTaste.com

Chilli Chocolate & Cinnamon Cake

Chilli Chocolate & Cinnamon Cake

Hello Everyone! Well… Today has been quite an eventful day! For my followers who do not know, today marks my quarter of a century years young! 25 years of achievements and failures has brought me to where I am today.

Round 1 of Birthday Celebrations

My colleagues surprised me with a cake earlier this afternoon – quite funny as the whole morning they kept telling me not to expect anything because they didn’t have a surprise for me, nor did they have cake. By afternoon, my Manager called me to their department, asking me to help her with a design that I had helped her with earlier in the afternoon. Being the gullible person that I am, I went up to her, and that’s when the rest started singing Happy Birthday and brought out the cake (mini tower of cream puffs). So I’d like to take this opportunity to thank everyone in the office who greeted me today – and for the surprise!

Round 2 of Birthday Celebrations

Round 2 of celebrations began earlier tonight as well, with my Mom, Sister, and my Godmother. We had Japanese for dinner and of course, the restaurant staff sang Happy Birthday to me as they brought out the cake that I had baked for myself for my birthday – which is tonight’s recipe! Original recipe can be found over on Dish.

Dense, rich and moist with a little hint of chilli and cinnamon – everything a great chocolate cake should be, and even more delicious when served with candid pepitas. — Claire Aldous.

Chilli Chocolate & Cinnamon Cake Ingredients

PREP TIME 15 MINS | COOKING TIME 20-25 MINS | SERVES 10-12

INGREDIENTS

For the cake:

  • 200g Lindt Chilli Chocolate, roughly chopped
  • 200g unsalted butter, cubed
  • 2 large free range eggs, lightly beaten
  • 1/2 cup caster sugar
  • 2 tbsp plain flour
  • 1 tsp ground cinnamon
  • 1 tsp vanilla extract
  • 1/2 tsp salt
  • 1/4 tsp ground cayenne pepper (optional if you’d like a little more kick to your chilli chocolate cake)

For the glaze:

  • 100g dark chocolate
  • 100ml thickened cream

METHOD

  1. Preheat the oven to 170C (325F or gas mark 3).
  2. Melt the butter and chocolate in a heat-proof bowl in the microwave at 30-second intervals and stirring until the butter and chocolate has melted. Once melted, stir in the sugar and vanilla extract, setting aside to cool for 10 minutes.
  3. Once cooled, gradually stir in the eggs and then fold in the flour, salt, cinnamon, and cayenne pepper. Pour into a buttered cake tin and smoothen the top.
  4. Bake for 20-25 minutes until the centre of the cake is set but not too firm. Once done, transfer to a rack and leave to cool completely in the tin.
  5. While the cake is cooling down, get started on the glaze by melting the dark chocolate in a heat-proof bowl set over a pan of simmering water, stirring occasionally. Do not let the base of the bowl touch the water. Once the chocolate has melted, slowly add in the cream, stirring gently. Remove from the heat.
  6. Transfer the cake to a dish and pour the glass over. Finish with a light dust of confectioners’ sugar and enjoy with family and friends!

Chilli Chocolate & Cinnamon Cake

Chilli Chocolate & Cinnamon Cake

BON APPÉTIT

– Ally xx

myTaste.com