Auguest 2021: Brendon D'Souza

Banana Peel Curry with Coconut Rice & Pickled Red Onion

“When someone cooks with love, the meal deserves to be celebrated. You get dressed, choose a killer playlist, and pour a glass of wine then sit down to share the magic with your loved ones.” — Brendon D’Souza

Auguest 2021: Brendon D'Souza

Hello Everyone! How’s life? It’s Brendon D’Souza from CookWithBrendon.com here. By day I work in sales and around the clock I spend the countless hours we have in lockdown doing my favourite thing – cooking for my loved ones and developing recipes for my blog.

After 6 years at my former blog Brendon The Smiling Chef, I realised there might be a space for online cooking classes and social get-togethers for like-minded foodies. After running a number of free workshops with my colleagues and friends I’m so ready to take it to the next level and open up the classes to the world. Let me know if you would like to join in the fun!

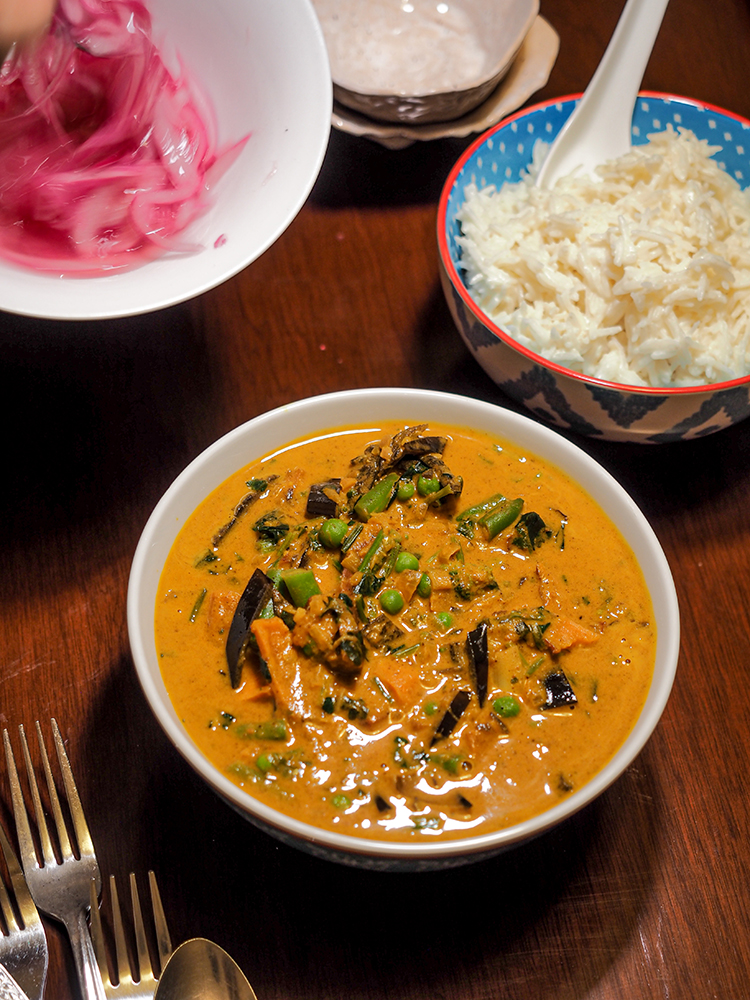
Now more than ever is the perfect time to try and find clever little ways to use up leftover bits and pieces you find in the kitchen. This curry will allow you to do exactly that, and is inspired by the flavours of Laos, Thailand, India, and Australia altogether.

Banana Peel Curry

By no means do I claim to be the creator of this dish. As I’m sure you’ve seen over your socials it gained cult status recently when Nigella Lawson wrote about it in her 2020 TV series and cookbook Cook Eat Repeat. It’s such a great way to transform something that would otherwise be destined for the bin. I was surprised to learn that banana skins are packed full of potassium so I’m hoping it’s doing that extra bit of good for my insides too.

I’ve also taken the liberty to use up some leftovers for this dish including a batch of leftover marinara sauce and some roast sweet potatoes. So you can absolutely feel free to swap out some of the ingredients for others which you may have at hand. Don’t forget to tag #CookWithBrendon so I can see your creations. Let’s cook!

Banana Peel Curry Ingredients

PREP TIME 30 MINS | COOKING TIME 30 MINS | SERVES 2-3

INGREDIENTS

  • 2 ripe bananas
  • 2 medium red onion, sliced
  • 1/2 tbsp castor sugar
  • 1/4 cup rice wine vinegar
  • 1/2 cup basmati or jasmine rice
  • 1 can coconut milk
  • 1 tsp ground cumin
  • 1 tsp ground coriander
  • 1 tsp ground turmeric
  • 1/2 cup canned tomatoes
  • 1/2 tsp brown sugar
  • 1/2 cup diced sweet potato (or use regular potato)
  • 1/2 cup frozen peas (or any other fresh or frozen green veg)
  • 1 bunch coriander

METHOD

Start this recipe 1 hour before serving time.

  1. Banana Peel: Peel the bananas. Slice off the tops and tails.*
  2. Place the banana peels into a large heatproof bowl with 1/2 tbsp salt. Cover with boiling water and leave to soak for 30 mins. This helps to tenderise the skins and they will change in colour from yellow to brown which is totally fine.
  3. Pickled Onion: While the bananas are soaking. Finely slice 1 onion and place into a glass or ceramic bowl with the rice vinegar, castor sugar and 1/2 a tablespoon of salt. Give it a stir and then set aside. Repeat every 10 minutes or so while you’re making the curry and the onions will turn a vibrant pink and tenderise by the time you’re ready.

Banana Peel Curry with Coconut Rice & Pickled Onion

  1. Remove the banana peels from the soaking liquid** and pat dry with a paper towel. Slice the peels finely into batons.
  2. Coconut Rice: Place the rice into a medium heatproof saucepan. Cover with enough cold water to reach 2-cm above the level of the rice, then add the coconut milk. Place over a high heat and bring to the boil. When it is bubbling, immediately turn the heat off and pop on a tight fitting lid and let it sit there***. The rice will continue to absorb any liquid while you prepare the curry.
  3. Banana Peel Curry: Heat a medium saucepan over a low heat. Add 1 tablespoon of sunflower oil, the cumin, coriander powder, and turmeric. Cook, stirring for 1-2 minutes to toast the spices, and then add the marinara sauce****.
  4. Add 1 tablespoon of crushed ginger and the banana skins, and cook, stirring over medium heat for 5 minutes.
  5. Add 1/2 a cup of vegetable stock or water and bring to the boil. Cook for a further 5 minutes or until the banana peels are tender.
  6. Add the sweet potato, frozen peas, coconut milk, and chopped coriander stems, and cook for another 2-3 minutes or until the veggies are cooked through. Finally, add the coconut milk and stir until combined.
  7. Serve with the coconut rice and pickled onion. Enjoy!

Banana Peel Curry with Coconut Rice & Pickled Onion

Notes:

  • *These can be composted. Save the banana flesh for another use (I’m thinking everyone’s favourite lockdown banana bread!).
  • **The minerals found in the banana peels such as potassium, phosphorus and calcium, will leach into the water. You can then use this liquid fertiliser for your plants.
  • ***I use my Mum’s absorption method trick to cook my rice and it works every time!
  • ****I’ve used 1/2 a cup of leftover marinara sauce with onion in it but you could easily substitute for 1 small onion and 1/2 a cup of crushed tomatoes.

Give this recipe a try and if you do be sure to tag #CookWithBrendon in your posts when you do!

I’m trying really hard to grow @cookwithbrendon on Instagram and now TikTok so if you have a second to visit and give both a follow I’d be so grateful.

Banana Peel Curry with Coconut Rice & Pickled Onion

Photo Courtesy & Recipe Copyright © 2021 | Brendon D’Souza (@cookwithbrendon)

BON APPÉTIT

– Brendon D’Souza

myTaste.com

Advertisement
Auguest 2019: Jialing Mew

Baked Brie with Rosemary, Honeyed Pear & Walnuts

Happy Auguest everyone! I’m Jialing and this is my 5th year as the grand finale for Amcarmen’s Kitchen’s Auguest series. I’ve learnt a lot in these past five years, but clearly not how to stop procrastinating.

Baked Brie with Rosemary, Honeyed Pear & Walnuts

I am at a friend’s wedding, typing away on my phone as quickly as I can while waiting for dinner to come out, moments before it is meant to go live (despite Allison having sent me daily reminders – sorry mate). If you, like me, frequently find yourself with many commitments, and little time, boy do I have a recipe for you! Having learnt from my previous Auguest blogs, this recipe uses just a few ingredients and equipment, and comes together in 15 minutes!

As a bonus, it is vegetarian friendly, and can be easily adapted to be gluten friendly, by swapping out the bread. But it’s not for vegans. Sorry. Please direct yourself to Auguest 2016 for my Poached Pears with Chocolate Chia Mousse if that’s what you’re after.

Baked Brie with Rosemary, Honeyed Pear & Walnuts Ingredients

PREP TIME 5 MINS | COOKING TIME 10-12 MINS | SERVES 4-6*

*Or one (1) very hungry Jialing.

INGREDIENTS

  • 200g Brie cheese
  • 3 pears
  • 2 sprigs rosemary
  • 1/4 cup walnuts
  • 2 tbsp honey

To serve

  • Strawberries
  • Crusty bread

METHOD

  1. Pre-heat oven to 180C (350F or gas mark 4) and line a tray with baking paper – this will help keep the honey from sticking to the surface when it caramelises!
  2. Cut pears into quarters, and lay onto the baking tray, leaving space for the brie cheese in centre.
  3. Place the unwrapped brie cheese in the centre of the tray and lay whole sprigs of rosemary on top.

Tip: Laying them on top rather than poking them into the cheese infuses the flavour without creating holes that the melting cheese will spill out of as it bakes!

  1. Pile walnuts gently on top of the rosemary sprigs, and drizzle the brie cheese and pears generously with honey.
  2. Bake for 10-12 minutes, until the brie cheese is soft and the honey just starts to bubble. As the honey cools it will caramelise the walnuts.
  3. Gently lift the brie cheese using spatula and place onto a cheese board. Arrange pears (careful, they’ll be hot too) and fresh strawberries around the brie cheese and serve immediately with fresh crusty bread. Enjoy!

Baked Brie with Rosemary, Honeyed Pear & Walnuts

Baked Brie with Rosemary, Honeyed Pear & Walnuts

And here we have a rather curious Winston.

Photo Courtesy & Recipe Copyright © 2019 | Jialing Mew

BON APPÉTIT

– Jialing Mew

myTaste.com

Auguest 2019: Marissa Mai

Seared Lemon Butter Scallops With Avocado Sauce

Hello beloved foodies! My name is Marissa and I run the Sydney Foodie Blog, also known as Maiyummyy. Today it’s such a pleasure for me to be invited to guest blog on Amcarmen’s Kitchen once again for the second time since Ally started her Auguest series in 2015.

For those who follow me over on Maiyummy on Instagram, you’ll know that my strong expertise is in Vietnamese cuisine. So good news! Today I will be sharing with you a new fusion recipe inspired by one of my favourite fruit, Avocado. This dish is called Seared Lemon Butter Scallops With Avocado Sauce, which is inspired by Rachael of Rachael Ray Every Day.

Da Nang, Vietnam

I grew up in Da Nang, one of the most popular coastal cities in Vietnam. It is a coastline city that stretches 30km long, famous for beautiful beaches, resorts, great climate, and a great source of fresh vegetables and seafood for the locals. The reason behind choosing this dish is because I always have a strong passion for seafood and fresh ingredients. We always cook seafood during family gatherings or during Vietnamese celebrations served with beer.

Scallops are considered quite rare to cook in Da Nang because it can be very pricey (like abalone) to catch, so we don’t get the chance to cook them often. The idea of this dish originated from this city, and it is simple, quick, and easy to cook; it is quite delicate and rich in texture.

Seared Lemon Butter Scallops With Avocado Sauce Ingredients

PREP TIME 15 MINS | COOKING TIME <10 MINS | SERVES 3

INGREDIENTS

For the scallops

  • 3 sea scallops
  • 2-3 garlic cloves, finely minced
  • 1 tbsp unsalted butter (I used 25% less fat Devondale Butter)
  • 1/4 tsp freshly ground black pepper
  • Pinch of salt
  • Zest from half a lemon

For the avocado-mayo sauce

  • 1/2 medium-sized avocado, peeled and pitted
  • 2 tsp free-range egg Traditional Creamy Mayonnaise (I used Praise brand)
  • Pinch of salt
  • Pinch of sugar
  • Zest from half a lemon

Optional

  • 2 red bird’s eye chillies
  • 2 stalks green shallots, chopped

METHOD

  1. Preparing the Sea Scallops: Wash the sea scallops clean under cold water, and thoroughly dry them with a paper towel.
  2. Season the sea scallops with a pinch of salt, ground black pepper, and lemon zest Let it sit and marinate for about 15 minutes before cooking.
  3. Avocado-Mayo Sauce: While waiting for the scallops to marinate, prepare the avocado sauce. Using a fork, smash the peeled and pitted avocado in a small bowl.
  4. Add the lemon zest and mayonnaise. Mix well and then season with a touch of salt and sugar to taste. Set aside.
  5. Cooking the Scallops: Melt the unsalted butter in a 12-inch pan (don’t use a non-stick pan), over medium-high heat.
  6. Carefully add the scallops to the sizzling hot pan, making sure that they do not touch each other. Immediately add the minced garlic to the pan.

Note: Do not add the minced garlic before putting the scallops in. This is to prevent the garlic from burning first.

  1. Sear the scallops for about 2 minutes on one side without disruption, until golden crust forms. Wait until the garlic turns golden brown, then remove them from the pan so that it does not burn.
  2. Using a tong, carefully flip the scallops and cook the other side for another minute. The center of the scallops should be slightly translucent. Overcooking will result in chewy and unpleasant texture.
  3. Plate up and Serve: Divide the avocado-mayo sauce into 3 white porcelain soup spoons arranged on a plate. Top with the seared scallops, chillies, and shallots.
  4. Serve immediately as a delicate entrée and enjoy!

Seared Lemon Butter Scallops With Avocado Sauce

Seared Lemon Butter Scallops With Avocado Sauce

Photo Courtesy & Recipe Copyright © 2019 | Marissa Mai

BON APPÉTIT

– Marissa Mai

myTaste.com

Auguest 2019: Brendon D'Souza

Potato Gnocchi with Red & Yellow Peppers

Hi Foodies, it’s Brendon D’Souza from @brendonthesmilingchef here.

It’s an honour to take part in Auguest once again this year at AMCarmen’s Kitchen. Allison and I met in Sydney a few years ago through Instagram, and then in-person at a food blogging event I hosted. Since then we’ve had countless foodie adventures together.

I started a food blog called Brendon The Smiling Chef around 2012, following the success of a recipe column of the same name. I wrote, styled, and photographed the recipes of my favourite dishes and reviewed some of my favourite restaurants and cafes. The blog continued to run until around 2016. I then focused on photography and a few other passions, worked for tech startups like Deliveroo and Tix and eventually landed a role at a global workspace provider. Earlier this year I launched my photography business Sydney Food Photography. I’ve been lucky to collaborate with some amazing brands like Samsung, OzHarvest and more.

Potato Gnocchi with Red & Yellow Peppers

When I received the theme for this year, I knew I wanted to take a playful twist on the definition of fruit. Potatoes are called pomme de terre in French which could literally translate to ‘apple of the earth’ and peppers (or capsicums as we call them in Australia), are also technically a fruit of the nightshade family (Solanaceae).

Gnocchi are delightful potato dumplings made with a few simple ingredients. They are one of my favourite comfort food this winter and pair very well with a tangy roasted pepper sauce.

Potato Gnocchi with Red & Yellow Peppers

PREP TIME 25 MINS | COOKING TIME 1 HOUR 30 MINS | SERVES 6

INGREDIENTS

For the gnocchi

  • 500g potatoes, skin on
  • 200g plain flour + extra
  • 1 free-range egg yolk, lightly beaten
  • Salt and pepper, to taste

For the peppers

  • 1 large red pepper, sliced
  • 1 large yellow pepper, sliced
  • 1-2 cloves garlic, sliced
  • 1-2 tbsp olive oil + extra

To serve

  • 250g cherry tomatoes, halved
  • Handful chopped parsley
  • Grated Grana Padano or other hard Italian cheese, to serve

Potato Gnocchi with Red & Yellow Peppers

METHOD

  1. Preparing the Potatoes: Place the potatoes in a large pot and cover with cold water. Place over high heat and bring to a boil. Continue to boil until cooked through. A knife should glide through the potato when it’s cooked. Remove from the heat and drain. Cover the potatoes with cold water and set aside to cool.
  2. Roasted Peppers: Pre-heat the oven to 180ºC/160ºC fan forced. Toss the peppers with a little olive oil and garlic slices. Spread in a single layer in a roasting pan and roast for 20-25 minutes until the peppers have softened and start to caramelise around the edges. You may need to stir the peppers in the pan while roasting. Remove from the oven and set aside.
  3. Potato Gnocchi: Once the potatoes have cooled, peel and then mash. Add the 200g of flour, egg yolk, salt and pepper and mix with a wooden spoon to form a pliable dough. If the mixture looks a little sticky, add more flour until it forms a ball. It will look and feel like play dough.
  4. Bring a large pan of salted water to a boil. Sprinkle a chopping board with some extra flour. Divide the dough into quarters and roll to form a 1.5cm thick sausage. Cut the sausage into 1cm thick slices with a sharp knife dipped in some cold water. This helps to prevent the dough from sticking. I like to make my gnocchi a little rough and leave them as discs.
  5. Cook the gnocchi in small batches for 2-3 minutes. They will float to the surface when they have cooked through. Remove to large heatproof bowl and toss with a little olive oil to prevent sticking.
  6. Add the roasted peppers, cherry tomatoes, and parsley to the gnocchi and toss to combine. Drizzle with olive oil and grated Grana Padano to serve and enjoy!

Potato Gnocchi with Red & Yellow Peppers

Optional extra: I love the taste and texture of pan-fried gnocchi. To do so, heat a frying pan over a medium-high heat. Add 1 tsp butter and a drizzle of olive oil. When hot, add the gnocchi in batches and sauté until golden brown.

Potato Gnocchi with Red & Yellow Peppers

Check out my foodie adventures on Instagram at @brendonthesmilingchef

Photo Courtesy & Recipe Copyright © 2019 | Brendon D’Souza

BON APPÉTIT

– Brendon D’Souza

myTaste.com

Auguest 2019: Shazrinah Shazali

Dark Chocolate Açaí Tahini Tart with Mixed Fruit Mountain

Indulgences can be sinful and healthy. A mixture of sweet, bitter and salty goodness combined into what may seem to be regular dark chocolate tart, is sure to give your guests a delicious and tantalising surprise.

PREP TIME 25 MINS | COOKING TIME 10 MINS | SERVES 6-8

INGREDIENTS

For the crust

  • 2 packets of Oreos
  • 2 tbsp tahini
  • 2 tbsp unsalted butter OR 4 tbsp coconut oil
  • Pinch of Himalayan salt

For the filling

  • 340g dark chocolate (70%)
  • 1/2 cup whipped cream OR coconut cream
  • 1/2 cup fresh or frozen açaí berries*, blended
  • 1/4 cup maple syrup (optional)
  • 2 tbsp unsalted butter OR 4 tbsp coconut oil
  • 1 tbsp vanilla essence
  • Pinch of Himalayan salt

* If using frozen açaí berries, thaw first before blending.

Dark Chocolate Açaí Tahini Tart with Mixed Fruit Mountain

Tip: Switch out the butter for coconut oil and whipped cream for coconut cream to easily make this tart vegan and dairy-free friendly. Use vegan-friendly maple syrup or other substitute sweeteners, and of course a vegan biscuit/cookie base. Also, while most dark chocolate brands are vegan-friendly, it’s best to check for those that do/do not contain any whey or dairy in them.

METHOD

  1. Crust: Preheat oven to 180C.
  2. Blend the Oreos, unsalted butter, Himalayan salt, and tahini together in a food processor.
  3. Transfer the blended mixture to a 10” tart tray and bake for 10 minutes. Once done, set aside to cool before filling the tart.
  4. Filling: Heat dark chocolate, unsalted butter, whipped cream, and maple syrup in a saucepan at a low to medium flame until melted and well combined.
  5. Once melted, mix in the vanilla essence, blended açaí berries, and salt.
  6. Take off the heat and then pour into the crust.
  7. Even out filling and chill in the fridge overnight to set.
  8. Finishing: Top with fruits of your choice to add freshness and volume to your tart. In this case, I used a medley of mangoes, kiwis, blueberries, and cherries. Serve and enjoy!

Dark Chocolate Açaí Tahini Tart with Mixed Fruit Mountain

PS: Ally here! Before we end tonights post, please read this article on the Goddess behind Fuel’d, who is none other than Shaza!

Photo Courtesy & Recipe Copyright © 2019 | Shazrinah Shazali

BON APPÉTIT

– Shazrinah Shazali

myTaste.com

Pineapple Coconut Braised Pork Ribs

Pineapple & Coconut Braised Pork Ribs

I am Justine Michael (JM) De Guzman. A 26-year old Information System Developer and a very passionate home cook from the humble town of Limay, from the province of Bataan. I worked at a Government agency as a System Developer, had a break due to burnout, and that’s when I started focusing on my kitchen (which will soon be a little less, because I’m about to get back on my career track).

How did I get into cooking and food? Well I don’t exactly know when, but all I can remember was ever since I was a little boy, I used to lurk around with my mom, aunties, and Lola in the kitchen. While other kids of my age play outside, I on the other hand was busy buzzing around my mom’s kitchen staff. I used to ask a lot of questions about how our food was done. I would always insist on chopping and slicing the ingredients for our lunch. And I would be the first to ‘tikim’ (taste) my Lola’s dish. Yeah, since childhood, I was into food and cooking. I’m always present when and wherever there’s food.

Though I never really had the opportunity to pursue my passion in cooking until I graduated college, my parents wouldn’t allow me to enroll into culinary or any related program because it’s ‘mahal’ (expensive). We were financially unstable during those times. My mom had cancer, and thank God she’s a very lucky and blessed survivor up to this moment. Going back to the story, it was actually my dentist who became my stepping stone on getting into the real world of cooking. Long story short, she has a sister, who happened to be a celebrity chef who resides in Manila, who is also a lecturer at a premier culinary institution in the country. She endorsed me to her for a scholarship grant given by the said school. So I got in, studied, and trained for months. Voilà!

After my culinary training, an opportunity came, not in the cooking industry though, so I still haven’t really experienced cooking for a living. That’s when I started my career in my field of profession (information system). I worked at the office, but my passion, or should I say obsession for cooking never faded. I’ve been known by my colleagues as the guy who cooks and the guy who has baon (packed food) 🙂 Food became my motivation for work. I always wonder what to cook for dinner when I get home, and for my baon for tomorrow’s lunch.

I began exploring different cuisines, by researching through the web, books (I started collecting books about food), food channels, etc. Aside from food and cooking, my other fascinations include history (Asian history), linguistics, society, and culture. I started to appreciate our food, Filipino food – Southeast Asian food, and those are great factors that shaped up my style and way in cooking. I developed my standards, philosophy, and list of ‘musts’ in my cooking. I rarely cook foods these days that are Western in my point of view. I’m so patriotic. Ingredients should always be fresh and sourced by me. LOL. Ingredients that can be made from scratch must never be substituted with industrially manufactured ones (I hate sinigang mix!). You’ll never see stuff like tomato sauce, sinigang mix, and stew mix, etc. in my pantry.

Pineapple & Coconut Braised Pork Ribs

If I remember it right, I started following Amcarmen’s Kitchen’s IG posts since last year. I really love her content and I frequently visited her blog as well. It was on the first day of May this year when I received a message from her asking about my interest in being part of her Auguest series.

The dish I’m sharing is of my own creation That said, this isn’t a traditional and commonly home cooked dish in most Filipino households. I’ll just call it Pineapple and Coconut Braised Pork Ribs. Before diving into the recipe, let me share some insights about this dish. As I’ve mentioned before, I have these so called “standards, philosophy, and musts” in my cooking. As much as I can, I don’t use industrially manufactured ingredients, so this dish uses fresh pineapple (but you guys can use the canned one, it’s just me. LOL.).

My philosophy in cooking:

You shouldn’t cook or eat food just to survive or satisfy your hunger. For me food must be respected, consumed, and celebrated every time, along with the stories it underlies with. That’s why it’s important for me to know the background and the story behind one dish. Like why this is cooked this way, why these ingredients are used, etc.

Fun fact, I have this odd habit, just before we eat at home, I first gather the attention of everyone. I weirdly and literally discuss the dish we have on the table, the name, and the ingredients, how I cooked it, what’s its origin (if it’s a traditional dish), my reasons and inspiration of coming up with the dish if I just made it out of creativity and imagination, the taste profile, etc. Just like you do it in a culinary school. Only after that will then they’re allowed to eat. LOL. It’s weird right?! But it’s true. No kidding aside.

Again, this is not a traditional Filipino food per se, but I still call it Filipino food. When we say Filipino cuisine, we’re basically dealing with food that’s been shaped by various factors. Culture, beliefs, traditions, religion, local and indigenous ingredients, influences locally, and internationally. Pinoy foods’ characteristics show strong Southeast Asian/Malay, Chinese, Spanish, and Indigenous influences. I always use them in reference whenever I’m developing a dish, just so that I could come up with a more meaningful one. Like, when I think of an ingredient(s) to be used for my dish, I always make sure, it has to be significant to one’s culture or tradition. I wouldn’t use jalapeño or habanero pepper for my Bicol express, simply because it’s not native nor a traditional Filipino ingredient. You get my point, right? LOL 🙂 I always make sure that each ingredient used is there for a reason; it’s not just there because I want it to be there.

So, Pineapple and Coconut Braised Pork Ribs. As the name implies it’s pork braised in a sauce base with pineapple and coconut cream. Why pork ribs? Well, we Filipinos love our pork. Right? Who doesn’t love pork ribs! Pineapple is my hero ingredient. This is a very common ingredient used in Filipino cooking, and I’ve seen lots of traditional dishes that use it as the base or just a “sahog” (topping). My mom would add juice from a pineapple in her caldereta and hamonado dishes, and fresh chunks in her curry. Then we have coconut. What represents Southeast Asian/Pinoy food more than coconut? I’m a huge fan of gata, and I often cook dishes with gata as its base. It is a shared ingredient among ASEANs. The aromatics I used were shallots, garlic, and ginger – the Filipino mirepoix 2.0 as I call it, as 1.0 being the forever trinity of tomatoes, shallots, and garlic. I added spices into it, which is not a very common practice among Filipino cooking, aside from our ultimate spice known as “black pepper” to give it the curry-like flavour profile – black peppercorn, chillies, coriander, star anise, bay leaves, and cinnamon. For the seasoning, I used a balance of both fish sauce and soy sauce. In addition, since this is a sweet-tangy-savoury dish, I added “panutsa” or unrefined block sugar (but seriously brown sugar’s fine).

Pineapple & Coconut Braised Pork Ribs Ingredients

PREP TIME 30 MINS | COOKING TIME 45-60 MINS | SERVES 5-6

INGREDIENTS

  • 1 & 1/2 kg pork spare ribs, cut into individual ribs
  • 1 whole large fresh pineapple, divided
  • 200ml (approx. 3/4 cup) juice from half of the pineapple
  • 4 & 1/2 cups coconut cream
  • 6 red bird’s eye chili, finely minced
  • 6 shallots, finely minced
  • 2 bay leaves
  • 2 star anise
  • 1 cinnamon stick (or alternatively, 1 tbsp cinnamon powder)
  • 1/2 bulb garlic, finely minced
  • 6 tbsp panutsa or brown sugar
  • 4 tbsp ginger, finely minced
  • 1 & 1/2 tbsp coriander powder
  • Fish sauce, to season
  • Salt & pepper, to taste
  • Soy sauce, to season

METHOD

  1. In a large wok (kawa) over high heat, sear the ribs until browned and develops a crust on all sides. Set aside.
  2. Turn the heat down to low and add a portion of the coconut cream (about 1/4 cup) into the wok. Simmer until the coconut oil separates from its curd.
  3. In the now separated coconut oil, sauté the finely minced aromatics (shallots, garlic, and ginger) altogether. Sauté until aromatics are translucent.
  4. Turn the heat up to high. Return the seared pork ribs back to the wok and then pour in the pineapple juice, remaining coconut cream, all the spices, soy sauce, and fish sauce.
  5. Cover, bring to a medium boil, and then immediately turn the heat down to low.
  6. Meanwhile, in a medium heated pan, sear the cubed pineapples until browned and caramelized.
  7. For the last 15 minutes of simmering, add in the seared pineapple. Simmer the dish uncovered, just until the pineapple has absorbed the sauce. Season with salt and pepper to taste.
  8. Serve with steamed white rice. A little bowl of patis (fish sauce) with crushed chilies is a good accompaniment to this. Enjoy!

Pineapple & Coconut Braised Pork Ribs

You can technically call this dish “ginataan”, and you might also find resemblance with hamonado because of its “fruitful” ingredient – pineapple and a hint of “curry-ness” from the added dry spices.

I hope you’ll like this recipe.

Photo Courtesy & Recipe Copyright © 2019 | JM de Guzman

BON APPÉTIT

– JM de Guzman

myTaste.com

Auguest 2019: May (my_kusina_ph)

Green Papaya Salad with Crispy Fried Soft-shell Crabs

Hello everyone, my name is May. I am behind the IG account @my_kusina_ph. I normally feature Filipino food and I love using “bilao” as my plating dish, hence, the hashtag #bilaoserye for some of my home-cooked meals. It was last August since I started my IG food account, almost a year now. My friends encouraged me to set one up as they know how much I love to cook (because I have been cooking for them a lot! Lucky them!). So I said to myself, why not give it a try!

When I was a kid, my lola (grandmother) and mother, both true blooded Kapampangans (Kapampangans by the way are known to be one of the best Filipino cooks) would ask me to help out in the kitchen by washing utensils and chopping ingredients. At that time, I felt it was more of a chore. Later on in high school, I find myself enjoying my “me” time in our little kitchen, experimenting and trying out recipes (I’m having goosebumps right now as I remember my aunt’s handwritten recipe book). I guess that’s when my love for cooking started.

Green Papaya Salad with Crispy Fried Soft-shell Crabs

Through IG, I have met people who share the same passion in cooking and food in general. They have inspired me to become a better cook. Most of them are generous enough in sharing their recipes! Allison is one of the warmest people whom I’ve met virtually in IG. I wish to meet her in person someday! She would post the ingredients and let us guess what she would be cooking next. Often times, she would feature a particular ingredient and highlight how it can be used in a certain dish. I am very happy to be part of her “Auguest” series!

This month, her blog would be featuring fruits. I chose to feature green papaya since it’s very accessible in tropical countries like the Philippines.

Back home in the province, we would just pick this fruit from our farm anytime we needed one for cooking. Here in Manila, everything comes with a price, unless you have a tree in your backyard or a generous neighbor has one. Here’s a photo of our papaya tree:

Papaya Tree

I have travelled around Asia and whenever I visit a country, I make it a point to enrol myself on short cooking courses to learn more about the local cuisine. I love the diversity in Asian cuisine; the way various spices and herbs come together to create a glorious dish!

Green Papaya Salad is a well known Asian salad dish. It’s a spicy salad made from shredded unripe papaya. In fact, it is present in most Southeast Asian cuisines. In Thailand, this dish is called Som Tam, in Cambodia, Bok L’hong, in Laos as Tam Som and in Vietnam as Gỏi đu đủ.

PREP TIME 15 MINS | COOKING TIME | SERVES 3

INGREDIENTS

For the green papaya salad

  • 200g green papaya, shredded
  • 40g carrots, shredded
  • 6 string beans, cut into 2 inches long
  • 4 cloves garlic
  • 1-3 red bird’s eye chilis, chopped
  • 1-2 stalks of Coriander leaves
  • 1 tomato, sliced
  • 6 tbsp roasted peanuts, coarsely crushed
  • 3 pcs Crispy Fried Soft-shell Crabs*

For the dressing

  • 7 tbsp freshly squeezed lime juice
  • 7 tbsp Thai fish sauce
  • 5-7 tbsp coconut sugar

*To cook the soft-shell crabs, dredge them in seasoned flour with salt, then dipped in beaten egg, and lastly coated with flour. Deep fry in cooking oil until golden in color and crispy.

METHOD

  1. First, add the chilis, garlic cloves, and string beans together in a mortar. Lightly crush/pound.
  2. Add in coconut sugar, fish sauce, lime juice, and mix well, adjusting the flavors as you work, to your liking.
  3. Lastly, add in shredded papaya and carrots. Mix well.
  4. Transfer to a serving dish, and top with roasted peanuts and crispy fried soft-shell crabs. Garnish with coriander leaves. Serve.

Below is a photo of the tool I used for shredding the papaya and carrots. Easy to use. I got it from one of my market tours in Vietnam and it only costs Php 100!

Vegetable/Fruit Shredder

Here’s the finished product!

Green Papaya Salad with Crispy Fried Soft-shell Crabs

Enjoy this healthy salad dish! Oh, you can top it with shrimp if you can’t find soft-shell crabs!

Photo Courtesy & Recipe Copyright © 2019 | May (my_kusina_ph)

BON APPÉTIT

– May (my_kusina_ph)

myTaste.com

Auguest 2018: Jialing Mew

Waffles with Oven-fried Adobo Flakes

Welcome to part two of my Auguest feature! A few days ago I shared a tried-and-true vegan and gluten-free sweet recipe, and now that I’ve gotten that out of the way, we’re taking a very tasty trip to the other side of the delicious breakfast spectrum. I’m using this second recipe as a chance to make something I love but haven’t tried cooking myself before: adobo flakes! True to form (Allison reminded me that I do this every year… yikes), I left it to the last available minute, but worry not, because it actually worked out better than I expected! I did originally intend to turn this into a Filipino twist on fried chicken and waffles, but the adobo flakes turned out so fantastically that I couldn’t bring myself to make them share the spotlight. Please note that my poor time management was completely unrelated to this decision. However I do still highly recommend the waffle pairing, because I did eat them that way, and let me tell you, it was DIVINE. That isn’t even a word I use regularly, but it does so accurately describe the marriage of the saucy crispy chicken and fluffy golden waffles.

Oh, and I’m pleased to announce that all the liquid-cooking techniques from my past recipes came in very handy for the first part of this recipe.

Waffles with Oven-fried Adobo Flakes

Waffles with Oven-fried Adobo Flakes

PREP TIME 10 MINS* | COOKING TIME 1 HOUR | SERVES 4

*Not including marination time of minimum 2 hours or maximum overnight for a more intense flavour.

INGREDIENTS

For the marinade

  • 1 & 1/2 cups white vinegar
  • 1/4 cup soy sauce
  • 3-4 dried bay leaves
  • 3 red chillis, with just the tops cut off
  • 1 head garlic, lightly crushed to remove skins
  • Generous amount of cracked black pepper
  • 1/2 kg chicken breast fillets (about 2 large breast pieces)
  • 1 can coconut milk
  • Canola oil spray

METHOD

  1. Combine marinade ingredients in a large bowl and marinate chicken for at least 2 hours, or over night to really intensify the flavour.
  2. Transfer marinade and chicken into a pan on medium heat, and cook, uncovered, turning chicken every so often. The vinegar will boil away and smell quite acidic – be prepared!
  3. Preheat oven to 200C (180C fan forced or 400F or gas mark 6), and line a large baking tray with grease proof paper. In the meantime, remove chicken from the pan once cooked through (about 10-15 minutes) and set aside in a large bowl.
  4. Add coconut milk to pan and bring down to a simmer. The sauce will reduce to a thicker consistency after about 15-20 minutes. Once thickened, remove from heat and discard the bay leaves (and chilli if you don’t want to eat it) – the garlic will have fallen apart and any leftover chunks will melt in your mouth.
  5. While the sauce cooks, why not get to work shredding the chicken! I like to grip a piece on one end with tongs and rake a fork through the meat going with the grain, working my way up.
  6. Once the chicken is well shredded, evenly distribute onto the baking tray (I did one breast per batch), and generously spray with canola oil and give the tray a shake to even the coat.
  7. Place into the oven for 10 minutes, then increase the temperature to 220C. If the chicken looks like it’s browning more quickly in certain spots, take it out and redistribute the flakes, then return to oven and bake for another 10minutes.
  8. Now get your waffles ready – I usually make one big batch and keep some in the freezer, then just defrost for a quick breakfast option! Putting them in the oven just after you take out the chicken and toasting them in the residual heat makes them a little bit crispy on the outside – yum!
  9. Once ready, heap a little mountain of of adobo flakes onto your waffles, finishing off with a generous drizzle of sauce, and serve straightaway. You can thank me later.

Waffles with Oven-fried Adobo Flakes

Waffles with Oven-fried Adobo Flakes

Photo Courtesy & Recipe Copyright © 2018 | jialingmew

See you all next August!

– Jialing

myTaste.com

Auguest 2018: Jialing Mew

Mango Pudding with Coconut Sago

Happy Auguest everyone! I’m back for my fourth year running, and I’ll be taking over Amcarmen’s Kitchen with two South-East Asian inspired breakfast recipes this week. For once, Allison has chosen a theme that I could easily get on board with (those of you who suffered through 2016’s vegan Auguest with me know my pain). But thanks to my mom I have been a professional breakfast-eater since 1991, so trust me when I say that THIS is my area of expertise! If you don’t believe me, ask the former breakfast-skippers at my office who were inspired by my morning meals 😉

The great thing about breakfast is that it can be whatever you want it to be: simple or complex, savoury or sweet, hot or cold, vegan food or normal people food… I could go on. So for today’s recipe I’ll be sharing one of my favourite breakfasts to eat during summer weekdays, though it can be enjoyed at any time of the year. I like to prepare this on Sunday so that I (and my boyfriend/colleagues/innocent bystanders) stay safe from my hangriness for the rest of the week.

Throwing it back to 2016 with a vegan (you heard me!) recipe where we start out with…

Boiling coconut milk.

Classic.

Mango Pudding with Coconut Sago

PREP TIME 1 HOUR | COOKING TIME  | SERVES 6

INGREDIENTS

  • 1 cup fresh mango, finely diced
  • 1 can lychees drained, reserve syrup

For the Mango Pudding

  • 2 cups coconut milk
  • 2 cups frozen mango
  • 1/4 cup reserved lychee syrup
  • 2 tsp agar agar powder (check your local Asian supermarket)

For the Coconut Sago

  • 2 & 1/2 cups coconut milk
  • 1/2 cup reserved lychee syrup
  • 1/2 cup tapioca pearls (sago)
  • 1 tsp vanilla
  • Pinch of salt

Optional

  • Coconut flakes
  • Fresh Mango chunks

METHOD

  1. Set aside 6 lychees to garnish. Chop remaining lychees into smaller pieces. Divide chopped mango and lychee between 6 glasses or containers. Set aside.
  2. Mango Pudding: Purée 2 cups frozen mango with 1/4 cup reserved lychee syrup until smooth.
  3. On medium heat in a sauce pan, combine agar agar powder and 2 cups coconut milk, stirring until the mixture boils.
  4. Remove pan from stovetop and stir in the mango purée, making sure the mixture is well combined.
  5. Divide mixture between the 6 glasses, carefully pouring to cover the fruit chunks. Place in refrigerator to set while making the coconut sago.
  6. Coconut Sago: Combine all the ingredients in a sauce pan over low heat, stirring constantly until tapioca pearls have absorbed most of the liquid and doubled in size – approximately half an hour, depending on your stove.
  7. Take the mango pudding out from the fridge and spoon the tapioca into each glass, then top with the remaining whole lychees, and optional coconut flakes and mango chunks.
  8. Serve immediately if you’d like it warm, or return to the fridge to chill for at least an hour for a more summer-appropriate dish!

Mango Pudding with Coconut Sago

Mango Pudding with Coconut Sago

Photo Courtesy & Recipe Copyright © 2018 | jialingmew

Enjoy x

– Jialing

Auguest 2018: Brendon D'Souza

Easy Avo Toasts

Hi Foodies! My name is Brendon D’Souza and I run the Sydney Food and Lifestyle Blog known as Brendon The Smiling Chef. I’m so honoured to be guest-posting here at AMCarmen’s Kitchen once again for the third time since Ally started her Auguest series.

In between running a busy collaborative workspace in the heart of Sydney, and a number of side hustles, I love developing fresh and tasty recipes that you will love to cook. Think comforting winter roasts, colourful salads, decadent desserts and much more!

Easy Avo Toasts

Sydney will forever be known as the home of over-glorified Avocado Toast for breakfast (or “brekkie” as we like to call it), and you will always find a variation of this simple recipe at any cafe or restaurant.

Treat your friends to a gorgeous breakfast feast that’s actually super easy to prepare. This is a great recipe for children to make too!

Easy Avo Toasts

PREP TIME 5 MINS | COOKING TIME — MINS | SERVES 1

INGREDIENTS

  • 2 slices multigrain bread
  • 1 large ripe avocado
  • 2 tsp olive oil

METHOD

  1. Toast the bread to your liking.
  2. Carefully peel the avocado and remove the stone.
  3. Use a spoon to scoop out the flesh and slice.
  4. Drizzle the toast with olive oil and top with the sliced avocado and season with a touch of salt and pepper. Serve and enjoy!

Brendon’s Tips

  • Jazz up your Avo Toast with a selection of your favourite ingredients.
  • Try smoked salmon, crispy bacon, fried eggs, rocket, feta, sliced cucumber, cherry tomatoes, roast beetroot or even fresh berries.

Easy Avo Toasts

Easy Avo Toasts

Check out my Instagram @brendonthesmilingchef to keep up do date with all my adventures.

Photo Courtesy & Recipe Copyright © 2018 | brendonthesmilingchef

Happy cooking and keep smiling,

– Brendon (Brendon The Smiling Chef)

myTaste.com