Auguest 2018: Simon Swadling

French Toast with Red Wine Pears

I’ve always loved breakfast, and French toast was actually one of the first things I started making and teaching myself. It’s probably the start of me really getting into food and it becoming my passion – I loved making making either savoury style (parsley and parmesan with bacon) or the more traditional sweet one.

My love of breakfast foods has ended up becoming a family tradition that on long weekends or holidays we will often start off with a fancy brunch/breakfast made by me. This French toast recipe is what I came up with for Mothers day this year, as sweet French toast is my mum’s favourite breakfast. It has some autumnal vibes with the maple and mulled wine flavours, but really the base recipe of the French toast can be paired with any number of different things, so feel free to go off script and try something different!

French Toast with Red Wine Pears

PREP TIME 15 MINS | COOKING TIME 45 MINS | SERVES 4

INGREDIENTS

For the French toast

  • Loaf of Brioche bread (the batter will do enough for 4 large slices)*
  • 2 large free range eggs
  • 3/4 cup full cream milk
  • 2 tbsp brown sugar
  • 1 tsp vanilla extract
  • 1/2 tsp ground cinnamon
  • 1/4 tsp nutmeg, freshly ground
  • Zest of half an orange

For the poached pears

  • 1 cup red wine
  • 1 cup water
  • 2/3 cup caster sugar
  • 1/2 cup orange juice
  • 4 cloves
  • 4 small Corello pears**
  • 1 cinnamon stick

For the maple mascarpone

  • 1 tub (250g) mascarpone
  • Maple syrup, to taste
  • Dry meringue pieces
  • Fresh raspberries, or any other berries that you like

*If your brioche bread hasn’t been pre-cut (which is ideal), then cut the brioche into thick rectangular pieces. This means that you’ll get a crispy outside, custardy outer layer, and still some fluffy brioche in the middle.

**If you can’t get your hands on the small pears, use 2 large pears and serve each slice with half a pear instead.

METHOD

  1. Poached Pears: Combine all the ingredients for the poached pears into a medium-sized saucepan. If the pears aren’t fully covered, then ensure to turn them around every few minutes to get an even colour and even cooking all around. Timing will depend on the ripeness of the pears so simmer until soft when tested with a knife.
  2. Remove the pears, and continue to boil down the poaching liquid until reduced to a syrup-like texture. You may prepare the pears the day before and then warm them through before serving.
  3. Maple Mascarpone: Mix the mascarpone in a bowl to soften and then add about a tablespoon of maple syrup. Adjust to your own personal liking. Set aside in the fridge.
  4. French Toast: Add all the ingredients, except the brioche bread in a shallow dish and mix well until combined.
  5. Heat up a medium-sized frying pan with a knob of butter and a bit of oil on medium heat.
  6. Dip the brioche slice in the egg mixture on each side and allow it to soak a little.
  7. Fry the slice on each side until golden, about 3 to 4 minutes. Repeat for the remaining slices.
  8. Assemble: Cut the pears in half. Place the French toast on a plate with the pears on top. Crumble the meringue over and serve with fresh raspberries, and a scoop of the maple mascarpone.
  9. Finally, drizzle over a bit of the poaching syrup from the pears and enjoy!

French Toast with Red Wine Pears

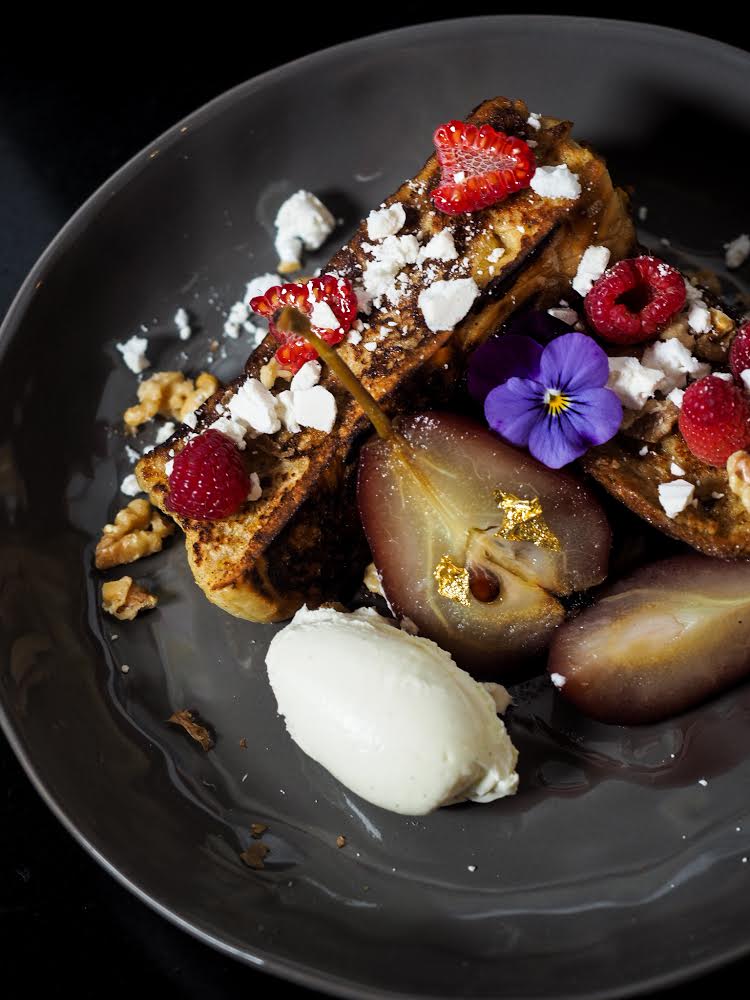
Photo Courtesy & Recipe Copyright © 2018 | thebeardedpatissier

– Simon (The Bearded Patissier)

myTaste.com

Auguest 2018: Wendy Chok

Rustic Bread: PMS Toast

It’s me Wendy, back for another recipe to share! The last time I was on here I shared a recipe for homemade Rustic Bread and a savoury Pizza Toast brekkie with everyone. This time I will be sharing what I like to call ‘PMS Toast’ which I will explain further in a while. I also shared a little bit about myself, and my love for food, so now I will share about how I know Ally on a personal level.

I met and got to know Ally about 3 years ago through work. She was one of my team members in our Marketing team for an Advertising and Event Management firm that we both worked at. We became very close friends and still even so after having left the company because we have the same level of random craziness, vibe, and of course our love for all things food.

Amcarmen's Kitchen & Peek A Pastry
Peek A Pastry & Amcarmen’s Kitchen

We share a special kind of bond at work and it might be because we spend a lot of time together, at work of course, for a lot of event events, working late at night on occasions, have food together in the office whether breakfast, lunch, snack time or dinner time, and enjoy great food together in celebration for when we’ve successfully finished every event that we’ve worked on. I love our team because we always had each other’s backs and we just simply complement each other well.

I know that Ally wants to pursue her dream to participate in MasterChef Australia and I am using all my power on law of attraction to make it happen. I will see Ally in MasterChef Australia one day and tell my kids or grandkids that “that is my friend!”

Moving on – I am not a sweet tooth but when the time (PMS) comes, nothing is sweet, what is sweet? How do you spell sweet? C-A-L-M is how you spell sweet. When you are cranky and tired, you just crave for something sweet, something sugar loaded and warm. So here I present you two fast and sweet breakfast ideas to hit my spot, and hopefully yours too.

PMS Toast: Cinnamon Everything Toast

PREP TIME 5 MINS | COOKING TIME 10 MINS | SERVES 1

INGREDIENTS

  • 2 slices of homemade Rustic Bread
  • 1 tbsp brown sugar
  • 1 tbsp unsalted butter, at room temperature
  • 1 tsp ground cinnamon (2 teaspoons for me, the cinnamon lover)

METHOD

  1. Place the butter in a small heatproof bowl and melt in the microwave for about 20 seconds. Make sure that it is not too liquidy as you want those buttery chunks on your toast. I like it rustic on this rustic bread.
  2. Mix all the ingredients together and smother it all over the toast.
  3. You can either bake it or toast it on a pan. Bake it at 240C (475F or gas mark 9) for 10 minutes, just enough time for everything to crunch up. If you like it toasted in a pan, face the side, which is smothered by the cinnamon paste down on the pan, and sear it for 2 minutes over medium heat.
  4. Serve and enjoy with a hot cup of coffee for breakfast or even as a nice afternoon snack!

Rustic Bread: PMS Toast

PMS Toast: Butter & Sugar Toast

PREP TIME 5 MINS | COOKING TIME 10 MINS | SERVES 1

INGREDIENTS

  • 2 slices of homemade Rustic Bread
  • 1 tbsp unsalted butter, at room temperature
  • 1 tsp granulated white sugar

METHOD

  1. Smear the butter over the toast and sprinkle the top with white sugar.
  2. Bake it at 240C (475F or gas mark 9) for 10 minutes.
  3. Serve and enjoy with a hot cup of coffee for sweet start to your morning!

Short and sweet, just nice for a woman who is PMS-ing. Men take note!

Rustic Bread: PMS Toast

Before I say goodbye to everyone on Amcarmen’s Kitchen, I would like to thank Ally for giving me this opportunity to write on her well-established blog. I hope that my recipes are not too shabby and please dive in to my rustic way of cooking!

Photo Courtesy & Recipe Copyright © 2018 | peekapastry

– Wendy (Peek A Pastry)

myTaste.com

Auguest 2018: Wendy Chok

Rustic Bread: Pizza Toast

Hello to all amcarmenskitchen’s readers! I am Wendy, a petite woman in my mid 20s; and of course, I love baking and cooking. For me, spending time in the kitchen is just so therapeutic and satisfying, especially when you get to enjoy the food you’ve made after long hours of preparation. Additionally, I have this motherly instinct to feed people with a lot of food, and whenever someone tells me that the food that I make is delicious and would like to have it again next time around, I feel like I’ve won the title of Brunei’s MasterChef!

I recently started up a blog known as Peek A Pastry, however I haven’t been very active in updating it. I still cook and bake frequently, and have posted a few of my successes in the kitchen over on my Instagram page – @peek.a.pastry. Ally was actually the one who encouraged me to take the first step in opening up a blog, and so I did even though I simply just couldn’t commit to it. After given the opportunity to write down my recipes for Ally’s blog for my guest posts for this month, I got the feel of what it was like to write for a blog and this might very well the kick I need for me to start penning down my recipes and actually write!

Before I share with you my savoury breakfast idea in the form of a Pizza Toast, I’m going to share with you my recipe for Rustic Bread as the base for this toast. Of course, feel free to get store-bought bread too. Note: bake your bread the night before so that you’ll have it ready for a quick brekkie fix the next morning!

Rustic Bread

Rustic Bread: Pizza Toast Method

PREP TIME 2 HOURS 30 MINS* | COOKING TIME 50 MINS | MAKES 1 LOAF

*Allow for an additional 12 hours for dough to rise overnight

INGREDIENTS

  • 3 & 1/3 cups plain flour
  • 1 & 1/4 cups water, at room temperature
  • 2 tsp of salt
  • 1/8 tsp yeast
  • 1/2 cup boiling water (when baking)

METHOD

  1. In a large bowl, mix the plain flour, salt, and yeast together until combined. Slowly add in the room temperature water into the flour mixture until the dough starts to become sticky, just like the texture of slime. It’s okay to have a little bit of lumps in the mixture, but make that it is not too lumpy. Cover the bowl with cling wrap and let it rest at room temperature for about 20 minutes.
  2. After 20 minutes, fold the dough by wetting your hands and scoop them by the edge; palm facing you and fingers under the dough, pull it upwards and flip it across, as if you are helping a baby with his or her napkin. Pull and flip for about 5 times in total for every edge of the dough in the bowl. Set aside and let it rest for a further 20 minutes and repeat this action for another 3 times (four folds in total). Along way, your dough will rise a little, but not too much.
  3. After the fourth and last fold, rest the dough for 12 hours overnight.
  4. After 12 hours the next morning, you will see that your dough has risen and bubbling like crazy! Place a piece of parchment paper over a baking tray and lightly sprinkle a bit of plain flour atop as well as on the dough.
  5. Scrape the edges of the dough with your fingers so they will come out from the bowl easily and onto the parchment paper. Sprinkle some more flour on top of the dough and start to fold again.
  6. Start shaping the dough by cupping the bottom of the dough. Cup and twist until you get a nice round shape. At this point your dough should be feel supple and bouncy. Use your finger and slightly press on the dough and release. It should recover back to its initial shape instantly.
  7. Grease a large clean heatproof bowl and transfer the dough, together with the parchment paper underneath it to the bowl. Cover using a clean kitchen towel and let it rest in the bowl for another 50 minutes before baking it.
  8. Preheat the oven at 230C (450F or gas mark 8), add the boiling water into a small heat-proof bowl and place into the oven. Then place dough in the bowl into the oven and bake for 50 minutes.
  9. Once done, remove the bread from the oven. Remove from the bowl and leave to cool down for at least an hour on an elevated rack before slicing into it. Brush off excessive flour on top.

Rustic Bread: Pizza Toast

Rustic Bread: Pizza Toast

And now your Rustic Bread is ready to be topped with your favourite toppings! Follow the recipe below for a delicious Tuna Chunk Pizza Toast!

Rustic Bread: Pizza Toast

PREP TIME 5 MINS | COOKING TIME 15 MINS | SERVES 3-4

INGREDIENTS

  • Diced red onions
  • Mayonnaise
  • Parmesan cheese
  • Pineapple bits
  • Rustic bread slices
  • Tomato paste
  • Tuna chunks in olive oil (or you can use any tuna you want)
  • Unsalted butter

METHOD

  1. Spread the butter generously at the sides of the bread to give it a crunchy bite.
  2. Smother the tomato paste at the centre of each slice and start rustically building up all your toppings. Put as much as you like – I like to put tuna first then pineapple bits, followed by the diced onions. Season it with Parmesan cheese and finish it off with dollops of mayonnaise here and there. Bake them for about 15 minutes at 240C (475F or gas mark 9).
  3. Once done, serve and enjoy with a hot cup of coffee!

Rustic Bread: Pizza Toast

I am a savory person and I love everything savory. It might be because I’m Hakka (one of the Chinese dialects). Just to give you a little bit of imagination when you bite into this toast, let me paint a picture of it for you. Imagine as you take that first bite into the crunchy edge of the toast before everything else, and then you a change of texture to the chewy and savoury bread. Followed by all of the topping in that single bite; the umami and flaky tuna, the crunchy, spicy and sweet diced onions, the richness of the slightly burnt dollops of mayonnaise that sort of just melt in your mouth, engulfing everything together. Then here come the sweet and juicy pineapples, cutting through all the richness happening in that tiny space. You start over again as you take another bite to experience this rich and salivating moment!

Photo Courtesy & Recipe Copyright © 2018 | peekapastry

– Wendy (Peek A Pastry)

myTaste.com

Auguest 2018: Shazrinah Shazali

Mini Mixed Berry Pancakes

ShefShaz is back again on Amcarmen’s Kitchen and this time I will be sharing a sweet breakfast option for those who love to start their day off on a sweet note – Mini Mixed Berry Pancakes served with Earl Grey Ice Cream and Fresh Fruit.

Mini Mixed Berry Pancakes

Before we dive into the recipe, if you missed my guest post a few days ago, I whipped up some delicious homemade Salmon Fish Cakes for the savoury breakfast eaters! You can also read more about my approach to food and how I know Ally.

Mini Mixed Berry Pancakes Ingredients

PREP TIME 15 MINS | COOKING TIME 10 MINS | MAKES 24 MINI PANCAKES*

*Or 12 regular-sized pancakes

INGREDIENTS

  • 1 & 1/2 cups plain flour
  • 1 & 1/4 cups skimmed milk
  • 57g unsalted butter, melted
  • 1 large free range egg
  • 2 tbsp granulated sugar
  • 1 tbsp baking powder
  • 1 tsp vanilla extract
  • 3/4 tsp salt
  • Frozen mixed berries, or any other kind of fruits

To serve

  • Digestive biscuits, crushed
  • Earl Grey ice cream*
  • Fresh fruits
  • Icing sugar
  • Lemon slices (for a kick of tang)

*Or any other flavoured ice cream that tickles your fancy.

Mini Mixed Berry Pancakes

Mini Mixed Berry Pancakes

METHOD

  1. Preheat oven to 180C (350F or gas mark 4). Grease a 24-hole mini cupcake tray with a bit of butter to prevent the pancake batter from sticking to the tray. Set aside.
  2. In a large bowl, mix all the wet ingredients together until you have a smooth and creamy mixture.
  3. Sift in the dry ingredients and gently fold until just combined. Leave the mixture to rest for about 10 minutes to allow the baking powder to work its magic.
  4. Pour the batter into the tray, filling about 3/4 of the way and drop in your frozen mixed berries on top.
  5. Bake in the oven from about 10 minutes or until a toothpick inserted into the centre of the pancake comes out clean.
  6. Remove from the oven and set aside to cool down for about 5 minutes. Lightly dust with icing sugar and serve with ice cream, crushed digestive biscuits, and fresh fruit of your choice. Enjoy!

Mini Mixed Berry Pancakes

Mini Mixed Berry Pancakes

Before I end, I would like to thank Ally for giving me the opportunity to cook and write for her blog. We had a lot of fun during our cookout session – both the cooking and feeding our dishes to many tummies!

Recipe Copyright © 2018 | shefshaz

BON APPÉTIT

– ShefShaz

myTaste.com

Salmon Fish Cakes with Oven-baked Eggs

Everyone loves food. You have some who love to cook it and some who enjoy eating it. For me, passion for cooking only really started while I was studying abroad. I enjoyed the luxury of having control of what I ate and what I bought. Coming from a big family you don’t get to pick what everyone else eats. So having that choice was amazing. I couldn’t take it for granted.

I started getting serious with cooking when I moved to Sheffield in the UK. I wasn’t a Michelin style chef but I loved being able to create meals in minutes. Simplicity was my game and ShefShaz started all because of that simple concept. I wanted to share with students alike that making meals didn’t have to be difficult. That you could save a lot and look after yourself all at the same time.

Salmon Fish Cakes with Oven-baked Eggs

Salmon Fish Cakes with Oven-baked Eggs

As a mum, I live by the same concept. Keep things simple which reflects very well in the food I make. Having a kid is no joke but knowing you can put aside 30 minutes and whip up a delicious meal makes you feel super accomplished.

I have known Allison (Ally) more or less all my life. From childhood classmates to now still good friends. I think it’s great we both share a passion for food with a healthier twist. Ally has always been a very visual person. She knows how to make everything look good.

ShefShaz, Little ShefShaz, and Amcarmen's Kitchen
L to R: ShefShaz, Little ShefShaz, and Amcarmen’s Kitchen

The inspiration from my dishes are a very Jamie Oliver take on food. Simple, delicious food, fast. Something I know kids will enjoy as well as adults and bitesize to make each spoonful a party in your mouth.

Hope you enjoy this simple and quick recipe for Salmon Fish Cakes with Oven-baked Eggs!

Salmon Fish Cakes with Oven-baked Eggs Ingredients

PREP TIME 10 MINS | COOKING TIME 20 MINS | SERVES 4

INGREDIENTS

For the salmon fish cakes

  • 500g salmon fillets, skin off* and de-boned, minced
  • 20g fresh coriander
  • 6cm fresh ginger, finely minced
  • 2 stalks of lemongrass, finely minced
  • 1 chilli, minced with seeds in
  • Freshly ground sea salt and black pepper, to taste
  • 4 large free range eggs
  • 4 slices of bread
  • Cherry tomatoes, halved
  • Salad greens
  • Sweet chilli sauce
  • Lemon wedges

*Do not toss out your salmon skin! You can pop these into the oven to make crispy salmon skin for an extra added crunch texture to the dish.

METHOD

  1. Preheat oven to 180C (350F or gas mark 4). Line a baking tray with foil and set aside.
  2. Salmon Fish Cakes: Add all the ingredients for the salmon fish cakes into a large mixing bowl and combine.
  3. Form the mixture into patties, you should be able to make 8 patties with this recipe.
  4. Bake in the oven for 15 minutes (more or less depending on the side of your patties). Once done, remove from the oven and leave it to rest. Turn the oven temperature down to 160C (300F or gas mark 2).
  5. Toast: Cut a hole in each slice of bread using a round cutter.
  6. Crack one egg into each hole and then bake in the oven for 5 minutes.
  7. Serve immediately with fresh salad greens, cherry tomatoes and sweet chilli sauce.

Salmon Fish Cakes with Oven-baked Eggs

Salmon Fish Cakes with Oven-baked Eggs

The optional recipe below is actually a recipe by Allison that she whipped up for her Colombian style Arepas that she made during our weekend cook-off. We both paired the salsa together with our Salmon Fish Cakes just too see what it would taste like – and it was magical! So feel free to give this a go with this recipe!

OPTIONAL Aji (Colombian Salsa)

INGREDIENTS

  • 1 tbsp fresh lemon juice
  • 1 tbsp white vinegar
  • 1/4 cup spring onion (white and light green parts only), finely minced
  • 1/8 cup fresh parsley, finely minced
  • 2 small red chillies, deseeded and finely minced
  • 1/2 small tomato, finely minced

METHOD

  1. Combine all ingredients in a bowl.
  2. Mix well, cover, and let it sit it the fridge for at least an hour for all the flavours to infuse before serving.

Salmon Fish Cakes with Oven-baked Eggs

Salmon Fish Cakes with Oven-baked Eggs

Recipe Copyright © 2018 | shefshaz

BON APPÉTIT

– ShefShaz

myTaste.com