Amcarmen's Kitchen: Auguest Rundown

Amcarmen’s Kitchen: Auguest Rundown

Hello Everyone! I just thought that I’d give an update regarding my Auguest series on Amcarmen’s Kitchen. The last I gave and introduction on this was back in 2015 and realised that the mechanics that I mentioned in that post is totally different on how I have been approaching Auguest for the past years.

Before I begin, let’s start off with a nutshell summary of what Auguest is really all about – other than the obvious spelling mistake. For starters, it’s not a spelling mistake. The funny thing is that since I started this ‘Auguest’ series, I’ve completely forgotten how to spell August the correct way. Every time I have to write or type August, my mind automatically inclines me to spell is as Auguest. So why Auguest? Basically, guest bloggers and/or foodies will be taking over Amcarmen’s Kitchen for the month of August – Au-guest.

Polvorón Pops (Popvoróns)™
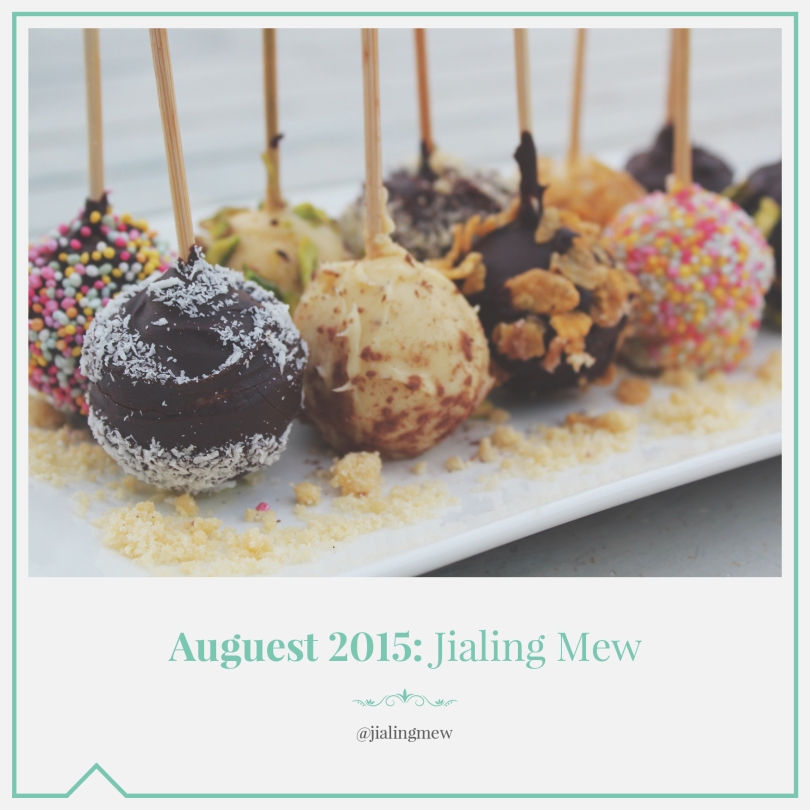
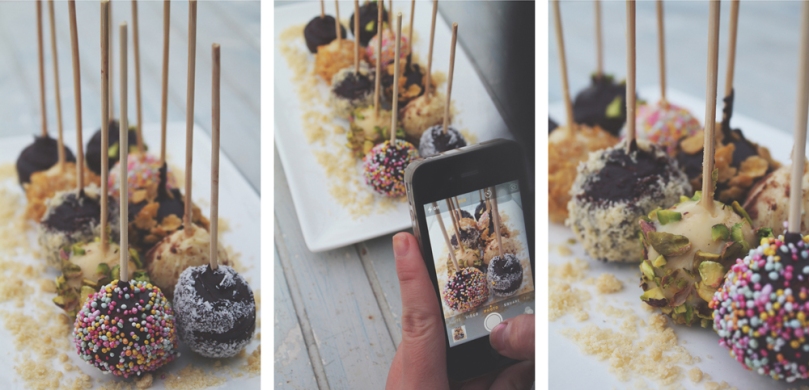
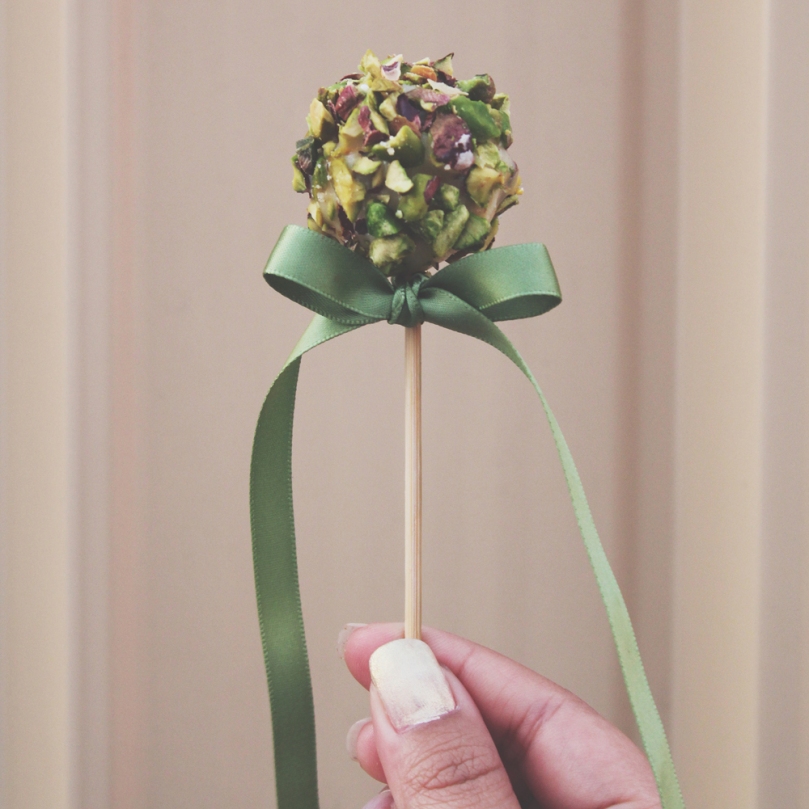
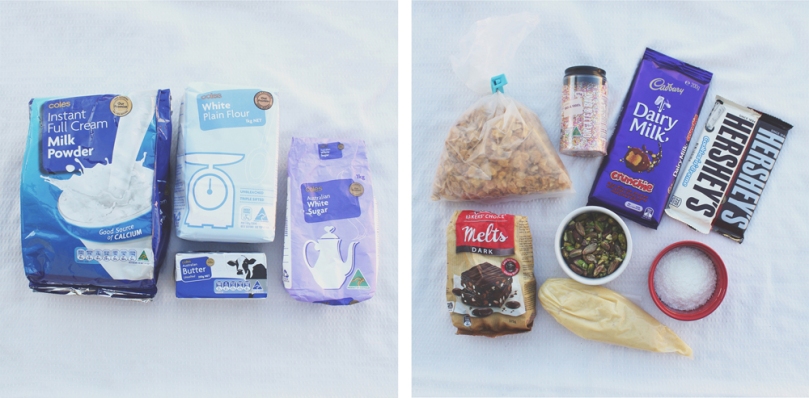
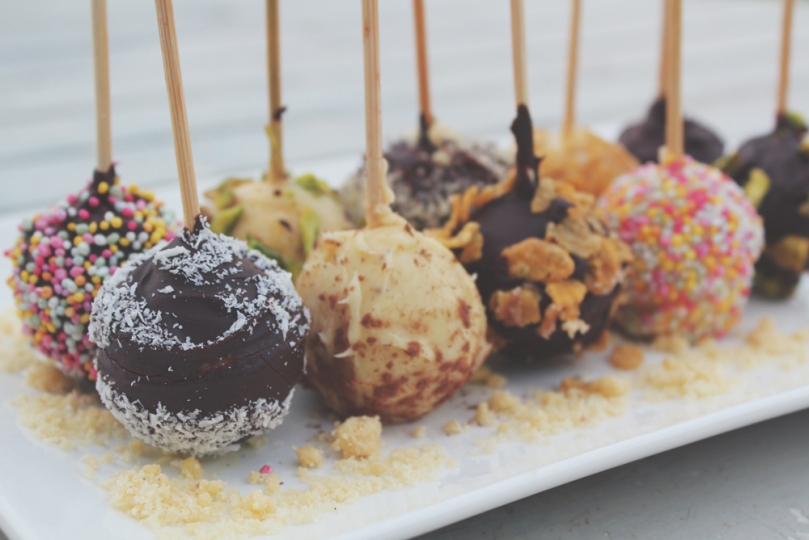
Polvorón Pops (Popvoróns) by Jialing Mew, ‘Back to your Roots’ Auguest 2015.

The idea for the series was based on a famous YouTube celebrity known as Tyler Oakley. If you don’t already know him, you can look him up on YouTube, especially his ‘Auguest’ collaboration videos. In a nutshell, he started something known as ‘Auguest’ back in 2013 where for everyday (maybe just weekdays I can’t remember) in August, he uploads collaborations with other well-known YouTubers. So therefore, my idea will be based on the concept of featuring other foodie friends and/or food bloggers and have them guest blog on Amcarmen’s Kitchen every year for the month of August.

So with saying that, I gather my foodie friends (both old and new faces) to submit their recipes based on the theme for the year, to share with everyone some new ideas and techniques that they may have. We all come from different parts of the world, so it’s good to see what can be made out of ingredients that we may not be familiar with! And that’s basically it.

Quinoa Black Bean TacosQuinoa Black Bean Tacos by Diandra Cappelut, ‘Yes Ve Gan!’ Auguest 2016.

Here are some frequently asked questions that have popped up over the years, and I’ll be sharing the answers with you (for those I have approached and/or for those who are interested on hopping onboard, for this year and the succeeding years to come) in case you have these questions floating on your mind as well:

FAQ #1: Do I need to have a (food) blog to be able to participate?

No you don’t! Many of the Auguesters that have been featured on Amcarmen’s Kitchen in the past do not have blogs. Though to qualify, you must at least have a passion for cooking and/or food. Creativity is also amiable.

FAQ #2: Are there any restrictions as to what I can cook?

There are no particular restrictions, as long as you stick to the theme for the year! You can cook up a savoury or sweet storm, for any meal of the day. The only time where restrictions may be applicable is if the theme itself is restrictive, i.e. for Yes Ve Gan! back in 2016, of course you won’t be able to cook with animals and their by-products, but other than that, you can let your creativity run wild! Also, try to avoid dishes that I’ve already covered on my blog, unless you’re going to do your own take on it.

FAQ #3: How many recipes will I need to submit?

Ideally, you will only need to submit ONE (1) recipe. However there are times where I may need you to submit two (2) just because of the number of participating Auguesters being less than what would allow me to feature at least two (2) recipes a week for Auguest. Don’t worry! If I need you to submit two recipes, I will inform you in advance to give you ample time to get your creative juices flowing and submit your recipes on time.

Blueberry Cheesecake Tarts (Gluten Free)Blueberry Cheesecake Tarts (Gluten Free) by Simon Swaddling, ‘Blood Pressure Friendly’ Auguest 2017.

FAQ #4: How will I know when my recipe will be posted?

A month before August creeps up on us, I’ll inform you of when I have scheduled your recipe to be uploaded on Amcarmen’s Kitchen. You may also request when you’d prefer your recipe to be uploaded, provided that no one else has already claimed that specific date (the very last day is always reserved/taken by my very best friend). Just make sure to inform me ahead of time. Also note that during this time, my upload schedules will only be every Wednesday & Sunday.

FAQ #5: When do I need to submit my recipe?

You may send it in as soon as you are done – this can be a month before, or at the very least, a week before your recipe is due to be posted. Of course, the earlier the better! This is to give me time to proofread your write up and edit your photographs.

FAQ #6: How many photographs of the final dish do I need to submit?

There is no limit to how many photographs you will need to submit, however I may filter through them and possibly choose a maximum of five (5) to post. Consider sending in your best ones! Also please take note on the file size of your photographs – nothing less than 2MB or pixel width of 1000. Make sure your photographs are well lit and not blurry. You don’t have to do a methodical step-by-step photo guide, just a photo of the ingredients used to make your dish and different angles/orientations of the final outcome. You may also do a before/after shot if applicable.

Salmon Fish Cakes with Oven-baked EggsSalmon Fish Cakes with Oven-baked Eggs by Shazrinah Shazali, ‘Sweet & Savoury Breakfast’ Auguest 2018.

Of course if you have any other lingering questions on your mind, please do not hesitate to drop me an email at amcarmenskitchen@gmail.com and I’ll be more than glad to answer them for you!

Here’s a guideline of things you will need to include in your write up (besides the recipe of course):

  • Introduction to yourself (this may include a brief insight into your personal life, and most importantly, how you got into cooking and food, if you are a returning guest foodie, then you may wish to cover how you’ve grown over the past year)
  • How you know me (if this is your first time to guest on Amcarmen’s Kitchen)
  • Introduction to your featured dish (this may include information on your selected hero ingredient, the history of the recipe if applicable, etc.)
  • Indicate prep time, cook time, and number of servings
  • Ingredients
  • Method
  • Conclusion

And here’s a list of things you will need to submit altogether:

  • Blog post write up
  • Photographs of your dishes (at least one of the photographs must be in portrait orientation for the purpose of IG stories)
  • A picture of yourself (for the purpose of IG stories)
  • Your full name (first and last will suffice, for the purpose of IG stories)
  • Your blog website and/or IG handle

Sò Lông Nướng Mỡ Hành (Grilled Mussels with Buttered Green Onions)Sò Lông Nướng Mỡ Hành (Grilled Mussels with Buttered Green Onions) by Marissa Mai, ‘Back to your Roots’ Auguest 2015.

Feel free to also share on your blogs and/or social media pages when your recipe has gone live. Please also remind me to send you a bit.ly link to your post for sharing purposes.

So before I end, I realised I’ve said creativity a number of times in the FAQ. Here are a few things to note on what I mean by ‘creativity’:

  • In terms of the recipe itself, don’t just straight up copy someone else’s. If you’re tackling a classic, then go beyond it by adding your own twist to it!
  • In terms of execution, challenge yourself! Work with ingredients that you’ve never worked with before. Be experimentive and create unlikely food pairings or fusions of cuisines!
  • In terms of plating, don’t just plop it all on the first plate you see. Of course I don’t expect you to be a plating genius, but do consider the type of plate you need to use, the colour, size, etc. that will best represent your dish. Also consider how each element will look like on the plate!

Raw Nutty Orange & Blueberry Vegan 'Cheesecake'Raw Nutty Orange & Blueberry Vegan ‘Cheesecake’ by Wong Miao Hui, ‘Yes Ve Gan!’ Auguest 2016.

I hope this guide to my Auguest series has been helpful, especially to those who are new to it and to those who want to hop onboard! I’m excited to see what’s in store for the upcoming Auguest series!

Cheers!

– Ally xx

Advertisement

Poached Pears with Chocolate Chia Mousse

Hello! I’m Jialing and I will be taking over Amcarmen’s Kitchen for today. I will confess that today’s blog was very close to being a two-step tutorial on how to boil a cup of water and make tea – the only semi-regular dietary part of my life that does not involve any animal by-products.

As someone who has clearly only ever eaten vegan food a handful of times (I genuinely thought that the vegan theme was intended as a joke when I first agreed to do a recipe), I found this year’s Auguest theme to be a punishment. I mean challenge. I ended up ransacking my own pantry and refrigerator for inspiration, confirming with Allison and Google about what ingredients could and couldn’t be used by vegans. What seems like day later, I emerged triumphant – pears, wine, cocoa powder, and a questionable bag of chia seeds (waste not, want not…) sat atop my counter, ready for the arduous vegan road ahead.

Now, onto the recipe, poetically inspired by the very essential act of boiling water.

Poached Pears with Chocolate Chia Mousse Ingredients

PREP TIME min. 24 HOURS* | COOKING TIME 40 MINS | SERVES 4

*The chocolate chia mousse will need to be prepared the day before to allow chia seeds time to soak

INGREDIENTS

For the chocolate chia mousse

  • 1 & 1/2 cups almond milk
  • 1/3 cup chia seeds
  • 1/4 cup cocoa powder
  • 4 tbsp 100% pure maple syrup**
  • 1/2 tsp vanilla extract
  • Strawberries for garnish

For the poached pears

  • 4 buerre bosc pears, peeled
  • 1/2 bottle moscato or other sweet dessert wine***
  • 3 tbsp 100% pure maple syrup**
  • 3 star anise
  • 2 cinnamon sticks
  • 2 tsp cloves
  • Pinch of nutmeg
  • Water

**Maple-flavoured syrup isn’t vegan, so be sure to check the label!
***Find your fave vegan wines here http://www.barnivore.com/wine

METHOD

  1. Chocolate Chia Mousse: Prepare the chocolate chia mousse the day before, to allow chia seeds time to soak. Combine the cocoa powder, vanilla, and maple syrup, stirring until well mixed.
  2. Slowly pour in almond milk, stirring until mixture is smooth. Add chia seeds and stir until well-incoporated. Leave in fridge to soak overnight, stirring mixture once in between.
  3. Once the chia seeds have fully absorbed the liquid, they will increase significantly in size and have a gelatinous texture. Transfer to a blender or food processor and blitz until smooth and creamy. Tip: leave the chia mixture unblended and top with fresh fruit and desiccated coconut as a healthy and envy-worthy breakfast.
  4. Poached Pears: In a sauce pot large and deep enough to hold pears, combine wine, maple syrup, cinnamon sticks, star anise, cloves, nutmeg, and just enough water to cover pears.
  5. Bring the wine and spices to the boil over high heat.
  6. Add the pears, positioning them so that they are completely submerged, and continue to boil for another 25 minutes, until pears are cooked through and tender. Be sure to turn pears for even cooking, particularly when liquid gets low, keeping in mind that the bottoms of the pears will take longer to cook than the tops.
  7. Once pears are cooked, remove from the pot, reserving the syrup, and set aside to cool.
  8. Carefully simmer remaining syrup until reduced to about 1/2 cup.
  9. To serve, divide mousse into small bowls or stemless glasses and garnish with sliced strawberries. Place a pear on each plate, next to the mousse. Drizzle the pear with syrup. Enjoy!

Poached Pears with Chocolate Chia Mousse

Recipe Copyright © 2016 | jialingmew

ENJOY YOUR MEAL!

Jialing.

myTaste.com

Auguest 2016: Brendon D'Souza

Spinach, Broccoli & Thai Green Curry Soup

Hi Foodies, it’s so exciting to be able to share a recipe with you via Amcarmen’s Kitchen and I want to say a big thank you to Allison for organising such a wonderful global blogging experience. Last year, I was able to cook and collaborate in the same kitchen with Allison, where were exchanged some delicious recipes. If you haven’t had the chance to read them, here are the links to my Giant Chocolate Chip Cookie and Cookies & Cream.

My friends call me a chilli fiend. I can’t help it, I am after all Indian. I just love the pungency and zing it adds to soups, curries and stews. I created this recipe on one of those cold winter Sydney evenings when feeling a little bit under the weather. It’s packed full of delicious super greens, fragrant herbs and spices that will help to reinvigorate your senses. Make a big batch and pack it for work the next mayor freeze in snap-lock bags for 1-2 months.

Spinach, Broccoli & Thai Green Curry Soup Ingredients

PREP TIME 30 MINS | COOKING TIME 30 MINS | SERVES 3-4

INGREDIENTS

For the green curry paste

  • 1 large garlic clove, peeled
  • 5cm piece of ginger, washed
  • 2 spring onions
  • 1 bunch coriander, washed, roots and stems scrubbed
  • 1 bunch Thai basil, washed (optional)
  • 2 tbsp cumin powder
  • 1/2 tsp turmeric powder
  • 2-3 small green chillies

For the soup

  • 2 tbsp sunflower oil
  • 1 cup firmly packed English Spinach, washed and finely chopped
  • 1 broccoli, cut into florets, stem diced
  • 1/2 cup coconut milk
  • Lime wedges
  • Extra coconut milk, to serve

METHOD

  1. Roughly chop the garlic clove, ginger, spring onions, coriander leaves, root and stems, and Thai basil. Place these and the remaining ingredients into a blender along with a 1/4 cup water. Blitz to form a smooth paste. You may need to add some more water to help the mixture along.
  2. Heat the sunflower oil in a large saucepan over medium heat. Add the curry paste to the saucepan and cook, stirring occasionally until fragrant. Add the spinach and broccoli and season with salt and pepper to taste. Add 1L cold water and cook over medium-high heat for 10 minutes or until the broccoli stems are tender and the spinach is wilted. Allow to cool.
  3. Purée the mixture using a stick blender, then return to the heat and add the coconut milk. Allow to heat through. Serve with lime wedges and a drizzle of coconut milk. This soup goes really well with turkish borek or spinach and ricotta triangles.

Spinach, Broccoli & Thai Green Curry Soup

For more tasty recipes and Sydney food adventures head to www.brendonthesmilingchef.com

About Brendon
I’m a food writer, blogger and passionate home cook living and working in Sydney. By day I work at one of the world’s fastest growing premium restaurant delivery services, and by night I cook, style and photograph recipes for my award-winning recipe blog. I really can’t stop smiling, believe me, I’ve tried and probably lasted 2 seconds. Sharing food, stories and recipes with family and friends makes me happy, which is exactly why I created “Smiling Chef”. I often try to include a selection colourful vegetables in my cooking, for both it’s nutritional benefits, and the fact that it makes such great #foodporn for Instagram. Get in touch if you need #instaworthy shots of your restaurant or cafe food for your website and social networks. I’m also keen singer and pianist and also love street and landscape photography – see more at @my_omd_and_me.

Instagram: @brendonthesmilingchef/ @my_omd_and_me
SnapChat: bthesmilingchef
Facebook: brendonthesmilingchef
Twitter: bthesmilingchef

Recipe Copyright © 2016 | brendonthesmilingchef

Happy cooking and keep smiling,

Brendon D’Souza:)

myTaste.com

Auguest 2016: Wong Miao Hui

Raw Nutty Orange & Blueberry Vegan ‘Cheesecake’

The perfect vegan dessert for your next dinner party.

Hey there! My name is Miao, pronounced “Meow” and I am currently located in Singapore. I’ve known the lovely Allison for a good 12 years now, perhaps for even longer! We attended the same high school back in Brunei. A few years went by before we recently got in contact again, and this time we had more in common than ever before­ – the both of us had branched from loving food, to loving to cook food during our years of studying abroad. Our enthusiasm was shared over social media and it was agreed that we had to, had to, collaborate in hosting a dinner party the very next time we stood on common soil.

Dinner parties are great! They indulge our senses through so many different factors; from the atmospheric music playing in the background, the vibrant and dramatic display of what’s being served, to the tantalising aroma of something sizzling, something roasted, something seasoned in the air. In every way, a dinner party is an experience of art, as a guest you are inclined to explore the texture of your dish and savour the flavours, forming an opinion that’ll later be added to the table’s conversation. For people who love to cook, a dinner party is an exciting show to curate.

I’ve hosted a few dinner parties since the start of my time in Singapore, and every time it’s been the perfect way to rekindle old friendships, create new memories, and to sprout conversations between acquaintances. Well what’s a dinner party without its guests? Allison and I rounded up a few other pals from our high-school days along with a few foodies I’ve grown to love in Singapore.

One seat at the table was reserved for our vegan friend, adding a little variety to the collective diet. Accommodating to a vegan was completely new to me, the savoury vegan recipes weren’t all that hard to comprehend, but because I specialise in baking cakes, deciding what to create for dessert took a little more time for consideration. We made an array of dishes for the mains, including both vegan approved recipes and recipes with meat, while trying as much as possible to have everyone enjoy similar flavours. The dessert was to mark the finale of the show, and it only seemed appropriate to have everyone leave with the same experience and same lingering flavour in their mouth.

Well, after some time browsing through recipes online, I realised just how darn easy vegan desserts are to make! And they can still be just as rich and indulgent as desserts with animal products – like the vegan ‘cheesecake’ I’m about to introduce. Now I sit here still thinking how I wasn’t introduced to vegan desserts any earlier; they’re healthier, somewhat more refreshing and require less cleaning up. So without further ado, here is the perfect dessert recipe for your next dinner party with or without your vegan buddies.

Raw Nutty Orange & Blueberry Vegan 'Cheesecake'

PREP TIME 15-20 MINS | FREEZE TIME min. 12 HOURS | SERVES 8

INGREDIENTS

For the nutty crust 

  • 2 cups raw nuts
  • 1/2 cup medjool dates
  • 1/2 cup dried cranberries
  • Pinch of salt

For the orange ‘cheesecake’

  • 3 cups cashews
  • 3/4 cup fresh orange juice
  • Juice of one lemon
  • 1/2 cup melted coconut oil
  • 1/2 cup agave or maple syrup
  • Orange zest from all the juiced oranges
  • Pinch of salt

For the blueberry layer

  • 2 cups frozen blueberries
  • 1/4 cup of the orange ‘cheesecake’ mixture

METHOD

  1. To make the crust: Process all ingredients for the crust in a food processor, until the nuts become crumbs and the mixture sticks together when you press it. Press into the bottom of an 8 inch spring-form pan to form the first layer of your cake. Leave in the fridge to chill.
  2. To make the orange cheesecake layer: Excluding the orange zest, blend all other ingredients in your blender at high-speed until very smooth, then with a spoon add in the orange zest to taste. Take out 1/4 cup of the mixture for the blueberry layer, pour the remaining mixture onto the chilled crust and then leave it in the freezer.
  3. To make the blueberry layer: Simply blend the blueberries and the 1/4 cup of cheesecake mixture with your food processor. Spread this evenly over your cheesecake and keep it in the freezer or fridge overnight. I prefer keeping it in the freezer as I live in a tropical climate and it only takes 15 minutes for the cake to soften for serving.
  4. You can serve the cake with blueberries or sliced oranges for that additional wow factor.

Raw Nutty Orange & Blueberry Vegan 'Cheesecake'

Raw Nutty Orange & Blueberry Vegan 'Cheesecake'

Recipe Copyright © 2016 | misohui

Enjoy!

Miao.

myTaste.com

Auguest 2016: Diandra Cappelut

Quinoa Black Bean Tacos

Hello Everyone! Diandra here. Just another third culture foodie.

A few months ago, I delved into the weird side of Youtube and somehow ended up watching a documentary about the cruelness of pig farming at three in the morning. From there, I watched a famous vegan Mukbang star, Mommy Tang, who talked about how she became vegan and how a plant-based diet has helped her lose weight, overall positively affecting her health. Intrigued by the idea of veganism, I watched more and more documentaries on the negative impact of animal farming on the environment and animal products on our health.

Mind-blown by the influx of information, I decided to cut down my consumption of animal byproducts overnight. Mind you, I was that girl who ate meat for breakfast, lunch and dinner. I LOVE MEAT. But, after educating myself on the many issues that come with consuming meat and other animal byproducts, I simply couldn’t live with myself if I continue eating meat mindlessly for breakfast, lunch and dinner.

Could I let go of meat and dairy completely? No. Not right now. But maybe one day. However, currently I have drastically cut down my consumption of animal byproducts to the point where I eat a plant-based diet 6 days out of the week. I give myself one cheat day. Still, not bad for a girl who was pretty much a full-time carnivore.

I always encourage others to try and lessen their consumption of animal byproducts. You don’t have to give it up completely, but at least lessen. The secret of eating a plant-based diet without passing out halfway through the day is to fuel yourself with CARBS. This Quinoa Black Bean Taco recipe is the perfect filling and delicious vegan meal. Oh and it’s extremely high in protein 😉 Yes, you can find lots of protein in plants too, not just in meat! Hope you like it!

Quinoa Black Bean Tacos Ingredients

PREP TIME 15 MINS | COOKING TIME 10 MINS | SERVES 3-4

INGREDIENTS

  • 2 cups Superlife Co. mixed quinoa, cooked
  • 1 can black beans
  • 1 cup frozen corn
  • 1 cup spinach
  • 3 garlic cloves
  • 2 tomatoes
  • 1 yellow bell pepper
  • 1/2 brown onion
  • 1 tbsp olive oil
  • Jalapeños
  • Taco Seasoning
  • Taco Shells

Optional

  • Cayenne pepper
  • Salt-free Mexican seasoning blend

Quinoa Black Bean Tacos Method

METHOD

  1. Dice the tomatoes, onion and bell pepper. Mince the garlic.
  2. Add olive oil, garlic and onion into a heated pan. Sauté until the onions and garlic are nice and golden.
  3. Add the bell peppers and frozen corn, and continue sautéing until the peppers are soft and the corn is defrosted.
  4. Add the cooked quinoa into the pan, sprinkle in the taco seasoning and mix everything together.
  5. Taste the quinoa/black bean mixture. If you would like additional spice and seasoning, add in the cayenne pepper and Mexican blend seasoning. Note: Taco seasoning is normally already pretty salty, so additional salt is not necessary.
  6. Turn down the heat and add the tomatoes into the pan. Mix everything together.
  7. ASSEMBLING THE TACO: Take a warm taco shell and line the bottom with some spinach leaves.
  8. Add the quinoa/black bean mix into the taco shell.
  9. Lastly, top the taco off with some jalapeños and voila!

Quinoa Black Bean Tacos

Quinoa Black Bean Tacos

Recipe Copyright © 2016 | diandracappelut // saladhunter.sg

Eat them all up! 😉

Diandra.

myTaste.com

Auguest 2016: An Introduction

Hello Everyone! I can’t believe the months are creeping up so fast; in 4 months time it’ll be Christmas and then 2017! Before I dive into today’s post, I would just like to apologise to my followers and readers for not updating my blog last month. If I hadn’t already mentioned in my previous post from June, I’m currently and still in the Philippines and for the first part of my trip, Internet connection hasn’t been great – and well, kind of non-existent to be honest, and hence why I haven’t been able to update my blog for the month of July. I did however promise you guys content for August, and here it is!

August is now here and for those of you who don’t know, August is guest bloggers/foodies month on Amcarmen’s Kitchen, hence also known as Auguest. For those of you who are just tuning into my blog, last year I started this as a way to get in touch with other food bloggers/foodies as well as a great opportunity to network and produce some really cool content for our blogs/websites. Last year’s theme was based on preparing dishes from your roots. A few of my guests took traditional recipes and put their own twist to them while others took street food to another level. Also, if you want to read up on how this annual series of mine started, click here.

This year’s theme for Auguest is Yes Ve Gan! I thought of this theme back in March when I visited Singapore for about a week. I contacted a friend of mine from high school and asked if she wanted to cook together and host a small dinner party after our kitchen adventures. We invited a friend over who is a vegan and so our menu that night revolved around cooking food that was vegan. We made a spiced cauliflower soup for entrée, wholewheat spaghetti with a sage and butternut squash sauce, and finally, my friend made a blueberry and citrus no-bake vegan cheesecake which will be featured on Amcarmen’s Kitchen. It was a delicious was to end a vegan feast and I’m sure everyone will enjoy it as much as we all did that night.

Of course that’s not the entire reason why I decided to revolve the theme around vegan eats, but is also an effective way to educated those that by going vegan, it protects animals, the environment, and your health. I hope that I do not get bashed on my blog for saying this but not actually be a vegan or vegetarian myself – and I will say this now and openly admit that I do not see myself going vegetarian or vegan anytime soon. For now, I’ll just have to see where my food journey will take me. Next week we’ll be welcoming Diandra on Amcarmen’s Kitchen so stay tuned and make her feel welcome 🙂

Cheers!

– Ally xx

Auguest 2015: Jialng Mew

Polvorón Pops (Popvoróns)™

Hello everyone, it’s Jialing again, with my second/final recipe for this week. It’s been a pleasure sharing my recipes with you, and I hope to do it again in the future, but in the meantime, feel free to add me on Instagram – @jialingmew. Also, check out Tuesday’s Chicken Pastel Mini Pot Pies if you haven’t already 🙂 Today’s recipe is another one of my Filipino favourites, but this time based on a sweet treat called Polvorón, which is made with powdered milk and toasted flour and wrapped in colourful cellophane.

Polvorón Pops (Popvoróns)™

I’d previously tried to bring packs of polvoron back to Sydney with me after a trip back to Manila so that my Australian friends could try it, but was told at Sydney Airport Customs that it was on the permanent confiscation list, because of the powdered milk. But fortunately, Australia is not doomed to a polvorón-less fate! The ingredients are actually all very easy to find, and had I realised at the time that they were so simple to make, I wouldn’t have had to go through all that trouble with Customs.

Polvorón Pops (Popvoróns)™

To be quite honest, although I had made polvorón before, a very long time ago, I sort of had to make up this recipe as I went along, adjusting the proportions using some educated guesswork. Traditionally, polvoron is shaped with a special metal tool – that I did not have access to. So I was stuck with the option of cookie cutters, which of course, were nowhere to be found (and probably would not work out at all, looking back in retrospect), and finally, shaping them by hand. I then had one of my pressure and stress-induced moments of genius, and polvorón cake pops happened! Luckily it worked out (better than expected, actually), so I didn’t have to come up with a different recipe, and I can quietly sit down to calmly write about this experience. The recipe can easily be adjusted to make more (or less), which is a bonus! So we all lived happily ever after ❤

Polvorón Pops (Popvoróns)™ Ingredients

PREP TIME 20 MINS | COOKING TIME 15 MINS | MAKES 16-20 POPS

INGREDIENTS

  • 1 cup chocolate chips or melts (I used 1 cup each of dark and white chocolate)
  • 1 cup plain flour, sifted
  • 1/2 cup unsalted butter, melted
  • 1/2 cup powdered milk
  • 1/2 cup white sugar
  • Additional toppings (i.e. crushed nuts or cereal, desiccated coconut, sprinkles, cocoa powder, etc)

METHOD

  1. Using a frying pan or wok, toast the all purpose flour gently on low-medium heat, stirring the flour constantly until it is very lightly browned throughout, about 10-15 minutes. You should notice a change in the aroma of the flour, though the colour change will be very slight, so keep a watchful eye on the pan! Do not overheat, as the resulting taste will be bitter (a helpful tip is to keep a small bowl of all-purpose flour nearby so you can keep checking the colour difference). Once flour is toasted, remove from heat and pour into a large heat-safe mixing bowl.
  2. Make the polvorón mixture by adding the powdered milk and white sugar to flour, stirring until well combined. Add the melted butter and continue to stir (or use hands) until the mixture resembles wet sand, and holds when pinched. At this stage, you can eat some of the polvorón mixture (highly recommended – it’s divine) and add more sugar or powdered milk to your liking. If the polvorón mixture is too dry, add a teaspoon of melted butter.
  3. Using your hands, firmly pack a small amount of the mixture into a 1-inch ball, rolling in between palms to shape. Set completed ball aside on a baking paper-lined plate or small tray, and repeat until the rest of the mixture is used up (should make around 16-20 balls).
  4. Using toothpicks or BBQ skewers (I used BBQ skewers, and cut them in half), very slowly and carefully insert pointed end about 2/3 of the way through each ball. If the ball cracks, gently press around cracked areas and reshape around the inserted skewer. Place the polvorón pops in the fridge to harden while preparing the next step.
  5. Melt chocolate using a double boiler method, being careful not to allow any steam into the chocolate. Alternatively, place into a microwave-safe bowl and heat in the microwave on high for 15 seconds at a time, stirring between intervals, until chocolate is fully melted (please note that you may need to adjust intervals according to your microwave).
  6. Place bowl of melted chocolate on a clean surface, and pour selected toppings separately into small bowls or dishes arranging work surface so that all the bowls and dishes are all adjacent to each other.
  7. Remove polvorón pops from the fridge, and dip one at a time into the melted chocolate mixture (the chocolate will start to set once removed), then immediately into the toppings. Transfer back to the tray and continue dipping and coating the remaining pops.
  8. Serve immediately, or store in a container and keep refrigerated until needed. I’m not exactly sure what the shelf-life of these is, but I’d recommend eating them within 2 weeks – if you can even resist eating them for that long #polvoronparty #theend

Polvorón Pops (Popvoróns)™

Polvorón Pops (Popvoróns)™

Recipe Copyright © 2015 | jialingmew

ENJOY YOUR MEAL!

Jialing.

myTaste.com

Auguest 2015: Jialng Mew

Chicken Pastel Mini Pot Pies

Hello Everyone, I’m Jialing, and I’ll be taking over Amcarmen’s Kitchen for this week, so watch this space for my experimental Filipino fusion recipes! Like Allison, I come from a Filipino background, but didn’t really start doing a lot of cooking until my university years. My cooking style is… hazardous… I may set off the occasional fire alarm, or forget a key ingredient or two, but don’t worry! My recipes for this week have been Amcarmen-approved. Today’s recipe features one of my favourites, Chicken Pastel, which is a cream-based chicken and vegetable dish, typically eaten with rice, as typical with most Filipino cuisine.

Chicken Pastel Mini Pot Pies

Today’s recipe came into existence after I made a batch of chicken pastel using 1kg of meat, then realising too late that I only had 2 cups of rice left in the pantry, and wasn’t due for a Coles-run for another week 😦 I decided to make use of recently purchased ramekin sets by turning the pastel into pot pies, which proved to be a big success with my boyfriend (or so I surmised, after returning to a mountain of empty ramekins). The pastel is adapted from my mother’s recipe, using chicken thighs, which she claims is tastier (and she’s right, of course), but be warned that this recipe makes several servings of pastel, simply because there are a lot of components, but feel free to play around with the ratios.

So apparently, after doing a bit of research, Filipinos adapted this dish from the Spanish Pastel de Pollo – essentially the same thing – which is actually eaten with a pastry crust. Not rice. So… this recipe isn’t so much fusion food as accidentally recreating the recipe in its original state… But… anyway.

Chicken Pastel Mini Pot Pies Ingredients

PREP TIME 2 HOURS | COOKING TIME 1 HOUR 35 MINS | MAKES 6 MINI POT PIES

INGREDIENTS

For the marinated chicken

  • 500g chicken thigh fillets, cubed
  • 3 tbsp light soy sauce
  • 1 & 1/2 tbsp flour
  • Juice of 1/2 a lemon

For the pastry

  • 2 & 1/2 cups plain flour
  • 2/3 cup ice water
  • 250g unsalted butter, chilled and cut into 1 cm cubes
  • 1/2 tsp salt
  • 1/2 tsp white sugar

For the chicken pastel filling

  • Prepared marinated chicken
  • 1 can (420g) cream of mushroom soup
  • 1 can (230g) vienna sausage*, cut into 1/2cm pieces, reserve the liquid
  • 1/2 cup grated tasty cheese
  • 6 large cup mushrooms, diced
  • 3 garlic cloves, minced
  • 2 medium-sized carrots, peeled and cubed
  • 1 large potato, peeled and cubed
  • 1 large red Spanish onion, diced
  • 1 medium-sized capsicum, diced
  • 1 chicken bouillon cube

*Alternatively you can use cocktail sausages or pre-cooked chorizo sausages

METHOD

Preparation

  1. Marinate the chicken: Toss the chicken thigh fillet with lemon juice and soy sauce, and marinate in a large covered bowl for at least an hour (or refrigerate overnight for juicer chicken).
  2. Once you are ready to prepare the chicken pastel (after you have made the pastry), add the flour to the chicken marinade, making sure to mix evenly.
  3. Prepare the pastry dough: Combine the flour, white sugar, and salt in a large mixing bowl. Using a pastry cutter (or a blunt knife, in my case), cut the butter into the flour until it resembles a coarse, pebbly mixture. Be careful not to overwork the mixture as this will cause the butter to melt before baking and reduce the pastry’s flakiness!
  4. Slowly add the iced water, one tablespoon at a time, gently stirring it into the flour until the mixture just holds when pinched (it should still look crumbly, but not doughy).
  5. Carefully shape mixture into two round disks (if the dough does not hold, add another tablespoon of iced water), then cover each with plastic wrap and refrigerate them for at least one hour. While the pastry is chilling, prepare the filling.

Chicken Pastel Filling

  1. Heat a large frying pan over medium-high. When the oil is hot, add the garlic stirring until fragrant and golden brown, followed by the onions. While onion is cooking, add the chicken bouillon cube.
  2. Once the onions are soft and translucent, add the chicken together with the marinade liquids. Stir continuously until the marinade thickens slightly and the chicken is almost cooked through.
  3. Add the carrots and potato, cooking them until softened for about 3-5 minutes. Then add in the capsicum and mushroom, cooking them further for another 3-5 minutes.
  4. Once all vegetables are cooked through, add cream of mushroom soup, plus half the can of water or milk if you prefer, stirring well (if you are using cocktail sausages or chorizo, use one full can of water/milk). Reduce the heat to low and allow the mixture to simmer on the stove for about 15 minutes.
  5. Add the vienna sausage pieces and the reserved liquid to the chicken mixture, and stir, allowing to simmer for another 5-10 minutes until the sauce is thickened.
  6. Remove from stove, and allow the chicken pastel to cool down a bit while preparing the pastry.

Chicken Pastel Mini Pot Pies

Prepare the pastry for the pies

  1. Preheat oven to 200C (200F or gas mark 6). Spray 12 ceramic ramekins with cooking oil (or grease with butter) and set aside.
  2. Sprinkle some flour onto a clean tabletop or surface. Remove one disk of pastry dough from fridge (leave the other in the fridge while you work, to make sure the butter in the mixture remains chilled), and gently work into a ball. Cut into 6 equal portions.
  3. Working with one portion at a time, divide into two pieces – one piece should be approximately 1/3 of the portion (this will be the top) and the remaining 2/3 of the portion will be used to line the inside of the ramekin.
  4. Roll out the larger portion into a circle large enough to fit inside the ramekin. Gently drape the pastry into the ramekin, pressing it onto the bottom and sides. Smooth out the folds of pastry so that the entire interior of the ramekin is covered, with a slight border of pastry going over the lip of the ramekin.
  5. Spoon enough chicken pastel filling into the pastry-lined ramekin, ensuring that it does not spill over the edge.
  6. Roll out the remaining 1/3 portion of pastry into a circle, and gently place on top of the filled ramekin. Join edges to pastry lining the lip of the ramekin, pinching the pastry securely.
  7. Using a small paring knife, cut slits into the top (this will allow the heat to escape, so the pie tops do not explode in your oven).
  8. Repeat with remaining 5 portions (to make process quicker, first divide all the portions into 1/3 and 2/3 pieces, and then roll them out and line the six ramekins. Fill the ramekins, then pinch the tops into place and cut slits).
  9. Arrange the ramekins on a baking tray, lined with baking paper (this will catch any drips from the filling). Bake in preheated oven for 45-60 minutes (may or may not take longer depending on your oven), or until tops are golden and pastry is flaky.
  10. Once the first batch of pot pies are in the oven, repeat steps 13-19 with the remaining pastry dough from the fridge.
  11. Once cool, the pies should come out of the ramekins quite easily, with gentle help from a breakfast knife.
  12. Serve hot and enjoy with a side of a green leafy salad of your choice.

Chicken Pastel Mini Pot Pies Process

Chicken Pastel Mini Pot Pies

Baked pies can be refrigerated for up to one week, or frozen for up to 3 months. Place frozen pies in refrigerator overnight to thaw. To heat refrigerated pies, place in an oven preheated to 200 C for 15-20 minutes.

Unfortunately, the recipe for the chicken pastel filling and pastry don’t quite match up in terms of quantity, so there WILL be leftover chicken pastel. But never fear! It is quite delicious eaten with a bowl of steaming white rice, in true Filipino fashion #pastelfordays

Chicken Pastel Mini Pot Pies

Recipe Copyright © 2015 | jialingmew

ENJOY YOUR MEAL!

Jialing.

myTaste.com

Auguest 2015: An Introduction

Auguest 2015: An Introduction

Hello Everyone! Yes, I am aware that I said today I would get right back into Review Sundays since I did a post on the Sisterhood of the World Bloggers Award last week. However, since it’s August and I’ve got some exciting content for you guys this month, I thought I’d take this opportunity to explain what will happen on Amcarmen’s Kitchen for the upcoming month!

I came up with this idea about a month ago or so while I was in the shower – well actually, the idea already existed, but I used that as a base and put a food blogger twist to it.  Before I get into it, I should probably make mention that I did not misspell August in the title of this post – and yes you read it right as ‘Auguest’ and here is why:

The idea is based on a famous YouTube celebrity known as Tyler Oakley. If you don’t already know him, you can look him up on YouTube, especially his ‘Auguest’ collaboration videos. In a nutshell, two years ago he started something known as ‘Auguest’ where for everyday (maybe just weekdays I can’t remember) in August, he uploads collaborations with other well-known YouTubers. So therefore, my idea for content this month will be based on the concept of collaborating with other foodie friends and/or food bloggers and have them guest blog on Amcarmen’s Kitchen for the month of August.

How this will work is that for example, today’s content on my blog would feature a post/recipe written by another blogger, while their post/recipe on their blog will be written by me. Then next week, another blogger will be featured on my blog, and so on. I thought that this would be a great way to get in touch with other food bloggers as well as a great opportunity to network and produce some really cool content for our blogs/websites. It didn’t quite work out as I hoped it would as I initially wanted to feature at least 12 different bloggers on my blog. It was actually quite difficult to find bloggers who were interested in taking part, and also it was a bit difficult for me to organise with so little time on my hands. I do hope to make this a yearly thing, so I hope that it will actually work out the way I had initially envisioned it!

I still have 4 foodies/bloggers that will be guest blogging on Amcarmen’s Kitchen for the rest of August. The theme of this year’s collaboration will be ‘Back to your Roots’ – cooking up dishes from your own cultural background and basically food that you love eating. In addition, I will still be writing reviews on Sunday’s from next week onwards – so don’t miss me too much! And I will still be writing, on the other blogger’s page so you can still head on over to their blog, when the post goes live to have a read 🙂

Cheers!

– Ally xx


I wanted to keep this to last because I didn’t want the beginning of the post to start of with a whole chunk of rant that has nothing to do with the actual post. Just think of this a bonus material on the life of Amcarmen’s Kitchen when not actually in the kitchen.

So, I just wanted to let you all know that I am back in Singapore (arrived just a few hours ago) and boy was it hectic! First off all, the baggage belts in the Sydney Airport this morning were all down for some reason – like actually across the WHOLE airport, which meant that baggages had to be manually transported from the check-in counters to the aircraft. I thought, okay maybe the flight might be delayed for a bit since they needed to do this. When I boarded the plane and was waiting for take off, they made an announcement that not ALL baggages were loaded into the aircraft that I was on because of that whole system being down and they didn’t want the flight to be delayed. They said that the baggages would be loaded onto the next flight out of Sydney to Singapore which was 3 hours behind the flight I was on.

When I got off the plane, I waited for about 10 minutes at the baggage belt after passing immigration, HOPING that my bags travelled with me. Ground staff then started approaching people saying that what was already on the belt were the bags that the aircraft was able to carry and that no new bags were being placed on the belt for collection. I could’ve sworn that I saw less than 50 bags on the belt. Terrible! And they were all priority bags for suites, first, and business class people. So after that I had to queue up at the lost and found with practically half of the other passengers who didn’t get their bags as well. Good thing I was able to beat a few people and was kind of sort of at least in the first quarter of the line, but I swear the line did not even move for like 20 minutes. Anyway, I got out of the airport 2 HOURS after my flight landed – I blame Sydney Airport for such unnecessary hassles.

Good thing I have extra clothes and underwear packed in my hand carry, and an extra $120 to compensate for the troubles. I overheard a lady saying that she had no clothes at all because they were all packed in her check-in baggages – and she leaves the next morning to another destination. I feel sorry for those who are in that situation and hope that they get their bags soon! And I hope I get mine tomorrow morning as well!