Mediterranean Multi-grain Rice & Chickpea Salad

Mediterranean Multi-grain Rice & Chickpea Salad

Hello Everyone! Last week I shared a post on my Instagram for an open collaboration that me and two of my IG foodie friends organised and hosted. It was for National Pack Your Lunch Day (March 10) and out of the three main components that made up my lunchbox, one of them was this Mediterranean Multi-grain Rice & Chickpea Salad, alongside the recipe I shared last week to serve with this salad.

Mediterranean-inspired Lunchbox

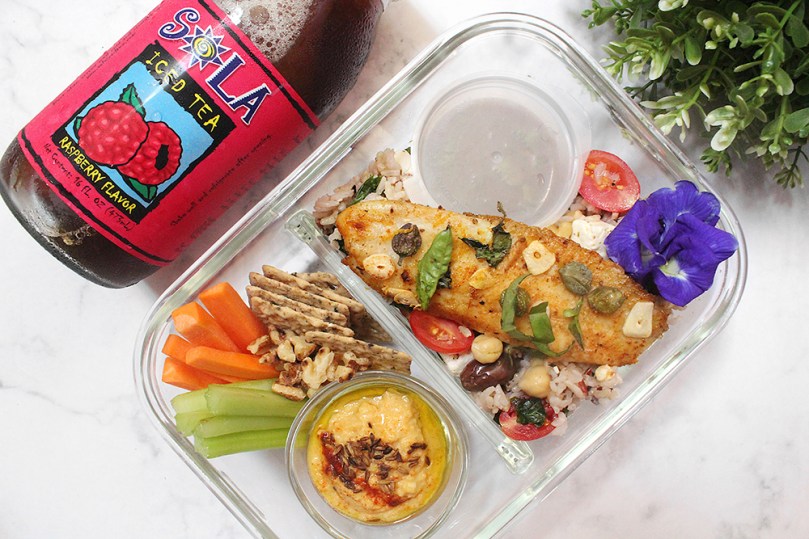
Like with the recipe I shared last week for a Mediterranean Baked Fish dish, this salad is also loaded with fresh Greek flavours of olive oil, olives, feta, and lemon. Other than those ingredients, all you really need is a killer salad dressing and some grain of choice; brown, red, or a mix of those two. I recently bought a pack of multi-grain rice made of a mix of black, brown, and red rice, with adlai as well, so decided to use that for this recipe.

Mediterranean Multigrain Rice Salad

Everything else is customisable to your liking; instead of rice, you can use quinoa or anything rice-like shaped such as farro, pearl barley, or couscous. You can choose whether to add fresh, roasted, or sautéed vegetables, and add your leafy greens of choice. Change up the cheese, or even leave it out to make it vegan friendly. If you don’t have walnuts lying in your pantry, feel free to swap it out for flaked almonds, pine nuts, pistachios, cashews, sunflower seeds, or pepitas – anything really to give the salad an added texture and crunch. The possibilities with this salad are endless!

This salad comes together effortlessly and is an excellent work lunch option or to bring to a potluck party as you can easily double or triple its serving size. Coat the salad with a Balsamic, Olive Oil, and Basil Dressing and you’re in for a delicious treat! It’s light, yet filling at the same time; tangy, juicy, and crunchy!

PREP TIME 10-15 MINS | COOKING TIME 20 MINS | SERVES 4*

*This recipe serves 4 as a meal, or 6 to 8 as a side.

INGREDIENTS

Mediterranean Multigrain Rice Salad Ingredients

For the salad

  • 1 & 1/2 cups multigrain rice (combination of black, red, and brown rice, plus adlai), cooked
  • 1 can (425g) garbanzo beans (chickpeas), drained and blanched
  • 100g cherry tomatoes, halved
  • 100g kale, leaves trimmed and roughly torn
  • 100g marinated Greek feta with olives, in olive oil
  • 1/4 cup walnuts, toasted and roughly chopped
  • 1 packet 5 grain rice cakes, crushed

Balsamic, Lemon, and Basil Dressing Ingredients

For the dressing

  • 2 tbsp balsamic glaze
  • 2 tbsp extra virgin olive oil
  • 1 garlic clove, finely minced
  • Basil leaves, roughly chopped
  • Juice and zest of 1 lemon
  • Salt & black pepper, to taste

METHOD

  1. Dressing: Add all the ingredients together in a jar and seal tightly. Shake vigorously for about 2 to 3 minutes, until well combined. Set aside.
  2. Salad: Add all the ingredients to a large mixing bowl and toss to combine.
  3. Add the dressing and then toss again to evenly coat the salad with the dressing. Transfer to individual serving plates and serve with some Mediterranean Baked Fish. Enjoy!

Mediterranean Multi-grain Rice & Chickpea Salad

BON APPÉTIT

– Ally xx

Follow me on my social media accounts:
Facebook: Amcarmen’s Kitchen
Instagram: @amcarmenskitchen
TikTok: @amcarmenskitchen

myTaste.com

Advertisement

Crispy Tofu Kare-Kare

Hello Everyone! Yes, I am here again with another recipe for you guys this week! The dish that I will be sharing tonight is a build up on the Mushroom ‘Bagoong’ recipe that I shared yesterday, which I will further explain in tonight’s post.

The word kare actually means curry, so therefore kare-kare is a thick and creamy curry, or stew that is rich in peanut flavour, cooked with your protein of choice and various vegetables. The stew gets its rich flavour from my homemade vegetable broth, ground roasted peanuts and peanut butter, together with sautéed onions, and garlic. It is coloured with annatto and can be thickened with toasted or plain ground rice. It is said that kare-kare has a similar flavour to satay because of the peanuts in the sauce.

The main protein used in a traditional kare-kare is beef, oxtail being the preferred choice of cut and often paired with either beef tripe, beef hock, or beef meat. Various cuts of pork can also be used such as, but not limited to, pork belly, hocks, and/or trotters.

Crispy Tofu Kare-Kare

Kare-kare can also be made exclusively from vegetables, known as Kare-kareng Gulay, that may include, but not limited to, eggplant, Chinese chard (pechay/bok choy), yardlong beans, banana heart/blossoms, okra, daikon, other other various greens. Now while this already is a vegetarian/vegan version of the traditional kare-kare, the condiment on the side, usually shrimp bagoong, strips it of its vegetarian or vegan title. While you can leave the bagoong to the side, kare-kare is just not the same without it. Hence, in yesterday’s post, I made a vegan alternative to bagoong to complete this dish.

I think the last meat-based kare-kare that I had before I stopped eating meat was crispy pork belly kare-kare, and to mimic that, I added crispy fried tofu to my kare-kareng gulay of fried eggplant, blanched yardlong beans and Chinese chard, and boiled banana heart. I first came across Crispy Tofu Kare-kare from various posts I had seen on Instagram last year. Since then I’ve been looking for a reason to make the dish for a blog post and finally I can do so as it fits with the theme for the month!

Crispy Tofu Kare-Kare Ingredients

PREP TIME 10 MINS | COOKING TIME 30 MINS | SERVES 6

INGREDIENTS

For the kare-kare

  • 3-4 garlic cloves, minced
  • 1 small red onion, diced
  • 1 cup vegetable broth (plus additional, if needed)
  • 1/2 cup + 1/2 tbsp creamy smooth peanut butter
  • 1/3 cup white rice flour
  • 1/4 cup roasted peanuts, crushed
  • 2 tbsp cooking oil
  • Salt, to taste

For the annatto mixture

  • 1 & 1/2 tsp annatto seeds
  • 1/4 cup hot water
  • Banana heart, boiled
  • Chinese chard (pechay), blanched
  • Eggplant, fried
  • Firm tofu, fried
  • Yardlong beans, blanched
  • Mushroom ‘bagoong’
  • Roasted peanuts, crushed

METHOD

  1. Annatto Mixture: Combine the annatto seeds and hot water in a cup. Leave to soak for the seeds to release their colour.
  2. Kare-Kare: Add oil in a medium-sized stockpot over medium-high heat. Once hot, sauté the garlic until golden brown and fragrant, about 30 seconds. Follow with the onions and cook for a further 30 seconds before adding the crushed peanuts. Continue to cook for a further minute.
  3. Add the peanut butter and mix well until melted before adding 1 cup on the vegetable broth. Mix and season with a pinch of salt, then turn the heat down to medium-low. Leave to simmer for about 10 minutes for the flavours to infuse.
  4. Take about a third cup of extra vegetable broth and add the white rice flour to it. Mix until the flour is incorporated into the broth.
  5. Stir the rice flour mixture into the peanut butter stew. Leave to cook until the sauce thickens, a further 10 minutes and mix every 2 to 3 minutes to make sure the sauce doesn’t stick to the bottom of the pot.
  6. Strain the annatto seeds from the water and add the annatto liquid into the stew. Mix well to incorporate its colour, and if needed, add more vegetable broth to thin out the stew. You may also need to adjust the seasoning to your liking.

At this point, you may choose to add your prepared tofu and vegetables to the stew or separate them for plating up.

  1. Serve and enjoy with steamed rice and mushroom ‘bagoong’ to complete this vegan dish!

Crispy Tofu Kare-Kare

Crispy Tofu Kare-Kare

BON APPÉTIT

– Ally xx

myTaste.com

Magic Vietnamese-style Glass Noodle Salad

Magic Vietnamese-style Glass Noodle Salad

Hello Everyone! This bowl as a whole reminds me of a deconstructed version of Vietnamese spring rolls – vibrant in flavour as they are in colour, topped with poached prawns, fried tofu, snow peas, fresh carrots and mint leaves, and a sprinkle of crushed roasted peanuts.

Magic Vietnamese-style Glass Noodle Salad

In fact, the recipe for the sauce/dressing used for this dish is based off of a Vietnamese spring roll dipping sauce. It is made with lemon juice, fish sauce, sugar, and a bit of fresh garlic and chillies. The sauce is very acidic, which is exactly what you need to trigger the color changing properties of the butterfly pea flower. These striking blue and violet glass noodles, steeped in butterfly pea flowers to achieve their rich colour, transform before your eyes when mixed with the acidic sauce.

It’s cool, refreshing and perfect for the warmer days of spring and summer! But before we dive into tonight’s recipe, please take the time to check out the original recipe where I drew my inspiration from over on Love and Olive Oil by Lindsay.

Magic Vietnamese-style Glass Noodle Salad Ingredients

PREP TIME 15 MINS | COOKING TIME 15 MINS | SERVES 4-6

INGREDIENTS

For the glass noodles

  • 3 packets (80g per pack) glass noodles
  • 1 & 1/2 cups water
  • 1/4 cup dried butterfly pea flowers
  • Pinch of salt

For the dressing

  • 1/4 cup water
  • 3 tbsp lemon juice
  • 2 tbsp granulated sugar
  • 1 tbsp sesame oil
  • 2 tsp fish sauce (or more, to taste)
  • 2 garlic cloves, finely minced
  • 2 red bird’s eye chillies, finely minced

To assemble

  • Carrots, shredded
  • Firm tofu, fried
  • Mint leaves
  • Prawns, poached
  • Roasted peanuts, crushed
  • Snow peas, blanched

METHOD

  1. Dressing: Combine all the ingredients in a small to medium-sized bowl and mix well. Adjust taste to your liking by adding more fish sauce, lemon juice, or chillies. Set aside.
  2. Glass Noodles: Combine the dried butterfly pea flowers in a small saucepan together with the water and salt. Bring to a boil over high heat. Once boiling, turn the heat off and leave to steep for about 10-15 minutes. Discard the flowers.
  3. Place the glass noodles in a large mixing bowl and pour the blue-infused water over the noodles. Give it a good mix, making sure that the noodles are covered with water. Place a clean tea towel over the bowl and set aside for the noodles to soak and cook, about 5 minutes.
  4. Once the noodles are cooked through, drain and separate into two batches in bowls. Drizzle half of the prepared dressing in one of the bowls and give it a good mix. You’ll see that the colour will change from blue to violet in a matter of seconds.
  5. Assemble: Place an equal amount of the blue and violet noodles into individual serving dishes and top with vegetables and meat of your choice. I kept mine pescatarian so went with poached shrimp and bulked it up with tofu as well. I added vegetables such as shredded carrots, snow peas, mint leaves, and topped it off with some roasted peanuts.
  6. Add more dressing as you wish and enjoy as a room temperature or cold dish on a hot summer’s day!

Magic Vietnamese-style Glass Noodle Salad

Magic Vietnamese-style Glass Noodle Salad

BON APPÉTIT

– Ally xx

myTaste.com

Stir-fried Handmade Noodles with Spicy Tofu & Mushroom Mince

Stir-fried Handmade Noodles with Spicy Tofu & Mushroom Mince

Hello Everyone! I can’t believe that it’s already October – how did the months in quarantine fly by so fast? I felt like March was just last week! I hope everyone is staying safe at home, and only going out when necessary, for work or essentials. I still haven’t reported back to the office since our country declared enhanced community quarantine, and I hope that I won’t have to go back until this pandemic is under control.

That aside, I will continue sharing blue-inspired dishes for the month of October, and what better way than to kick things off with this recipe for Stir-fried Handmade Noodle with Spicy Tofu & Mushroom Mince. I initially drew my inspiration for this recipe by Blue Willow, a thematic bar and bistro located in Singapore that derives its inspiration from one of our favourite science-fiction movies of 2009 – Avatar.. Now, I haven’t been there myself, but when I was doing research earlier on this year to look for blue-inspired dishes, I came across Blue Willow’s Eywa Natural Blue Carbonara, where pasta dough is naturally coloured using butterfly pea flowers.

Chinese Handmade Noodles

My initial idea was to recreate this exactly as it is, a blue carbonara. As the months went by and drew closer to tackling this dish, paired with hours of research for new recipes (not necessarily just for this dish in particular), my idea shifted to making Chinese-style handmade noodles instead of pasta. To be honest, this was actually a recipe that I had initially planned for the third week of September, to serve with the Chinese Blue Tea Eggs (茶叶蛋) that I had also made earlier last month. However, I wasn’t happy with how the dish was put together, in terms of how I dressed the noodles. I didn’t want to share something that I wasn’t happy with, visually and taste wise, so it wasn’t until I did more research and tackled this dish once again towards the end of September – and finally something that I am happy to share with you guys!

Before we dive into tonight’s recipe, please take the time to check out the original recipe for Handmade Noodles over on The Woks of Life by Sarah, one of a family of four cooks. Also, check out the original recipe for Tofu and Mushroom Mince over on Scruff And Steph by Scruff.

The making of the noodles really tired me out for they were kneaded, rolled, and cut from scratch, and all by hand. If you have a mixer with a dough hook attachment, it’ll be a piece of cake! If not, you need a bit (lot) of elbow grease, and you’ll be making noodles the same way cooks have been making them in China for centuries.

PREP TIME 1 HOUR | COOKING TIME 30 MINS | SERVES 4

INGREDIENTS

Chinese Handmade Noodles Ingredients

For the handmade noodles

  • 3 cups all purpose flour
  • 1 cup water
  • 1 & 1/2 tsp loose dried butterfly pea flowers
  • 1/4 tsp salt

Stir-fried Handmade Noodles with Spicy Tofu & Mushroom Mince Ingredients

For the spicy tofu & mushroom mince

  • 250g firm tofu, mashed
  • 1/2 cup dried sliced shiitake mushrooms, rehydrated finely minced
  • 1/2 cup dried wood ear mushroom, rehydrated and roughly chopped
  • 2 garlic cloves, minced
  • 2 red bird’s eye chillies, minced
  • 1 small red onion, minced
  • 1 thumb-sized ginger, julienned
  • 2 tbsp coconut oil
  • 2 tbsp sesame oil
  • 1 tbsp light soy sauce
  • 1 tbsp sweet soy sauce
  • Salt and freshly ground black pepper, to taste

For the stir-fried noodles

  • 3 tbsp sesame oil
  • Spring onion stalks, white part only

To serve with

  • Chinese greens of choice
  • Spring onions, for garnishing

METHOD

  1. Handmade Noodles: Combine the dried butterfly pea flowers in a small saucepan together with the water and salt. Bring to a boil over high heat. Once boiling, turn the heat off and leave to steep for about 10-15 minutes. Discard the flowers and set aside to cool down completely.
  2. Add the all purpose flour to a large plate (or even directly onto your clean kitchen countertop). Create a well in the middle and bit by bit, pour the blue water into the flour, mixing with a pair of chopsticks, spatula, or even just your hand as you go. Once all the water is added, the dough should be in shaggy threads with little/no dry flour in the bowl.
  3. Begin pressing the dough together. Avoid the temptation to add additional water, as this will affect the texture of your noodles. If you find the dough is too dry and there’s still dry flour that’s hard to incorporate into the dough, drizzle just enough water until there’s no dry flour left. Knead the dough for about 15 minutes.
  4. Cover the dough with plastic wrap and set aside to rest for about 30 minutes. During this time, it will continue to absorb moisture, and become more pliable and elastic.
  5. Spicy Tofu & Mushroom Mince: While the dough is resting, heat oil in a large frying pan over medium. Add in the ginger together with the red bird’s eye chillies and sauté until fragrant, about 45 seconds. Immediately add in the garlic, continuing to sauté until fragrant and slightly golden in colour before adding the onions. Cook until the onions have softened and begin to go translucent, a further 45 seconds.
  6. Add the mashed tofu, shiitake and wood ear mushrooms. Continue to stir and cook for 5 minutes and then add in the light and sweet soy sauce. Season with salt and freshly ground black pepper, and stir the tofu-mushroom mixture around for a further 10 minutes. Taste and adjust the seasoning to your liking. Set aside and cook your noodles.

Chinese Handmade Noodles

  1. Stir-fry Noodles: After the dough has rested, knead it a few more times to get any air bubbles out of it, about 2-3 minutes. Form into a ball and cut it in half.
  2. On a floured surface, roll one half of the dough into a thin sheet, about 2mm thick. Flour the surface of the sheet thoroughly, flip over, and thoroughly flour the other side. Once floured, fold the dough so you have 4 layers. Slice the noodles with a sharp knife to your desired thickness. As you’re cutting the noodles, gently separate them out with your hands and toss them in flour so they don’t stick.
  3. Bring a pot of water to a boil and cook the noodles for 1 to 3 minutes, depending on the thickness. Keep an eye on the noodles as they cook and taste them to determine when they’re cooked. There is a lot of variation depending on how thinly they were rolled and cut, so test in real time to determine when they’re done. Drain and rinse under cold water. Set aside.
  4. Add sesame oil in a separate frying pan over high heat until smoking. Add the spring onion stalks together with the boiled noodles and fry for about 3-4 minutes.
  5. Transfer to individual serving dishes and top with the Spicy Tofu & Mushroom Mince. Garnish with spring onions and serve with Chinese Greens of your choice. Enjoy!

Stir-fried Handmade Noodles with Spicy Tofu & Mushroom Mince

You can also follow the recipe for Chinese Handmade Noodles and basically make anything and everything with them! These deliciously chewy, springy noodles can be served in soup or mixed with whatever tasty sauces and toppings you can dream up for a delicious meal. Here are just some key tips for success:

  • Use bread flour (high gluten flour): The way to get a good chew in your noodles is to develop the gluten in the dough. Using flour with high gluten content makes a big difference. That being said though, all purpose flour works fine too.
  • Don’t add too much water: The dough will look rather dry and lumpy at first, but do resist the temptation to add additional water. Too much water will make the noodles gummy rather than springy. You just have to have faith and give the flour enough time to absorb moisture through kneading.
  • Use lots of flour when rolling and cutting: The action of cutting the noodles with a knife will press the layers of dough together. To prevent them from sticking, be sure to thoroughly flour both sides of the dough before folding and cutting. This is another reason to avoid using too much water in the dough – to prevent it from sticking.
  • Be mindful of thickness: The noodles will expand when cooked, so whatever thickness you see when cutting the raw dough, the cooked noodles will be significantly thicker. Keep this in mind when rolling and cutting. You may want to roll the dough out thinner and cut the noodles thinner than you initially think.

Storage Tips:

  • Cooked Noodles: If you plan on reheating, you can slightly undercook the noodles (to al dente) to create a better texture once reheated. Store the noodles in an airtight container or a ziplock bag in the fridge for up to 3 days or in the freezer for up to 3 months.
  • Frozen Dough: Let the frozen dough thaw in the fridge overnight. Transfer the refrigerated dough to room temperature and let it rest for 2 hours. The dough will become super soft and can be gently shaped, rested for another 10 minutes or so, and rolled. Follow the method stated above to cook.

Stir-fried Handmade Noodles with Spicy Tofu & Mushroom Mince

BON APPÉTIT

– Ally xx

myTaste.com

Auguest 2020: Melissa Delos Reyes

Crispy Orange Tofu with Broccoli

“Creating food is a therapeutic process. It’s a way for me to unwind and slow down in this fast-paced world. To see my family & friends enjoy what I create is worth all the effort.” — Melissa Delos Reyes

Auguest 2020: Melissa Delos Reyes

Ola! I’m Melissa or Mel, the smol lady behind Eats Meru on Facebook and Instagram. I am a social media associate by profession and I freelance in photography and graphic design. Ever since I was young, I’ve always enjoyed cooking, experimenting with food, and following recipes!

I created Eats Meru pre-pandemic to share my food adventures at first. Everything changed when the Covid-19 virus struck. No one was prepared. Businesses were greatly affected, especially the small/start-up local brands. Since then, I’ve converted my goal for Eats Meru as a platform where I can help local MSMEs to share their products especially now that everyone is doing their best to make a living.

For this post in the Auguest series, I chose the color orange. I’ll be sharing a healthy and plant-based version of the famous Orange Chicken that uses tofu as the protein of the dish; it’s sticky, orange-y, tangy, crispy, and tasty too! You can easily make this dish as most of the ingredients can be found in your fridge and pantry. It is also perfect for those busy weeknights as it comes together in 20 minutes.

Crispy Orange Tofu with Broccoli Ingredients

PREP TIME 10 MINS | COOKING TIME 10 MINS | SERVES 4

INGREDIENTS

For the crispy tofu

  • 2 packs firm tofu, drained and cut into 1-inch size cubes
  • 2 tbsp cornstarch
  • 1 tsp rice flour
  • 1/4 tsp garlic powder
  • 1/4 tsp freshly ground black pepper
  • 1/4 tsp salt
  • Vegetable oil, for frying

For the orange sauce

  • 1 cup fresh orange juice (about 3 medium-sized oranges)
  • 1/4 cup water
  • 3 tbsp sugar
  • 2 tbsp soy sauce
  • 2 tbsp white or rice vinegar
  • 1 & 1/2 tbsp cornstarch (2 tbsp for a thicker sauce)
  • 1 tsp chilli, minced
  • 1/8 tsp salt
  • 4 garlic cloves, finely chopped
  • 1 inch ginger, minced (or 1 tbsp grated)
  • Spring onion (for garnishing)
  • Blanched broccoli

METHOD

  1. Crispy Tofu: In a large bowl, combine the cornstarch, rice flour, garlic powder, salt, and pepper. Mix well and coat the tofu in the cornstarch mixture.
  2. In a deep, heavy-bottomed pot, heat the vegetable oil (enough to cover the tofu) over medium-high. Carefully drop the coated cubed tofu in the oil and fry until slightly golden brown. Do not overcrowd the pot; work in batches if needed.
  3. Once done, use a slotted spoon to remove the tofu and transfer to a wire rack or strainer to cool down.
  4. Orange Sauce: Combine all the ingredients for the orange sauce, except water and cornstarch in a saucepan over medium heat. Cook and bring to a boil.
  5. Mix the cornstarch in the water together to create a slurry and gradually stir it into the simmering sauce. Cook until the sauce thickens, stirring well for even thickening. Taste for salt, sweetness, flavour, etc. and adjust as you go.
  6. Turn the heat off and add the crispy tofu. Toss to evenly coat them with the sauce. Transfer to a serving bowl and garnish with the spring onions. Serve immediately while hot, with rice and blanched broccoli (or any of your favorite greens for that matter). Enjoy!

This Crispy Orange Tofu can be modified for an even healthier option. For this recipe, the tofu is deep-fried in oil, but if you prefer, and have a bit more time on your hands, you can bake the tofu instead. Additionally, you can consider serving it with some cauliflower rice and other greens of your choice.

Crispy Orange Tofu with Broccoli

Crispy Orange Tofu with Broccoli

Photo Courtesy & Recipe Copyright © 2020 | Melissa Delos Reyes (@eatsmeru)

BON APPÉTIT

– Melissa Delos Reyes

myTaste.com

Auguest 2020: Karina Pineda

Adlai Tomato Risotto

“Take off on a food journey that is both healthy and happy” — Karina Pineda

Auguest 2020: Karina Pineda

Hello! My name is Karina, the girl behind wander little girl on Instagram. Two years ago, I initially started my food blog to document my #foodjourney—basically a marriage between transitioning to a healthy lifestyle (which was then a strictly plant-based diet) and learning my way around the kitchen. Fast forward to the present, a few things have changed, from my perspective on health and wellness to the direction of my blog. I decided to see wander little girl as a serious brand and grow it (especially now that we’re in the midst of a global pandemic).

At one point within that two-year timeline, Allison and I followed each other. Though we hardly interacted with one another, it was when she opened slots for this year’s Auguest series that we began to communicate.

When Allison told me the chosen theme and the recipe guidelines, I was thankful for having seen and grabbed the opportunity to guest in this series. Titled Colors of the Rainbow, participating guests (or should I say, Auguests) were tasked to come up with a vegan, vegetarian, or pescatarian recipe in line with their assigned color. For me, this served as a walk down memory lane, back to wander little girl’s roots.

Adlai Tomato Risotto

Having picked the color red, I challenged myself to cooking beyond my comfort zone, hence Adlai Tomato Risotto. I had never made risotto prior and I wanted to add a few twists to the beloved dish. First, the risottos that I’ve tried are usually creamy, and so I whipped up a tomato-based version; that way, it would scream bloody RED! Next, I veganized it by using vegetable broth made from scratch and vegan margarine. Last (but definitely not the least), I swapped rice (specifically arborio rice) with adlai. Before anything, please hear me out! Since I live in the Philippines, I wanted to promote a grain that was both locally produced and a healthier alternative. Since adlai absorbs more than the regular white rice here, this Adlai Tomato Risotto is just as creamy and thick as its traditional counterpart! The entire process from preparing to cooking may be tedious and time-consuming, but I promise that the hard work is worth it; it’s like a dish straight out of an Italian restaurant!

Adlai Tomato Risotto Ingredients

PREP TIME 45 MINS* | COOKING TIME 30 MINS | SERVES 4-5

* Includes making of the vegetable broth

INGREDIENTS

For the adlai tomato risotto

  • 1 cup uncooked adlai
  • 1 & 1/2 cup of canned diced tomatoes
  • 2 tbsp tomato paste
  • 1 & 1/2 tsp olive oil
  • 1 & 1/2 tsp vegan margarine or spreadable
  • 1 tsp rosemary (+ more for topping)
  • 1 tsp thyme (+ more for topping)
  • 3-4 cloves of garlic
  • Half a white onion (or less, depending on your taste)
  • Sliced mushrooms
  • Ground pepper
  • Spanish paprika
  • Brown sugar (optional)

For the vegetable broth

  • 6 cups water
  • Chosen vegetables (in picture: carrots, stems of sweet potato leaves, garlic, and ginger)
  • Ground pepper
  • Salt

METHOD

  1. Vegetable Broth: Gather the vegetables to be used for the broth and place them in a pot. Add ground pepper and salt to taste. Pour 6 cups of water into the pot. Allow it to boil on a stove top for 30 minutes. Set it aside afterwards.
  2. Adlai Tomato Risotto: Mince garlic cloves and half a white onion. Heat a pan on the stove top. Add olive oil. Sauté the minced garlic and onions. Add margarine to enhance the flavor.
  3. Pour the cup of uncooked adlai, and cook it until slightly toasted. Start with a bit of the vegetable broth from earlier (I used a ladle and poured two servings) and stir it. Once the broth has been absorbed, pour another portion again. Repeat the process until all of the vegetable broth has been used and the adlai is cooked.
  4. Add sliced mushrooms. Pour diced tomatoes and tomato paste. Mix well until everything is incorporated and evenly colored.
  5. Sprinkle the herbs (i.e. rosemary and thyme) as well as the spices (i.e. ground pepper and Spanish paprika). Add brown sugar to taste, but this step is optional. Continue to mix everything.
  6. Once cooked, allow the risotto to cool. Transfer it into a large plate or bowl. Top it with more rosemary and thyme. Eat the risotto on its own or pair it with corn. Enjoy!

Adlai Tomato Risotto

Adlai Tomato Risotto

Photo Courtesy & Recipe Copyright © 2020 | Karina Pineda (@wanderlittlegirl)

BON APPÉTIT

– Karina Pineda

myTaste.com

Auguest 2020: Shazrinah Shazali

Roasted Garlic & Onion Tomato Tagliatelle with Butter Beans,Tuna, and a Chilli Balsamic Drizzle

“Cooking is an exploration of our own creativity. Always try out new flavour combinations, different cooking techniques, build on textbook recipes, and have fun!” — Shazrinah Shazali

Auguest 2020: Shazrinah Shazali

Hello Everyone! I am a neuroscientist and home-grown chef best known as ShefShaz. I started my entrepreneurial journey from home, supplying healthy lunch meal plans to offices and homes. I then ventured into collaboration with The Healthy Habit in January 2018 to develop menus and co-founded FUEL’D. Just this year I’ve also recently co-opened a cafe in the gardens to work with the garden’s nursery to develop menus and create delicious food from their produce.

Tonight I will be sharing a delicious and healthy dish that is packed with the flavours of roasted garlic, chilli, and balsamic vinegar. You can easily whip up for a quick weeknight dinner if you’re pressed for time!

Roasted Garlic & Onion Tomato Tagliatelle with Butter Beans,Tuna, and a Chilli Balsamic Drizzle Ingredients

PREP TIME 10 MINS | COOKING TIME 20 MINS | SERVES 4

INGREDIENTS

For the tagliatelle

  • 200g dried tagliatelle pasta
  • 1 can (approx 400g) butter beans, drained
  • 1 can (approx. 185g) tuna in olive oil
  • 1 can (approx. 400g) roasted garlic and onion tomato pasta sauce
  • 4 garlic cloves, minced
  • 4 shallots, minced
  • 2 red bird’s eye chillies, minced
  • 1 tsp sweet ground paprika
  • Salt and freshly cracked black pepper, to taste
  • Parmesan cheese (optional)

For the chilli balsamic drizzle

  • 1/4 cup olive oil
  • 2 garlic cloves, minced
  • 1 red bird’s eye chilli, minced
  • 2 tbsp balsamic vinegar
  • 1 tsp fresh parsley, minced
  • Salt and freshly cracked black pepper, to taste

METHOD

  1. Chilli Balsamic Drizzle: In a mortar and pestle, grind the garlic, chilli, and parsley together. Add the olive oil, balsamic vinegar, and season with salt and pepper to taste. Adjust to your liking and set aside.
  2. Roasted Garlic & Onion Tomato Tagliatelle: In a large pot with boiling salted water, cook the tagliatelle pasta according to packet directions or until al dente. Drain and set aside, reserving about half a cup of the pasta water.
  3. In a separate pan over medium-high heat, sauté the minced garlic, shallots, and chilli until golden, fragrant, and translucent, about a minute or two.
  4. Add in the drained butter beans together with the tuna in olive oil and cooked until warmed through. Add the ground paprika and season with salt and pepper to taste.
  5. Stir in the canned tomato pasta sauce plus the half cup of reserved pasta water. Bring to a rapid simmer before adding the cooked pasta. Once done, transfer to individual serving plates.
  6. Top with parmesan cheese if desired, fresh arugula or any other leafy greens you prefer, and drizzle with the chilli balsamic mixture. Serve and enjoy!

Roasted Garlic & Onion Tomato Tagliatelle with Butter Beans,Tuna, and a Chilli Balsamic Drizzle

Roasted Garlic & Onion Tomato Tagliatelle with Butter Beans,Tuna, and a Chilli Balsamic Drizzle

Photo Courtesy & Recipe Copyright © 2020 | Shazrinah Shazali (@shefshaz // @fueld.bn // @glowcafebn)

BON APPÉTIT

– Shazrinah Shazali

myTaste.com

Herb & Caper-crusted Salmon

Herb & Caper-crusted Salmon

Hello Everyone and happy first of July! If you’re a little pressed for time when it comes to preparing and cooking, this should be one of your go-to, quick yet healthy and light weeknight dinner recipes. The salmon is full of fresh flavours, tang, and heat! It could not be any simpler to make and goes from fridge to table in 20 minutes, even including all the sides you need to make this a complete meal! Simply chop up your herbs and capers, slather it onto your salmon filets, then bake. Easy peasy lemon squeezy right?

Herb & Caper-crusted Salmon

Salmon is one of the most nutritious foods you can find. This popular fatty fish is loaded with nutrients and may reduce risk factors for several diseases. It’s also super tasty, versatile, and widely available. Salmon is rich in long-chain omega-3 fatty acids, which have been shown to reduce inflammation, lower blood pressure and decrease risk factors for disease. Salmon is also rich in high-quality protein, which is needed to heal, protect bone health, and prevent muscle loss, among other benefits. The list goes on.

Before we dive into tonight’s recipe, please take the time to check out the original where I drew my inspiration from over on Iowa Girl Eats by Kristin. The original recipe crusts the salmon with a caper and dill-infused gremolata – which is just a fancy name for chopped parsley, lemon zest, and garlic. I used basil and green onions/scallions in place of the dill and parsley only because I could not find those herbs at the grocers. I think it worked well with the herb substitutes that I used, so don’t be afraid to mix up your herbs for the crust to what’s readily available at your local grocers.

Herb & Caper-crusted Salmon Ingredients

PREP TIME 10 MINS | COOKING TIME 7-9 MINS | SERVES 4

INGREDIENTS

  • 4 salmon filets, about 150g per filet
  • 2-3 garlic cloves, minced
  • 2 red bird’s eye chillies, minced
  • 2 stalks green onion, roughly chopped
  • 1 & 1/2 tbsp capers, drained, rinsed, and roughly chopped
  • Olive Oil
  • Salt and freshly ground pepper, to taste
  • Zest of 1 lemon

METHOD

  1. Preheat oven to 200C (400F or gas mark 4), and line a baking sheet with foil. Grease with a little bit of oil or butter and set aside.
  2. Mix the chopped/minced basil, green onions, chillies, capers, lemon zest, garlic, salt, and black pepper to the centre of a large plate. Squeeze a bit of lemon juice into the mixture to moisten.
  3. Rub the salmon filets with olive oil and then season generously with salt and freshly ground black pepper. Press the top and sides of each filet into the herb and caper mixture to create an even crust.Place the filets onto the prepared baking sheet and bake for 7-9 minutes. Be careful and do not over bake them!
  4. Once done, transfer the salmon filets to individual serving plates. Serve with a squeeze of fresh lemon juice on the salmon fillets, and some creamy mashed potatoes on the side with blanched asparagus or any other greens of choice. Enjoy!

Herb & Caper-crusted Salmon

Herb & Caper-crusted Salmon

BON APPÉTIT

– Ally xx

myTaste.com

Dr. Seuss’ Green Eggs and No Ham

Dr. Seuss’ Green Eggs and No Ham

Hello Everyone! I’ve been wanting to do my own take on Dr. Seuss’ Green Eggs and Ham for Amcarmen’s Kitchen ever since last year. I was super excited when I realised that I could tackle this idea for this month, but then quickly questioned, what am I going to do about the ‘ham’ part of this recipe?

For those of you who don’t know me personally, or if you haven’t picked it up from the recipes I have been sharing since the beginning of the year, I’ve been slowly cutting meat out from my diet. Since the second half of last year, I’ve managed to cut both beef and pork from my diet (with very rare relapses – I can’t avoid a good beef kaldereta during work events). I tried cutting out chicken from my diet this year too and attempted a pescatarian diet, but that didn’t quite work out. Nonetheless, I’ve strictly kept the recipes I’ve been uploading on the blog to pescatarian, vegetarian, or vegan.

Dr. Seuss’ Green Eggs and No Ham

Mini tangent aside and back on to tonight’s recipe; after having spent countless hours on the Internet searching for how I could adapt Dr. Seuss’ Green Eggs and Ham without the ham, I came across Jenny’s Green Eggs, No Ham over on Jenny Can Cook.

Breakfast can’t get any healthier than this! This recipe for Dr. Seuss’ Green Eggs and No Ham has three servings of green vegetables to boost your immune system, combined with the fluffiest, moist, flavorful, and evenly cooked scrambled eggs for protein – all in one single meal!

The best thing about this recipe is that you can get creative with the greens. Choose what’s cheap and local to your area; what’s in season and most importantly, your favourite greens to eat!

Dr. Seuss’ Green Eggs and No Ham Ingredients

PREP TIME 10 MINS | COOKING TIME 10 MINS | SERVES 3

INGREDIENTS

  • 6 large free-range eggs
  • 1 red bird’s eye chilli, sliced
  • 1 small red onion, diced
  • 1 cup kale leaves, roughly chopped
  • 1 cup spinach leaves
  • 1/2 cup broccoli, roughly chopped
  • 4 tbsp milk
  • 2 tbsp olive oil
  • 1 tbsp sesame oil
  • Salt and freshly ground black pepper, to taste

METHOD

  1. In a small bowl, beat the eggs together with the sesame oil and milk. Season with a touch of salt and freshly ground black pepper then set aside.
  2. In a large non-stick frying pan, heat 1 tablespoon of the olive oil over medium-high. Add the diced onion and cook until soft, about 1 minute. Then add in the broccoli and cook for a further minute or two. Season with a touch of salt and freshly ground black pepper.
  3. Add in the kale leaves and give it a good mix before adding the spinach leaves in. Reduce the heat down to low and cover for about a minute to allow the leaves to wilt. Once wilted, transfer the cooked vegetables to a plate or bowl.
  4. Bring the heat back up to medium* and in the same frying pan, add the remaining olive oil. Pour the eggs into the pan and using a rubber spatula, begin pulling the cooked outer edges in towards the centre of the eggs. Uncooked eggs will flood the area you just pulled back while the cooked scrambled eggs will gather at the centre of the pan.
  5. When the eggs are about halfway cooked through, add the cooked vegetables back to the pan and continue pulling the uncooked eggs to the center of the pan.
  6. Turn off the heat when the eggs are 90% cooked. And transfer to a serving plate immediately. Perfectly cooked scrambled eggs are moist but not runny, with no crisp or brown edges.
  7. Garnish with some sliced red chillies, freshly ground black pepper, and a sprinkle of ground smoked paprika. Serve immediately with some toasted bread on the side if you desire. Enjoy!

Dr. Seuss’ Green Eggs and No Ham

* It’s important to leave the heat somewhere between medium-low and medium, so that it warms up but doesn’t get too hot. If the pan is too hot, the eggs will cook too quickly and become rubbery.

** If you plan on adding cheese to your eggs, add it in at this point. This will allow ample time for the cheese to melt and integrate into the eggs. Make sure that the cheese is shredded/prepared and set aside so you can add it to the eggs quickly.

Dr. Seuss’ Green Eggs and No Ham

BON APPÉTIT

– Ally xx

myTaste.com

Super Green Shakshuka

Super Green Shakshuka

Hello Everyone! I can’t believe that we’re already halfway through the year! Metro Manila has now shifted from Enhanced Community Quarantine to General Community Quarantine since the beginning of this week and I honestly don’t know what’s going to happen. We haven’t even started to flatten the curve, and here we are letting people out and go back to work with positive cases rising much higher than when we were under enhanced quarantine.

I’ll unfortunately be reporting back to the office starting this coming Monday and Tuesday, twice a week while the other 3 days will be to continue working from home. I honestly don’t see the point in risking my health and my life just to go into the office two times a week when there is still so much uncertainty with the on-going pandemic, especially when it’s ten times harder to get anywhere via public transport due to capacity limitations to comply with social distancing. It was hard enough to get a ride to and from work pre-pandemic times, what more now? I remember waiting almost an hour for a ride home on many occasions, now I’ll probably be waiting 2 or even more hours just to get home, exposed in the open to the virus. While there’s a shuttle service initiated by the company I’m working for to avoid this issue, I don’t know how long they’ll be able to keep up with a door-to-door pick-up/drop-off service.

Super Green Shakshuka

Anyway, mini tangent/rant aside, a new month means it’s time to move onto the next colour of the rainbow for this year’s theme on Amcarmen’s Kitchen! The recipe that I’ll be sharing with you tonight is inspired by a dish that I had way back when I was still living and studying in Australia. It was in fact a weekend farewell brunch for me as I left the country the following day for good after having completed my degree and graduated a couple months back before this weekend brunch gathering.

I first came across the idea of a green shakshuka at SHUK North Bondi. Green shakshuka puts a healthy green spin on the classic Middle Eastern shakshuka recipe. Traditionally, a shakshuka is a mixture of simmering tomato sauce and spices, topped with gently poached eggs. Within the tomato sauce there’s diced onions, garlic and bell peppers. Lastly, it’s garnished with freshly chopped herbs such as cilantro and parsley.

The great thing about a shakshuka is its versatility. Similar to how you can toss most ingredients from your fridge into a smoothie, the same can be said for a shakshuka. For this green shakshuka, I’ll be replacing the tomato sauce and bell peppers with an abundance of sautéed green vegetables.

Super Green Shakshuka Ingredients

Whatever veggies you’ve got lying around, just throw them in! For my improvised take on this recipe, I’m going with broccoli and asparagus for some bite, and leafy greens such as locally grown kale, spinach, chilli, and malunggay leaves. I also threw in some green chillies for a kick of heat and some fresh basil and green scallions for freshness.

Super Green Shakshuka Ingredients

PREP TIME 10 MINS | COOKING TIME 30 MINS | SERVES 3

INGREDIENTS

  • 3 large free range eggs
  • 1 cup broccoli, roughly chopped
  • 1 cup kale leaves, roughly chopped
  • 1 cup spinach leaves
  • 3/4 cup chilli leaves, stemmed
  • 1/2 cup asparagus, roughly chopped
  • 1/4 cup malunggay leaves, stemmed
  • 2-3 garlic cloves, finely minced
  • 2 large green chillies, sliced
  • 2 small red onions, finely diced
  • 2 small red bird’s eye chillies, sliced
  • 1 stalk green scallions, chopped
  • 3 tbsp olive oil
  • 2 tsp black olives, sliced
  • 2 tsp capers
  • Handful basil leaves, roughly chopped
  • Salt and ground black pepper, to taste
  • Shaved parmesan cheese

Optional (to serve with)

  • 1 large avocado, peeled, pitted, and sliced (optional)
  • Crusty bread, toasted

METHOD

  1. Heat olive oil in a non-stick sauté pan over medium heat. Add the minced garlic and sauté until golden brown and fragrant, about 30 seconds. Be careful to not burn the garlic. Then add in the diced onions together with half of the sliced green chillies and the white parts of the scallions, cooking until they soften, about 1-2 minutes.
  2. Next, add in the chopped broccoli and cook for about a minute before adding the chopped asparagus in. Season with a touch of salt and freshly ground black pepper. Give it a good mix and cook for a further minute or so until they start to soften a bit.
  3. Add in the chopped kale and spinach leaves with just a touch of water. Cover for about 30 to 45 seconds to allow the steam to wilt the leaves. Add in the chilli leaves followed by the malunggay leaves and give it a good mix. Cook, uncovered, for about a minute or two; turning the heat down to low at this point so that your veggies do not overcook.
  4. Flatten the veggie mixture with a spatula and create 3 small wells. Crack an egg into each well and season with a touch of salt freshly ground black pepper. Add the sliced black olives, capers, red and green chillies, and green scallions. Cook the eggs until done to your liking. You can also cover to steam and cook the eggs faster (about two minutes for cooked whites and a lovely runny yolk). Heat off, and sprinkle with the chopped basil leaves to garnish.
  5. Serve immediately with your choice of sliced avocado or crusty bread, or ever both for a heavy brunch. Enjoy!

Super Green Shakshuka

You can easily double this recipe to serve more hungry tummies. It’s an easy, one-pan dish filled with lots of green goodies and poached eggs. Whether you eat it for breakfast or dinner, it’s a hearty, nutrient-packed meal that will last you through any season!

Super Green Shakshuka

BON APPÉTIT

– Ally xx

myTaste.com