Salsa Verde

Salsa Verde

Salsa Verde

Hello Everyone! A new month means a new theme on the blog – and I’m sorry to start off on a negative note but I had plans to do a month-full of recipes that emphasise mangoes as the hero of the dish since it’s been in season for a while now here in Brunei. However, if you’re a regular reader on my blog, you’ll know that I have been working for the past 4 Sunday’s (which is basically my only time to enjoy myself in the kitchen), and because of that, I haven’t actually prepared any dishes for the theme that I had planned for my blog. I also haven’t been cooking any other dishes since my last free Sunday back in April, and so I decided that for this month, there will be no theme for the blog. Do not fret though! I will still be posting recipes, but they will be recipes that I have cooked up in the past – some taking us back towards the end of last year – that I didn’t get around to posting or fitting into a theme every month.

Tonight, I will be sharing with you, a recipe that I came across when I was exploring the Sydney Fish Markets for the nth time. Most of the fresh seafood stores there provide mini recipe cards to encourage the public to purchase their fresh catch. Every time I visited, I would always grab a recipe card, and one of the recipes that I was interested in was for Seared Tuna with Salsa Verde – and that’s what I’ll be sharing with you today, a recipe for an easy, simple, yet yummy Salsa Verde with pan-fried salmon in my case, but it’s completely up to you on what type of fish you’d like to pair it with!

For those of you who don’t know, Salsa Verde literally just means green sauce that contains mainly herbs, common in Italian, French, German, Spanish, and Mexican cuisines, each with their own twists and variants. The recipe that I will be sharing tonight gears more towards Mexican  where it is typically made up of puréed cooked or raw tomatillos, with jalapeños or other chili peppers, white onion, cilantro, and sometimes lime to enhance the taste. Salsa verde can range in spiciness from mild to mouth-searing. It may be served warm or cold, as a condiment – a dip for tortilla chips and served with tacos, or paired with grilled pork, grilled meats, and even fish.

Salsa Verde Ingredients

PREP TIME 10 MINS | COOKING TIME — MINS | SERVES 250ml

INGREDIENTS

  • 1/2 cup grapeseed oil
  • 1 bunch basil leaves
  • 1 bunch flat-leaf parsley leaves
  • 7 anchovy fillets
  • 4 garlic cloves
  • 2 tbsp baby capers in brine, rinsed
  • Juice of 1 lemon

METHOD

  1. Combine all the ingredients in a food processor or blender and process until smooth.
  2. Serve and enjoy as a condiment with your choice of dish (a dip for tortilla chips and served with tacos, or paired with grilled pork, grilled meats, and even fish). This recipe makes enough sauce to fill about a 250ml sized jar and can be kept in the fridge for up to a week.

Salsa Verde

Salsa Verde with Pan-fried Salmon

BON APPÉTIT

– Ally xx

myTaste.com

Butterflied Buffalo Roast Chicken

Butterflied Buffalo Roast Chicken

Butterflied Buffalo Roast Chicken

Hello Everyone! Wow, I cannot even begin to tell you guys how mentally and physically drained I am right now – well, if I am to talk about today in particular, it’s probably not from having worked for 17 days straight already with Sunday breaks, but because I probably had (not even) too much to drink. I said not even because I know that what I had a few hours ago was not my maximum capacity, but I’m feeling tipsy and sleepy already. My boss called for a “brainstorming” session after work hours which actually turned out to be a chill session with dumplings and beers (red wine for me because I’m sophisticated and classy af) haha!

Anyway, all that aside that the fact that I have to work this coming Sunday again, tonight’s recipe is a favourite of mine – I mean, who doesn’t like buffalo chicken?! We can’t be friends if you don’t like it; I’m serious. I served mine with a simple kale and roasted chickpea salad with crumbled blue cheese on top. Buffalo chicken goes well with anything blue cheese! Be sure to check out the original recipe over on Food.com; the original recipe calls to actually brush the sauce mixture onto the chicken, but I marinated the chicken in the sauce mixture instead to absorb all the yummy flavours into the flesh.

Butterflied Buffalo Roast Chicken

PREP TIME 20 MINS* | COOKING TIME 1 HOUR 35 MINS | SERVES 6

*plus 4-6 hours of marination, or preferably overnight

INGREDIENTS

  • 2kg butterflied whole chicken, washed and cleaned thoroughly
  • 2 tbsp unsalted butter, melted and cooled
  • 1 – 1 & 1/2 tbsp tabasco sauce (or more if you like a good punch)
  • 1 tbsp red wine vinegar
  • 1/2 bulb garlic, minced
  • 2 tsp ground smoked paprika
  • Ground salt and black pepper, to taste

METHOD

  1. Combine all the ingredients, except for the butter, in a large mixing bowl. Mix well until combined. Coat your chicken in the marinade and then leave in the fridge to marinate for about 4-6 hours (or preferably overnight). Remove chicken from the fridge 45-60 minutes before roasting to bring it back to room temperature.
  2. Preheat oven to 230C (450F or gas mark 8). Line a baking tray with aluminium foil and place a rack above it.
  3. Place the chicken on the rack and into the preheated oven for 10-15 minutes. The lower the heat down to 175C (350F or gas mark 4) and continue roasting for an hour and 20 minutes more. Baste the chicken with a little bit of butter at every 20 minute intervals.
  4. Once done, remove the oven and set aside to rest for about 10 minutes before serving. Enjoy!

Butterflied Buffalo Roast Chicke

Butterflied Buffalo Roast Chicken with Salad

Butterflied Buffalo Roast Chicken with Salad

BON APPÉTIT

– Ally xx

myTaste.com

Strawberry & Watermelon Cake

Strawberry & Watermelon Cake

Strawberry & Watermelon Cake

Hello Everyone! If you’ve been following my blog from the very beginning, then you’ll know that today is a very special day indeed! My blog officially turns 2 years old today! My how time has flown by so quickly! I’m sure most of you know the story of how I came around to starting up my blog – but for those new comers out there, here is the story again:

I started up this food blog exactly two years ago during spring break, and instead of slaving away on the many assignments/projects I had at that time, I decided to spontaneously start up a blog, out of pure procrastination really. I wasn’t sure of how long I’d be able to keep up with this blog (because I have tried many times and failed), but I am happy that I am able to finally keep one up and running, even though I’m only posting once a week instead of 3 times a week like before I started working. on several occasions, I’d ask my Mom, “What would happen if I didn’t have a food blog?” And she would always reply the same way every time I asked her, “You’d be the most boring person ever.” Haha. Thanks. I definitely have her to thank for teaching me how to cook; well actually I’d like to say thanks to the fact that I got into a university away from home and family as it not only taught me how to be independent, it also showed me how bad I was at cooking for myself during my first year at uni.

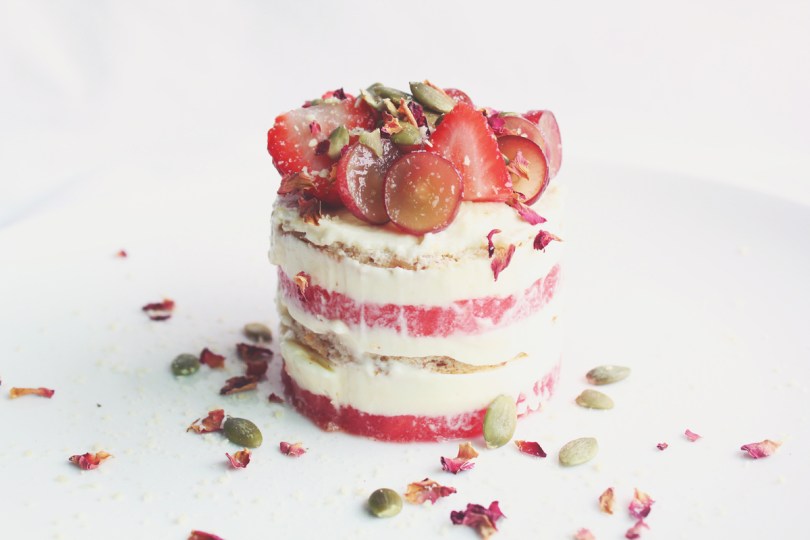
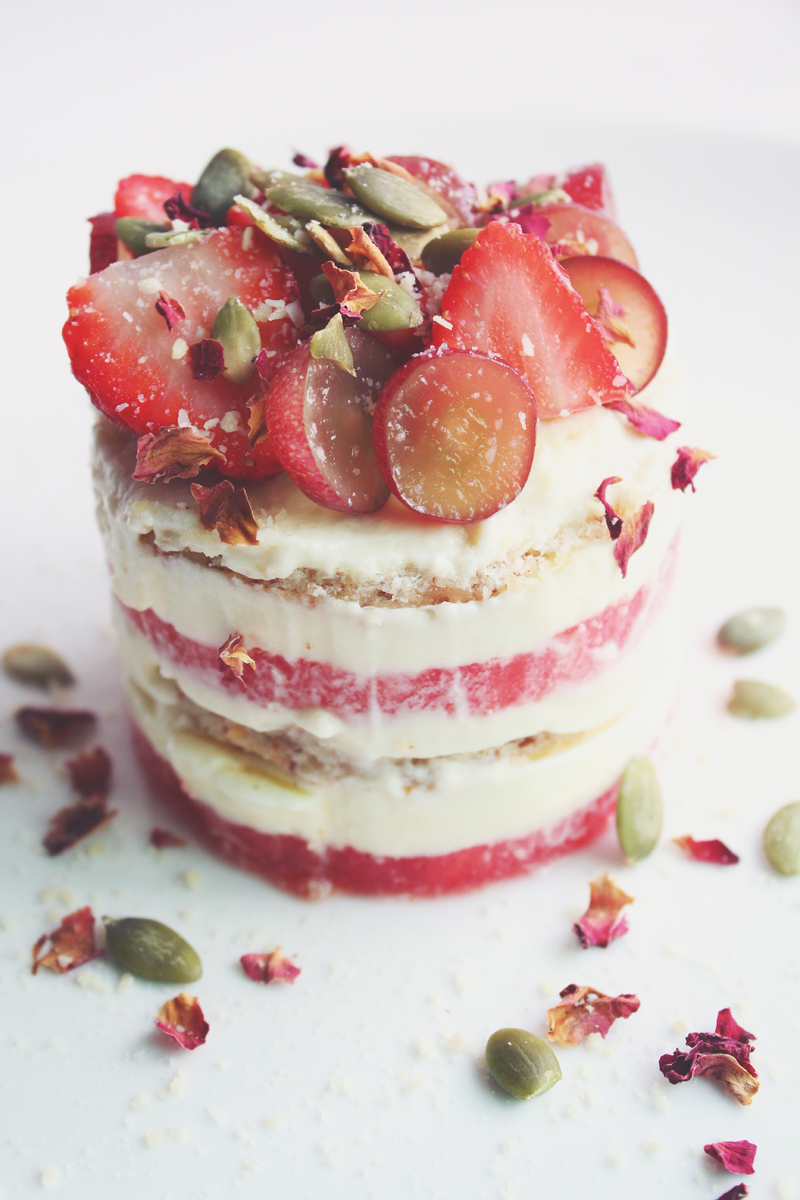
Like last year, to celebrate my blog turning 2 today, I decided to bake a cake for this occasion. I actually did a test bake two weeks ago since this is the first time I was following this recipe – I didn’t want to fail miserably and have nothing to post for this special occasion. I’m glad I did that test bake because there was a major backfire *oops*. Well, it wasn’t such a huge backfire, but it was because it was a significant part of what binds the cake together so without it, the cake would’ve been pretty dry. I’m talking about the rose-scented cream here. The first try, I actually bought the wrong type of thickened cream – I bought the light thickened cream only because that’s what I saw on the shelf. So I whipped it for a good, I don’t know, probably a total of 15-20 minutes or so and it what not whipping at all. Then I realised it was because it was light cream which does have enough fat content to fully whip. So that was a fail, and by that time I was quite tired and frustrated over the cream that I decided to just leave it and try again the following week.

The second time around, I bought regular thickened cream and it whipped fine – too fine that I had over-whipped it and it became quite clumpy. You can actually rescue over-whipped cream by adding more cream, but at that time, I had poured the whole bottle of cream into the mixer. So what did I do? I had to ask my mom to drive me to the grocers again to buy more cream, and finally after the third attempt with this rose-scented cream, I managed to get it right! I didn’t want to waste the other batch of over-whipped cream and so I kept whipping it until it started to come together as homemade butter. After I had whipped it into butter, I had a taste of it and then realised that I had just made sweet rose-scented butter – which in my opinion was a bit ew since I’ve never tasted sweet butter with a hint of rose flavour in it. Haha! So yeah.

Strawberry & Watermelon Cake

Anyway, I took inspiration to bake this cake from one that I tried from Black Star Pastry when I was still living in Sydney. Since it’s debut into the world of pastries, it is known to be the most Instagrammed cake.  Also, the original recipes uses silvered pistachios, but I used pepitas instead. The only reason was that pistachios here for some reason are always brown, like not even green, and I didn’t want to put something brown to top of my beautiful cake so I went for green pepitas instead. Another thing, I couldn’t find rose petals anywhere here in Brunei. So, I decided to go through boxes of teas to read their labels, looking for any that had rose petals in them. I was lucky that one of the teas that I brought home from Sydney last year had rose petals in them!

Don’t forget to check out the recipe that I followed to make this cake over on Gourmet Traveller. You can get creative and make a cake in any shape you want. When I had this at Black Star Pastry, it was square in shape and probably no bigger than about 8cm x 8cm x 8cm in size (maybe). I made mine into round cakes (about 3 in total with this recipe) with a diameter of about 7.5cm.

Strawberry & Watermelon Cake Ingredients

PREP TIME 20 MINS* | COOKING TIME 15 MINS | SERVES 3

*plus 1-2 hours of chilling time

INGREDIENTS

  • 10 seedless red grapes, sliced thinly
  • 250g seedless watermelon, about 0.5cm thick slices
  • 1 punnet (125g) strawberries, halved
  • 1/4 cup almond meal
  • 1/4 cup rosewater
  • 4 tbsp caster sugar
  • 1 tbsp pepitas
  • 1 tbsp dried rose petals

For the Almond Dacquoise

  • egg whites
  • 2/3 cup almonds, coarsely chopped
  • 2/3 cup pure icing sugar, sieved
  • 1/2 cup caster sugar

For the Rose-scented Cream

  • 100ml thickened cream
  • 1 tbsp caster sugar
  • 1 tbsp rosewater

METHOD

  1. For the almond dacquoise: Preheat oven to 200C. Process almonds in a food processor until finely ground, then combine in a bowl with icing sugar. Whisk eggwhites in an electric mixer until soft peaks form (3-4 minutes), then gradually add caster sugar and whisk until stiff peaks form (1-2 minutes). Gently fold through almond mixture, spread on a 30cm x 40cm oven tray lined with baking paper and bake until golden (10-15 minutes). Set aside to cool on tray, and then using a round cutter, cut the dacquoise into 6 circles.
  2. For the watermelon layer: Cut the watermelon into half a centimetre thick rounds using the same cutter used to cut the dacquoise. Arrange watermelon rounds in a single layer on a wire rack. Sprinkle with 20ml rosewater, then scatter with 2 tbsp sugar. Stand to macerate (30 minutes), then pat dry with absorbent paper.
  3. For the rose-scented cream: Whisk cream and sugar in an electric mixer until soft peaks form, gradually add rosewater and whisk until stiff peaks form (do not over-whisk!!!).
  4. Assembly: Staring with a watermelon slice as your base, spread about a tablespoon and a half of rose cream evenly over  it and then top with a layer of dacquoise. Scatter a pinch of almond meal and then top with more cream. Repeat, and then top of the last dacquoise layer with a bit of cream to hold the strawberry chunks, slices of grapes, and other toppings. Refrigerate until firm (1-2 hours).
  5. Serve and enjoy chilled!

Strawberry & Watermelon Cake

Strawberry & Watermelon Cake

BON APPÉTIT

– Ally xx

myTaste.com

Honey-Roasted Chicken

Honey-Roasted Chicken

Honey-Roasted Chicken

Hello Everyone! Before I begin with this post, I just want to say that I just realised that two Sunday’s ago was quite possibly the last Sunday that I had off and I probably won’t see another relaxed Sunday at home until the beginning of June. Yes, you read that right! Last Sunday I got up at the wee hours of 3:55am to get ready for work. WORK! Last Sunday we kicked off our month-long sporting event with a 2km and 10km Run that started at around 7am. Our team had to be there by 5am to help set up, prepare, and do a lot more things in order to ensure a smooth event. I was also event photographer that morning so I was constantly moving here and there for a good 5 hours. Though it wasn’t a whole day/night event, it was still tiring – I mean, getting up at 4 in the morning is tiring enough especially when I couldn’t sleep well the few hours before. Anyway, so this Friday will be another opening ceremony, this time for Badminton, and then on Sunday again for Basketball.

Besides my 7-day working months from now until June, I’m thrilled to say that my blog will be turning 2 years old on Saturday! I’ll be posting a recipe up on that day to celebrate 2 years of not giving up on this blog – which I believe is a first! I’ve started up many blogs before (but mainly diary-style) and so far I’ve been able to keep up with this one! I won’t say anymore and save the rest of my tangents for Saturday’s post. Anyway, it’s week 2 of delicious yummy roast chicken and I’ve got a classic recipe to share with you. To be honest, whenI first came across this recipe, I found it weird how it had a hint of ground cinnamon and turmeric in it which in my opinion dominated the honey flavour just a bit. I’ll admit that I much preferred the taste of last week’s roast, but this one is alright too. You can eat it with a whole load of roast veggies and fresh greens, or steamed rice. Don’t forget to check out the original recipe over on SBS.

Honey-Roasted Chicken Ingredients

PREP TIME 10 MINS* | COOKING TIME 1 HOUR 35 MINS | SERVES 6

*plus 4-6 hours of marination, or preferably overnight

INGREDIENTS

  • 2kg whole chicken, washed and cleaned thoroughly
  • 8 tbsp honey
  • 3 tbsp light soy sauce
  • 3 tbsp olive oil
  • 2 tbsp freshly squeezed lime juice
  • 1 & 1/2 tsp ground cinnamon
  • 1 & 1/2 tsp ground tumeric
  • Thumb-sized ginger, minced
  • Butter, for basting
  • Ground salt and black pepper, to taste
  • Assorted veggies, for roasting
  • Cooking twine

METHOD

  1. Combine all the ingredients, except for the butter, in a large mixing bowl. Mix well until combined. Coat your chicken in the marinade and then leave in the fridge to marinate for about 4-6 hours (or preferably overnight). Remove chicken from the fridge 45-60 minutes before roasting to bring it back to room temperature.
  2. Preheat oven to 230C (450F or gas mark 8). Line a baking tray with aluminium foil and place a rack above it.
  3. Start by making a loop with the twine and fastening it around the stub of the neck. Bring it around the sides and tie a knot at the cavity, then pull it tight around the breast. Now, loop the twine around the drumsticks and tie another knot, tightening it until the legs cross.
  4. Place the chicken on the rack and into the preheated oven for 10-15 minutes. The lover the heat down to 175C (350F or gas mark 4) and continue roasting for an hour and 20 minutes more. Baste the chicken with a little bit of butter at every 20 minute intervals.
  5. Once done, remove the oven and set aside to rest for about 10 minutes before serving with seasonal roast veggies, or steamed rice. Enjoy!

Honey-Roasted Chicken

BON APPÉTIT

– Ally xx

myTaste.com

Chilli, Paprika, Tarragon, & Worcestershire Roast Chicken

Chilli, Paprika, Tarragon, & Worcestershire Roast Chicken

Chilli, Paprika, Tarragon, & Worcestershire Roast Chicken

Hello Everyone! A new month means a new theme on the blog! If you have been following my blog on a weekly basis, you’ll probably know that two months ago I did a series on Healthy Eating, Salad Edition. During that time, I always paired my salads with a yummy roast chicken on the side. So for this month, I thought I’d share with you 4 different marinade recipes that are sure to bring your love for roast chicken to another level!

Tonight, I’ll be sharing a recipe that I kind of just threw together in a few minutes only with the items that I had in my fridge and pantry at that time. I was about to head over to a friend’s house, and I promised that I would cook something for him while he used my face as a canvas to practice his make-up skills. I had no idea what to bring over because I know that he is quite a healthy person. So I decided to roast some chicken breast fillets for us. The chicken I had to buy though because I don’t really eat the breast parts, so I walked over to the grocers and got a fillet each for the two of us. Then when I got home, I basically grabbed some herbs, spices, and basically whatever else I could find that I knew would/could make a nice flavour combination. I didn’t even use any measurements for this as well, I just dabbed in a whole lot of Worcestershire sauce, olive oil, chilli, paprika, and the works. I initially used fresh thyme leaves at the time since that was what I had in the fridge.

Chilli, Paprika, Tarragon, & Worcestershire Roast Chicken Ingredients

To be honest, I wasn’t sure what this would taste like. When we had these breasts fillets (after only having marinated them for about an hour or so), it was simply delicious! My friend really loved it and wanted to grab the recipe off from me too. I remember how he had a hard time trying to pronounce Worcestershire, so he ended up calling it the “Wot-shit-shit” sauce. When he went to the grocers one time, he called me up to ask which section was the sauce shelved at and I told him to ask one of the staff. He didn’t want to only because he didn’t want to ask “excuse me, where is you wot-shit-shit sauce?” Haha! Ever since then, I’ve made this recipe a couple of times for dinner gatherings with friends when I was still living in Sydney – and I’ve also made it for myself to pair with my salads. This was the first time that I had made it for my family and they too love it. I switch out the fresh thyme for fresh tarragon only because the grocers had that instead of thyme – but it tastes just as good!

Chilli, Paprika, Tarragon, & Worcestershire Roast Chicken Ingredients

PREP TIME 10 MINS* | COOKING TIME 1 HOUR 35 MINS | SERVES 6

*plus 4-6 hours of marination, or preferably overnight

INGREDIENTS

  • 2kg whole chicken, washed and cleaned thoroughly
  • 4-5 sprigs of fresh tarragon
  • 1/2 bulb garlic, minced
  • 3 tbsp olive oil
  • 2 tbsp Worcestershire sauce
  • 2 tsp chilli flakes
  • 2 tsp smoked paprika
  • Juice of 1 lemon
  • Butter for basting
  • Cooking twine

METHOD

  1. Combine all the ingredients, except for the butter, in a large mixing bowl. Mix well until combined. Coat your chicken in the marinade and then leave in the fridge to marinate for about 4-6 hours (or preferably overnight). Remove chicken from the fridge 45-60 minutes before roasting to bring it back to room temperature.
  2. Preheat oven to 230C (450F or gas mark 8). Line a baking tray with aluminium foil and place a rack above it.
  3. Start by making a loop with the twine and fastening it around the stub of the neck. Bring it around the sides and tie a knot at the cavity, then pull it tight around the breast. Now, loop the twine around the drumsticks and tie another knot, tightening it until the legs cross.
  4. Place the chicken on the rack and into the preheated oven for 10-15 minutes. The lover the heat down to 175C (350F or gas mark 4) and continue roasting for an hour and 20 minutes more. Baste the chicken with a little bit of butter at every 20 minute intervals.
  5. Once done, remove the oven and set aside to rest for about 10 minutes before serving. Enjoy!

Chilli, Paprika, Tarragon, & Worcestershire Roast Chicken

BON APPÉTIT

– Ally xx

myTaste.com

Strawberry & Banana Smoothie

Strawberry & Banana Smoothie

Hello Everyone! It’s Week 4 of Smoothie month and tonight I’ve got a very simple recipe yet packed with lots of flavour and nutrients. I don’t actually have much to share with you guys besides the fact that it has been a long week of work. I actually genuinely thought that today was Thursday, and then to my dismay, it’s only Wednesday – I was so looking forward to being one step closer to my 1-day weekend!

Besides my life being non-exciting for the past week, on Monday I started my Meat Free Week in preparation for Easter. So far, it’s going well and I can definitely say that I am in a much better place than where I was two years ago with this. Two years ago I was always hungry and depressed for being always hungry. I lasted the whole week but despised the rollercoaster of emotions that I experienced. Last year, I did not last 3 days I think – I needed my meat. This time around, I’ve completed 3 days without meat, but I have to say, yesterday I had such intense cravings for deep fried crispy chicken – and to my dear friend Pam, saying round 2 to Korean Fried Chicken did not help me get over my cravings that day! Haha.

Anyway, tomorrow will be a bit more exciting I guess. After work I’ll be having dinner with my Marketing colleagues and then heading off to do some ice-skating! Oh gosh, what have I gotten myself into. Firstly, I may have mentioned this in a previous blog post before, and I can’t skate to save my life! The last time I went ice-skating, I fell hard on my bum 7 times in a span of a 2-hour skating session. Secondly, I managed to slice my pinky finger on someone else’s skates as I was going down for my last fall of the day. It was a small cut, but the scar is still visible *sad face*

Moving on, if you’re not already a fan of strawberries, you should be. Not only are they juicy, summery and delicious, they’re a bona fide superfood, too. Nutrient-rich and packed with antioxidants (like vitamin C), strawberries offer a wide range of health benefits. Strawberries boost your immunity, promote eye health, help fight cancer and bad cholesterol, reduce inflammation, regulate blood pressure, boost fibre, aid in weight management, and result in healthier, younger-looking skin. To read each health benefit in more detail, head on over to Reader’s Digest Best Health. Likewise, bananas too contain many important nutrients and powerful antioxidants that help support heart health, improve digestive health, moderate blood sugar levels, and many more. You can read more on the health benefits of bananas here.

Strawberry & Banana Smoothie Ingredients

PREP TIME <5 MINS | COOKING TIME | SERVES 2

INGREDIENTS

  • 2 cups fresh or frozen strawberries
  • 1 fresh banana, peeled
  • 1 cup coconut water
  • 1 cup Ice
  • 1 tablespoon honey, if needed to sweeten

METHOD

  1. Add all ingredients to a blender, and pulse until combined. If the smoothie is too thick, add more milk. If it is too thin, add more fruit and/or ice.
  2. Serve immediately and enjoy!

Strawberry & Banana Smoothie

BON APPÉTIT

– Ally xx

myTaste.com

Chocomolé Smoothie

Chocomolé Smoothie

Hello Everyone! It’s week 3 of deliciously healthy smoothies to kickstart your mornings, boost your afternoons, or fuel your post-gym workouts. Well, tonight’s smoothie is a little less healthy in comparison to the two that I’ve posted since the month started – and I say this just because I’m using full cream milk in the recipe. I’ve opted for the light yoghurt though if that makes any difference! *cheeky grin* Anyway, this recipe was inspired by a smoothie that I had probably over a year ago or two now back when I was brunching my way through Sydney with friends. I had this smoothie (or something similarly along the lines of this smoothie) at a café called Rustic Pearl. When I saw this on their menu, the reaction ew came to mind followed with mixed emotions. Nonetheless, I decided to be adventurous and instead of going with a conventional banana and cinnamon smoothie, I ordered the Chocomolé (Chocolate & Guacamole) – may I just add what a creative name to call the smoothie! This was the best decision that I made that day. The smoothie was an absolute yum!

Anyway, don’t forget to check out the original recipe over on Texanerin Baking. There are options for vegan, diary-free, and paleo as well, where you can basically switch out the Greek yoghurt with coconut milk yoghurt, and completely omit the use of full cream milk as well or replace it with coconut milk. Though it was delicious for me, it might not be to everyone’s liking for I think my Mom didn’t like it when I made this batch a couple of weeks ago for the first time haha.

Chocomolé Smoothie Ingredients

PREP TIME <5 MINS | COOKING TIME | SERVES 1

INGREDIENTS

  • 1 medium cold banana
  • 1/2 cold avocado flesh (about 85 grams would suffice)
  • 1/4 cup plain Greek yogurt (or coconut milk yogurt for vegan, dairy-free, paleo
  • 2-4 tbsp milk, optional (omit for vegan, dairy-free, paleo or use coconut milk)
  • 2 tbsp cocoa powder
  • 1/2 tsp vanilla extract

METHOD

  1. Blend everything together in a blender until it’s very creamy. Add more milk until it is to the desired thickness or your liking.
  2. Top with some banana slices and some roughly chopped dark chocolate. Serve immediately or keep covered in the refrigerator for up to one day.

Chocomolé Smoothie

BON APPÉTIT

– Ally xx

myTaste.com

Kale Piña-Cavado

Kale Piña-Cavado

Hello Everyone! So last week was a little hectic, and today is no different as well. I’m currently back in Brunei; I arrived at 4 in the afternoon, and tomorrow I’ll be back in office – sad times. I had a great week in Singapore, though I wouldn’t call it a rest and relaxation kind of holiday. I was out and about most of the time, exploring, café hopping, eating, playing with dogs, and many more activities which included the shedding of calories for my wallet. Anyway, so from my previous post I mentioned that I was going to go to the River Safari with my sister – and we did! It was a lot of fun seeing a lot of aquatic animals, especially Kai Kai and Jia Jia the Giant Pandas!

The following day, Pam, my sister, and myself started our morning at a café known as Boufé. The food was delicious and it reminded me so much of the brunches that I had when I was back in Sydney. I’m really sad that Brunei doesn’t have that kind of brunch that I’m after – or maybe there is, it’s just that I haven’t had the time to explore the new/existing cafés in Brunei. Anyway, after that we headed straight for the Dog Café (also known as We are The Furballs or WTF) to play with the cutest dogs ever! If you want to see photos of this, you can head on over to my personal Instagram account, @amcarmen.

After the weekend, things slowed down a little bit as I did most of the shoppings that I needed to do, and went to the places that I had planned on going to. The only last thing that I did was co-host a dinner party with a high school friend for our other high school friends, one of which I had not seen since we finished IB and headed of for university (which was 5 years ago!). One of our friends is a vegan so, my friend, Miao, and I took up the challenge to whip up some yummy vegan dishes. Both of us had never cooked up a vegan dish before so we were both quite excited to see how it would turn out. I remember at one point when Miao was making her Spiced Cauliflower Soup, she tasted it and didn’t seem like she was blown away with it. She then asked me to taste it, and as I was tasting it, she said:

“Something’s missing, but I don’t know what. I don’t think it needs anymore herbs because I think it’s quite balanced already… Or maybe it’s because it’s vegan?”

I laughed out loud at that comment! Maybe it was just because it’s lacking a lovely chicken broth base or oils from fried up bacon as its base – but nonetheless, the soup was still pretty amazing. Good job Miao! For mains, I cooked up a Chunky Butternut Squash Wholegrain Spaghetti with Sundried Tomatoes and Sage Leaves. Again, we had a hefty laugh at the table when Ann (our vegan friend), filled her plate with the pasta, sundried tomatoes, and sage leaves. She then started to mix it and was about to take a bite until Miao’s boyfriend, Robin, pointed out that she was missing the Butternut Squash sauce. We laughed out because she thought that it was some sort of agilo olio. It was funny, but I guess you’d have to be there to understand the extent of the humour. Lastly, we ended the savoury with a delicious No-bake Blueberry and Orange “Cheesecake”.

Okay, I apologise for a super long post, so I guess I will keep this part short. I think I may have added too much kale, or not enough pineapple because the kale was really overpowering the taste of the smoothie. Kale has a lot of vitamins and also contains powerful antioxidants that help protect your immune system and fight against certain cancers. If you want to read more about the health benefits of kale, please click here. Now, you may substitute kale for spinach if kale isn’t readily available where you are; I know that it’s not very cheap to get kale here in Brunei since it’s air-flown in from Australia. Before you scroll down to the recipe, don’t forget to check out the original over on Delicious by Dre.

Kale Piña-Cavado Ingredients

PREP TIME <5 MINS | COOKING TIME  | SERVES 3-4

INGREDIENTS

  • 2 & 1/2 cups kale, stemmed and roughly chopped
  • 2 ripe avocados, pitted and flesh removed
  • 1-2 cups fresh coconut water
  • 1/2 medium-sized pineapple, chopped

METHOD

  1. Combine all the ingredients in a blender in this order: avocado, pineapple, kale, and 1 cup of coconut water. Pulse a couple of times to mix up the ingredients in the blender a bit and then blend on high for about 30 to 60 seconds. Add more coconut water if needed to reach your desired consistency.
  2. Serve immediately and enjoy!

Kale Piña-Cavado

BON APPÉTIT

– Ally xx

myTaste.com

Salade Niçoise du Saumon Fumé

Salade Niçoise du Saumon Fumé

Hello Everyone! Man am I completely beat! Straight after work, I headed to the gym with my sister and my colleague Audry for an intense 2-hour Body Combat Session called “Combat Cancer” in conjunction with World Cancer Day. I can feel my leg muscles getting sore so I probably won’t be able to walk properly tomorrow morning. Also, can I just say that I have never sweated and smelled so much after that session. In addition, I completely forgot to bring makeup remover so I imagined eyeliner running down my face from the sweat. To my surprise, my makeup was still on point! Anyway, that aside, I’m glad that I had the time to write this post yesterday afternoon (it was a public holiday yesterday which meant no work! Most importantly, it was Brunei’s 32nd National Day).

So, it’s the last of our Healthy Eating journey for the month of February – of course the journey doesn’t completely end here as you should always be eating healthy! What I meant is that it’s the end of this theme for the blog. I will continue to share healthier recipes throughout the upcoming months in my blog, but focusing on other areas other than salads. Next month I will be sharing healthy smoothie recipes with you all; the last time I shared smoothies on my blog was back in October last year when I had Breakfast/Brunch Month on the blog. Hope y’all are excited for that!

Anyway, I came across this recipe – well more like I saw a photo of this dish on Instagram and was instantly drawn to the beautiful colours from the greens and tricolour potatoes. I scrolled down to look at what the dish was a non-traditional Niçoise Salad. I didn’t follow a particular recipe for this dish, but instead I looked at the photo and pulled out the obvious ingredients that I could see. I then search for a dressing to go with the dish and voilà – Salade Niçoise du Saumon Fumé non-traditionnel (Non-traditional Niçoise Salad with Smoked Salmon):

Salade Niçoise du Saumon Fumé

It is non-traditional because Salade Niçoise is typically composed of a salad of tomatoes, tuna (cooked or canned), hard-boiled eggs, Niçoise olives, and anchovies, dressed with a vinaigrette. It is served variously on a plate, platter, or in a bowl, with or without a bed of lettuce. The salad may include raw red peppers, shallots, artichoke hearts, and other seasonal raw vegetables, but according to many sources, excludes cooked vegetables, such as green beans and potatoes, which are commonly served in variations of Salade Niçoise around the world. So, yes, this version of Salade Niçoise that I will be sharing tonight is definitely not a traditional one as you can tell – but it will definitely knock your socks off! I really like this salad, and the dressing/vinaigrette that I made to go with it. Hope you enjoy it too! Feel free to add other veggies to it as you wish… You know, whatever floats your boat kind of thing 🙂

Salade Niçoise du Saumon Fumé

PREP TIME 15 MINS | COOKING TIME 15-20 MINS | SERVES 5-6

INGREDIENTS

For the salad

  • 250g green beans, ends trimmed
  • 250g mixed salad leaves, washed and drained
  • 220g smoked salmon*
  • 100g kalamata olives, sliced
  • 3 large free range eggs, soft or hard boiled**
  • Potato varieties such as chat, sweet potatoes, and purple sweet potatoes (or a range of heirloom potatoes), peeled and cut into chunks

For the dressing

  • 6 tbsp extra virgin olive oil
  • 3-4 anchovy fillets, roughly chopped
  • 3 tbsp red wine vinegar
  • 2-3 garlic cloves, minced
  • 1 small red onion, minced
  • Pinch of ground black pepper

*Plain smoked salmon is fine, or you ca mix it up a bit and get herbed smoked salmon or with five peppers which is the one I used for this recipe.

**Bring a small saucepan of room temperature water together with the eggs up to a boil. Once boiling, the the heat off and let it sit for five minutes is perfect for a runny yolk (or cook as long as seven minutes for a more firmly set, but still spoonable, yolk). For hard boiled eggs, cover and let it sit for 8-10 minutes off the heat.

METHOD

  1. Firstly, combine all the ingredients for the dressing in a medium-sized jar. Cover and shake well to combine the ingredients. Set aside. Tip: you can make the dressing in advance by a day or a few hours before serving to ensure that all the flavours infuse together. Keeps well in the fridge for up to a week if you have any leftovers. You can also add more olive oil and red wine vinegar throughout the week if you need more dressing.
  2. Toss the potatoes in a little bit of ground salt and black pepper. Then place in a steamer and steam for about 10-15 minutes, or until tender but still a bit firm. Once done, remove from the heat and set aside.
  3. Blanch the green beans in boiling water for about 5-6 minutes. Once done, transfer to an ice bath to stop the cooking process. This ensures that you’ll have nice and crisp green beans in your salad.
  4. Plate up accordingly and pour over the dressing. Share and enjoy with family and friends!

Salade Niçoise du Saumon Fumé

Salade Niçoise du Saumon Fumé

BON APPÉTIT

– Ally xx

myTaste.com

Quinoa, Green Beans, and Roasted Capsicum Salad with Pan-seared Rump Steak

Quinoa, Green Beans, and Roasted Capsicum Salad with Pan-seared Rump Steak

Hello Everyone! I can’t believe that January flew by that quickly! We’re already into the second month of the new year but I feel as if though the year has just started! It’s going to be a short month too since it’s February. Anyway, when I got up this morning, I came across a photo on Instagram with the caption:

“Did y’all make New Year Resolutions? How’s it going so far? If you got lazy, you can always start back up today.”

We’re all human, and we all fall into that trap of not keeping our resolutions, but it is indeed never too late to start back up today… Or tomorrow. As long as you are determined to continue going, you will probably reach your end goal. One of my resolutions is to get fit and eat healthy, and I can honestly say that I haven’t been keeping up with this for the past 2 weeks. I’ve been busy with deadlines and helping out in a 5-day event that ended on the weekend, that I have completely ignored exercising and eating right. I am now determined to get back on track, but I feel a sore throat coming down so who knows when I’ll be able to get back on track – but I ain’t giving up that’s for sure.

Quinoa, Green Beans, and Roasted Capsicum Salad with Pan-seared Rump Steak

Tonight, I want to share an experimental recipe that I whipped up a few weeks ago. I rarely cook with quinoa (pronounced as KEEN-wah), and the sole reason for that is because it is very expensive – the bag of 280g (just a little bit under 2 cups) I bought already set me back $12.80. If we take a second to overlook the cost of quinoa, it is actually very beneficial to our health. It is incredibly nutritious as its fibre content is much higher than most grains. It is also very high in protein, containing the essential amino acids that we need . Quinoa contains a great amount of minerals – minerals that we other do not get enough of, especially magnesium, potassium, and zinc. If you would like to read up more on the health benefits of quinoa, click here.

I usually cannot go with a meal if it doesn’t have some sort of meat on the plate – which is why I decided to match this salad with another hit of protein from pan-searing a nice slab of rump steak. I was kind of going for medium-rare, but I think the beef turned out to be a bit more towards the rarer side of medium-rare. Nonetheless, it was delicious indeed (my mom seared the meat a little longer after cutting these few slices). You can pair it with any other meats if you wish, or have it completely vegetarian or vegan; whatever tickles your fancy.

Quinoa, Green Beans, and Roasted Capsicum Salad with Pan-seared Rump Steak

PREP TIME 10 MINS | COOKING TIME 30 MINS | SERVES 5-6

INGREDIENTS

  • 500g rump steak
  • 250g green beans, ends trimmed
  • 100g feta cheese
  • 2 cups chicken stock*
  • 1 cup quinoa
  • 1 cup wild rocket leaves
  • 1 red capsicum
  • Ground salt and black pepper, to taste
  • Olive oil fry pan-searing

For the dressing

  • 1 & 1/2 tbsp fresh lemon juice
  • 2 tsp honey
  • 2 tsp olive oil
  • 1 tsp smoked paprika

*You can make you own stock by boiling chicken carcasses for about half an hour, together with whole black peppercorns, bay leaves, and salt. Or you can use the store bought ones, again, whatever tickles your fancy.

METHOD

  1. Bring the quinoa and chicken stock to a boil in a medium-sized saucepan. Once boiling, reduce heat down to low, cover, and then simmer until tender and most of the liquid has been absorbed, about 15 to 20 minutes. Once done, fluff with a fork and transfer to a large mixing bowl.
  2. While the quinoa is simmering away, blanch the green beans in boiling water for about 5-6 minutes. Once done, transfer to an ice bath to stop the cooking process. This ensures that you’ll have nice and crisp green beans in your salad. Drain and then add to the large mixing bowl.
  3. Season the beef with some ground salt and black pepper. Bring a large frying pan with olive oil to a heat over high, until it starts to smoke. Add your steak and sear for about 2-3 minutes per side for rare, 3-4 minutes for medium-rare, 4-5 minutes for medium-well, or 5+ minutes per side for well done. Once done, set aside to rest for about 10 minutes.
  4. While the beef is resting, you can move on to roasting the capsicum. Rub the red capsicum with a little bit of oil and place directly on open flame of gas stove. Rotate occasionally so that the red capsicum blisters and chars on all sides. Once done, set aside to cool down. Peel the skin off and cut into strips once it has cooled down enough to handle. Add to the large mixing bowl together with the rocket leaves and feta cheese.
  5. Whisk the lemon juice, honey, oil, and paprika in a small bowl until well combined. Add to the large mixing bowl and toss the salad around until well coated and combined.
  6. Serve the salad topped with a few slices of the rump steak. Enjoy!

Quinoa, Green Beans, and Roasted Capsicum Salad with Pan-seared Rump Steak

ps: do not be deceived by the portion of this dish. I just used an oversized dish to plate it up. This kept me quite full for a few hours and I didn’t even finish everything on the plate!

BON APPÉTIT

– Ally xx

myTaste.com