Mantou Bruschetta

Mantou Bruschetta

Hello Everyone! Wishing all my family, friends, followers, and passersby a Happy New Year! I hope everyone had a good Christmas and New Year’s break to refresh, rejuvenate, and reflect asides from celebrating. I hope 2022 will be a better year for all of us.

For those who have been following my blog for a while now, you’ll all know that I always set a theme for the year. This year will be a little bit different. I won’t be setting a specific theme only because I have a backlog of recipes that I created last year but did not have a chance to post it on my blog. Rather than have it sit in my archives, I decided that I’ll spend the first few months of the year getting them up on the blog.

To kick off the new year, I will be sharing my recipes that I whipped up for the King Chef 2021 Challenge last year, starting with this non-traditional bruschetta recipe using mantou buns. We could create anything and everything as long as it featured any ingredient/product from Lee Kum Kee and King Chef, from the challenge kits provided.

Mantou Bruschetta

Like with many of my ideas, this Mantou Bruschetta came into mind while I was in the shower. For those who aren’t familiar with bruschetta, it is an Italian starter dish that consists of grilled bread that has been rubbed with garlic, and then topped with olive oil and salt. There are many variations for toppings, but the most popular and most known one outside of Italy is a mixture of basil, fresh tomato, garlic, onion, and mozzarella.

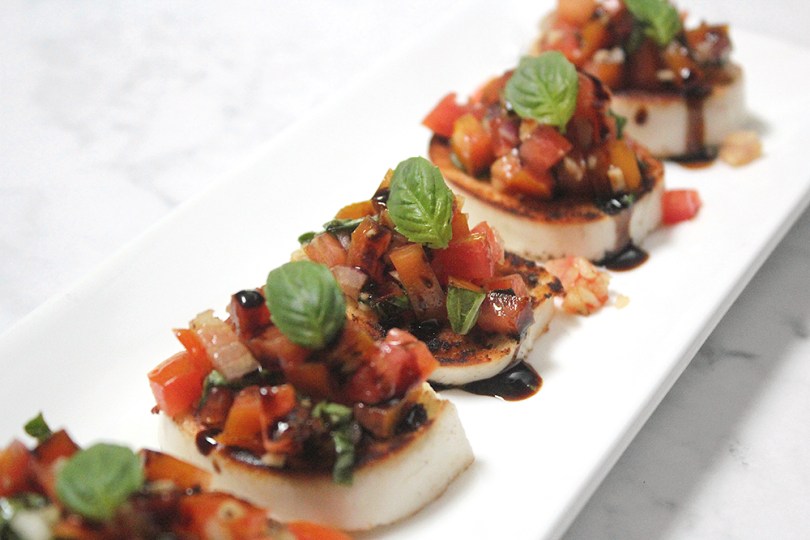
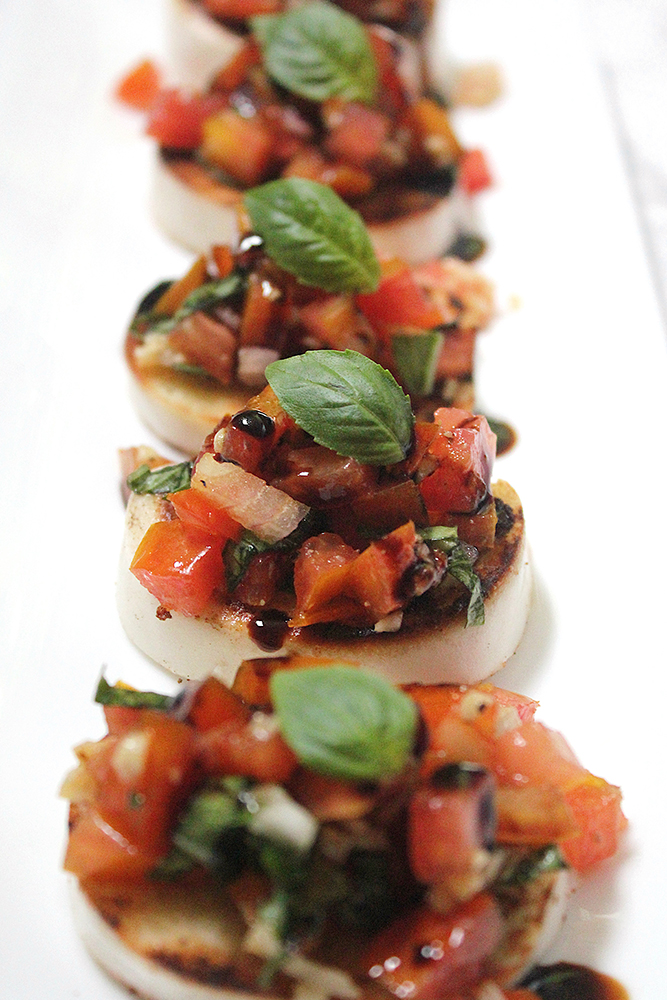
Traditionally, the best choice of bread for bruschetta is an Italian or French loaf – preferably a loaf of bread that has a thick crust and firm consistency. In fact, the dish was developed as a way of salvaging bread that was going stale. Though mantou buns don’t have either of those characteristics, I thought that I could use them as an option for this recipe. Now, As you can see in my photos, I may have pan-toasted them a little bit too much as they turned out to be darker in colour than I wanted them to be. It all worked out in the end in terms of flavour though; the browning gave the mantou bun slices an extra nutty flavour that complimented the sweetness of them.

Now that I got the King Chef product sorted out, I thought hard about what Lee Kum Kim product to incorporate from the challenge kit provided – between premium soy sauce or hoisin sauce. Since soy sauce is salty in taste, I decided to add this to the tomato topping for my bruschetta. So here’s my Chinese-Italian fusion of Mantou Bruschetta; it’s light and fresh, yet tangy and intense at the same time from the balsamic vinegar glaze. It is also sweet and nutty, making it the perfect antipasto to serve at your next dinner party!

Mantou Bruschetta Ingredients

PREP TIME 1 HOUR | COOKING TIME 5 MINS | SERVES 2-3

INGREDIENTS

For the mantou bruschetta

  • 4-5 pcs King Chef’s mantou buns, cut into 1-inch thick slices
  • Olive oil
  • Salted butter (or margarine)

For the tomato topping

  • 4 small-sized tomatoes, deseeded and chopped
  • 2 garlic clove, finely minced
  • 1 small red onion, diced
  • Handful of basil leaves, roughly chopped
  • Cracked black pepper, to taste
  • 1 tbsp extra virgin olive oil
  • 1 tsp Lee Kum Kee’s premium soy sauce
  • Balsamic vinegar glaze, to garnish

METHOD

  1. Tomato Topping: Add all the ingredients in a medium-sized bowl and mix until well combined. Set aside to chill in the fridge for at least an hour before serving.
  2. Mantou Bruschetta: Melt butter with a little bit of olive oil in a small non-stick pan over medium heat. Toast each side of the slice until browned to your liking. Once done, remove from the pan. Work in batches if needed.
  3. Plate up by topping each toasted mantou slice with about a tablespoon of the tomato mixture. Drizzle with some balsamic vinegar glaze, and top each with a small basil leaf. Serve and enjoy immediately.

Mantou Bruschetta

BON APPÉTIT

– Ally xx

Follow me on my social media accounts:
Facebook: Amcarmen’s Kitchen
Instagram: @amcarmenskitchen
TikTok: @amcarmenskitchen

myTaste.com

Advertisement
Chicken & Broccoli Alfredo Stuffed Conchiglie

Chicken & Broccoli Alfredo Stuffed Conchiglie

Hello Everyone! I’ve got one last Broccoli recipe to share with you guys before I power through with the theme for April. I’ll be back to my usual Wednesday posts as I have finally caught up with all the recipes I had planned for the past two months. It wasn’t easy playing catch up seeing as I had to balance both writing the recipes and work over the past few weeks when I posted more than a recipe or two for the week. Anyway, I’ll keep tonight’s post short and sweet as I don’t really have much to talk about in terms of how my week went. I spent pretty much a whole two hours in the kitchen this afternoon whipping up multiple ways for you to add some colour and enjoyment to your breakfast mornings, all of which will be revealed on Wednesday!

Chicken & Broccoli Alfredo Stuffed Conchiglie

Tonight’s recipe is one that I have been wanting to try out for a while now – well not this specific recipe, but rather to work with jumbo pasta shells ever since I brought them back from my recent travels to Singapore. I was at the grocers looking for some products to bring back to Brunei, more specifically products that you don’t find in Brunei, and I came across these jumbo pasta shells (also known as ‘Conchiglie’). You’d think that you’d be able to find Conchiglie pasta in Brunei, and you can actually but just not the jumbo-sized ones. With this recipe, you can choose to make your own Alfredo sauce, or you can just buy the ready made ones at your local grocers; I guess it depends on whether you have time up your sleeve or not! The recipe may be a little bit time consuming like shredding the chicken, stuffing the shells, but trust me when I say that it all pays off in the end and it is actually a very easy and fool-proof recipe! It tastes so good straight out of the oven, and even better the day after if you have any leftovers. Be sure to check out the original recipe over on Life in the Lofthouse by Holly.

Chicken & Broccoli Alfredo Stuffed Conchiglie Ingredients

PREP TIME 30 MINS | COOKING TIME 25 MINS | SERVES 4-6

INGREDIENTS

For the pasta

  • 500g jumbo Conchiglie pasta
  • 500g chicken breast
  • 1 head broccoli, cut into florets
  • 1 cup shredded mozzarella cheese
  • 1/2 cup shredded parmesan cheese
  • Ground sea salt and black pepper, to taste

For the Alfredo sauce

  • 300ml thickened cream
  • 1 cup full cream milk
  • 3/4 cup freshly shredded mozzarella cheese
  • 2/3 cup freshly shredded Parmesan
  • 2-3 garlic cloves, minced
  • 1 small red onion, finely diced
  • 3 tbsp unsalted butter
  • Ground sea salt and black pepper, to taste
  • Olive oil

METHOD

  1. Add the chicken breast together with 2-3 dried bay leaves, a pinch of whole black peppercorns, and about a teaspoon of salt in a pot of water. Bring to a boil and leave to simmer for about 20 minutes. Once done, remove the chicken breast from the stock and set aside to cool down. *Do not discard the stock as it can be kept as a base for soups. I used mine on the same day and made a delicious pumpkin soup while I had these shells on the go too.
  2. Once the chicken as cooled down, shred and place in a medium-sized mixing bowl. Set aside.
  3. Bring a small pot of salted water to a boil and add the broccoli florets in. Poach for about a minute or two so that it still has a crispy bite to it. Immediately transfer to an ice bath to stop the cooking process. Roughly chop the broccoli florets and add to the bowl with the shredded chicken.
  4. Preheat oven to 180C (350F or gas mark 4).
  5. Bring a pot of salted water to a boil and cook the Conchiglie pasta to the package instructions, 18 minutes until al dente. Once done, drain and lay the shells out on a baking tray lined with parchment paper. Let shells cool down completely.
  6. While waiting for the shells to cool, heat the olive oil in a medium-sized saucepan over medium-high. Melt the unsalted butter and then sauté the minced garlic until golden brown and fragrant, about 30 to 45 seconds. Add in the finely diced onions and cook until soft, about 1-2 minutes.
  7. Add the thickened cream and milk to the saucepan and reduce the heat down to medium. Bring to a simmer. Once simmering, remove from heat and stir in the parmesan and mozzarella cheese. Season with ground sea salt and black pepper to taste. Set aside to cool down a bit.
  8. Pour about a cup of the Alfredo sauce to the shredded chicken and chopped broccoli and stir together until well combined.
  9. Add a spoonful of Alfredo sauce to the bottom of a greased baking pan, about 9″ x 13″ will do.
  10. Fill the shells with a large spoonful of the chicken, broccoli, and Alfredo sauce mixture, and place each shell into the prepared pan.
  11. Pour the remaining Alfredo sauce evenly over the shells and sprinkle the tops with more mozzarella and parmesan cheese.
  12. Bake in the oven, uncovered, for about 25 minutes or until warm and bubbly.
  13. Serve and enjoy!
Chicken & Broccoli Alfredo Stuffed Conchiglie

Chicken & Broccoli Alfredo Stuffed Conchiglie

BON APPÉTIT

– Ally xx

myTaste.com

Trine Boscaiola

Trine Boscaiola

Trine Boscaiola

Hello Everyone! It’s week 3 of Pasta Month and I’ve got a few things to say before we dive into the recipe. I apologise in advance that what I am about to say has nothing to do with the upcoming recipe – it’s more me telling you about my day/week and upcoming week. So if you don’t want to read this part, you can skip onto the recipe 🙂 Anyway, so last week Friday I had a nice dinner with my colleagues and then we ended the night escaping from a hostage-themed escape room and we did pretty well I must say! We escaped within an hour and one minute – which from what I remember is 14 minutes earlier than the set time limit hooray! Hostage is one of their new rooms, and the other is The Ring-themed *OMG* which I really want to try out with my friends, but I know I will probably regret it later on.

On Sunday, I also spent the afternoon with different colleagues and we watched The Conjuring 2 – which I don’t know whether it was a huge mistake or not haha. I didn’t think I was that scared from the movie, but I only knew that I was definitely scared when I could barely sleep that night. The image of Valak kept appearing in my head in the dark room – but I was definitely fine the next day/night. We then had dinner and said our goodbyes. Today, a few colleagues of mine headed over to the KFM studio to do a voice recording – basically just getting us to wish everyone “Selamat Hari Raya” for the upcoming festivities next month. It was actually quite fun in the end even though I had to convince just one colleague that I did not want to do the script in Malay because they’d all probably laugh at my pronunciation and intonation.

And that’s all I have for you – OH I almost forgot! Tomorrow morning I’ll be flying of to Singapore again for a couple of days. Taking a small break from work to do some shopping, eating, and meeting up with friends – it going to be a great weekend ahead!

Trine Boscaiola Ingredients

PREP TIME 5 MINS | COOKING TIME 10-15 MINS | SERVES 5

INGREDIENTS

  • 500g trine (curly fettuccine) pasta, or any other pasta shape
  • 250g rindless bacon rashers, thinly sliced
  • 1 punnet (250g) brown mushrooms, thinly sliced
  • 40g unsalted butter
  • 300ml thickened cream
  • 1/3 cup parmesan cheese
  • 5 spring onion stalks, chopped
  • Ground salt and black pepper, to taste
  • Olive oil

METHOD

  1. Bring a large pot of salted water to a boil. Cook the trine pasta according to packet instructions or until al dente.
  2. While the pasta is cooking away, heat about 1 tablespoon of olive oil in a large frying pan over medium-high. Cook the bacon until slightly browned and then remove from the pan. Add in the unsalted butter and then the mushrooms and cook for about 3-4 minutes or until soft. Then add in the pale parts of the chipped spring onion.
  3. Add in the cream together with about a cup of the pasta water and parmesan cheese. Turn the heat down to low and bring the mixture to a low simmer.
  4. Once the pasta is done, drain and then transfer the pasta to the cream mixture together with the fried bacon bits. Turn the heat back up to medium-high and then give it a good mix. Top with the remaining spring onions and then turn the heat off.
  5. Season with salt and pepper and toss until well combined. Divide the pasta among serving dishes and top with extra parmesan. Serve and enjoy!

Trine Boscaiola

Trine Boscaiola

BON APPÉTIT

– Ally xx

myTaste.com

Spaghetti al Nero di Seppia con Calamari e Vongole

Spaghetti al Nero di Seppia con Calamari e Vongole

Spaghetti al Nero di Seppia con Calamari e Vongole

Hello Everyone! It’s week 2 of Pasta Month and let me tell you a little story (don’t I always? *cheeky grin*) before I move on to the recipe. The first time I had squid ink pasta was in an Italian Restaurant when I was studying in Sydney. If I’m not mistaken, the restaurant is called Pizza e Birra on Crown Street in the suburb of Surry Hills. I was having a fancy dinner night out with my flatmate at that time and squid ink pasta was on their specials menu. I was a bit hesitant at first because I obviously hadn’t tried it before and to be honest, I was a bit put off knowing that the colour of the pasta would be black (yes, at that time my palette wasn’t quite as sophisticated as it is right now). To my surprise, the squid ink pasta tasted like any normal pasta – it was just that the colour that was different to me. I’ve had my fair share of squid ink pastas, both in Australia, and here in Brunei. I decided to combine my favourite flavours from both experiences to put up this dish to share with you guys.

I’ve never made fresh squid ink pasta at home, and only because I have no idea where to source squid ink from besides from the ink sacs of fresh squids/cuttle fish. I did some reading online and found that you can actually buy bottled squid ink, but you definitely won’t find them in stores here in Brunei. Heck they don’t even have store bought squid ink pasta here! So how did I manage to source mine? Well, if you’re a regular follower/reader of my blog, you’ll know that I was in Singapore a couple of months back. I was shopping for groceries with my friends for a dinner party that night and I was flabbergasted by all the produce and products found in that grocery store. I was supposed to be focused on grabbing the ingredients I needed to cook my dish for that night, but instead I wandered off, going from aisle to aisle, looking at anything and everything. I found myself in the pasta aisle and that where I came across store bought squid ink pasta. You had no idea how excited and in shock I was when I saw it – because I had no idea that you could buy it on the shelves; and without any hesitation at all, I bought myself a pack to bring back here to Brunei. I know, I know – I’m crazy right? Haha. My next mission will be tomato squid ink pasta from scratch, and I’ll definitely share it on my blog whenever I get around to trying it out! For now, here’s one recipe you can do for your squid ink pasta:

Spaghetti al Nero di Seppia con Calamari e Vongole Ingredients

PREP TIME 10 MINS | COOKING TIME 10-15 MINS | SERVES 5

INGREDIENTS

  • 1 pack (500g) squid ink pasta*
  • 1 pack (250g) cherry tomato medley, halved
  • 1 fish bouillon cube, dissolved in 2/3 cup of boiling water
  • 250g baby clam meat
  • 4 red bird’s eye chillies, sliced
  • 2 large squids, cleaned and cut into pieces
  • 1 lemon, wedged
  • 1/2 bulb garlic, minced
  • Olive Oil
  • Parsley, roughly chopped

*Fresh homemade squid ink pasta or store bought is fine for this recipe

METHOD

  1. Lightly score the inner surface of the squid, or alternatively, cut into rings. Set aside.
  2. Bring a large pot of salted water to a boil. Cook the squid ink spaghetti according to packet instructions or until al dente.
  3. While the pasta is cooking away, heat about 2 tablespoons of olive oil in a large frying pan over medium-high. Sauté the minced garlic and chillies together until golden brown and fragrant.
  4. Add the clam meat, juice of half a lemon, and a pinch of ground black pepper. Give it a good mix before adding the fish bouillon stock. Turn the heat down to low and leave to simmer for about 3-4 minutes. Add in the calamari when the pasta is almost done.
  5. Once the pasta is done, drain and then transfer to the calamari and clam mixture. Turn the heat back up to medium-high and then give it a good mix. Top with the chopped parsley and then turn the heat off.
  6. Serve immediately with a lemon wedge. Enjoy!

Spaghetti al Nero di Seppia con Calamari e Vongole

Spaghetti al Nero di Seppia con Calamari e Vongole

BON APPÉTIT

– Ally xx

myTaste.com

Minestrone Soup

Minestrone Soup

Hello Everyone! Winter Warmer Month is coming to an end this week *sad face* but surely we won’t be saying goodbye to soups forever. I’ll keep today’s post short only because I am actually just writing this now (maybe 30 minutes before this goes up) and I didn’t prepare it in advance or during the day. I’m keeping it short because I’m really tired, but I didn’t want to skip out on posting.

Basically I woke up at 6:30am today, yes that’s actually quite early for me especially since I didn’t sleep well last night, don’t know why. I got up earlier than usual to get ready and head over about an hour out West on the train, to Brendon’s (brendonthesmilingchef) place for a cooking collaboration that had been planning for just about over a month now. We spent the whole morning until late afternoon shopping, cooking, styling, eating, and talking – and overall it was a successful day. I won’t say what we made today because that will be coming up for the month of August!

Minestrone Soup

Okay (again I always do this), I said I’d keep it short but I’m already 200 words in and I haven’t actually talked about today’s recipe – Minestrone Soup. is a thick soup of Italian origin made with vegetables, often with the addition of pasta or rice. Common ingredients include beans, onions, celery, carrots, stock, and tomatoes. There is no set recipe for minestrone, since it is usually made out of whatever vegetables are in season. It can be vegetarian, contain meat, or contain a meat-based broth. I’ve made this soup a couple of times in the past and I used risoni pasta and added bacon chunks to it before. Today, I’m keeping it quite traditional, and used left over angel hair pasta hair that I cut into about 2cm long pieces.

Minestrone Soup Ingredients

PREP TIME 10 MINS | COOKING TIME 65 MINS | SERVES 4-6

INGREDIENTS

  • 375g McKenzie’s Italian Style Soup Mix, washed and drained
  • 150g maple-glazed bacon, cut into bits
  • 1 can (400g) canned diced tomatoes
  • 1 cup angel hair pasta, cut into 2cm long strands
  • 2-3 garlic cloves, minced
  • 2 small carrots, peeled and sliced
  • 1 celery stalk, sliced
  • 1 medium-sized onion, diced
  • 1 large potato, peeled and cut into small chunks
  • Ground salt and black pepper to taste
  • Shaved parmesan cheese
  • Bread of choice

METHOD

  1. Preparing the Beans:
    • Quick method: Put required quantity into a saucepan and cover with water – approximately 3 cups of water for every cup of soup mix. Bring to the boil and simmer for approximately 45 minutes or until cooked, skimming if necessary.
    • Traditional method: Soak soup mix for approximately 6-8 hours (overnight if convenient) before cooking.
  2. Minestrone Soup: Heat oil in a large pot over medium-high. Fry the bacon bits until browned, then sauté the garlic together with the bacon until fragrant and golden brown. The add in the onions and cooking until soft.
  3. Add in the carrots, celery, and potatoes, and season with salt and pepper to taste. Give it a good mix and leave to cooking for about 5 minutes before adding the canned diced tomatoes in. Cook for a further 5 minutes.
  4. Add in the chicken stock and bring to a boil. Once boiling, add in the prepared beans and further simmer for about 10-15 minutes, in the last 4 minutes, add in the angel hair pasta.
  5. Turn the heat off, and divide equally into serving bowls (4 large bowls, or 5-6 small bowls) and top with some shaved parmesan cheese. Serve immediately with some stone-baked Pane di Casa bread.

Minestrone Soup

BON APPÉTIT

– Ally xx

myTaste.com

Angel Hair Carbonara

Angel Hair Carbonara

Hello Everyone! Today has been a particularly lazy day spent at home binging on Game of Thrones; now on the last episode of Season 3 and I must say, episode 9 was just brutal with the death of the Starks, just as Arya was about to reunite with her mother and elder brother. Sorry if I spoilt it for anyone; just don’t read the sentence before this! While on the topic of GoT, I totally ‘ship Arya and Gendry.

Angel Hair Carbonara

In other news, no I didn’t actually rip strands of hair from an angel; it is actually known as Capellini, literally translated: ‘little hair’, which is a very thin variety of pasta. As it is very thin and light, it goes well in soups or dressed with very light sauces. I did actually get out of bed today in between episodes and made myself lunch, and today I decided to whip up an easy angel hair carbonara. I was told once before that the key to a good carbonara was to add a dash of worcestershire sauce. Of course I didn’t believe the man (my ex-housemate’s friend) at first because he was piss-drunk at the backyard of the house that I used to live in. At first I was like “worcestershire sauce, really?” in my head, but I nodded and said that I would give it a try, but not that day. Today, I tried it with worcestershire sauce, and I must say that it actually tasted pretty good. Well, he is Italian so I guess he knew what he was talking about.

I’ve made carbonara two ways before; one with cream and one without. Personally, I prefer the first with cream. If you prefer without cream, just add a ratio of one egg to one egg yolk in a bowl together with some parmesan cheese, a bit of salt and ground black pepper. Beat well and pour over a pot of drained hot pasta, heat off. Mix well and allow the hot pasta to cook the egg. Add fried bacon bits and spinach or rocket leaves if you wish.

Angel Hair Carbonara Ingredients

PREP TIME 5 MINS | COOKING TIME 10 MINS | SERVES 4

INGREDIENTS

  • 250g capellini (angel hair) pasta, or any other type of pasta
  • 150g streaky bacon, cut into small bits
  • 300ml thickened cream
  • 100ml milk
  • 4 large free range egg yolks
  • 3/4 tsp worcestershire sauce
  • Handful of rocket leaves, washed and drained
  • Ground salt and pepper to taste
  • Shaved parmesan cheese, to serve

METHOD

  1. Heat a bit of oil in a medium-sized frying pan and fry the bacon bits until browned. Add the cream and milk, and season with salt and pepper. Bring to a simmer. Once simmering, add in the worcestershire sauce.
  2. Meanwhile, bring a pot of salted water to a boil and cook your pasta according to packet directions. In this case, Barilla angel hair pasta takes about 4-5 minutes. Once cooked, drain and add the pasta to the sauce mixture together with the rocket leaves. Give it a good mix.
  3. Portion the pasta into 4 separate plates and place an egg yolk on top of each bed of pasta (the hot pasta will cook the egg yolk once you mix it all in together). Serve immediately and enjoy!

Angel Hair Carbonara

Not too long ago, I remember my friend saying to me that she missed my mom’s carbonara. Her’s is a little bit different since during that time I wasn’t even interested in cooking. She bought white sauce from a jar in the supermarkets and added minced chicken and sausages for her fettuccine carbonara. Even if it was jarred sauce, it was still a hit amongst my high school friends. They remembered how my mom used to pack extra lunch boxes on Thursday afternoon and delivered them to school during lunch break to share amongst my friends. I miss those days.

BON APPÉTIT

– Ally xx

myTaste.com

Garlic & Rosemary Pizza

Garlic & Rosemary Pizza

Hello Everyone! Sorry for the lack of updates on the blog! I did say in the last post or so perhaps that I’d be travelling during this time and that I was unsure of whether I’d have, not so much the time, but more the internet connection to be able to post updates for you guys – and that’s exactly what happened! The first week of my trip I was staying in Sta. Maria Bulacan where my grandmother is currently residing has no wi-fi connection. I am now in Lucena at my cousin’s place with internet!

Garlic & Rosemary Pizza Ingredients

3 pizzas down and just 1 more to go after this recipe. I prepared this post and the next even before I left for holidays, but as I said, I didn’t have the connection. Today I have a very simple pizza recipe for you. The first time I had this pizza was back home in Brunei at a restaurant called Fratini’s. I was with my Mom and two younger sisters at that time for a 50% off dinner promotion during the month of fasting for Muslims known as Ramadhan. If I’m not mistaken (since I am talking about several years ago), we ordered their winning dish Linguine Fratini which was quite a hefty dish, but sharing that between 4 people was not enough; just. So we decided that we wanted to order a pizza too, to share, but nothing to hefty as the pasta dish. So the waiter/waitress at the time recommended the garlic and rosemary pizza, which we ended up ordering at the end. When it came to the table, I was actually quite shocked. “Where’s the sauce?” I asked myself. Everything that I knew about what pizza was meant to be, stuffed crust, tomato sauce, and cheesy goodness, all gone. But when I had a slice of that pizza, I was in heaven. It was like garlic bread, but in pizza form. It was delicious that I didn’t even want to share the pizza with anyone else!

My pizza came out a little too tan for my liking, and didn’t really have the same flavour I experienced back then. It was nonetheless still tasty, however I think I overdid the salt a wee-bit too much.

Garlic & Rosemary Pizza Ingredients

PREP TIME 10 MINS | COOKING TIME 8-10 MINS | SERVES 3-4

INGREDIENTS

METHOD

  1. Combine all the ingredients to a small bowl and let it sit for about 30 minutes to an hour for the fresh garlic and rosemary leaves to macerate in the olive oil.
  2. Preheat oven to 220C. Place your pizza stone in the oven as well to heat it up.
  3. Roll out your dough to a circle the same size as your pizza stone on a lightly floured surface as thick or thin as you want. Then drizzle the olive oil mixture over the top of the dough.
  4. Carefully remove the stone from the oven and quickly slide the pizza over the top of the stone. Place it back in the oven and bake for about 8-10 minutes or until cooked all the way through. It should not take more than 15 minutes in total.
  5. Remove from the oven and serve with any sort of pasta dish as a side!

Garlic & Rosemary Pizza

Garlic & Rosemary Pizza

BON APPÉTIT

– Ally xx

myTaste.com

Pappardelle al Ragù

Pappardelle al Ragù

Hello Everyone! So today’s recipe is sort of a carry on from Monday’s special. If you’re like me, living by yourself, having a whole roast leg of lamb to yourself, you’re bound to have leftovers. What do you do? Lamb Ragù! Well, I’m pretty sure you can come up with other dishes to use your leftovers, if you have any that is, or you could always go out and buy lamb shanks or any other cuts that work for this dish.

I decided to go for a lamb ragù because not too long ago, exactly two weeks ago actually now that I think of it, a friend of mine planned for a little celebration for completing our degrees! We had dinner at the Westfield in Pitt Street, at a place called Janus Italian, and apparently she tried to book Jamie’s Italian but they are all booked out for groups until April! But nonetheless, Janus Italian was a nice dining place too – not to mention spacious as we had the whole back area to ourselves, well illuminated, and we could basically hear each other talk without having to shout across the table – all of which we probably wouldn’t have had/been able to do at Jamie’s. Seriously, though the food at Jamie’s is superb, it’s cramped, dark, and loud. Anyway, where I am getting at with this is that I had the Pappardelle al Ragù with slow cooked lamb. It was the best thing I’ve ever had! I even had the entrée sized dish and I was full about three quarters of the way into my dish. It was so good that when I knew I’d be making a roast leg of lamb, I would be able to make this too! Original recipe for slow-cooked lamb ragù can be found on Taste.

Pappardelle al Ragù Ingredients

PREP TIME 210 MINS | COOKING TIME 3 HOURS | SERVES 4-6

INGREDIENTS

  • 1kg roast leg of lamb meat
  • 500g pappardelle pasta
  • 1 can (400g) diced tomatoes
  • 3 celery sticks, sliced
  • 2 garlic cloves, crushed and then minced
  • 2 red bird’s eye chillies, sliced
  • 1 large carrot, peeled and cut into small chunks
  • 1 large spanish onion, finely chopped
  • 1/2 cup red wine
  • 1/4 cup fresh herbs such as rosemary and thyme, chopped
  • 2 tbsp extra virgin olive oil
  • 2 tbsp tomato paste
  • 1 chicken stock cube
  • Shaved parmesan cheese, to serve
  • Salt and pepper to taste

METHOD

  1. Preheat  oven to 220C.
  2. Heat olive oil in a large, frying pan over medium-high heat. Add in the garlic, chillies, and fresh herbs. Sauté until fragrant and then add the onions in. Cook until the onions are soft before adding the carrots and celery in. Season with salt and pepper, and cook for a further 10 to 12 minutes, stirring continuously.
  3. While the vegetables are cooking, add the lamb meat as well as the bones to a casserole dish (in my case I just used my rectangle pyrex dish).
  4. Add the red wine and leave to cook for about a minute or two before adding the the diced tomatoes, stock cubes, tomato paste, and about 2 cups of cold water. Stir to combine and then bring to a boil.
  5. Once boiled, remove from the heat are carefully scoop out the vegetables transfer them to the pyrex dish with the lamb meat. Then pour the liquid into the dish. Cover using aluminium foil, or with the lid if using a casserole dish with a lid, and place in oven to cook for about 3 hours or until tender.
  6. Once the lamb is done, get started on your pappardelle pasta. Bring a medium-sized saucepan of salted water to a boil. Cook the pasta according to the packet instructions, until al dente. Drain and transfer to a serving plate. Top with the lamb ragù and shaved parmesan. Serve!

Pappardelle al Ragù

Pappardelle al Ragù

BON APPÉTIT

– Ally xx

myTaste.com

Pastabella - PRIMI (PASTA): CARBONARA

Pastabella

Hello Everyone and hello to an all new Review Sunday! I’ve visited Pastabella twice now; the first time was for Marissa’s birthday dinner at the beginning of this month, and the second time was two nights ago when I caught up with my friend Rowena from back home. Both times did not disappoint; the food was absolutely amazing and the dining experience was taken to the next level with great company.

Pastabella is an Italian restaurant that is all about fresh house-made pasta and wood fired pizza. Now it may not have the best looking ambience in comparison to the other cafés and restaurants on the same street, but it had a homely feel to it. The inside space was like sitting down in your own dining room, while the outside space felt like your backyard or patio area.

There is this man, a cheerful guy he is, who I believe may quite possibly be the owner of Pastabella, greeted us with a smile, a cheeky joke and a laugh, which I thought was quite pleasant because it set the mood for us. I absolutely hate it when you’re greeted with snotty and unpleasant waiters/waitresses, but no, none at Pastabella! You could easily joke around with this man as well and he even returned the favour. When he served us, he asked “who ordered the spachatella?” I raised my hand and he placed the dish in front of me. He then asked “and who ordered the gamberi?” I mean, I was with one other person at that time so it was obviously Rowena’s dish. Nonetheless I responded by saying “I think someone inside ordered this” while I tried to point through the glass windows at a table inside. He the responded by saying “oh okay” and took about two steps away from our table, then quickly turned around, laughed, placed the dish in front of Rowena, and said “she’s a cheeky one isn’t she?” Golden. There were many other funny encounters but I’ll end up writing a whole paragraph or two more about that!

Pastabella - PRIMI (PASTA): BOSCAIOLA
PRIMI (PASTA): BOSCAIOLA
House-made fettuccine pasta with mushroom, bacon, and shallots in a fresh creamy sauce ($18.00)

This dish was quite similar to their carbonara, minus the mushrooms of course and add the egg. I had a little taste of this from my friend’s plate and I quite enjoyed how the cream sauce was nice and relatively thin, but still very flavoursome.

Pastabella - PRIMI (PASTA): CARBONARA
PRIMI (PASTA): CARBONARA
Famous Italian dish of house-made spaghetti pasta with bacon, shallots, egg, and cream ($18.00)

Carbonara is like a classic favourite of mine, but I always try to stray away from ordering it for two reasons mainly. The first is because I can make my own carbonara and secondly, for me I find that carbonara anywhere is the same. When this came to our table though, I have never seen anything like it! When I say that, I am actually referring to it’s presentation. I’ve had my fair share of carbonara’s and never have I seen it being served with a raw egg yolk sitting on a bed of pasta. It tasted amazing! The sauce was rich and absolutely divine, but I probably would struggle to eat a whole plate of it just because the richness and creaminess gets to you at a certain point.

Pastabella - PRIMI (PASTA): CHILLI CON GAMBERI
PRIMI (PASTA): CHILLI CON GAMBERI
House-made fettuccine pasta with tiger prawns, rocket, garlic, and olive oil, cooked in a white wine sauce with a dash of chilli ($22.00)

I had a little taste of this off Rowena’s plate – the tiger prawns were cooked to perfection. Plump, juicy, and soft; nothing of that rubbery texture that I’ve had at a fair share of other places. This dish here was perfection. The pasta was cooked well and I remember Rowena saying that she gets skeptical when dishes say ‘chilli’ but they don’t live up to that level of spice that she expects. This dish did not disappoint her tough! To quote her, “they used legit chillies”. I felt though that those who cannot take the heat will complain about the ‘dash’ of chilli – did not feel like dash! But I’m not complaining; I love the spicy kick!

Pastabella - PASTABELLA SPECIALS: RISOTTO MARINARA
PASTABELLA SPECIALS: RISOTTO MARINARA
Traditionally cooked risotto with mixed seafood in our traditional napolitana sauce garnished with fresh parsley ($26.00)

This for me tasted really good; the seafood was cooked to perfection and flavours were on point. But like other marinara dishes that I’ve had, I feel like they all taste the same.

Pastabella - PASTABELLA SPECIALS: SPACHATELLA, PISTACHIO E PANA
PASTABELLA SPECIALS: SPACHATELLA, PISTACHIO E PANA
A traditional Sicilian style pasta cooked with fresh cream, sprinkled with roasted pistachio nuts, and topped with pecorino cheese ($25.00)

I was intrigued by this one because never have I ever had a pasta-pistachio combination before. I love pistachios, and I know they have a very distinct taste to them as well. This pasta tasted so great! The pistachios really enhanced the flavour of the dish and was finished off nicely with pecorino on top. It was something that I’ve never tasted before, and I couldn’t even compare it to any other dish in terms of flavour.

In my opinion, the pizzas that we ordered were nothing really special that would make me want to go all the way back here for more. Don’t get me wrong, the pizzas were good, but it’s more like there are other pizza places that are nearer to where I live that are just as good.

Pastabella - PIZZA: ITALIANA
PIZZA: ITALIANA
Napolitana & mozzarella cheese base with eggplant, zucchini, mushrooms, artichokes, olives, and garlic ($23.00)

Pastabella - PIZZA: PASTABELLA
PIZZA: PASTABELLA
Signature Pastabella sauce, grilled chicken, mushrooms, and olives ($20.00)

Pastabella - DOLCI (DESSERTS): PIZZA ALLA BANANA
DOLCI (DESSERTS): PIZZA ALLA BANANA
Banana and custard pizza, drizzled with a delicious caramel sauce and lightly sprinkled with icing sugar ($14.00)

After a filling feast, we just had to have dessert, and we definitely made the right choice. Wood fired dessert pizza with a custard-base sauce, fresh bananas, and caramel sauce – what a combination! Though I love the taste of fresh bananas, I probably would’ve loved them to be fired in the pizza oven for a few minutes to caramelise. I bet that would be AMAZING.

Pastabella - DOLCI (DESSERTS): PASSIONE DI FRUTTI
DOLCI (DESSERTS): PASSIONE DI FRUTTI
Banana, passionfruit and custard pizza, sprinkled with icing sugar ($15.00)

I know, you’re probably thinking that this is exactly the same as above but with passionfruit instead of a caramel sauce. Well you are totally right! But this was supposed to be a dessert pizza with peaches and passionfruit instead of banana. To my dismay, they had run out of peaches that night, and they asked if banana was okay. Well, I couldn’t do anything about it, so I just agreed to it. Not disappointed on the taste though because it was just as good as the last time I had their pizza alla banana dessert!

I definitely recommend this place if you want to spend a quiet date night with friends or even your special someone. There’s just something about ambience that makes you feel right at home, and eating great traditional pasta and pizza with good company that makes Pastabella a great dining place.

So based on all that, I’d say that this place is a definite 9.5 for food (just a slight disappointment that they didn’t have peaches for the passione di frutti dessert pizza we ordered), ambience probably 8, and service an easy 10. Value? I’d probably give it an 8.5? The portions were decent for the price in my opinion!

Pastabella
89 Glebe Point Road,
Glebe, NSW
Australia, 2037

– Ally xx

Kangaroo Lasagne

Kangaroo Lasagne

Hello Everyone! The kangaroo makes another appearance on tonight’s blog post! I finally got around to using the other half of the kangaroo mince that I first cooked with about a month or more ago now. I decided to go with making a lasagne only because I had most of the essential ingredients already in my fridge/pantry at the time I was planning on making it – I really only needed the lasagne sheets and a few of the vegetables.

Tonight’s post is not going to be as long as the others; I don’t have much to tell. If you read my post on the Kangaroo Bolognese that I made a while back, you’d know the story behind how I came to purchase roo mince. Also, I mentioned in that post that I neither loved nor hated the taste of kangaroo – it was just an inexplainable feeling. I even said that, after having given kangaroo a second chance while camping in Uluru, I was leaning more towards liking it. After making this lasagne though, I’m definitely disliking the taste of it. However, it may very well be the fact that I made a lot of it to last me 6 meals, so that may be the reason why I started to dislike it after a while – but no; I won’t be purchasing kangaroo for a while. Maybe never again actually because I’ll be leaving Sydney soon and roo meat is DEFINITELY not available back home.

Kangaroo Lasagne

I actually ran out of mozzarella cheese when making the lasagne so I ended up adding tasty cheese as well because that was the only other cheese I had in the fridge – and I didn’t have much of it either. I have also doubled the quantities for the béchamel sauce as I found that I didn’t have enough for the meat filling recipe that I had.

Also, just a little side note, if you want to try this recipe out, DON’T lay the eggplant slices raw. They barely even cooked when the lasagne was in the oven. Took a bite, and it just ruined the dish for me. I had to take them out and cook them separately. Much hassles! So make sure you bake/grill/pan fry them before layering them in-between the meat and lasagne sheets. I mean, I already had this at the back of my head, that I needed to cook them first, but no, I didn’t. First amateur cook mistake for 2015 – yeap, I’m off to a good start.

Kangaroo Lasagne Ingredients

PREP TIME 15 MINS | COOKING TIME 1 HOUR 30 MINS | SERVES 6-8

INGREDIENTS

For the meat filling

  • 500g kangaroo mince
  • 1 can (400g) Italian diced tomatoes
  • 1 sachet (2 tbsp) tomato paste
  • 1 cup water
  • 3 tbsp olive oil
  • 4-5 dried bay leaves
  • 3 garlic cloves, crushed then minced
  • 2 tsp dried oregano
  • 1 carrot, cut into small chunks
  • 1 medium-sized red onion, diced
  • 1 red birds-eye chilli, sliced (optional for that added kick of spice)
  • 1 zucchini, cut into small chunks
  • Ground sea salt and black pepper to taste

For the béchamel sauce

  • 2 cups milk
  • 3 tbsp olive oil
  • 3 tbsp plain flour
  • 1/2 tsp nutmeg
  • Pinch of sea salt
  • Wholemeal lasagne sheets
  • 1 pack (250g) mozzarella cheese, grated
  • 1 large eggplant, sliced

METHOD

  1.  Preheat oven to 180C.
  2. Heat the olive oil in a large frying pan and pan fry the eggplant slices until done, about 4-5 minutes per side. Set aside.
  3. In the same frying pan, sauté the garlic until golden and fragrant. Then add the onions in a sauté until soft. Add the vegetables in and cook for about 5 minutes before adding the kangaroo mince in. Cook over medium heat and slowly brown the meat. When the meat has completely browned, add the canned diced tomatoes, tomato paste, oregano, and water. Season with salt and pepper, then simmer for about 25 to 30 minutes.
  4. While the meat is simmering away, get a head start on the béchamel sauce. Heat the olive oil in a medium-szied saucepan. Add the plain flour and nutmeg to the oil and stir continuously for 2 to 3 minutes. Slowly add the milk in a bit at a time while still stirring the mixture continuously. Stir until the sauce is smooth, season and then set aside.
  5. In a ovensafe dish (I used a 28cm x 18cm pyrex dish), add half of the meat filling and top with half of the eggplant slices. Arrange a layer of lasagne sheets over the top and then followed by a layer of the béchamel sauce. Top with half of the pack of mozzarella cheese and then repeat for another layer.
  6. Place the in the oven and bake for about 40 to 45 minutes.
  7. Serve with a salad on the side and perhaps some yummy garlic bread.

Kangaroo Lasagne

Kangaroo Lasagne

BON APPÉTIT

– Ally xx

myTaste.com