Hainanese Chicken Rice

Hainanese Chicken Rice

Guess who’s back? Back again? That’s right, I’m back from the dead (as some may say) and here with another post! I do apologise for not posting over the past few weeks. I just finished my first semester of my 4th year and it feels so good to have completed everything! I finished on Tuesday morning and practically celebrated the whole day – from a barbecue, to 22 Jump Street, and finally ending the night/early the next morning at a bar/club. I didn’t really get back into my cooking until this morning after having gone grocery shopping to fill up my empty fridge. It felt so good to see a shelf full of fresh fruit and vegetables, and meat.

Today’s recipe is something close to my heart, or should I say tummy? I remember growing up with Thien Thien Chicken Rice just a couple of blocks away from where I spent my early 7 years of life, and still continued to go back and forth there up until today. $3.20 chicken rice? Don’t mind if I do! Hainanese Chicken Rice here in Sydney is almost 3x (sometimes even 4x) more expensive and honestly not as delicious as chicken rice back home – but I can’t do anything about it. When I crave it, I just have to have it. I recently had some at Kreta Ayer in Kingsford with some friends and we were a bit disappointed. The chicken was well cooked, rice was mediocre, and the sauces, disappointed. Chilli sauce from a bottle? No spring onion and ginger oil? No soup to go with the dish? This must be a joke.

Hainanese Chicken Rice

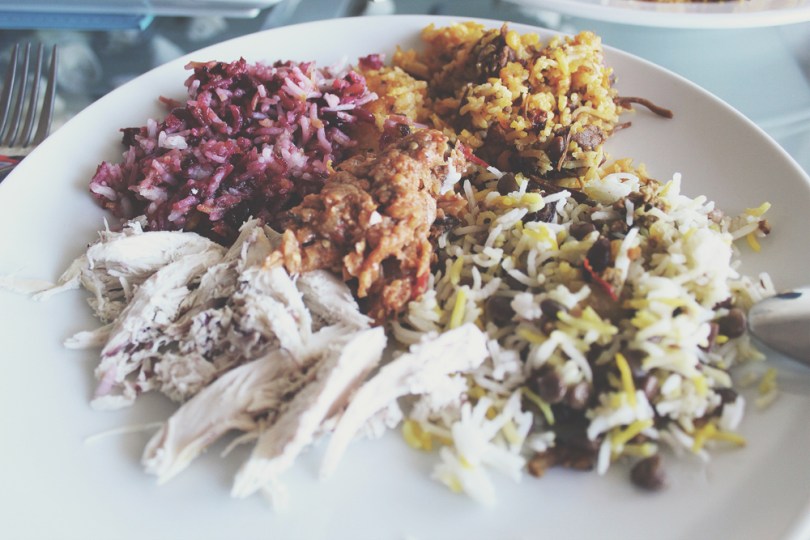
After that disappointment, my friend and fellow housemate, Marissa, and I decided that when we were both free from assignments and exams, that we would make our very own Hainanese Chicken Rice, and that’s exactly what we did for today. I was in charge of cooking the chicken and rice, while Marissa took care of the sauces and carving of the chicken.

Check out the original recipes that we followed:

Hainanese Chicken Rice

PREP TIME 10 MINS | COOKING TIME 1 HOUR SERVES 6-8

INGREDIENTS

For the chicken

  • 1 whole chicken (ours was 1.6kg)
  • 5-6 thick slices of ginger
  • 3 stalks of spring onion, cut into 1″ sections (both green and white parts)
  • 1 pandan leaf, washed and halved
  • 2 tsp chicken stock powder
  • 1 tsp sesame oil
  • Salt for cleaning and seasoning the chicken

For the rice

  • 3 cups uncooked long-grain rice, washed and drained
  • 3 cups reserved chicken poaching broth
  • 2 tbsp olive oil
  • 3 cloves garlic, finely minced
  • 1 pandan leaf, washed and halved
  • 2 tsp grated ginger
  • 1/2 tsp sesame oil

For the chilli sauce

  • 6 red birds-eye chillies
  • 2 cloves garlic, finely minced
  • 2 tbsp reserved chicken poaching broth
  • 2 tbsp grated ginger
  • 1 tsp white sugar
  • 1/4 tsp salt
  • 1 tsp lemon juice

For the spring onion and ginger oil

  • 4 stalks spring onion, sliced thinly
  • 3 tbsp peanut oil
  • 2 tbsp grated ginger
  • 1/2 tsp salt

For the dressing and garnishes

  • 1 tomato, sliced
  • 1 lebanese cucumber, peeled and sliced
  • Sliced spring onions
  • 2 tbsp light soy sauce
  • 1 tbsp chicken poaching broth
  • 1 tbsp sesame oil

Hainanese Chicken Rice: Chilli Sauce

Hainanese Chicken Rice: Spring Onion and Ginger Oil

METHOD

  1. Rub a small handful of salt all over the chicken, getting rid of any loose skin and dirt. Rinse chicken well, inside and outside, and season with a generous amount of salt. Stuff the chicken with the ginger slices, green onions and pandas leaves. Place the chicken in a large stockpot and fill with cold water to cover the chicken. Bring the pot to a boil over high heat, then immediately turn the heat to low to keep it to a simmer. Cook for about 30 minutes more (less if you’re using a smaller chicken).
  2. When the chicken is cooked through, turn the heat off and remove the pot from the burner. Immediately lift and transfer the chicken into a bath of ice water to cool. Discard the stuffing. The quick cooling will stop the cooking process, keeping the meat soft and tender, and giving the skin a lovely firm texture. The quality of the chicken skin is important in this dish! It’s all about the skin texture. DO NOT DISCARD THE CHICKEN POACHING BROTH.
  3. While the chicken is cooking, prepare the sauces and dressing. For the chilli sauce, combine chillies, ginger, garlic, sugar and salt in a mortar and pound to a paste. Add the lemon juice and chicken poaching broth, and pound again. Set aside.
  4. For the spring onion and ginger oil, add the spring onions, ginger and salt to a heatproof mortar and pound lightly with the pestle. Heat the oil in a small frying pan until smoking and pour onto the mixture. Once the sizzling stops, combine lightly with the pestle and leave to infuse for a few minutes.
  5. For the dressing, mix the sesame oil and soy sauce with the chicken poaching broth.
  6. For the rice, heat cooking oil in a saucepan over medium-high heat. When hot, add the ginger and the garlic and fry until your kitchen smells like heaven. Be careful not to burn the aromatics! Add in your drained rice and pandan leaves, and stir to coat, cook for 2 minutes. Add the sesame oil, mix well. Add the reserved poaching broth and bring to a boil. Immediately turn the heat down to low, cover the pot and cook for 15 minutes. Remove from heat and let sit (with lid still on) for 5-10 minutes more.
  7. While the rice is cooking, remove the chicken from the ice bath and carve to serve.
  8. If you have any remaining chicken stock after that, you can season it and add a few onion slices. This can be served as a light soup to accompany the meal. We added some slices of hairy melon to our soup.

Hainanese Chicken Rice

BON APPÉTIT

– Ally xx

myTaste.com

Spicy Carrot, Chickpea & Almond Soup with Roasted Croutons

Spicy Carrot, Chickpea & Almond Soup with Roasted Croutons

Hello Everyone! Sorry for the lack of posts once again. I’ve been a bit busy with University, preparing for the last 2 weeks to go! It’s been hectic! Also, the weather hasn’t been very cheerful for the past couple of days. Winter is definitely kicking in! It’s cold, damp and miserable. On occasions there’d be rays of sunshine, but Sydney weather being deceptive and all, the sunshine never lasts long. So what better way to warm up that a nice bowl of spicy soup with crunchy croutons? Soup has never tasted so good.

Today I cooked from the UNSW Student Cookbook, a recipe by Serena Coady. This dish was served at the Cookbook Launch last week and I fell in love with it. It tasted so good that I really wanted to make a whole bowl for myself after a measly taste test without the croutons. Today was definitely the perfect time to whip it up. I tweaked the recipe just a bit in terms of using different bread, herbs and beans, and leaving the sour cream as is, but otherwise I pretty much followed the recipe.

To be honest, the title of this recipe doesn’t quite live up to it – the spicy part that was. I was a bit disappointed that my soup was not spicy at all, like I wouldn’t even say it was mildly spicy. So I may have added a bit too much of dried chilli flakes to give it that kick that I was after. Now that really grasped the word ‘spicy’! It may just be cultural thing, I know a lot of my Western friends who can’t take anything spicy at all, or even calling a dish that had a dash of paprika in it ‘really spicy’. I seriously have no comment for that.

Spicy Carrot, Chickpea & Almond Soup with Roasted Croutons Ingredients

PREP TIME 5 MINS | COOKING TIME 25 MINS SERVES 4

INGREDIENTS

  • 500g carrots, peeled and sliced
  • 1 medium brown onion, diced
  • 5 cups vegetable stock
  • 1 can (400g) chickpeas, drained
  • 1/2 cup flaked almonds
  • 1 tbsp smoked paprika
  • 2 tsp dried chilli flakes
  • 1/2 tsp dried oregano leaves
  • 3-4 slices of Pane di Casa bread from Bakers Delight
  • 1/4 cup + 2 tbsp extra virgin olive oil
  • Dollop of sour cream
  • Ground salt and pepper to taste

METHOD

  1. Preheat oven to 250C.
  2. Heat 2 tbsp of olive oil in a large pot over medium to high heat and sauté onions until soft, about 2 minutes. Add in the carrots with the chillies, paprika and oregano and sauté until combined. Season with a touch of salt and pepper. Increase the heat to high and stir intermittently for 15 minutes until carrots are tender and browned. Add the vegetable stock and chickpeas and bring to a boil. Simmer for another 10 minutes. Add the almond flakes into the soup, saving some for garnish later.
  3. Meanwhile, spread the flaked almonds on a lined baking tray and place in the oven for about 5 minutes or until the flakes are golden brown. Remove and set aside.
  4. Rip the slices of bread into bite size pieces and toss with 1/4 cup of olive oil in a small bowl. Spread onto the same lined baking tray and roast in the oven for about 8-10 minutes or until golden brown. Set aside.
  5. Pour the soup over into a blender (working in batches if I does not all fit) and blend on low speed for about a minute until well combined and smooth. Pour into a bowl and add a dollop of sour cream. Sprinkle with almonds, croutons, and paprika. Serve.

Spicy Carrot, Chickpea & Almond Soup with Roasted Croutons

A definite favourite winter warmer.

BON APPÉTIT

– Ally xx

myTaste.com

South American Style Eggs with Fresh Tomato Salsa & Turkish Bread Roll

South American Style Eggs with Fresh Tomato Salsa & Turkish Bread Roll

For brunch yesterday I had planned to make a sandwich with my Turkish bread roll. I had bought some Hungarian salami, tomatoes, rocket leaves, and a spicy capsicum spread to go with it. When I actually started to gather the ingredients for my sandwich I realised I had an untouched carton of a dozen eggs, I then decided to poach an egg or two to go with my sandwich. I then also spotted chorizo sausages at the back of the refrigerator and I instantly wanted to fry those up too with some caramelised onions.

I then ended up completely changing what I had in mind as I started to chop up the ingredients. I slowly craved for scrambled eggs with chorizo on the side… And then I thought of those South American Style Eggs that I had at Café con Leche about a month ago. I stopped there – I scrapped the salami and decided scrambled eggs with chorizo it was! I didn’t want the bread to go stale as well so I ended up toasting those in the oven and having them with my lunch. I also wanted to use the tomato and rocket leaves I bought so I ended up making a fresh salsa with it. My simple sandwich turned into something so epically large that it left me 5-months pregnant with a food baby (an expression that I always use to describe a very good, but gluttonous, meal).

PREP TIME 10 MINS | COOKING TIME 10-15 MINS SERVES 1

INGREDIENTS

For the eggs:

  • 2 large free range eggs
  • 1 Mexican chorizo sausage, sliced
  • 2 tbsp milk
  • 1/2 spanish red onion, diced
  • 2 tbsp extra virgin olive oil
  • Ground salt and pepper

For the tomato salsa:

  • 1/2 large tomato, diced
  • 1/2 spanish red onion, diced
  • 1 lime, juiced
  • 2 tsp extra virgin olive oil
  • Handful rocket leaves
  • Ground salt and pepper
  • Turkish bread roll

METHOD

  1. For the tomato salsa, combine all of the ingredients in a small bowl and toss to mix. Let it sit for an hour for the flavours to infuse (this is entirely optional, I let mine to sit for about 10-15 minutes and it still tasted amazing).
  2. Preheat oven to 180C. Slice the bread roll in half and drizzle with olive oil. Place in the oven and toast for about 10 minutes or until golden brown (mine were a bit overdone only because I completely forgot about them in the oven).
  3. In a small bowl, whisk together the eggs and milk, and season with salt and pepper. Heat the oil in a medium-sized frying pan over medium heat. and sauté onions until soft, about 2 minutes. Add the chorizo and cook, stirring, until just beginning to brown, about 5 minutes. Bring the heat down to medium-low and add he egg mixture and cook, stirring, about 3 minutes (or more depending on the desired firmness of the eggs). Transfer to serving plate with bread roll and tomato salsa.

South American Style Eggs with Fresh Tomato Salsa & Turkish Bread Roll

On a side note, while attempting to give this recipe a fancier name than just Scrambled Eggs with Chorizo, I came across a Spanish recipe called Migas con Chorizo. Migas meaning a dish of eggs scrambled with torn-up corn tortillas, with Chorizo sausages. I am definitely keeping this in mind the next time I want to make eggs with chorizo.

BON APPÉTIT

– Ally xx

myTaste.com

Pan-fried Salmon with Mashed Potatoes & Wilted Spinach

Pan-fried Salmon with Mashed Potatoes & Wilted Spinach

Yesterday I whipped up a simple lunch. I don’t really have a back story for this, or some long winded explanation of a foreign ingredient, so today’s post will be short and straight to the point.

PREP TIME 10 MINS | COOKING TIME 25-30 MINS SERVES 2

INGREDIENTS

  • 2 salmon portions, skin on
  • 3 large golden potatoes, wash, peeled and cut into small chunks
  • 1 cup loose leaf baby spinach
  • 1/2 cup milk
  • Ground sea salt and pepper
  • Knob of unsalted butter
  • 1 tbsp Red Rock Deli-Style Dip, Sundried Tomato, Chargrilled Eggplant & Pinenuts (optional)

METHOD

  1. Place the potatoes in a medium-sized pot filled with salted water. Boil the potatoes for 15-20 minutes or until potatoes are tender. During the last 5 minutes, add the milk to a small saucepan and warm, do not boil.
  2. Meanwhile, press salmon filets between paper towels to dry surfaces thoroughly. Season on all sides with salt and pepper. Heat a knob of butter in a frying pan over medium-high heat. Add salmon filets skin side-down. Immediately reduce heat to medium-low. Cook, pressing gently on the back of the fillets to ensure good contact with skin, until skin is rendered and crisp, about 6 minutes. If skin shows resistance when attempting to lift with a spatula, allow it to continue to cook until it lifts easily. Flip salmon and cook on second side, about 1 to 1 and a half minutes longer, for medium-rare to medium. Transfer salmon to a plate lined with a paper towel to soak up any excess oils, and allow to rest. In the same pan, wilt spinach leaves.
  3. Remove the potatoes from the heat and drain. Working quickly, push the potatoes through a sieve using a rubber spatula, back into the pot. Add the milk and butter and fold. Season with salt and pepper to taste. Transfer to a serving plate together with the wilted spinach, salmon and deli dip.

Pan-fried Salmon with Mashed Potatoes & Wilted Spinach

BON APPÉTIT

– Ally xx

myTaste.com

Prawns with Salted Duck Egg Sauce

Prawns with Salted Duck Egg Sauce

Hello everyone! Apologies for the lack of posts over the week. I assure you all that I am still eating well and I have not gone back to consuming instant noodles 🙂 The lack of posts is usually because I’ve already uploaded the recipe for it, or that what I’ve made is just a simple lunch/dinner that wasn’t photo-ready, and even also because I use natural lighting for all my photos, so when the sun is down, no photo = no post. And yes, my friends can vouch for the existence of many other photos that I have been accumulating over the past 3 years from when I first started to cook. The reason why I don’t want to use old photos is because some of them are out of focus, not presented well, or not the correct lighting, and basically…all over the place? I’m not too sure how to word the last one, but what I’m trying to say is that I’ve kind of adapted to the whole white background scene for my photographs, and I want to keep it consistently like that (unless of course for food that is not my own). I’m a little bit OCD so I like all my photographs to have the same style…for now.

Anyway, enough of the rant, about my apparent perfectionism, today I decided to make one of my favourite dishes, Prawn with Salted Duck Egg Sauce. If you read my previous post last week, I posted a recipe similar to this but with fried chicken instead. I also mentioned that I first tried this dish with prawns but have never actually made it for myself with prawns. So last week Saturday when I went to Paddy’s Market with Lina and Marissa, I bought myself some fresh tiger prawns to make this dish.

I must admit, I love prawns, but I barely cook with it only because I always have this tendency to overcook them. I always end up with dry and tough prawns which is a shame because, when cooked right, they’re just melt in your mouth delicious. I can never cook them to perfection as well because I’m always scared of them actually being undercooked. I am proud to say though that I was able to cook these prawns to melt-in-the-mouth perfection. I have never been happier. Plump, firm but tender, succulent, fresh prawns. Truly foodgasmic. Also a quick and simple dish that requires probably less than 10 minutes to cook. The only down side is that prawns are never cheap. Here at least that is…the ones I used here were almost $30 per kilo while I know I can get even fresher prawns back home for less than $10 per kilo.

PREP TIME 5 MINS | COOKING TIME 20-25 MINS SERVES 2-3

INGREDIENTS

  • 400g fresh tiger prawns, shelled and deveined (to save time, you can buy prawns that have already been shelled and deveined)
  • 2 salted duck egg yolks, steamed and smashed
  • 2 sprigs fresh curry leaves (dried leaves can be used as well if not available)
  • 2 red bird’s eye chillies, chopped
  • 2 cloves garlic, finely diced
  • 1 can (350ml) evaporated milk
  • 2 tbsp extra virgin olive oil
  • Ground salt and pepper

METHOD

  1.  Heat oil in a large frying pan over high heat. Sauté the garlic, curry leaves and half of bird’s eye chillies until fragrant. Stir in the egg yolks until they start to foam. Add the evaporated milk and bring to a boil until the sauce has slightly thickened. *This recipe calls for 350ml of evaporated milk, if you want a drier dish, then use less milk
  2. Season the prawns with salt and pepper and then add to the sauce mixture. Turn the heat down to medium and let the prawns simmer for 3-4 minutes. Once the prawns have turned pink, remove from the heat and garnish with remaining chillies. Serve immediately with steamed rice.

Prawns with Salted Duck Egg Sauce

BON APPÉTIT

-Ally xx

myTaste.com

Mini Sausage Rolls with a Hazelnut-dressed Mixed Leaf Salad

Hello Everyone! A few days ago I decided to make sausage rolls just because I wanted to. You could argue though, why go through all the trouble to make your own when you can easily just by pre-packed frozen sausage rolls from the supermarket? I guess this way you can be a little bit more creative in what you want in your sausage rolls rather than the generic minced beef that supermarkets sell. You can basically wrap any sort of flavoured sausages in puff pastry (homemade or store bought, doesn’t really matter)! For today’s recipe, I went on and made myself some Mexican Chorizo with Caramelised Onion sausage rolls.

Chorizo, for those of you who don’t know, is a name given to a variety of sausages, both fresh and cured. The two most common types of chorizos are:

  • Spanish Chorizo – cured, or hard, sausage made from coarsely chopped pork. It has a deep, smoky flavour due to the heavy amounts of paprika in the spice mix. Also, it can be eaten without cooking because it has been cured.
  • Mexican Chorizo – ground, rather than chopped, and the sausage is fresh rather than cured. Also, the red colour comes from the spicy red pepper rather than the smoked paprika. It must be cooked prior to eating.

PREP TIME 20 MINS | COOKING TIME 15-20 MINS SERVES 24 ROLLS

INGREDIENTS

For the sausage rolls

  • 3 Mexican chorizo sausages, removed from casing
  • 2 sheets frozen puff pastry, semi-thawed
  • 1 large red onion, halved and then sliced
  • 1 egg, beaten
  • 1 tbsp milk
  • Sesame seeds
  • Knob of unsalted butter
  • Tomato sauce, to serve (optional)

For the salad (original recipe from Coles)

  • 1 packet (120g) Coles brand 4 leaf salad mix
  • 2 tbsp hazelnuts
  • 1/4 cup extra virgin olive oil
  • 1 tbsp white wine vinegar
  • 1/2 tsp white sugar
  • Ground sea salt and pepper to taste

Mini Sausage Rolls with a Hazelnut-dressed Mixed Leaf Salad

METHOD

  1. Preheat oven to 200C. Roast hazelnuts on a baking tray for 5 minutes. Transfer to a clean tea towel and let to cool.
  2. In a medium pan, melt butter and sauté onions until soft and caramelised. Remove from heat and set aside.
  3. Cut puff pastry sheets into 8 rectangles (halved and 4 cuts across). Add about a teaspoon of sausage meat to one end of the rectangle and top with caramelised onions. Tightly roll the pastry around the sausage meat and brush the ends with the beaten egg and milk mixture to secure. Using the tips of the back of a fork, gently press down on the edges to seal the join.
  4. Space them out on a tray lined with baking paper. Brush the tops with the rest of the egg wash and sprinkle with sesame seeds. Bake in the oven for 15-20 minutes or until puffed, golden and cooked through.
  5. Meanwhile, return to the hazelnuts. Rub to remove the skins then roughly chop. Combine the oil, vinegar and sugar in a small bowl and season with a touch of ground sea salt and pepper. Stir in the hazelnuts. Place the salad leaves in a large bowl and add the dressing. Toss to combine. Serve with fresh out of the oven sausage rolls.

Mini Sausage Rolls with a Hazelnut-dressed Mixed Leaf Salad

BON APPÉTIT

– Ally xx

myTaste.com

Fried Chicken with Salted Duck Egg Sauce

Fried Chicken with Salted Duck Egg Sauce

Hello Everyone! Today for lunch I decided to pull out an old recipe that I have been making for a while now. I first came across a similar dish back in 2009/2010 maybe, at a restaurant back home, Mangrove Paradise Restaurant, where one of the waiters recommended the stir fried prawns with salted egg sauce. I am so glad that they made that recommendation because the dish was simply divine! I never tried to recreate this dish at home because, if you read my story on My Kitchen Journey, I was never really into cooking until 2 years ago really.

I was looking up recipes online one day figuring out what to make, and then I remembered this dish. I searched and searched online but could not find the one that I specifically had. I came across variations of the dish, but it wasn’t what I wanted to make. I then came across this recipe from yummylittlecooks which was close enough. I tweaked the recipe and method a bit, but I actually haven’t tested this recipe out with prawns, which I should definitely do next time, with some fresh curry leaves (I couldn’t find any this week so I resulted to used dried ones). They go so well with fried chicken though!

PREP TIME 1 HOUR | COOKING TIME 20-25 MINS SERVES 4-5

INGREDIENTS

  • 1/2 cup canola oil for shallow frying

For the marinade

  • 15 pcs chicken mid-wings, washed and cleaned
  • 1/2 tsp salt
  • 1 tsp sesame oil
  • 2 tbsp water
  • 2 tbsp cornflour
  • 2 tbsp plain flour
  • Dash of ground black pepper

For the sauce

  • 3 salted duck egg yolks, steamed and smashed
  • 2 sprigs fresh curry leaves (dried leaves can be used as well if not available)
  • 3-4 red bird’s eye chillies, chopped
  • 1 can (350ml) evaporated milk

METHOD

  1. Combine all the marinade ingredients in a large bowl and mix the chicken around until well coated. Cover the bowl with cling wrap and leave to marinade for 1 hour. Do not refrigerate it to bring the meat down to room temperature before cooking.
  2. Preheat oven to 180C. Heat up oil in a large frying pan an working in batches, shallow dry the chicken until skin is crispy and golden (about 4-5 minutes per side). Remove from the heat and place on a baking tray lined with aluminium foil.
  3. Place the wings in the oven for a further 8-10 minutes to finish off in the oven. *In the past I have found that my wings were still a bit raw on the inside after frying, and frying them longer in the pan would either burn my wings or make it go dry, which is why I added this step in to finish cooking the wings without burning, and the wings remained crispy on the outside and juicy on the inside
  4. Meanwhile, drain some on the oil from the pan and sauté the egg yolks, curry leaves and half of bird’s eye chillies until fragrant. Add the evaporated milk and bring to a boil until the sauce has slightly thickened. *This recipe calls for 350ml of evaporated milk, if you want a drier dish, then use less milk
  5. Place the chicken wings on a shallow serving bowl and pour the sauce over the top. Garnish with the remaining chillies and curry leaves. Serve with steamed rice.

Fried Chicken with Salted Duck Egg Sauce

BON APPÉTIT

-Ally xx

myTaste.com

Persian Lunch

Persian Lunch

May the 4th be with you.

About a month ago or so (I actually cannot remember) I saw a post on the UNSW Food Lovers Society page that linked to a Facebook page called mamaCOOKoo. As intrigued as I was to know more about it, I clicked on their page and found out that they are a community that “connects amazing home cooks with hungry locals”. I then went onto their website to find out more about what they do. I read up on the story of how mamaCOOKoo came to be and found it interesting, and smart. Basically, husband and wife, both terrible at cooking, wanted to find a cost-effective solution to their troubles, and thus the birth of mamaCOOKoo, food that reminds us of home, mamas and grandmas, and their magic in the kitchen. You could register as a foodie, or as an amazing home cook. Torn between the two, I decided to sign up as a foodie as a craved for delicious home-cooked meals and mainly because I am curious to know about and experience the different cuisines out there in my area. I mean, yeah my cooking is good, but I don’t know about the ‘amazing’ part, just yet.

So about 2 weeks ago I got an email from Rumana, the founder of mamaCOOKoo, inviting me to eat Persian food. When I read the menu, I was on board immediately. Also, I’ve never really had Persian food before so I was really interested to taste authentic home-cooked Persian food. I feel that if you really want to experience a new cuisine, authentic, home-cooked is always the way to go first. I feel that restaurants today, especially in Australia, rarely have that authentic taste, and is always in some way tweaked and fused with a bit of a western touch. The really authentic restaurants are often difficult to find as well.

I got to experience authentic, home-cooked Persian food today and I definitely have no regrets.The food, AMAZING. And of course the people that we shared the meal with were also amazing. I invited my fellow food buddy Jialing and her boyfriend Zargham. We met Rumana and her husband Nilesh, Aadil and of course Arash who was our home cook for the day. We also got to know his wife who came in just as we were about to have dessert (not Persian, but still amazing with the ‘scotch-butter’ sauce). Lots of fun talking about random things I might add, from experiences with fire alarms, to cats and dogs (and of course which of the two were better, dogs hands down), and just all things food in general. We also got to know Arash, about his inspirations and how he started cooking by learning from his mom.

Here are some shots of the food that we had today:

Persian Lunch: Mirza Ghosayme
Mirza Ghosayme – Smoked bbq eggplant with eggs, garlic and tomatoes; this was a winner for me! I could just eat this all day, everyday!

Persian Lunch: Albaloo Pollo
Albaloo Pollo – Sour cherry rice; I am generally not a fan of cherries (probably scarred from those horrible preserved cherries in a jar), but this changed my view on cherries! Such a creative and vibrant dish and definitely something I’ve not seen in restaurants before!

Persian Lunch: Adas Pollo
Adas Pollo – Lentils, sultana, nuts (almond, pistachio) and rice; again, sultanas aren’t my thing but it felt like it wasn’t even there, the dish was just so good. SO good.

Persian Lunch: Gaymeh Pollo
Gaymeh Pollo – Slow cooked lamb, saffron, tomatoes, split peas, potato and rice; perfection on a plate.

Persian Lunch: Fesunjun
Fesunjun – Slow cooked chicken breast with pomegranate and walnuts; so tender and YUM.

Persian Lunch: Dolmeh
Dolmeh – Eggplant and capsicum stuffed with mushrooms, beans and rice, cooked in a tomato and tarragon sauce; just WOW.

Persian Lunch: Poached Pear with a 'scotch-butter' sauce and a dollop of cream
and lastly our not-so-Persian dessert (more French-inspired), Poached Pear with a ‘scotch-butter’ sauce and a dollop of cream; scotch-butter is in fact just butterscotch sauce, but Arash calls in scotch-butter because he couldn’t pronounce it at first. We love us some scotch-butter!

Overall, an amazing experience, both the food and the company. I’m glad that I came across mamaCOOKoo and I’m glad that they have started up this community. The only downside to this is that I probably will have to start running/walking again after such a full-on breakfast/lunch/dinner all in one go (I didn’t have breakfast because I believed that it would ruin my Persian lunch experience, and I was obviously too full to have dinner afterwards). But hey, if you have not experienced this feeling before, then I have news for you. You are NOT a true foodie at heart.

Also, if you are based in NSW, you can order the food that you see in this blog if you don’t have time to cook, or don’t like to cook at all, and are after a nice home-cooked meal. You can also order food for parties! I recommend that you register with mamaCOOKoo so you can find out more about home cooks around your area. Or hey! If you are an amazing home cook then do get in touch with Rumana! Links below:

– Ally xx

Beetroot Gnocchi

Beetroot Gnocchi

Yesterday (30th April) was the 10-year anniversary of the iconic and always quotable click flick Mean Girls. I cannot even begin my obsession over this movie (okay, I’m not that obsessed, I just love it so much that I can quote it all day long). Leading up to this day, I planned a Mean Girls themed party and since its anniversary fell on a Wednesday, we had to bring in a pink dish to share, and of course wear pink as to quote Karen Smith, “On Wednesdays we wear pink”. If you want to skip ahead to the recipe, scroll down, otherwise enjoy reading about my DIY Mean Girls shirt:

Mean Girls Day: DIY Shirts

I was initially going to buy a shirt off eBay but it was a bit too expensive – well that was one of the reasons, the other reasons were the font not being right, not the right shade of pink, etc. Yes, the designer in me kicked in. And then I thought, yeah I’m a designer, why not I just make my own t-shirt? And so I did! I bought a pink tank top from Esprit and can I just say what a snatch! Originally priced at $14.95 and was down to $7.95 – and then a further 50% off from that price! With the help of my lovely friend Tara who does textiles as one of her majors for her degree, she taught me how to screen print using the photo-emulsion technique. Yeap, making my own screen printed shirt was the way to go, literally costed me less than $5 but a bit of time and effort. At least it was something that I am happy with and it turned out so great! “YOU CAN’T SIT WITH US!”

Mean Girls Day: DIY Shirts


So for the pink dish that I made to share with everyone, I made Beetroot Gnocchi. I’ve never made gnocchi before so I was a bit nervous as I didn’t want to screw up and have nothing for my guests to eat, but as always, beginner’s luck was on my side once again. They turned out really well and I would like to say that they taste really good (and I’m sure they do), I’m just not a very big fan of beetroot. It’s just something about the taste of it that I can’t really put my finger on. But as I said, I’m sure they would be so fetch for beetroot lovers.

Beetroot Gnocchi

PREP TIME 30 MINS | COOKING TIME 30 MINS SERVES 5-6

INGREDIENTS

For the beetroot purée

  • 1 bunch beetroot, cleaned and scrubbed (if the greens are still attached, cut them off, wash them, and reserve them for another use such as for salads)
  • Extra virgin olive oil
  • 2 sprigs rosemary

For the beetroot gnocchi dough

  • 3/4 cup roasted beetroot purée
  • 2 cups plain flour, divided
  • 1 cup ricotta cheese
  • 3/4 cup grated parmesan cheese
  • 1 large egg
  • 1 tsp salt
  • 1/2 tsp black pepper

To garnish

  • Juice and zest of one lemon
  • Rosemary sprigs

METHOD

  1. Preheat the oven to 250C. Place the beets in a large piece of aluminium foil. Coat the beets with the olive oil and sprinkle rosemary leaves over. Feel free to use plenty of olive oil as we will then use the beet-infused oil to dress the gnocchi. Fold the foil over and crimp the sides closed. This helps keep the beets moist, and also contains all the juices. Place in the oven and roast until tender. Smaller beets take about 25 minutes while larger and older beets can take up to an hour. You can check its tenderness by piercing a fork through them. Once done, remove the beets from the oven and set aside so that it is cool enough to handle. Once cool, you can use your fingers to to rub off the their peels. Transfer the beet-infused oil into a small bowl and reserve for later.
  2. Cut the beets into chunks and place them into a blender. Blend until smooth. Take 3/4 cup of the beet purée and place it into a medium bowl. If you have any extra puréed beets, place them into a container and refrigerate. You can use them for other dishes. Stir in the ricotta and parmesan cheese, eggs, salt, and pepper. Then mix in 1 & 1/2 cups of flour (the dough can be made a day ahead, just keep it refridgerated).
  3. Place the remaining 1/2 cup of flour in a bowl. Lightly dust a baking sheet with flour. Scoop the dough into rounds and transfer to the bowl with flour. Then with the tinges of a fork, press down into the dough and then transfer to baking sheet.
  4. Working in batches, cook the gnocchi in a large pot of simmering salted water. Cook for about 2 minutes or until when the gnocchi starts to float to the surface. Cook the gnocchi for a further 1 & 1/2 minutes longer. Then, using a slotted spoon, transfer gnocchi to a serving dish. Drizzle with the beet-infused oil and top with lemon zest, a few squeezes of lemon juice and fresh rosemary leaves.

Beetroot Gnocchi

Beetroot Gnocchi

BON APPÉTIT

– Ally xx

myTaste.com

Big Breakfast for One

Big Breakfast for One

The most wonderful thing about life when it comes to food is breakfast. I always look forward to breakfast, but I think 90% of the time I actually go without having a proper breakfast, or no breakfast at all – which does sadden me a bit. This is either because I get up too late for breakfast and just skip to brunch, or when I do get up early, I’m rushing off to Uni and usually grab a banana or whatever fruit I have lying around on my way out (which also rarely happens so I just end up waiting until class is over and then packed left-over lunch it is).

What makes me happy though is that I can have Breakfast for Lunch or Breakfast for Dinner. Breakfast all day everyday (please excuse my apparent over-excitement over breakfast). Today, I had my breakfast for lunch, and man it was so good. Who doesn’t love bacon and eggs for lunch?

Big Breakfast for One

PREP TIME 5 MINS | COOKING TIME 10-15 MINS SERVES 1

INGREDIENTS

  • 1 slice of wholemeal bread, toasted, buttered & cut diagonally in half
  • 2 slices of gourmet tomatoes, grilled
  • 2 fresh free range eggs at room temperature, poached
  • 3 slices of rindless bacon, grilled
  • Handful of loose leaf baby spinach, wilted
  • 1 tbsp white vinegar
  • Knob of unsalted butter
  • Ground salt and pepper to taste

METHOD

Poaching the eggs:

  1. Bring small saucepan of water to the boil over medium-high heat, then reduce the heat to low-medium – the water should be just simmering. Add in the vinegar and stir.
  2. Crack one egg into a small bowl and quickly, but gently pour it into the water. Repeat with the other egg. A really soft poached egg should take around 2 minutes, but if you want it a bit more firm, it will take about 4 minutes. To check if they’re cooked right, carefully remove the egg from the pan with a slotted spoon and give the yolk a gentle push (you can tell just by your instincts if it is under or overcooked – or perfect)!

I honestly think that the rest is pretty self-explanatory.

Big Breakfast for One

BON APPÉTIT

– Ally xx

myTaste.com