Strawberry Shortcake

Strawberry Shortcake

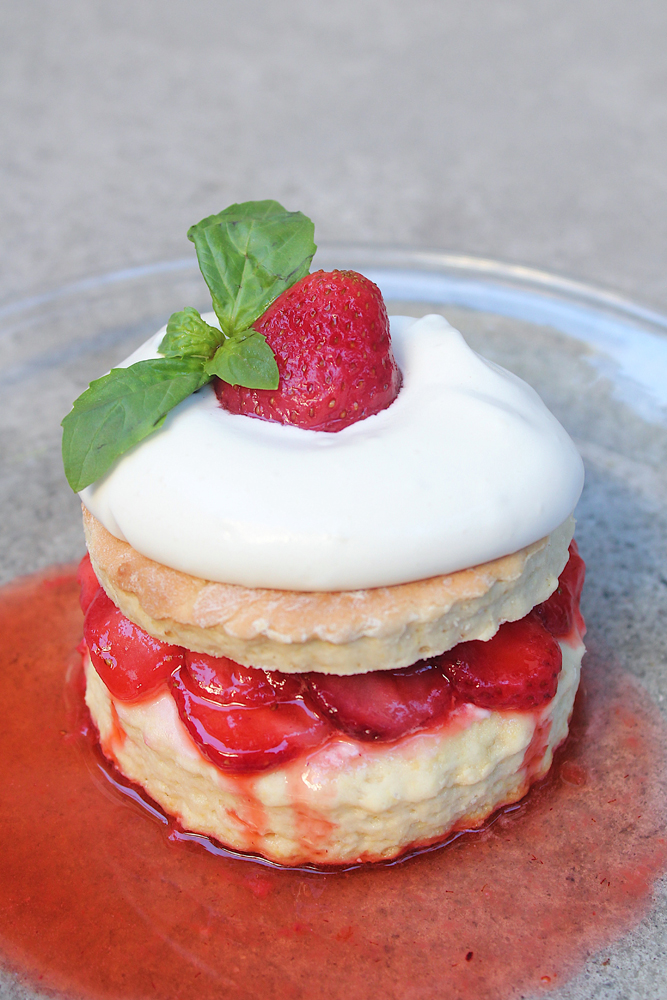
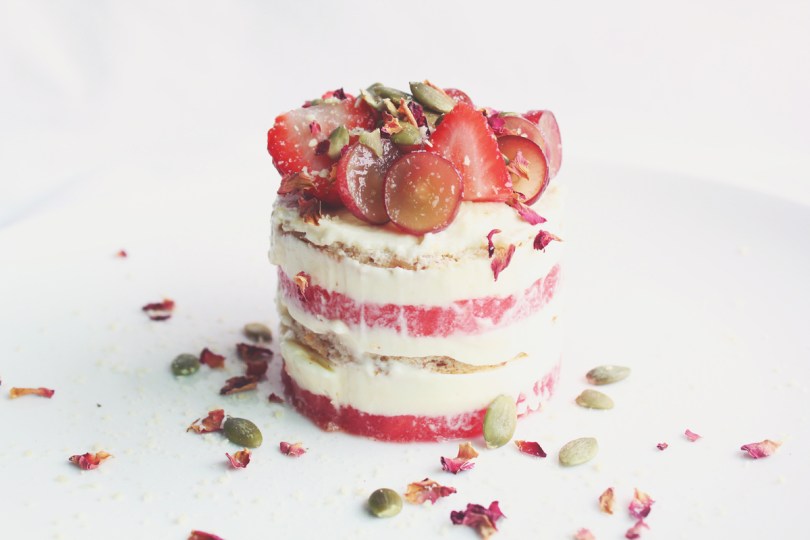
Hello Everyone! I feel like February is flying by so quickly; in just a few days, it’ll already be March! But before we think ahead into the new month, let’s focus on tonight. Tonight, I will be sharing a classic recipe of strawberries, sweet biscuits, and whipped cream. A trio of decadence!

Skip the store-bought strawberry shortcake and make your own at home completely from scratch – it’s much easier than you think! With only a handful of basic ingredients, you can make tall, fluffy, and sweet biscuits, layer them with juicy strawberries and freshly whipped cream for a dessert that’s sure to impress.

Strawberry Shortcake

The name shortcake is derived from an old English cooking definition of short. It refers to something made crisp with the addition of fat. Therefore, shortcake is a crisp, crumbly cake that is made from butter which is how it got its name.

Before we dive into tonight’s recipe, please check out the original where I drew my inspiration from over on Cooking Classy by Jaclyn.

Strawberry Shortcake Ingredients

PREP TIME 25 MINS | COOKING TIME 10-12 MINS | MAKES 12 BISCUITS

INGREDIENTS

For the strawberries

  • 300g fresh or frozen strawberries, washed and hulled
  • 3 tbsp white granulated sugar

For the sweet biscuits

  • 1 & 1/2 cups plain all-purpose flour
  • 1/2 cup buttermilk*, cold
  • 60g unsalted butter, cold and diced into small cubes
  • 1 large free-range egg
  • 1 egg white, lightly beaten
  • 5 tbsp white granulated sugar, plus 1 tbsp extra for topping
  • 3/4 tsp baking powder
  • 1/2 tsp salt
  • 1/2 tsp vanilla extract
  • 1/4 tsp baking soda

For the whipped cream

  • 1/2 cup all-purpose cream
  • 3/4 tsp white granulated sugar
  • Fresh basil leaves, for garnishing (optional)

* Buttermilk is required for this recipe. If you do not have buttermilk, you can make your own by mixing 2 teaspoons white vinegar or lemon juice with 1/2 cup milk. Stir and let sit for 5 minutes.

METHOD

  1. Strawberries: Slice the strawberries and add them to a small bowl together with 3 tbsp of sugar. Toss and allow to macerate in the fridge for at least 30 minutes.
  2. Sweet Biscuits: Preheat oven to 220C (425F or gas mark 7) and line a baking sheet with parchment paper.
  3. In a large mixing bowl, whisk together the flour, 5 tablespoons of sugar, baking powder, baking soda, and salt. Add the cubed butter and rub them into the flour using your fingertips until the mixture resembles a breadcrumb-like texture. Make a well into the centre of the flour mixture
  4. In a separate mixing bowl, or large liquid measuring cup, add the buttermilk, one whole egg, and vanilla extract. Pour the buttermilk mixture in the well of the flour mixture. Mix with a flat-bladed knife until a soft dough starts to form.
  5. Turn the dough onto a lightly floured surface and knead gently until it smoothly comes together. Pat the dough into a square about 2cm thick and using a floured cutter, cut 6-cm diameter rounds. Press the dough together and cut out the remaining rounds, and transfer to the lined baking sheet.
  6. Brush the tops of each round with egg white and sprinkle evenly with the 1 tablespoon of sugar. Bake in the preheated oven until cooked through and lightly golden brown, about 10-12 minutes. Once done, transfer to a wire rack and leave to cool for about 10 minutes.
  7. Whipped Cream: Pour all-purpose cream and sugar into a chilled mixing bowl. Using an electric hand-held mixer, whip the cream and sugar until stiff peaks form. Be cautious as to not over whip the cream.
  8. Assemble: To assemble the shortcakes, use a serrated knife to split each biscuit in half, lengthwise. Dollop a spoonful of the whipped cream over the bottom halves and then top with a generous amount of the sliced strawberries. Top with the second half of the biscuit and serve immediately after assembling. Enjoy with a cup of hot tea for a mid-morning or mid-afternoon snack.

Strawberry Shortcake

Here are some tips for the best Strawberry Shortcake:

  • Use well-chilled butter. Those cold little clumps of butter will melt into the biscuits as they bake, leaving them perfectly tender and buttery.
  • Use cold buttermilk. This is so that the clumps of butter rubbed into the flour mixture stays cold as does not melt in the mixing and kneading process.
  • Be gentle with the dough. Don’t knead it too much or your biscuits will be quite tough when baked.
  • Flour your biscuit cutter. This is to reduce sticking. In addition, don’t twist the biscuit cutter when cutting into the dough or else or it seals the edges and the biscuits won’t rise as high.
  • Don’t skip the resting time for the strawberry mixture. Allowing time for the strawberries to macerate in sugar helps soften them up a bit.
  • Use cold, full-fat cream. These will whip up nicely. Did you know that you can actually add the sugar at the beginning for the whipping process? That was there’s no grittiness.

Strawberry Shortcake

BON APPÉTIT

– Ally xx

myTaste.com

Advertisement
Strawberry & Mascarpone Dessert Pizza

Strawberry & Mascarpone Dessert Pizza

Hello Everyone! For the month of February, I’ll be sharing some sweet dishes to celebrate the month of love! Though in my opinion, I believe love should be celebrated every day. No, I don’t mean that you should buy gifts and whip up something special in the kitchen every single day, but you should always make your significant other feel loved, whether big or small the gesture.

Strawberry & Mascarpone Dessert Pizza

For tonight’s recipe, forget chocolate dipped strawberries. Here’s a dish that takes the classic combination of Strawberries and Chocolates to the next level and is sure to impress your significant other for Valentine’s Day. I originally had a different recipe planned for tonight, but I was inspired by someone special to make this dessert pizza and share it with you guys.

Also, check out this recipe that I made a couple of years back if you wish to try out a different take on a berry dessert pizza: Nutella & Mixed Berries Pizza.

PREP TIME 10 MINS* | COOKING TIME 10 MINS | SERVES 3-4

* When you plan to tackle this recipe, make your dough ahead of time as needs to be refrigerated overnight before using.

INGREDIENTS

  • Classic New York Style Pizza Dough Recipe
  • 2 punnets (600g) fresh strawberries, washed, hulled, and sliced
  • 250g Mascarpone Cheese
  • 1/2 cup balsamic vinegar
  • 1/4 cup nuts, roughly chopped
  • 5 tsp Nutella
  • Handful of fresh basil leaves

METHOD

  1. Preheat oven to 220C (245F or gas mark 7). Place your pizza stone in the oven as well to heat it up.
  2. Roll out your dough to a circle about the same size as your pizza stone on a lightly floured surface as thick or thin as you want. Transfer the rolled-out dough onto a sheet of parchment paper. This will easily help you transfer your pizza onto the preheated stone.
  3. Brush around the edges with a little bit of water, then spread a thick wall of Nutella all the way around the edges. Fold, or roll the edges over the wall of Nutella and seal it in by pressing down on the damp dough to form a stuffed crust.
  4. Carefully remove the pizza stone from the oven. Transfer the dough onto the hot stone and bake in the oven for about 3-4 minutes.
  5. While the pizza is baking, heat the balsamic vinegar in a small non-stick saucepan over medium-high heat. Simmer, continuously stirring to check on the consistency of the glaze, until the vinegar is reduced to a thick sauce, about 5 minutes, Remove from the heat and leave to cool down for a bit.
  6. Remove the pizza from the oven. Spread a thin (or if you are that type, a generous) layer of mascarpone cheese onto the dough and, top with the sliced strawberries and the nuts. Place it back into the oven with the grill setting on and grill for a further 3-4 minutes or until cooked all the way through. It should not take more than 10 minutes in total.
  7. Remove from the oven and top with fresh basil leaves and drizzle with the balsamic reduction. Serve and enjoy immediately!

Strawberry & Mascarpone Dessert Pizza

Strawberry & Mascarpone Dessert Pizza

BON APPÉTIT

– Ally xx

myTaste.com

Strawberries & Cream Smoothie Bowl

Strawberries & Cream Smoothie Bowl

Hello Everyone! First of all I would like to wish all my friends and followers of Amcarmen’s Kitchen a very belated New Years as this is the very first post that I am writing since 2018 started. Yes, I am aware that I have been MIA for the past few months, and I do apologise for that. I’ve just had a lot to juggle for the past month – mainly work life took over, mixed with a bucketload of emotional rollercoaster rides, and procrastination that led me to neglect Amcarmen’s Kitchen. But I’ve finally gotten back into my cooking and I’ve never been happier to do what I love doing best, and that is making a mess in the kitchen to come up with amazing eats!

The theme for this year revolves around what I foresee my future boutique café menu to carry – which is Breakfast… ALL DAY – Breakfast for Breakfast, Breakfast for Lunch, and of course the best part, Breakfast for Dinner. I was inspired by a restaurant called Wild Honey if I’m not mistaken, that I went to in Singapore a few years back, where they served an All Day Breakfast menu. My friend and I went there for dinner and I cannot express how much I enjoyed a Smoked Salmon Eggs Benny for dinner. I mean, it wasn’t the first time I had breakfast for dinner; in fact, I’ve had my fair share of them at home during my uni days where I had nothing in the fridge but breakfast ingredients which always usually resulted in a plate of buttered toast, sautéed spinach, sunny side up eggs, fried bacon, and on the rare occasion, that is if there were any leftovers in the fridge from the previous day(s), some sweet potato mash. Yes, this is taking me back to a specific night (possibly 6 years ago OH MY), that I spent at home all alone, going through a Big Bang Theory marathon, and having my breakfast for dinner. Those were the days.

So yes, the theme for Amcarmen’s Kitchen this year will be all about Breakfast or Brunch eats as both are my favourite parts of the day and I honestly think that they should be eaten all day everyday! For the month of March and April, I’ll be tackling some healthy smoothie bowls for a quick-and-easy go-to breakfast or afternoon snack packed with nutrients that will keep you energized all day long. They have the taste and texture of a smoothie, but with health-boosting, super-satisfying toppings such as granola, flaxseed, chia seeds, fresh berries, coconut, or even a little bit of dark chocolate to turn them into a heartier meal. Aside from being delicious, whipping up a smoothie bowl is a great opportunity to get creative. The possibilities are endless!

Tonight, I will be sharing with you a ‘Strawberries & Cream’ inspired Smoothie Bowl. Double the ingredients if you wish to make a smoothie bowl for two.

Strawberries & Cream Smoothie Bowl Ingredients

PREP TIME 5 MINS | COOKING TIME | SERVES 1

INGREDIENTS

For the smoothie mixture

  • 1 cup frozen strawberries
  • 1/2 cup vanilla yoghurt
  • 1/4 cup low-fat milk
  • 1 tbsp honey
  • 1 tbsp chia seeds

Toppings

  • Blueberriescontains vitamin C & K, fibre, manganese, and other antioxidants
  • Chia Seeds – contains omega-3 fatty acids, fibre, antioxidants, iron, and calcium
  • Cornflakes – contains vitamins, folate, minerals, dietary fibre, proteins, and also carbohydrates
  • Fresh Strawberries – contains vitamin C, folate, potassium, manganese, dietary fibre, magnesium, antioxidants, and polyphenols
  • Honey-roasted Almonds – contains healthy fats, fibre, protein, magnesium, and vitamin E
  • Pumpkin Seeds – contains magnesium, manganese, copper, protein, and zinc

METHOD

  1. Blend the strawberries, yoghurt, milk, honey, and chia seeds together until smoothie.
  2. Transfer to a bowl and top with the cornflakes, fresh sliced strawberries, blueberries, almonds, pumpkin seeds, chia seeds, and a drizzle of honey.

If you don’t have all these toppings on hand, then don’t fret! Just use what you have on hand. Like I said before, whipping up a smoothie bowl is an opportunity to get creative and top them with your favourite fruits, seeds, nuts, and grains!

Strawberries & Cream Smoothie Bowl

Pro-tip: If you want to make a pretty design, add the heaviest topping ingredients last (don’t be like me and add them first haha).

BON APPÉTIT

– Ally xx

myTaste.com

Strawberry Kiwi Lime Yoghurt Cake

Strawberry Kiwi Lime Yoghurt Cake

Hello Everyone! I know the last two posts have been a bit of a downer; let’s just say I’m starting to feel a little bit better and more of myself this week so I hope that I will be back to my chirpy self soon. That aside, tonight’s recipe is actually one that I made just almost 2 months ago for a very special occasion; my sister’s 23rd birthday last August 23rd! We celebrated her birthday with a yummy all-you-can-eat Korean BBQ dinner at Seoul Garden followed by a surprise visit from a family friend which at that time we had offered to look after their two little boys for a week since their helper had to go back to the Philippines and they couldn’t find anyone else under short notice. Overall it was a fun evening spent with lots of food, cake, and little, but great company!

Happy 23rd Birthday Angela!

The cake that I decided to make for my sister was inspired by a recipe that I found online when I was researching ways that I could incorporate some of the ingredients from my blood pressure friendly list that I compiled at the beginning of the year. This recipe, from that list, features kiwis, strawberries, bananas, and fat-free yoghurt, all of which help lower your blood pressure. This cake is simple and easy to put together, yet is still delicious and guilt-free for when you reach out for a second heap of serving or three (or four)… Or you know the whole cake *cheeky grin* Not that I have done this myself before, you know, have a whole cake for no one else but just me, myself, and I. Anyway, onward with the recipe shall we? But before that, just a quick mention that the original recipe can be found over on SkinnyMs.

Strawberry Kiwi Lime Yoghurt Cake Ingredients

PREP TIME 10 MINS | FREEZING TIME 3 HOURS | SERVES 10-12

INGREDIENTS

For the base

  • 1/4 cup hazelnuts, finely ground
  • 1/4 cup walnuts, finely ground
  • 1 tbsp coconut oil, melted
  • 1 tbsp honey
  • 1 tbsp unsalted butter, melted
  • 1/4 tsp salt
  • Honey graham crackers (enough to make about 1 cup of crumbs)

For the filling

  • 2 punnets (2 x 250g) fresh strawberries, sliced thinly
  • 1 tub (500g) fat free all natural yoghurt
  • 1 large banana, mashed
  • 3 tbsp lime juice
  • 2 tbsp honey

For the topping

  • 2 kiwis, peeled and sliced into thin circles
  • Sliced strawberries (about 2-3 from the punnet)
  • Extra honey graham cracker crumbs (optional)

PS: Please ignore the egg in the ingredient shot, I actually didn’t use it at all even though it was in the original recipe. I decided to go with a no-bake base and therefore omitted the egg from my recipe.

METHOD

  1. Prepare an 8.5-inch springform pan by lining the bases with baking paper and greasing the edges with a little bit of butter. Add all of the base ingredients into a medium-sized mixing bowl and mix until well combined. Press half of the mixture over the base of the prepared pan and set aside in the refrigerator for about 10-15 minutes or until firm.
  2. In a separate medium-sized mixing bowl, combine the mashed banana, yoghurt, honey, and lime juice, whisking well until smooth. Set aside.
  3. Arrange half of the strawberry slices on top of the cooled crust then pour over half of the yoghurt mixture on top of the strawberries in an even layer.
  4. Repeat by adding the remaining half of the base over the top of the yoghurt mixture, arranging the strawberries slices, and the pouring the remaining half of the yoghurt mixture.
  5. Top the cake with the kiwi slices and strawberries slices before placing in freezer for about 3 hours or until completely frozen.
  6. Serve and enjoy! Tip: to cut, hold a knife under hot water for 10 seconds, dry and cut the frozen cake wile the knife is still warm!

Strawberry Kiwi Lime Yoghurt Cake

Strawberry Kiwi Lime Yoghurt Cake

BON APPÉTIT

– Ally xx

myTaste.com

Smashed Avo Toast (9 ways)

Hello Everyone! Finally I am back on track with my posts and the theme for the month of April is Avocado! All you need is about half a medium-sized avocado everyday as it provides 1% of the calcium, 5% of the magnesium, and 10% of the potassium that you need daily. Avocados are a good source of potassium, which can help lower blood pressure, and in addition, the dark green flesh just under an avocado’s brittle skin contains large amounts of disease-fighting compounds. Though avocados are proven to help lower blood pressure and an abundance of health benefits, we have to be weary of how much we intake daily as they are also high in calories.

Tonight, I will be sharing 9 different ways you can start your mornings with a smile on your face with 9 different smashed avocado toasts! Of course, don’t limit yourselves to just these 9 recipes; I encourage you to get creative with your smashed avo toasts and share your creations with me on Instagram using the hashtag #amcarmenskitchen

1. Five Pepper Smoked Salmon with Red Onions, Capers & Chilli Flakes

Five Pepper Smoked Salmon with Red Onions, Capers & Chilli Flakes

PREP TIME <5 MINS | COOKING TIME  | SERVES 2

INGREDIENTS

  • 2 slices multigrain brown bread
  • 1/2 avocado, smashed
  • 1 small red onion, cut into rings
  • 2 tsp capers
  • Smoked salmon slices with five peppers

METHOD

  1. Lightly toast bread in a toaster for about 1-2 minutes.
  2. Spread a generous amount of the smashed avocado onto the toast and top with smoked salmon, red onion rings, and capers. Sprinkle with a touch of chilli flakes for an added kick (optional).
  3. Enjoy!

2. Medley of Grape Tomato Caprese Salad with Balsamic Reduction

Medley of Grape Tomato Caprese Salad with Balsamic Reduction

PREP TIME <5 MINS | COOKING TIME 5 MINS | SERVES 2

INGREDIENTS

  • 2 slices multigrain brown bread
  • 1/2 avocado, smashed
  • 1 punnet (250g) grape tomato medley, halved
  • 4 cherry bocconcini cheese, sliced
  • 4 tbsp balsamic vinegar
  • Ground sea salt and black pepper, to taste
  • Olive Oil
  • Sweet basil leaves

METHOD

  1. Combine the grape tomatoes, bocconcini slices, and sweet basil leaves in a small bowl. Drizzle with olive oil and season with a touch of ground sea salt and black pepper to taste. Set aside and leave to macerate.
  2. Meanwhile, heat the balsamic vinegar in a small non-stick saucepan over medium-high heat. Simmer, continuously stirring to check on the consistency of the glaze, until the vinegar reduces to a thick sauce, about 5 minutes. Remove from the heat and leave to cool down for a bit.
  3. Lightly toast bread in a toaster for about 1-2 minutes.
  4. Spread a generous amount of the smashed avocado onto the toast, top with the tomato cappers salad, and drizzle the balsamic reduction over the salad.
  5. Enjoy!

3. Sliced Banana & Pumpkin Seeds drizzled with Honey

Sliced Banana & Pumpkin Seeds drizzled with Honey

PREP TIME <5 MINS | COOKING TIME  | SERVES 2

INGREDIENTS

  • 2 slices multigrain brown bread
  • 1/2 avocado, smashed
  • 1 large banana, sliced
  • Honey
  • Pumpkin seeds

METHOD

  1. Lightly toast bread in a toaster for about 1-2 minutes.
  2. Spread a generous amount of the smashed avocado onto the toast, top with banana slices and pumpkin seeds, and drizzle with honey.
  3. Enjoy!

4. Soft-boiled Egg with Chilli Flakes & Parsley

Soft-boiled Egg with Chilli Flakes & Parsley

PREP TIME <5 MINS | COOKING TIME 6 MINS | SERVES 2

INGREDIENTS

  • 2 slices multigrain brown bread
  • 1/2 avocado, smashed
  • 2 large free range eggs
  • Chilli Flakes
  • Parsley, roughly chopped

METHOD

  1. Bring a small pot of water to a rolling boil. Once boiling, reduce the water to a rapid simmer before gently lowering the eggs one by one into the pot. Cook for 5 minutes for a runny yolk, or 7 minutes for a barely set yolk. Once done, remove from the heat and place in an ice bath to stop the cooking process. Once cool, peel the shell off and slice.
  2. Lightly toast bread in a toaster for about 1-2 minutes.
  3. Spread a generous amount of the smashed avocado onto the toast, top with the sliced eggs, and sprinkle with a touch of chilli flakes, and parsley.
  4. Enjoy!

5. Sliced Strawberries & Crumbled Goat’s Cheese with Balsamic Reduction and Peppermint Leaves

Sliced Strawberries & Crumbled Goat's Cheese with Balsamic Reduction and Peppermint Leaves

PREP TIME <5 MINS | COOKING TIME 5 MINS | SERVES 2

INGREDIENTS

  • 2 slices multigrain brown bread
  • 1/2 avocado, smashed
  • 4 large strawberries, sliced
  • 4 tbsp balsamic vinegar
  • Goat’s cheese, crumbled

METHOD

  1. Heat the balsamic vinegar in a small non-stick saucepan over medium-high heat. Simmer, continuously stirring to check on the consistency of the glaze, until the vinegar reduces to a thick sauce, about 5 minutes. Remove from the heat and leave to cool down for a bit.
  2. Lightly toast bread in a toaster for about 1-2 minutes.
  3. Spread a generous amount of the smashed avocado onto the toast, top with the sliced strawberries, crumbled goat’s cheese, and drizzle the balsamic reduction over the strawberries.
  4. Enjoy!

6. Sautéd Brown & Shimeji Mushrooms topped with Fried Enoki & Parsley

Sautéd Brown & Shimeji Mushrooms topped with Fried Enoki & Parsley

PREP TIME <5 MINS | COOKING TIME 8 MINS | SERVES 2

INGREDIENTS

  • 2 slices multigrain brown bread
  • 1/2 avocado, smashed
  • 4 large brown mushrooms, sliced
  • 1/2 bunch (100g) shimeji mushrooms
  • 1/2 bunch (50g) enoki mushrooms
  • 2-3 garlic cloves, minced
  • Ground sea salt and black pepper, to taste
  • Knob of unsalted butter
  • Olive oil
  • Parsley, roughly chopped

METHOD

  1. Melt the unsalted butter in a small frying pan over medium-high heat and add about a teaspoon of olive oil.
  2. Sauté the minced garlic until golden brown and fragrant, about 30 to 45 seconds. Add in the sliced brown mushrooms and shimeji mushrooms and cook until tender, about 3-4 minutes.  Season with pinch of ground sea salt and black pepper. Once tender, remove from the pan and set aside.
  3. In the same pan, heat about 3 tbsp of olive oil over high heat until slightly smoking. Add the enoki mushrooms in and fry until golden brown in colour, about 2-3 minutes. Once done, transfer to a small plate lined with a paper towel. Set aside.
  4. Lightly toast bread in a toaster for about 1-2 minutes.
  5. Spread a generous amount of the smashed avocado onto the toast and top with the sautéd garlic mushrooms and the fried enoki mushrooms. Garnish with a touch of ground black pepper and parsley.
  6. Enjoy!

7. Diced Mango with Chilli Powder & Peppermint

Diced Mango with Chilli Powder & Peppermint

PREP TIME <5 MINS | COOKING TIME  | SERVES 2

INGREDIENTS

  • 2 slices multigrain brown bread
  • 1/2 avocado, smashed
  • 1 small mango, diced
  • Chilli powder
  • Peppermint leaves

METHOD

  1. Lightly toast bread in a toaster for about 1-2 minutes.
  2. Spread a generous amount of the smashed avocado onto the toast and top with the diced mangoes, chilli powder, and peppermint leaves.
  3. Enjoy!

8. Roasted Chickpeas & Parsley

Roasted Chickpeas & Parsley

PREP TIME <5 MINS | COOKING TIME 10 MINS | SERVES 2

INGREDIENTS

  • 2 slices multigrain brown bread
  • 1/2 avocado, smashed
  • 1 can (200g) chickpeas, drained
  • 2 tsp ground smoked paprika
  • Ground sea salt and black pepper, to taste
  • Olive oil
  • Parsley, roughly chopped

METHOD

  1. Preheat oven to 200C (400F or gas mark 6). Line a baking tray with aluminium foil. Set aside.
  2. Add the drained chickpeas in a small bowl together with the ground smoked paprika, sea salt, black pepper, and a drizzle of olive oil. Toss to coat.
  3. Spread the chickpeas onto the prepared baking tray and roast in the oven for about 10 minutes. Once done, remove from the oven.
  4. Lightly toast bread in a toaster for about 1-2 minutes.
  5. Spread a generous amount of the smashed avocado onto the toast and top with the roasted chickpeas and parsley.
  6. Enjoy!

9. Chorizo Sausage & Sweet Corn

Chorizo Sausage & Sweet Corn

PREP TIME <5 MINS | COOKING TIME 4-6 MINS | SERVES 2

INGREDIENTS

  • 2 slices multigrain brown bread
  • 1/2 avocado, smashed
  • 1 chorizo sausage, sliced
  • 1 can (200g) sweet corn kernels, drained
  • Olive oil

METHOD

  1. Heat olive oil in a small frying pan over medium-high. Pan-fry the chorizo slices until browned, about 2-3 minutes per side. Once done, transfer to a plate lined with a paper towel. Set aside.
  2. Bring a small pot of water to a rolling boil and blanch the sweet corn kernels for about a minute or two. Drain and set aside to cool down for a bit.
  3. Lightly toast bread in a toaster for about 1-2 minutes.
  4. Spread a generous amount of the smashed avocado onto the toast, top with the pan-fried chorizo sausages and sweet corn kernels, and drizzle with a bit of the chorizo oil (optional).
  5. Enjoy!

Just a little side note before I end tonight’s post, I spent the whole day amending quite possibly the same artwork because their comments/amendments were all on an installation basis. Such completely waste of time which then prevented me from actually completing the work I had set to do today because I had to keep going back and forth to the same bloody artwork.

​BON APPÉTIT

– Ally xx

myTaste.com

Honey Lime Rainbow Fruit & Quinoa Salad

Honey Lime Rainbow Fruit & Quinoa Salad

Hello Everyone! I can’t believe the month is going by in the blink of an eye! It’s already the third week of Cooking with Quinoa and I’ve got another colourful recipe to share with y’all. I’ll keep tonight’s post short as I’ve got nothing much to tell really – other than the fact that it was a slow day at work today, and has been for the second half of last week up until today. Tomorrow may be another slow day and I guess it will be like this for a while until another event creeps up on me. Even though there’s not much to do, I’m still slowly preparing the things that I need to deliver for January’s event so that I won’t find myself stressing out and doing things last minute a month before the event. At least I can enjoy my Christmas and New Years when it comes.

All that aside, if you’re obsessed with fresh fruit, then this is a dish you’d want to whip up as an easy pre and/or post workout meal. This salad is also very versatile in a sense that you can easily mix and match fruit combinations depending on what you like and what fruits are in season. The original recipe can be found over on The Recipe Critic: Tried and True.

Honey Lime Rainbow Fruit & Quinoa Salad Ingredients

PREP TIME 10 MINS | COOKING TIME 15 MINS | SERVES 4-6

INGREDIENTS

For the salad

  • 1 cup baby spinach leaves, rinsed and drained
  • 1 cup tri-colour quinoa, uncooked
  • 1 large orange, peeled and segmented
  • 1 punnet (125g) blueberries
  • 1 punnet (125g) strawberries, hulled and halved
  • 1/2 pineapple, peeled and cut into bite-sized chunks

For the honey lime glaze

  • 1/4 cup honey
  • 2 tbsp freshly squeezed lime juice

METHOD

  1. Rinse the quinoa before combining it with 2 cups of room temperature water in a medium-sized pot. Turn the heat up to high and bring the quinoa to a boil. Once boiling, cover, reduce heat to low, and simmer until the quinoa is tender, about 15 minutes. Drain and then set aside to cool. Note: Quinoa holds lots of water, so you have to make sure you drain it thoroughly after it’s cooked.
  2. Meanwhile, combine the honey and lime juice in a small bowl. Set aside.
  3. Add all the fruits into a large mixing bowl together with the cooked and cool quinoa. Mix until well combined.
  4. Transfer to a serving dish with the spinach leaves and then drizzled with the honey lime glaze. Serve as a healthy morning or afternoon snack, pre or post gym workout. Enjoy!

Honey Lime Rainbow Fruit & Quinoa Salad

Honey Lime Rainbow Fruit & Quinoa Salad

BON APPÉTIT

– Ally xx

myTaste.com

Poached Pears with Chocolate Chia Mousse

Hello! I’m Jialing and I will be taking over Amcarmen’s Kitchen for today. I will confess that today’s blog was very close to being a two-step tutorial on how to boil a cup of water and make tea – the only semi-regular dietary part of my life that does not involve any animal by-products.

As someone who has clearly only ever eaten vegan food a handful of times (I genuinely thought that the vegan theme was intended as a joke when I first agreed to do a recipe), I found this year’s Auguest theme to be a punishment. I mean challenge. I ended up ransacking my own pantry and refrigerator for inspiration, confirming with Allison and Google about what ingredients could and couldn’t be used by vegans. What seems like day later, I emerged triumphant – pears, wine, cocoa powder, and a questionable bag of chia seeds (waste not, want not…) sat atop my counter, ready for the arduous vegan road ahead.

Now, onto the recipe, poetically inspired by the very essential act of boiling water.

Poached Pears with Chocolate Chia Mousse Ingredients

PREP TIME min. 24 HOURS* | COOKING TIME 40 MINS | SERVES 4

*The chocolate chia mousse will need to be prepared the day before to allow chia seeds time to soak

INGREDIENTS

For the chocolate chia mousse

  • 1 & 1/2 cups almond milk
  • 1/3 cup chia seeds
  • 1/4 cup cocoa powder
  • 4 tbsp 100% pure maple syrup**
  • 1/2 tsp vanilla extract
  • Strawberries for garnish

For the poached pears

  • 4 buerre bosc pears, peeled
  • 1/2 bottle moscato or other sweet dessert wine***
  • 3 tbsp 100% pure maple syrup**
  • 3 star anise
  • 2 cinnamon sticks
  • 2 tsp cloves
  • Pinch of nutmeg
  • Water

**Maple-flavoured syrup isn’t vegan, so be sure to check the label!
***Find your fave vegan wines here http://www.barnivore.com/wine

METHOD

  1. Chocolate Chia Mousse: Prepare the chocolate chia mousse the day before, to allow chia seeds time to soak. Combine the cocoa powder, vanilla, and maple syrup, stirring until well mixed.
  2. Slowly pour in almond milk, stirring until mixture is smooth. Add chia seeds and stir until well-incoporated. Leave in fridge to soak overnight, stirring mixture once in between.
  3. Once the chia seeds have fully absorbed the liquid, they will increase significantly in size and have a gelatinous texture. Transfer to a blender or food processor and blitz until smooth and creamy. Tip: leave the chia mixture unblended and top with fresh fruit and desiccated coconut as a healthy and envy-worthy breakfast.
  4. Poached Pears: In a sauce pot large and deep enough to hold pears, combine wine, maple syrup, cinnamon sticks, star anise, cloves, nutmeg, and just enough water to cover pears.
  5. Bring the wine and spices to the boil over high heat.
  6. Add the pears, positioning them so that they are completely submerged, and continue to boil for another 25 minutes, until pears are cooked through and tender. Be sure to turn pears for even cooking, particularly when liquid gets low, keeping in mind that the bottoms of the pears will take longer to cook than the tops.
  7. Once pears are cooked, remove from the pot, reserving the syrup, and set aside to cool.
  8. Carefully simmer remaining syrup until reduced to about 1/2 cup.
  9. To serve, divide mousse into small bowls or stemless glasses and garnish with sliced strawberries. Place a pear on each plate, next to the mousse. Drizzle the pear with syrup. Enjoy!

Poached Pears with Chocolate Chia Mousse

Recipe Copyright © 2016 | jialingmew

ENJOY YOUR MEAL!

Jialing.

myTaste.com

No Bake Strawberry & Coconut Vegan 'Cheesecake'

No Bake Strawberry & Coconut Vegan ‘Cheesecake’

Hello Everyone! Yes I am aware that it is indeed Tuesday and not a Wednesday – but today is a special day which indefinitely deserves a special post too! Today is the middle child’s 22nd Birthday, and since last year (which was the year I came back to Brunei) I’ve been baking cakes for the family. It was the better solution to, I guess, wanting a specific flavour for an affordable price. I cannot stress enough house much I hate store bought cakes – mainly because of their icing; too thick, too sweet, just… Ugh. I’m not much of a baker since I’m more into savoury foods, but I guess baking a cake 4 times a year (at minimum) isn’t too stressful and helps me practice.

Happy 22nd Birthday Angela!
Happy 22nd Birthday Angela! – early dinner at Balkony today after work. The cake not only looked amazing, but it tasted so good as well! I will definitely try out more no bake vegan ‘cheesecakes’ in the upcoming months – maybe for my Birthday in November!

Today’s recipe shall keep in theme with the theme for this month on Amcarmen’s Kitchen, which is, if you haven’t been following, Yes Ve Gan! A month of tribute to animal-free dishes that are sure to tickle your tummies from a different perspective. Before I had the idea of coming up with an animal-free theme for the blog, I wanted to bake a strawberry shortcake for my sister. I then only just changed my mind earlier last week to do a No Bake Strawberry & Coconut ‘Cheesecake’ for her after being inspired and reminded of the cake that Miao made back in March when we gathered for a dinner and catch up session with friends in Singapore. I think I mentioned in the beginning of the month in a post that it was a pretty darn delicious cake and it made me crave for more! So I thought to myself, why do I give a raw vegan cake a try since, like Miao at that time, I have never done one before! It’s super easy to make and you can substitute the strawberries out for your favourites berries such as raspberries, blueberries, blackberries, or boysenberries.

No Bake Strawberry & Coconut Vegan 'Cheesecake'

This ‘cheesecake’ is completely gluten-free, dairy-free, and egg-free! The recipe makes for one 8″ sized cake, but of course you can always double the recipe to make a bigger one if you wish! Mind you, for those who have not read in an earlier post this month, I haven’t stopped eating animals, dairy, or eggs altogether. I still eat my meat, but not as often as I used to, and I still have my daily dose of cow’s milk in the mornings  to accompany my breakfast. I don’t see myself going completely vegan in the next couple of years – but who knows, that may change over time when I make that shift to loving all animals, and most importantly for a healthier lifestyle. For now, it is something that I want to look into and slowly add this way of eating into my daily diet.

No Bake Strawberry & Coconut Vegan 'Cheesecake' Ingredients

PREP TIME 25 MINS | FREEZE TIME min. 4 HOURS* | SERVES 8-10

*preferably overnight to ensure that the cake is set.

INGREDIENTS

For the crust

  • 250g medjool dates, pitted
  • 3/4 cup sliced almonds
  • Pinch of salt

For the filling

  • 1 cup raw cashews, soaked overnight* and drained
  • 1 punnet (25g) fresh or frozen (but thawed) strawberries
  • 2/3 cup full fat coconut milk
  • 4 tbsp coconut oil, liquified
  • 2 & 1/2 tbsp lemon juice
  • 2 tbsp maple syrup
  • Zest of 1 small lemon

For the topping

  • Fresh strawberries
  • Shredded coconut
  • Edible flowers (optional)

*if you are a bit pressed for time, or decided to make your cake today and hadn’t realised that you needed to soak your cashews overnight, then you can soak them in very hot water for about an hour instead of overnight.

METHOD

  1. Crust: Soak the pitted medjool dates in warm water for about 15-20 minutes and then drain. Put almonds in a food processor and pulse until finely chopped. Add the dates and a pinch of salt, and pulse until a paste forms.
  2. Press mixture into an 8-inch springform pan (if you don’t have a springform pan, use a pie tin or a regular cake pan covered with baking paper). Place the crusted pan in the freezer while you prepare the filling.
  3. Filling: Put all ingredients for the filling in a blender and blend on low until mixture is as smooth as possible. Pour the filling into the crust, cover with plastic wrap and freeze for at least 4 hours.
  4. Remove the cake from the pan and leave to thaw in room temperature for about 10-15 minutes before cutting. Top with fresh strawberries, shredded coconut, and edible flowers.

Tip: Run your knife under warm water (and dry off) before cutting, to make a cleaner cut. Let each piece thaw for a few more minutes before serving.

No Bake Strawberry & Coconut Vegan 'Cheesecake'

No Bake Strawberry & Coconut Vegan 'Cheesecake'

BON APPÉTIT

– Ally xx

myTaste.com

Strawberry & Watermelon Cake

Strawberry & Watermelon Cake

Strawberry & Watermelon Cake

Hello Everyone! If you’ve been following my blog from the very beginning, then you’ll know that today is a very special day indeed! My blog officially turns 2 years old today! My how time has flown by so quickly! I’m sure most of you know the story of how I came around to starting up my blog – but for those new comers out there, here is the story again:

I started up this food blog exactly two years ago during spring break, and instead of slaving away on the many assignments/projects I had at that time, I decided to spontaneously start up a blog, out of pure procrastination really. I wasn’t sure of how long I’d be able to keep up with this blog (because I have tried many times and failed), but I am happy that I am able to finally keep one up and running, even though I’m only posting once a week instead of 3 times a week like before I started working. on several occasions, I’d ask my Mom, “What would happen if I didn’t have a food blog?” And she would always reply the same way every time I asked her, “You’d be the most boring person ever.” Haha. Thanks. I definitely have her to thank for teaching me how to cook; well actually I’d like to say thanks to the fact that I got into a university away from home and family as it not only taught me how to be independent, it also showed me how bad I was at cooking for myself during my first year at uni.

Like last year, to celebrate my blog turning 2 today, I decided to bake a cake for this occasion. I actually did a test bake two weeks ago since this is the first time I was following this recipe – I didn’t want to fail miserably and have nothing to post for this special occasion. I’m glad I did that test bake because there was a major backfire *oops*. Well, it wasn’t such a huge backfire, but it was because it was a significant part of what binds the cake together so without it, the cake would’ve been pretty dry. I’m talking about the rose-scented cream here. The first try, I actually bought the wrong type of thickened cream – I bought the light thickened cream only because that’s what I saw on the shelf. So I whipped it for a good, I don’t know, probably a total of 15-20 minutes or so and it what not whipping at all. Then I realised it was because it was light cream which does have enough fat content to fully whip. So that was a fail, and by that time I was quite tired and frustrated over the cream that I decided to just leave it and try again the following week.

The second time around, I bought regular thickened cream and it whipped fine – too fine that I had over-whipped it and it became quite clumpy. You can actually rescue over-whipped cream by adding more cream, but at that time, I had poured the whole bottle of cream into the mixer. So what did I do? I had to ask my mom to drive me to the grocers again to buy more cream, and finally after the third attempt with this rose-scented cream, I managed to get it right! I didn’t want to waste the other batch of over-whipped cream and so I kept whipping it until it started to come together as homemade butter. After I had whipped it into butter, I had a taste of it and then realised that I had just made sweet rose-scented butter – which in my opinion was a bit ew since I’ve never tasted sweet butter with a hint of rose flavour in it. Haha! So yeah.

Strawberry & Watermelon Cake

Anyway, I took inspiration to bake this cake from one that I tried from Black Star Pastry when I was still living in Sydney. Since it’s debut into the world of pastries, it is known to be the most Instagrammed cake.  Also, the original recipes uses silvered pistachios, but I used pepitas instead. The only reason was that pistachios here for some reason are always brown, like not even green, and I didn’t want to put something brown to top of my beautiful cake so I went for green pepitas instead. Another thing, I couldn’t find rose petals anywhere here in Brunei. So, I decided to go through boxes of teas to read their labels, looking for any that had rose petals in them. I was lucky that one of the teas that I brought home from Sydney last year had rose petals in them!

Don’t forget to check out the recipe that I followed to make this cake over on Gourmet Traveller. You can get creative and make a cake in any shape you want. When I had this at Black Star Pastry, it was square in shape and probably no bigger than about 8cm x 8cm x 8cm in size (maybe). I made mine into round cakes (about 3 in total with this recipe) with a diameter of about 7.5cm.

Strawberry & Watermelon Cake Ingredients

PREP TIME 20 MINS* | COOKING TIME 15 MINS | SERVES 3

*plus 1-2 hours of chilling time

INGREDIENTS

  • 10 seedless red grapes, sliced thinly
  • 250g seedless watermelon, about 0.5cm thick slices
  • 1 punnet (125g) strawberries, halved
  • 1/4 cup almond meal
  • 1/4 cup rosewater
  • 4 tbsp caster sugar
  • 1 tbsp pepitas
  • 1 tbsp dried rose petals

For the Almond Dacquoise

  • egg whites
  • 2/3 cup almonds, coarsely chopped
  • 2/3 cup pure icing sugar, sieved
  • 1/2 cup caster sugar

For the Rose-scented Cream

  • 100ml thickened cream
  • 1 tbsp caster sugar
  • 1 tbsp rosewater

METHOD

  1. For the almond dacquoise: Preheat oven to 200C. Process almonds in a food processor until finely ground, then combine in a bowl with icing sugar. Whisk eggwhites in an electric mixer until soft peaks form (3-4 minutes), then gradually add caster sugar and whisk until stiff peaks form (1-2 minutes). Gently fold through almond mixture, spread on a 30cm x 40cm oven tray lined with baking paper and bake until golden (10-15 minutes). Set aside to cool on tray, and then using a round cutter, cut the dacquoise into 6 circles.
  2. For the watermelon layer: Cut the watermelon into half a centimetre thick rounds using the same cutter used to cut the dacquoise. Arrange watermelon rounds in a single layer on a wire rack. Sprinkle with 20ml rosewater, then scatter with 2 tbsp sugar. Stand to macerate (30 minutes), then pat dry with absorbent paper.
  3. For the rose-scented cream: Whisk cream and sugar in an electric mixer until soft peaks form, gradually add rosewater and whisk until stiff peaks form (do not over-whisk!!!).
  4. Assembly: Staring with a watermelon slice as your base, spread about a tablespoon and a half of rose cream evenly over  it and then top with a layer of dacquoise. Scatter a pinch of almond meal and then top with more cream. Repeat, and then top of the last dacquoise layer with a bit of cream to hold the strawberry chunks, slices of grapes, and other toppings. Refrigerate until firm (1-2 hours).
  5. Serve and enjoy chilled!

Strawberry & Watermelon Cake

Strawberry & Watermelon Cake

BON APPÉTIT

– Ally xx

myTaste.com

Belly Bao - BAONANA SPLIT

Belly Bao

Hello Everyone! Finally I’m back with an all new Review Sunday (on a Monday – sorry about that) on the blog! I had a pretty hectic day yesterday and didn’t get around to finishing this post. I spent yesterday morning hanging out with my sister, the afternoon with a fellow food-loving friend, Miao, over some cold drinks and cake, then went to indulge in the not-as-amazing-as-I-thought-it’d-be fireworks display for Singapore’s 50th National Day (might I add also, being sardined between sweaty, wet, and smelly people; it was so gross). Then ended the night meeting Alex, talking about anything and everything while we strolled around the area and eventually made our way to have some food.

So onwards with the review – I’ve only ever been to this place once, but have heard many things about it before it even started shaking up the Sydney scene permanently. I think, that is if I am not mistaken, Belly Bao first started dishing out these buns at various market stalls across Sydney about a year ago. I managed to visit a stall at the Paddington Markets on a Sunday afternoon before the found permanent residency at the GoodGod Small Club in the Sydney CBD.

Belly Bao

So the first and not quite last, but won’t be back in a while kind of thing, time I visited the club was with my friend Marissa on a Thursday, maybe Friday night after she had finished her work. We got to the place at around 6:30pm and the place was already packed. The line to order food was not too long, but a good 20-30minute wait, so while Marissa was lining up to order food, I went around the club quite possibly 7-8 times to look for a seat, and occasionally approach people that looked like they were about to be done, asking if I could have their seats when they were done. Thank goodness I was able to snag a seat for a two just as Marissa was about to be next in line to order the food. So yes, if you do plan on visiting on a Friday or Saturday night, be prepared to hunt down seats for a while and battle the noise a bit (well it is a club after all).

BELLY BAOS

Belly Bao - SLOW BRAISED PORK BELLY
SLOW BRAISED PORK BELLY: Pickled mustard greens, coriander, crushed peanuts, and kewpie mayo ($6.50)

The braised pork belly was well cooked – tender, juicy, and packed with flavour. However, I was not a fan of the pickled mustard greens and the coriander. I was able to look past these because it was actual a delicious bao overall. Perhaps a little bit more kewpie mayo or a spoonful of the stock that the belly was braised it would have been nice as it did feel a bit dry with the steamed bun.

Belly Bao - CRACKLING ROAST PORK BELLY
CRACKLING ROAST PORK BELLY: Crackling, pickled radish, coriander, and kewpie mayo ($6.50)

Though I did not have this bao when I was at the club, I did have this when I visited their Paddington Market stall before they opened permanently at GoodGod. Like the first bao, this was also as delicious as the first – tender, juicy pork belly with a nice crispy crackling skin.

Belly Bao - SOFT SHELL CRAB
SOFT SHELL CRAB: Watercress, chilli aïoli, and lemon vinaigrette ($7.50)

Now, I love a good soft shell crab, however I was kind of disappointed with this bao just because the soft shell crab wasn’t as crispy as it could be. It had a bit of a crunch, which I’m guessing came from the shell of the crab anyway, and it was a bit chewy more than crispy. Although I really wanted to love it, it was a sad let down. If it had been the crispy soft shell crab aI hoped it’d be, it would’ve been a great bao especially paired with the chilli aïoli and lemon vinaigrette!

SIDES & SNACKS

Belly Bao - Belly Bao spicy half chicken
SIDES & SNACKS: Belly Bao spicy half chicken ($15.00)

Beside the baos, we also got a couple of sides and we didn’t need to think twice about getting some fried chicken; I mean, who doesn’t like fried chicken? Or better yet, spicy fried chicken? Absolutely delicious, crispy skin on the outside, and tender, juicy meat on in the inside. It wasn’t really that spicy to be honest, but it’s alright for someone who can’t take spicy I guess. Or if you don’t do spicy at all you can just opt to have the non-spicy chicken 🙂

Belly Bao - Sweet potato fries drizzled with chilli aïoli
SIDES & SNACKS: Sweet potato fries drizzled with chilli aïoli ($7.00)

You can honestly never go wrong with sweet potato fries, NEVER. This was a pretty hefty order though and I don’t think we even finished them because we were too full in the end to down them all. The fries weren’t very crispy to be honest which was a shame, but were still nevertheless oh so good. For some reason though, I found their chilli aïoli super spicy – even more spicy than the spicy chicken so not sure what happened there!

DESSERT BAOS

Belly Bao - BAONANA SPLIT
BAONANA SPLIT: Golden fried bao with vanilla ice cream, fresh banana slices, salted peanuts, drizzled with Nutella ($6.50)

Before I begin, I just want to say that I wished they did more desserts for their menu because their golden fried baos are heaven on earth. Maybe they could consider changing up the dessert menu once in a while like how other places change up their dessert flavours once every two weeks. That may just very well attract me towards the place even more! Anyway, I can’t really fault this dessert because I love banana and Nutella, and everything else paired with it. If I had to nitpick this dessert, I just wished that the Nutella was a bit more like a sauce 🙂

Belly Bao - STRAWBELLY BAO
STRAWBELLY BAO: Golden fried bao with vanilla ice cream, fresh strawberry slices, drizzled with condensed milk ($6.50)

From the two desserts, this was the once I actually ordered while Marissa had the first. I’m glad this was the one I ended up because I loved the strawberries and condensed milk drizzle over the whole dessert. It was delicious indeed!

NON-ALCOHOLIC QUENCHERS

Belly Bao - CHERRY MELON POP & GG ICE TEA(LEFT) CHERRY MELON POP: Freshly juiced watermelon & green apple popped sweet with Fee Brothers Cherry Bitters ($9.00)

(RIGHT) GG ICE TEA: Our classic house-brewed ice tea with fresh mint ($9.00)

Overall, I wouldn’t say that the food is really outstanding, but it’s a pretty good interpretation of traditional Taiwanese street food, “not how grandma remembers it”, or as one has questioned, is bao the new taco? They’re definitely a little more than just average, but would probably not score it more than a 7 out of 10; I just didn’t feel any fireworks as I had a bite of my slow braised pork belly bao. The dessert bao though I feel were on an entirely different level to the savoury baos, and so if I were to score the savoury and sweet separately, I’d give the dessert a higher ranking. Other than that, I suppose that the baos are a good value for money. One of these babies, plus a side or two, with dessert filled me up real good, each bao only setting you back about $6.50 on average. I believe that Belly Bao could have chosen a better place to locate their residency – something more in line with the history of how they started out would have been a much more enjoyable scene I believe. I was imagining a quirky café on the corner of a suburban street that isn’t too far away from the city, like perhaps Bronte or Coogee, with some outdoor seating. I was a bit disappointed to hear that they’ve teamed up with a club scene which feels like the complete opposite of what their food is about I guess; then again this is just my opinion. I’d give the ambience a 4 out of 10, possibly 5 if I am being generous – but yeah, dark, noisy, super packed, not quite the way I want to enjoy these delicious baos.

Belly Bao
53-55 Liverpool Street
Sydney, New South Wales
Australia, 2000

– Ally xx