Breakfast Muffins: Brownie, Salted Caramel & Avocado Gelato

Breakfast Muffins: Brownie, Salted Caramel & Avocado Gelato

Hello Everyone! The title of this post already sounds super enticing doesn’t it? Well brace yourselves, for tonight I will be sharing a cheekily sweet breakfast muffin that borderlines dessert. Who says you can’t have dessert for breakfast though? If anyone says that you can’t, unfriend them because you don’t need that kind of negativity in your life EVER. For those of you that are just tuning in, I usually upload a recipe to Amcarmen’s Kitchen on Wednesday nights. However, yes I am aware that it is a Monday night (in Brunei that is, for some it may be just the morning of), and the reason for the switch up for this month only is because Muffin Making Monday has returned!

I’m not sure if I’ve mentioned this in a post before, but I’ll say it again anyway, I am NOT a huge fan of chocolate. I can already see a few jaws dropping upon reading the previous sentence in pure disbelief. But yes it’s true. I can’t sit down and eat a whole bar of chocolate even if I wanted to. I’d probably get sick after just one bite. Don’t fret guys for there is a however – a slice (or two, maybe more) of a dark, rich, dense, and fudgy with a deep to-die-for chocolate flavour brownie is my exception. Oh and of course, how could I forget my love for the beautiful marriage between dark chocolate and avocado!

Breakfast Muffins: Brownie, Salted Caramel & Avocado Gelato

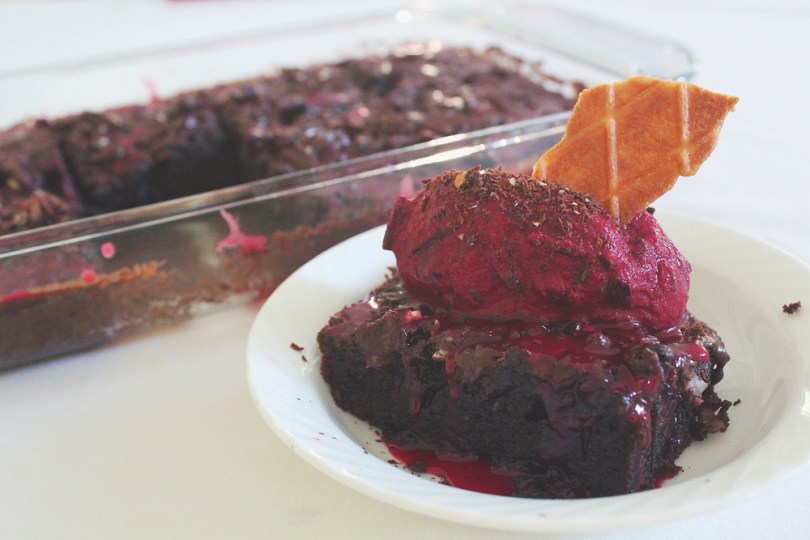
Therefore behold the Brownie Muffin – combining my Breakfast Muffin series with a favourite dessert of mine! I was going to call this hybrid a ‘Bruffin’ like how Brookies are for Brownie Cookies. Alas, I was disappointed to find that the term Bruffin has already been registered and trademarked for a light and flaky, brioche-like pastry in the form of a muffin! So should I call these Broffins? Sounds less cool than Bruffin *sad face* so I guess I’ll just stick with Brownie Muffins instead of a portmanteau of the two. Check out the original recipe by Shiran over on Pretty. Simple. Sweet.

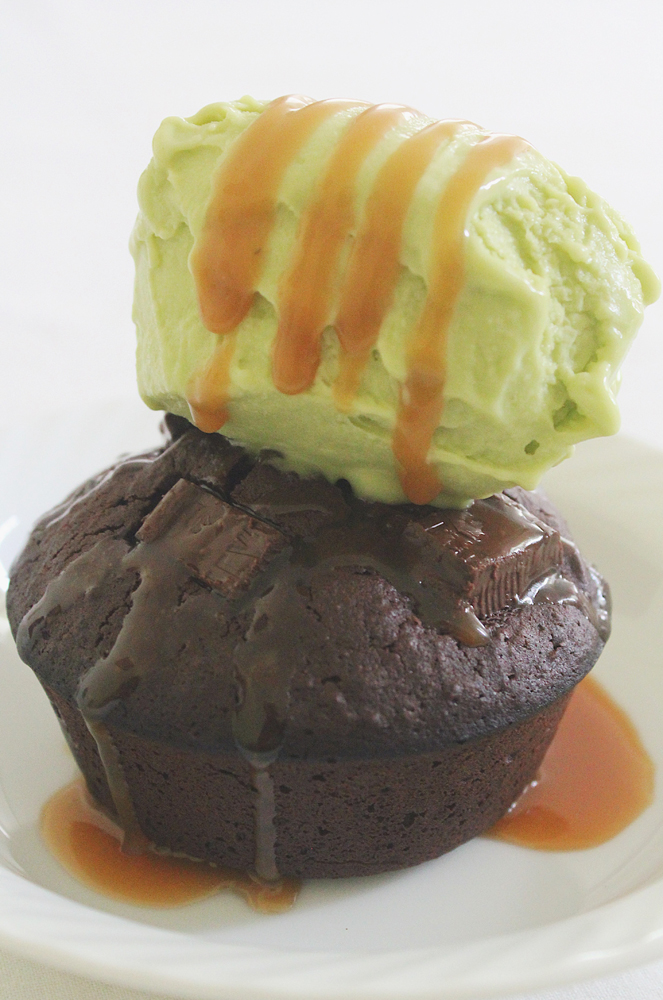
To take it to the next level, I’ve filled these Brownie Muffins with a sticky and salty caramel sauce so that you’re hit with an oozy gooey treat when you bite (or cut) into them! And of course, you need to complete this breakfast (dessert) with a generous serving of avocado gelato! I sourced mine from my favourite gelato place in Brunei known as Rumah Gelato! Whenever I want my fix of dark chocolate AND avocado gelato, this is where I’m at. I bought a large tub of just the avocado gelato to pair with this recipe, and of course extra to just indulge in happily for the next couple of days.

Breakfast Muffins: Brownie, Salted Caramel & Avocado Gelato Ingredients

Rumah Gelato's Bravo Avocado

PREP TIME 15 MINS | COOKING TIME 30 MINS | SERVES 6 MUFFINS

INGREDIENTS

For the brownie muffin batter

  • 113g (4oz) bittersweet or semisweet chocolate, coarsely chopped
  • 113g unsalted butter, cut into small cubes
  • 2 large free range eggs
  • 1/3 cup + 1 tbsp plain flour
  • 1/3 cup granulated sugar
  • 1/3 cup unsweetened cocoa powder
  • 1/8 tsp salt

For the salted caramel sauce

  • 2 cups granulated sugar
  • 170g unsalted butter, room temperature and cut into pieces
  • 1 cup double cream, at room temperature
  • 1 tbsp sea salt rocks
  • Avocado Gelato or any of your favourite flavours that tickle your tastebuds

METHOD

  1. Preheat oven to 180C (350F or gas mark 4). Grease a 6 hole muffin pan with butter. Set aside.
  2. Brownie Muffin Batter: Place the chopped chocolate and unsalted butter cubes into a medium-sized heatproof bowl. Heat in the microwave at 20-second intervals, stirring between each interval, until melted. Set aside.
  3. In a small bowl sift the plain flour, cocoa powder, salt, and set aside.
  4. Using an electric handheld mixer fitted with the whisk attachment, whisk the eggs and sugar on high speed until thick and pale, about 4 minutes. Reduce speed down to low and slowly add in chocolate and butter mixture, whisking until just incorporated.
  5. Using a spatula, fold in the flour mixture until just combined. Do not over-mix.
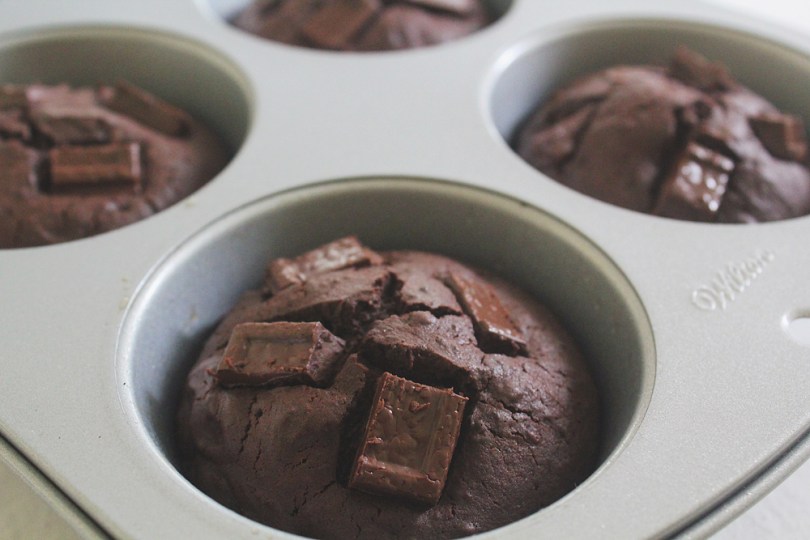
  6. Spoon the mixture into the prepared muffin pan, filling each case to about 3/4 of the way full. Bake for 13-16 minutes or until a toothpick inserted into the center of the muffins comes out with moist crumbs and not dry.
  7. Once done, transfer to a wire rack and let them cool for about 10 minutes before removing from the pan. Allow muffins to cool completely on the wire rack.
  8. Salted Caramel Sauce: In a small saucepan, melt the sugar over medium-high heat, stirring frequently to avoid burning. Once all the sugar has melted, watch your caramel carefully, swirling the pan occasionally.
  9. As soon as the sugar turns amber in colour add the butter and whisk vigorously until all the butter has melted.
  10. Remove the pan from the heat and slowly pour in the cream while whisking vigorously until the cream is incorporated well, and then whisk in the sea salt rocks.
  11. Fill a piping bag fitted with a small decorating tip with the caramel sauce. Insert the tip into the top of the muffin, pushing about an inch into the muffin. Squeeze the filling into the muffin. If the filling starts to leak outside of the hole, stop.
  12. Serve with ice-cream or gelato with the flavour of your choice, and drizzle more of the salted caramel sauce atop. Enjoy!

Breakfast Muffins: Brownie, Salted Caramel & Avocado Gelato

Breakfast Muffins: Brownie, Salted Caramel & Avocado Gelato

You can store these Brownie Muffins in an airtight container at room temperature or in the refrigerator for up to 2 days. Make sure to let them reach back to room temperature before serving. I personally would prefer to warm them up in a steamer (the oven or microwave usually dries it out even more) because I’d rather have a warm, fudgy, and gooey muffin than a room temperature one *cheeky grin* but like I said, it’s just my personal preference.

Before I wrap up tonight’s recipe, here’s a key extract from Shiran:

Timing is everything: The right baking time is always the most crucial part of making brownies. It only takes a couple of minutes to turn them from rich fudge brownies to a dry chocolate cake. When done, brownies should appear baked on the outside, but the center should still be soft. You’ll need to bake them only until a toothpick inserted into the center comes out with very moist crumbs, not dry.
— Shiran from Pretty. Simple. Sweet.

Breakfast Muffins: Brownie, Salted Caramel & Avocado Gelato

BON APPÉTIT

– Ally xx

myTaste.com

Spiced Red Wine Poached Pears

Spiced Red Wine Poached Pears

… on a bed of Pistachio Crumble with a Quenelle of Homemade Vanilla Bean Ice Cream drizzled with a Red Wine & Orange Reduction *drools*

Hello Everyone! I’m really bad at this, and I sincerely apologise. I know I said that I would get back on track with Amcarmen’s Kitchen until the end of the year but once again I have fallen slack and behind for God knows how many weeks now. The truth is that I have been super busy towards the end of last month and into early November with a hectic and stressful event that definitely took a toll on my high blood pressure for sure. Though the past 2 weeks have been quiet, I spent most of it recovering and relaxing from that hell of an event.  I worked at least 15 hours a day from 8am until almost midnight on most nights. I’m just glad that it’s all over… For now.

But anyway, the recipe that I will be sharing tonight is one that I actually made waaaaaay back somewhere in June when I was left home alone (my mom and my sister flew out to Singapore to visit my other sister), during a long weekend too, and I had no plans of stepping out of the house unless I had to *cheeky grin*. So why didn’t I upload the recipe for this back then? Simple – it didn’t comply with the theme I had set out to accomplish for this year on Amcarmen’s Kitchen. So then why now? It’s still 2017. Stop asking so many questions! Haha! I amuse myself sometimes. Well, this is actually part of a special recipe that I will be posting (hopefully) next week, which will also most likely be the last recipe for the year unfortunately. I’m going to use the rest of my time before the year ends to plan and prepare recipes for the upcoming year. I already have a theme in mind to tackle for the whole year and I’m already excited for it!

Spiced Red Wine Poached Pears

Moving on, sorry that introduction went on way longer that I thought it would (as always though right?). If I can recall, I decided that I wanted to practice my dessert-making skills, you know to a MasterChef quality level worthy of a place in the competition ONE DAY. I have to say that I’m quite impressed with how this dessert played out in my head, to paper, and to the actual deal. The pears were soft on the outside, but still had a nice bite and a bit of crunch to it on the inside; beautifully spiced and contrasted well to the mild sweetness of the vanilla bean ice cream. And everyone loves pistachios, or at least I hope they do so throw that onto the plate for another added texture to the overall dessert dish.

You may want to get a head start on the ice cream so that it’ll have time to set in the freezer. You can either make it the day before, or early in the morning so that it’s ready for dessert time after a hearty dinner.

Spiced Red Wine Poached Pears Ingredients

PREP TIME 4 HOURS* | COOKING TIME 25-35 MINS | SERVES 6

*Includes the minimum freeze time for the no churn vanilla bean ice cream; see below for the freeze time range

INGREDIENTS

For the spiced red wine poached pears

  • 6 large pears, peeled and keeping the stems intact**
  • 1 bottle (750ml) red wine
  • 3/4 cup white sugar
  • 10 cloves
  • 3-inch cinnamon stick
  • 2 star anise
  • Juice and zest of 1 orange

For the no churn vanilla bean ice cream

  • 2 cups thickened cream
  • 1 can (300g) sweetened condensed milk
  • 1 vanilla bean pod
  • 1 tbsp pure vanilla extract

For the pistachio crumble

  • 1/2 cup roasted and salted pistachios
  • 3/4 cup plain flour
  • 6 tbsp unsalted butter, melted
  • 2 tbsp white sugar
  • 1/2 tsp salt

**Make sure that you use fairly large pears for this recipe. I found that using smaller pears overcook easily as they need a while to absorb that beautiful red wine colour as well as the flavours.

METHOD

  1. No Churn Vanilla Bean Ice Cream: Using a mixer, beat the thickened cream on medium speed until heavy peaks start to form. Add the can of sweetened condensed milk and beat further. Be careful as to not over whip the mixture. Add the vanilla beans into the mixture along with the pure vanilla extract and gently stir it into the ice cream mixture. Place the ice cream mixture into a container and freeze for a minimum of 4 to 6 hours or overnight.
  2. Spiced Red Wine Poached Pears: Add all the ingredients for the poached pears into a large pot or any that’s a suitable size. Cut out a piece of parchment paper and place it directly on the pears so they remain submerged in the liquid, or alternatively you could also use a small plate.
  3. Bring the wine mixture to boil and then turn it down to a simmer and cook until the pears are soft on the outside are still a little crisp in the middle instead of soft all the way through (about 25 minutes); cooking time will however depend on the size of the pears. For softer pears, cook for a further 10 minutes.
  4. Once the pears are cooked through, use a slotted spoon remove the pears and set aside to cool. Keep cooking the liquid until it reduces to a syrup. Then, strain the wine reduction and discard the spices and zest. If you find the sauce too sweet, add some lemon juice to it to cut through some of that sweetness.
  5. Pistachio Crumble: Preheat oven to 180C (350F or gas mark 4) and line a rimmed baking tray with parchment paper. Process the pistachios in a food processor until roughly chopped. Add the flour, sugar, and salt; processing further just until combined. Add the unsalted butter, and continue processing until the mixture is thoroughly combined and forms pea-size crumbs.
  6. Spread the pistachio crumble mixture on the prepared baking tray. Press gently with damp hands, flattening the crumble to about 1/2 inch thick and bake in the preheated oven until the crumble starts to brown at the edges, about 15 minutes.
  7. Remove from oven, and, using a flat spatula to lightly crumble the mixture. Return to oven, and bake until the crumble is golden brown, about 8 to 10 minutes further. Once done, transfer to a wire rack, and set aside to cool on the baking tray completely, about 20 minutes, before roughly crumbling.
  8. Assemble your dessert by spreading the crumble onto the middle of each individual serving plates. Place one pear on top of the crumble and drizzle with the orange and wine reduction syrup. Quenelle the vanilla bean ice cream and place atop the crumble on the side of the pear.
  9. Serve and enjoy!

Spiced Red Wine Poached Pears

BON APPÉTIT

Ps: speaking of desserts – this is completely unrelated by the way, but I just thought I’d share this because it’s hilarious! A week ago or so, my friend asked a question on our whatsapp group chat and the question was: if you were a dessert, what would you be? Without hesitation, my other friend quickly replied “cactus” and to her hasty realisation, she retracted and said “oh I thought you meant desert” and everyone went spiralling down into a pit of undignified laughters – well I couldn’t stop laughing out loud and looking like an insane freak in front of my colleagues at work during that time. God bless her.

– Ally xx

myTaste.com

Beetroot Brownies with Chocolate Chunk Beet Ice Cream

Beetroot Brownies with Chocolate Chunk Beet Ice Cream

Hello Everyone! Firstly, I’d like to apologise to the moon and back to all my friends and followers for not posting in what seems like (or quite frankly has been) forever! A lot of things have been going on for the past few months, both in my personal and work life that I found it difficult to balance alongside with keeping up with Amcarmen’s Kitchen. The truth is, I haven’t had the time to write, or let’s just say that I did have the time, but I was either using my time unproductively or for something else instead of sitting down and getting back on track with posting. So yes, I am very sorry for the lack of consistency of posting on the blog in the recent months, but I’m planning on getting back on board with this for the remaining 3 months of 2017 (hopefully). It will however be a little scattered in a sense that you won’t see a set theme for the month just because I still have an archive of recipes that never got posted from the previous months.

Beetroot Brownies with Chocolate Chunk Beet Ice Cream

Back in July I started to hero beetroot in my cooking, and I shall continue that for the next two weeks (I think) before I share other recipes that still stick with the theme for 2017 which is Blood Pressure Friendly foods. Before I jump onto the recipe, I’d like to thank my friends Simon Swadling and Jialing Mew for contributing their recipes for this year’s Auguest – and yes, another thing that I did not plan properly for with everything going on so I apologise that I could only round up these amazing two friends for you!

Anyway, so somewhere down the path of whipping up this batch of beetroot brownies, which by the way includes Whittaker’s (New Zealand) Kaitaia Fire Chili Pepper Spice Dark Chocolate, I made the realisation that I basically just made red velvet brownies *cheeky grin* but of course, what makes a nice warm slice of heaven without ice cream? Specifically Chocolate Chunk Beet Ice Cream? Even MORE specifically, chunks of chocolate from Whittaker’s (New Zealand) Hawke’s Bay Black Doris Plum and Roasted Almonds Dark Chocolate? I think I just drooled. Cold ice cream with a kick of spice in it to really heighten the flavours atop a chocolatey, chewy, and moist brownie drizzled with a vibrant beetroot icing glaze? I’ll have the whole batch please thank you very much.

The original recipe to the brownies can be found over on BBC Good Food, and the original recipe to the beetroot ice cream can be found on Vegan Heaven.

PREP TIME 25 MINS | COOKING TIME 45 MINS | SERVES 12 SLICES

Note: Make the ice cream either the day before or a few hours (4-5 hours) to allow for freezing time before baking your brownies.

INGREDIENTS

Beetroot Brownies Ingredients

For the brownies

  • 500g whole raw beetroot, washed
  • 250g dark chocolate (70% cocoa), chopped*
  • 100ml olive oil
  • 3 large free range eggs
  • 1 & 1/4 cup plain flour
  • 3/4 cup granulated sugar
  • 2/3 cup cocoa powder
  • 1/3 cup macadamia nuts, roughly chopped
  • 2 tsp vanilla extract
  • 1 tsp baking powder

For the beetroot icing glaze

  • 1 cup icing sugar
  • 1 tbsp beetroot juice

Chocolate Chunk Beet Ice Cream Ingredients

For the ice cream

  • 500g whole raw beetroot, washed
  • 1 cup thick full fat coconut milk
  • 1/4 cup honey
  • 3 tablespoons chopped dark chocolate (Whittaker’s (New Zealand) Hawke’s Bay Black Doris Plum and Roasted Almonds)
  • 1 piece thumb-sized ginger, grated

*As mentioned earlier, I used Whittaker’s (New Zealand) Kaitaia Fire Chili Pepper Spice Dark Chocolate. But since I only had 100g of this, I used regular dark chocolate for the brownies and added half of the Whittaker’s chocolate to the mix, while the other half sprinkled on top of the baked brownies.

METHOD

  1. Boil the beetroots for both for the brownies and ice cream, in a pan of boiling salted water for 15-20 mins or until tender. Drain and leave to cool before peeling (wear clean rubber gloves to peel if you want to avoid beet-stained hands).
  2. Chocolate Chunk Beet Ice Cream: Roughly chop the cooked beets into small chunks and place them together with the coconut milk, honey, and the grated ginger in a food processor and blend until smooth.
  3. Transfer the beetroot-coconut mixture in a freezer-safe container, stir in the chococalte chunks and freeze for about 4-5 hours, whisking slightly every 20-30 minutes to avoid it getting too icy.
  4. Beetroot Brownies: Preheat oven to 180C (350F or gas mark 4) and grease a 10cm x 25cm baking dish. Chop a third of the cooked beetroots into small cubes and blitz the remainder in a blender or food processor to a paste. Sit the paste in a sieve over a bowl – just until you have collected 1-2 tbsp juice. Save the juice for the icing, and mix the olive oil into the beetroot paste. Set both aside.
  5. Bring a pan of water to a bare simmer and place a heatproof bowl with the chopped chocolate. Lightly stir until the chocolate had melted then set aside to cool slightly.
  6. Use an electric whisk to beat the eggs, sugar, and vanilla together in a large mixing bowl until light, fluffy, and tripled in size. Carefully fold the eggs into the beetroot and olive oil mixture, followed by the melted chocolate. Fold in the flour, cocoa powder, and baking powder, then add macadamia nuts and the chopped beetroot.
  7. Pour the mixture into your prepared baking dish and bake for 20-25 mins. The brownies should still be slightly gooey in the middle. Set aside to allow to cool slightly. While cooling, you can thaw your beetroot ice cream for 5-10 minutes before scooping and serving
  8. Mix enough reserved beetroot juice with the icing sugar to get a runny icing – dilute with water if you need. Remove brownies from the tin, drizzle with the icing and cut into squares.
  9. Enjoy a sinful slice or two, or more (who’s gonna stop you?) with family and/or friends, or you know, just by yourself *cheeky grin*.

Beetroot Brownies with Chocolate Chunk Beet Ice Cream

Beetroot Brownies with Chocolate Chunk Beet Ice Cream

BON APPÉTIT

– Ally xx

myTaste.com

Blueberry Goat Cheese Empanadas

Blueberry Goat Cheese Empanadas

Hello Everyone! I hope everyone in Brunei had a great long weekend, and enjoyed yesterday’s public holiday as well while I unfortunately had to work yesterday. Don’t worry, I was 80% rebellious today to compensate for the fact that we had work yesterday and decided to take the whole day to work on a small task haha. Anyway, for anyone not in Brunei, I still hope that you had a great weekend nonetheless.

Before I dive into tonight’s recipe, I just want to apologise for the post going up a day late and also for not getting this post up last week like it was scheduled to be. I had a ladies night out with two of my friends whom I’ve not seen since forever and I ended up getting home past my bed time, not having prepared this post beforehand. I had initially started off the post with some distressing news, but because I didn’t want to start off with a downer, I’ve saved what I have to say for last. So if you want to know what’s been happening, read until the end.

Blueberry Goat Cheese Empanadas

Blueberry Goat Cheese Empanadas

So let’s get cracking then shall we? I came across tonight’s recipe while I was browsing through Pinterest one night, searching up new and unique recipes to try out for myself, and I was particularly drawn to this recipe by Joanna from JoCooks of her Blueberry Goat Cheese Empanadas. I never thought about sweet empanadas before so I thought that this was a pretty unique recipe, and definitely something new to me and quite possibly to many others I know. I have no idea why but all my empanadas decided that they wanted to spew out their innards! Okay that sounded a bit gross, but I’m not going to lie, I laughed way too much at that sentence!

Blueberry Goat Cheese Empanadas Ingredients

PREP TIME 40 MINS* | COOKING TIME 15-18 MINS | SERVES 9-12 EMPANADAS

*includes chilling time in the fridge

INGREDIENTS

For the empanada dough

  • 1 cup plain flour
  • 1/3 cup plain whole wheat flour
  • 1/3 cup cold water
  • 20g unsalted butter, chilled
  • 1 large free range egg, yolk only
  • 1 tsp granulated sugar
  • 1/4 tsp salt

For the filling

  • 1 punnet (125g) fresh blueberries
  • 1/2 cup crumbled goat cheese
  • 2 tsp granulated sugar
  • 2 tsp plain flour
  • 1/2 tsp vanilla extract
  • 1 large free range egg, lightly beaten, for egg wash

METHOD

  1. In a small food processor, combine the plain flour, plain whole wheat flour, sugar, and salt. Pulse a few times until combined, then add in the butter and pulse for about 5 seconds. Add the egg yolk in together with the cold water and process until a soft dough is formed, a couple of minutes in total.
  2. Turn the dough onto a lightly floured surface and knead until smooth. Cover with plastic wrap and let it rest in the fridge for about 30 minutes.
  3. Preheat oven to 200C (400F or gas mark 6). Line a baking tray with parchment paper.
  4. In a small bowl, add the fresh blueberries, vanilla extract, plain flour, and sugar. Toss to combine. Set aside.
  5. Roll out the empanada dough so that it is about 1/8 of an inch in thickness. Cut the dough into 4-inch rounds, using a cutter if you have one or a bowl/big mug to measure out the rounds, should make about 9-12 rounds depending on the size of each round.
  6. Spoon about half a tablespoon of goat cheese onto each round, and then about a tablespoon of the prepared blueberries onto the centre of each round. Fold the dough over in half to enclose the filling. Press the edges together to seal and crimp with either your fingers or a fork.
  7. Transfer the empanadas to the prepared baking tray and brush each empanada with the egg wash. Poke a few holes into each using a fork before baking for about 15 – 18 minutes or until the empanadas are golden brown in colour. Set aside to cool for a while then serve and enjoy with a nice cup of tea!

Blueberry Goat Cheese Empanadas

Blueberry Goat Cheese Empanadas

Blueberry Goat Cheese Empanadas

BON APPÉTIT

For those of you who are just tuning into Amcarmen’s Kitchen, I sometimes like to treat my blog a like a journal where you get to read small snippets of my life from time to time – I feel that’s what makes this blog more human and that way you get to know who I am a little at a time.

Okay, for those of you who have managed to reach this point of tonight’s post, here we go… How do I begin to say this. If you could see me right now, I just spent a whole 10 minutes sighing heavily whilst fighting back the tears just thinking about how I am going to write this next sentence.

My Blacky, my bundle of joy who has been in the family since he was a little pup for just short of 7 years, passed away on Sunday afternoon. My Mom, sister, and I were out for not even 2 hours doing our usual Sunday groceries, and when we got back home, there we saw him, lifeless, on a bed of green grass under the lovely sun. I cried instantly, wanting to believe that what I was seeing was just a dream… But it wasn’t. He was gone. I immediately called up a colleague of mine, to ask if he had a shovel and a hoe so that we could dig a resting place for Blacky, and within less than half an hour, he was at my house, with his team members from work, there to help me dig and lay Blacky into the ground. I wasn’t expecting this at all – all I asked for was the tools so that I could do it myself, so I am thankful to have him as my colleague and my friend. Sorry to end the post on a downer, but like I said before, I didn’t want to start the post off with this. Goodbye Blacky. You will be missed oh so dearly.

– Ally xx

myTaste.com

Blueberry Bread Pudding

Blueberry Bread Pudding

Hello Everyone! I apologise for posting a day late – I got home quite late last night. Actually that’s a lie, I got home at a decent hour but because I was super full from the Korean BBQ Buffet Dinner that I had with two of my colleagues, I just wanted to take a shower and then go to sleep. Even though we work together and basically see each other 6 days a week for 8 hours, we don’t really get to just chill and catch up with each other, be it talking about our personal life or just random office gossip. All in all a great night with great company over great food.

In other news, I hope everyone had a great weekend, celebrating with their Mom’s on Mother’s Day. Ours didn’t quite go as planned, or well it did but we all ended up disappointment so to say. We, or my Mom actually, wanted to try out a restaurant that she had been eyeing for a while now for their breakfast buffet. We got there all excited and everything only to be disappointed with the buffet itself – or should I even call it a buffet really? To me, there wasn’t a substantial amount of food to call it a buffet, and hello?! What breakfast buffet doesn’t have an egg station?! I was immensely frustrated that I could not have sunny side up eggs, or scrambled eggs to go with my… Soggy hash browns and non-existent beef rashers, but instead had to suffice to cold pancakes and waffles. Outrageous. They had fried noodles though, which at first I thought was probably the only thing that could save me from further dissatisfaction – but I most definitely regretted taking a plate full of it. The noodles were subpar but paired with the most bitter vegetables ever which was enough for me to just push the plate away. A waste I know, but I couldn’t risk an upset tummy at that point. So what did I actually eat? Their assortment of breads and under-seasoned prawn noodle soup – a lot of it just to get my money’s worth. My Brunei friends/followers, if you’re wondering what restaurant I’m talking about, it’s Anjung Saujana at the International Airport. Their al a cart menu looked comparatively better, but meh, still not enticing enough for me to ever step foot in there again to be brutally honest. Sorry!

Blueberry Bread Pudding

Blueberry Bread Pudding

That aside, I was able to save Mother’s Day by putting together a lovely Blueberry Bread Pudding, filling it up with basically anything and everything I had left lying around from the previous blueberry recipes I have whipped up for Amcarmen’s Kitchen. I had some leftover white chocolate chips from my Blueberry Lemon & White Chocolate Scones, leftover ricotta cheese from last week’s recipe of Blueberry & Ricotta French Toast Roll Ups, and the most important leftover ever – the bread crusts from last week’s recipe as well (remember I said not to discard the bread crusts in that post? This is why).

So back when I was still living in Sydney, I think at that time I was just starting my final year of university, I hosted a little flowery tea party for 4 lovely friends of mine one fine weekend afternoon. One of the eats on the menu was finger sandwiches, and to be completely honest, I forgot what we actually put in them. I have a feeling it was tuna or egg sandwiches, but I really cannot remember. Anyway, that’s not the point, the point is that finger sandwiches usually have the crusts cut off and I distinctly remember that time saying that I was going to keep the crusts and make something out of them. If I remember correctly, I did make an all-crust bread pudding out of them, and this was the caption to the end result when I posted a photo of it on Instagram:

Any normal person would’ve either thrown them away or fed them to the pigeons – I am not a normal person. So instead of throwing leftover bread crusts from the tea party, I went on and made a bread pudding with almond flakes and dates out of it #freshfromtheoven #someonecomeoverandeatitwithme #foodporn #foodgasms — click here to see the full image of my Date & Almond Flakes Bread Pudding from way back in 2014.

Blueberry Bread Pudding Ingredients

PREP TIME 1 HOUR | COOKING TIME 1 HOUR | SERVES 12

INGREDIENTS

  • 200g ricotta cheese
  • 1 punnet (125g) fresh blueberries
  • 3 large free range eggs
  • 2 cups milk
  • 1/4 cup white chocolate chips
  • 2 tbsp maple syrup
  • 2 tsp vanilla extract
  • 1 tsp ground cinnamon
  • 1/4 tsp ground nutmeg
  • Handful of flaked almonds
  • Granulated sugar (optional)
  • Leftover bread crusts + half a loaf of white bread
  • Unsalted butter, for greasing

METHOD

  1. Grease a rectangular baking dish, mine was about 7.5″ x 11″ in size, with the unsalted butter.
  2. Cut the crusts off the remaining half loaf and lay the bottom of the baking dish with the crusts, making sure to cover as much of the bottom as you can.
  3. Spread all of the ricotta cheese on top of the bread crusts and top with half of the blueberries and half of the white chocolate chips.
  4. Cut the crustless slices of bread diagonally in half and arrange to cover the layer of ricotta cheese, blueberries, and white chocolate chips. Set aside.
  5. Whisk together the eggs, milk, maple syrup, ground cinnamon, and ground nutmeg until well combined. Pour over the bread, making sure to press the bread down to absorb the egg mixture.
  6. Top with the remaining blueberries, white chocolate chips, and flaked almonds. Sprinkle about a tablespoon of granulated sugar on top if you wish. Cover with aluminium foil and let it sit for about an hour before baking.
  7. Preheat oven to 180C (350F or gas mark 4) about 45 minutes into its sitting time. Baked, covered for 30 minutes, and then uncovered for another 30 minutes or until lightly browned and set.
  8. Let it stand for 5 minutes before serving. Enjoy!

Blueberry Bread Pudding

Blueberry Bread Pudding

BON APPÉTIT

– Ally xx

myTaste.com

Blueberry Lemon & White Chocolate Scones

Blueberry Lemon & White Chocolate Scones

Hello Everyone! I’ll make tonight’s post quick only because I am mentally and physically exhausted from both being sick and basically juggling so many projects simultaneously today. I managed to tick at least 70% of my list of things to do for work so I’m pretty happy about that, but it’s going to be a busy weekend!

Blueberry Lemon & White Chocolate Scones

Anyway, tonight’s recipe is one of my favourite go-to-brekkie when I was still living in Sydney for my university studies. When I lived up in the lower North Shore, I’d always walk about 15 minutes from home to catch the train to the city, and then a bus to campus. Along the way, I’d stop at Baker’s Delight and pick up a freshly baked Blueberry Lemon & White Chocolate Scone before hopping onto the train. I’d then have my scone on campus in the lecture hall, or tutorial rooms while waiting for class/lecture to start. It would alway make my mornings a little bit better especially when I’d have to be on campus by 8 or 9 in the morning.

So since the theme for the month of May on Amcarmen’s Kitchen is Blueberries, I decided to whip up my own batch of Blueberry Lemon & White Chocolate Scones to get into the nostalgic zone. I followed my own recipe for Basic Scones which I posted way back in mid-2014, and added blueberries, lemon juice and zest, and white chocolate chips into the mix.

Blueberry Lemon & White Chocolate Scones Ingredients

PREP TIME 20 MINS | COOKING TIME 20-25 MINS | SERVES 12 SCONES

INGREDIENTS

  • 3 cups self-raising flour, plus extra for dusting
  • 1 punnet (125g) fresh or frozen blueberries
  • 80g chilled unsalted butter, cubed
  • 1 cup milk
  • 1/2 cup white chocolate chips
  • Juice of half a lemon
  • Zest of 1 lemon

METHOD

  1. Preheat oven to 200C.
  2. Sift the self-raising flour into a large bowl and add the cubed butter together with the lemon zest. Rub the butter into flour using your fingertips until the mixture resembles a breadcrumb texture.
  3. Make a well in the centre and add the milk, lemon juice, and blueberries in. Mix with a flat-bladed knife until the mixture forms a soft dough. If the mixture is a bit dry and crumbly, add more milk if required. Turn onto a lightly floured surface and knead gently until smooth (don’t knead the dough too much though or your scones will be quite tough).
  4. Pat the dough into a 2cm-thick round, and cut into 12 equal logs.
  5. Place scones onto a tray lined with baking paper, 1cm apart from each other. Lightly sprinkle the tops with a little flour and bake for 20 to 25 minutes or until golden and well risen. Serve warm with a nice cup of tea!

Blueberry Lemon & White Chocolate Scones

Blueberry Lemon & White Chocolate Scones

Blueberry Lemon & White Chocolate Scones

BON APPÉTIT

– Ally xx

myTaste.com

Vegan No-bake Blueberry & Lemon 'Cheesecake'

Vegan No-bake Blueberry & Lemon ‘Cheesecake’

Hello Everyone and a very happy first day of May! For those of you celebrating Labour Day, I hope you’re having a blast with your long weekend! Unfortunately, Labour Day isn’t celebrated in Brunei, so yes, I worked today *sad face*. Well, I’m actually not here out of my usual posting schedule to talk about Labour Day, in fact, I’m here for a completely different, and special occasion!

Happy Birthday Mom!
Everyday I wake up, I always have you to thank. I have your guidance, your food, your warmth, your love, and your heart: someone who loves me (and the other 2 troublemakers as well) unconditionally. I promise I’m not just saying this because it’s your birthday haha! Happiest of Birthdays Mom!

This year for my Mom’s birthday, I decided to whip up a Vegan No-bake Blueberry & Lemon ‘Cheesecake’ after my huge success with my sister’s vegan ‘cheesecake’ back in August 2016. I’ve been wanting to try out more vegan ‘cheesecakes’ since then and now the opportunity has surfaced once again. This ‘cheesecake’ is completely gluten-free, dairy-free, and egg-free. Before we move on to the recipe, please check out the original over on Call Me Cupcake by Linda. Please take note that I have adjusted the quantities below to make an 8.5-inch round cake.

Vegan No-bake Blueberry & Lemon 'Cheesecake' Ingredients

PREP TIME 20 MINS | CHILL TIME min. 6 HOURS | SERVES 8-10

INGREDIENTS

For the base

  • 1 cup pitted dates, roughly chopped
  • 1 cup almonds, finely chopped
  • 1 tsp salt

For the filling

  • 1 & 1/2 cups cashew nuts, soaked in water overnight then drained*
  • 2/3 cup full fat coconut milk
  • 1/2 cup (50g) fresh or frozen (but thawed) blueberries
  • 6 tbsp coconut oil, melted
  • 4 tbsp freshly squeezed lemon juice
  • 3 tbsp maple syrup, to taste
  • Zest of 1 lemon

For the topping

  • Edible flowers**
  • Fresh blueberries
  • Shredded coconut

*Or soaked in very hot water for an hour if pressed for time

**To my Brunei followers if you could help me out, I don’t know where to find edible flowers here so what I usually do is just pick non-edible flowers from my garden, make sure they get a good wash and then use them only for photographic purposes.

METHOD

  1. Soak the roughly chopped dates in warm water for 15 minutes. Drain and transfer to a small mixing bowl combined with the finely chopped almonds and salt. Using the back of a fork, mash and mix the ingredients together until a paste forms.
  2. Press the mixture into an 8-8.5 inch springform pan (and if you don’t have one, you may use a regular pie/cake tin covered with parchment paper). Place the pan in the freezer while you prepare the ‘cheesecake’ filling.
  3. Put al the ingredients for the the filling in a blender and blend on low until the mixture is as smooth as possible. Pour the filling onto the crust, cover with plastic wrap and freeze for at least 6 hours before serving.
  4. Remove the cake from the pan and top with extra fresh blueberries, shredded coconut, and edible flowers. Leave to thaw in room temperature for about 10-15 minutes before cutting into it; you may run your knife under warm water and dry off to make a cleaner cut. Let each slice of cake thaw for a few more minutes before serving. Enjoy!

Vegan No-bake Blueberry & Lemon 'Cheesecake'

Vegan No-bake Blueberry & Lemon 'Cheesecake'

So usually, it is a habit of mine to read through the recipe first either a few days before, or the night before just so that I have proper planning when it come to buying the ingredients needed to proceed with the recipe. This time around, I completely forgot about doing this – I already had the recipe bookmarked from probably the beginning of the year so I guess this is probably one of the reasons why it completely slipped my mind. Why is it important to read a recipe ahead of time? Well for starters, the cashew nuts in this recipe require to be soaked in water overnight. Did I soak mine overnight? Nope I didn’t. Luckily, this can be rectified as it does say in the original recipe that if you’re in a hurry, you can soak the cashew nuts in very hot water for an hour (which is what I did) hehe.

Also, I missed out on a crucial bit of information which I only saw earlier on this afternoon when I was writing this post: “makes 1 tiny cheesecake (12cm/5-inches)” No wonder my cheesecake looked short and just barely had enough crust to cover the whole bottom. My springform pan is 8.5-inches in size which mean that I could’ve easily just doubled the recipe *face palm* but oh well, I would’ve have had enough ingredients to double the recipe if I had noticed it early and that’s only because I probably wouldn’t have been bothered to drive out to the grocers again to pick up a few more ingredients.

Vegan No-bake Blueberry & Lemon 'Cheesecake'

Happy Birthday Mom!

So what did I learn tonight? READ THE RECIPE FIRST A DAY OR TWO AHEAD OF TIME!

BON APPÉTIT

– Ally xx

myTaste.com

No-bake Avocado Lime Cheesecake

No-bake Avocado Lime Cheesecake

Hello Everyone! Today is a very special day, and for two reasons too! Today is special because God so loved the world that he gave his one and only Son, that whoever believes in him shall not perish but have eternal live (John 3:16 ESV). A very Happy Easter to all who celebrate the resurrection of Jesus Christ.

Besides today being Easter Sunday, today is also special because Amcarmen’s Kitchen turns 3! On this day 3 years ago I was sitting in my room, quite possibly still in my pyjamas at that time, blankly starting at my list of assignments to complete before the end of the Easter mid-semester break on my second-last semester of my degree. Knowing that I had so much to do in so little given time, I thought the only right thing to do at that moment was to take a nap and hopefully, magically, all my assignments would have been completed by the time I woke up from my nap… Well, that wasn’t what happened, but instead I decided to spontaneously delve into the world of WordPress, and *poof!* Kitchen Headquarters was born. Yes, Amcarmen’s Kitchen was previously known as Kitchen Headquarters in 2014 for a good year and a half before I did a whole rebranding in mid-2015.

As it has been for the past 2 years, I decided to make, not bake, a cake for Amcarmen’s Kitchen, and basically for my family and I to enjoy on behalf of my blog haha. I decided to try something new, while of course still sticking to the theme of using avocado in all my recipes for the month of April. Before we dive into today’s recipe, please do check the original by Sheilla on Chef Sheilla.

No-bake Avocado Lime Cheesecake Ingredients

PREP TIME 15 MINS | SETTING TIME 2 HOURS | SERVES 8-10

INGREDIENTS

For the avocado lime cheesecake mixture

  • 250g cream cheese, softened
  • 50g unsalted butter, melted
  • 300ml crème fraîche
  • 1 large avocado, mashed
  • 1 sachet (7g) clear gelatin or agar-agar powder
  • 1 cup granulated sugar
  • Juice and zest of 2 limes
  • 1 cup ground digestive cookies
  • 1 lime, for garnishing

METHOD

  1. Combine the ground digestive cookies and melted butter in a medium-sized bowl and mix until moist crumbs form. Press the crumb mixture onto the bottom of a 10″ springform pan that has been lined with parchment paper. Chill in the freezer for about 10 minutes to set.
  2. Take 100ml of the crème fraîche and combine it with the gelatin or agar-agar powder in a small saucepan. Stir for about 2 minutes until all the gelatin granules has dissolved. Turn the heat to medium and bring to a boil, stirring for a few minutes until the gelatin has completely melted. Remove from the heat and strain through a fine sieve. Set aside.
  3. Add the mashed avocado, cream cheese, sugar, the remaining 200ml of crème fraîche, lime juice, and lime zest to a large mixing bowl and using an electric mixer with a paddle attachment, mix everything together until smooth and well-combined. Pour in the gelatin-cream mixture and continue to mix until creamy and smooth in texture.
  4. Pour the avocado lime cheesecake mixture into the prepared springform pan and smoothen the top. Chill in the freezer for at least two hours for it to set.
  5. Release the cheesecake from the springform pan and serve right away! Garnish the top with some lime slices and zest. Enjoy!

No-bake Avocado Lime Cheesecake

The taste: amazing! The flavour of the avocado definitely shone through, and the hint of tangy flavour from the lime made the whole dessert refreshing in taste. The texture… Well let’s just say that it is supposed to be creamy and smooth, mine wasn’t as smooth as it could be. It has nothing to do with the original recipe; I think that I may have slipped up somewhere along the way. The obvious was probably that I was on the verge of over whipping the cheesecake mixture that the fresh cream started forming little clumps – I stopped before it severely over whipped. Also, I probably didn’t add enough gelatin to the cheesecake mixture so it didn’t quite set right. I only added half of the sachet in even though the original said ‘1 sachet’ – in my defense I didn’t know if Sheilla’s 1 sachet was the same quantity-wise as my 1 sachet. Oh well, I’ve adjusted the quantity of the gelatin in this recipe so hopefully the one listed above works!

Before I end tonight’s post, I’d just like to take this opportunity to thank first and foremost, my Mom who taught me how to cook. I also thank my other family members and friends who encouraged me to start up my blog because if it weren’t for them, Amcarmen’s Kitchen wouldn’t be here today, and I probably wouldn’t have continued pursuing my passion for cooking at home. Let’s face it, when I cook, I cook for my blog, and my family just so happens to be around to eat it after haha! Finally, to those who think I am just wasting my time on this, or assume that I work in a restaurant as a waitress because I didn’t actually go to culinary school to be able to work in a commercial/professional kitchen, take your negativity elsewhere. I have a degree in Design and I am working in the country’s leading Advertising Agency as a Creative Design and Events Management Executive, as well as a Copywriter. Thank you very much.

No-bake Avocado Lime Cheesecake

No-bake Avocado Lime Cheesecake

BON APPÉTIT

– Ally xx

myTaste.com

Banana Cheesecake Rollups

Banana Cheesecake Rollups

Hello Everyone! Yes, I’m still trying to play catch up here and hoping to get everything back to order by the time April sneaks up on us. I’ve been trying very hard to get recipes up on the blog for the past week, but I just never got around to because of, well, I was going to say several factors, but after running them by my head just a second ago, there were really only two factors that affected my mood to write. The first being unnecessary workplace drama that put me in such a mood for the past week, and second, it’s that time of month. You can imagine the rollercoaster of emotions I went through – I was just glad the the working week was over by the time it was Saturday, but it doesn’t help that I’ll be back to work again tomorrow. Seriously, a one-day weekend definitely NOT enough.

All that aside though, I watched Beauty and the Beast on Thursday night with my Mom and my sister. Belle could not have been played any better than Emma Watson; she was just an absolute fit for that role. Not only was she the definition of “Belle”, her singing was also on point. The movie just brought back many childhood memories, and I may have shredded a few tears here and there throughout the movie, and sung along to the songs while I saw people just snapchatting or Instagram storying the sh*t out of the movie – like put your phones away you uncultured and uneducated youngsters!

Anyway, tonight’s recipe is the last of the banana recipes that was supposed to be covered last month, and one that I stumbled upon through my research when I was planning for Amcarmen’s Kitchen early on the year. I did’t want to make a whole batch of these, so I only made 4 rollups. Unfortunately for me, out of the 4 only one didn’t burst open so I do apologise if the photographs for this recipe look a bit… Lonely. Hahaha! You can find the original recipe for these Banana Cheesecake Rollups over on The Cards We Drew. Also, just something to note, I tried this recipe out using puff pastry instead of crescent roll dough like in the original recipe. The reason? Nothing in particular actually aside from the fact that remade crescent roll doughs aren’t available here in Brunei and therefore I made the decision to use puff pastry instead. I also didn’t add the toppings to the rollups as I assumed that the dessert would already be too sweet for me to handle and with extra sweetness on top would probably be overkill for me. Feel free to top yours though if you’re a sweet tooth.

Banana Cheesecake Rollups Ingredients

PREP TIME 15 MINS | COOKING TIME 15-18 MINS | SERVES 12 ROLLS

INGREDIENTS

  • 2 large bananas, cut into 6 pieces each
  • 1 packet (500g) puff pasty block, defrosted
  • 250g cream cheese, softened
  • 3/4 cup of sugar
  • 1/2 cup of brown sugar
  • 1/2 tsp vanilla

METHOD

  1. Preheat oven to 180C (350F or gas mark 4). Line a baking tray with parchment paper and set aside.
  2. Lightly flour both the work surface and the pastry before rolling out to your required thickness. Allow for the pastry to stand for a few minutes to help reduce shrinkage.
  3. While the pastry is left to stand, combine the cream cheese, sugar, and vanilla in a medium-sized bowl and using a handheld electrical mixer, beat the ingredients together on high. Set aside.
  4. Roll out the puff pastry dough to about 3mm thick and cut into 12 long triangles. Starting at the largest end, add a tablespoon of the cream cheese mixture, a pinch of brown sugar, then a piece of banana on top.
  5. Tuck the edges over top of the banana, roll up, and place onto the prepared baking tray. Repeat this until you’ve made all 12 rollups.
  6. Bake in the oven for about 15-18 minutes, until golden brown and cooked through. Once baked, sprinkle some powdered sugar over top and serve warm with a cup of coffee. Enjoy!

Banana Cheesecake Rollups

Banana Cheesecake Rollups

BON APPÉTIT

– Ally xx

myTaste.com

Pan-fried Cinnamon Bananas

Pan-fried Cinnamon Bananas

Hello Everyone! First and foremost, I am truly apologise for the lack of posts for the past month! As some of you may have been aware from previous posts, or if you follow my personal social media pages, I spent the last 3 weeks travelling Australia and the Northern Island of New Zealand. I arrived back home last weekend and have just been catching up on truckloads of work that I haven’t had the time to update Amcarmen’s Kitchen during that catch up week, as well as when I was on holiday. I did have content and material prepared beforehand and I was supposed to be posting while I was on holiday, but let’s face it – I didn’t want to be stuck in front of the computer all day while there were so many beautiful places around me to visit. Plus, I usually get home late and just want to rest a recharge for the following day’s adventure. Other than my apologies, I had an amazing time in New Zealand and I am already planning a trip back same time next year for a South Island trip!

Just a quick note before I jump onto today’s recipe (yes I am aware that today is Sunday and it’s not my usual Wednesday upload schedule), I will be posting two more Banana recipes (this one inclusive), which for those of you who don’t follow, was the theme for the month of February for Amcarmen’s Kitchen. The reason being is that I have already had these recipe lined up to upload but didn’t get around to doing so and I didn’t just want to scrap them off, and yes, that is why I am posting today as well – just until  I catch up with the present and resume back to my normal Wednesday posts.

Today’s recipe is one of the easiest and quickest thing to make when you find yourself with a handful or more of overripe bananas. Of course, the first go-to recipe for overripe bananas would be to whip up a delicious loaf of banana bread – provided that I have the time and energy to do so – but pan-fried cinnamon bananas are just as tasty as banana bread. Pair them with a cuppa and you’ve got your Sunday afternoon hi-tea set and all ready to go!

Pan-fried Cinnamon Bananas Ingredients

PREP TIME <5 MINS | COOKING TIME 10 MINS | SERVES 2

INGREDIENTS

  • 2 large slight overripe bananas, sliced into 1/3″ thick rounds
  • 2 tbsp granulated sugar
  • 1 tsp ground cinnamon
  • 1/4 tsp ground nutmeg
  • Olive oil, for frying

METHOD

  1. Combine the granulated sugar, cinnamon, and nutmeg in a small bowl. Set aside.
  2. Add about a teaspoon of olive oil to a large non-stick frying pan and warm over medium heat.
  3. Add the sliced banana rounds and cook for about 2-3 minutes. During the last minute of cooking on the first side, sprinkle about half of the cinnamon mixture over the banana rounds.
  4. Flip the rounds, sprinkle with the remaining cinnamon mixture, and cook about 2-3 more minutes, until the bananas are soft and warmed through.
  5. Remove from the pan. Serve and enjoy with a nice cup of tea.

Pan-fried Cinnamon Bananas

BON APPÉTIT

– Ally xx

myTaste.com