Baked Purple Sweet Potato with Banana & Cherries

Baked Purple Sweet Potato with Banana & Cherries

Hello Everyone! A thousand apologies as this recipe was meant to go up a couple of days ago – but I haven’t been home at a decent hour for the past few nights to be able to write and get this up as planned. But, please bear with me for a moment as I attempt to absorb the fact that we’re 2 days away to the end of the month. All I can hint at this moment is that the upcoming month for me will say a final goodbye to a lifelong chapter – or should I say book? I feel like it’s more than an end to a chapter, but rather a book that I will be closing. To be able to open up a new story and at the same time revisit more chapters to one that was on hold for the past 3 years. One that I knew I will have the opportunity to continue writing. I know, I know, this all sounds very vague right now but in due time…

Baked Purple Sweet Potato with Banana & Cherries

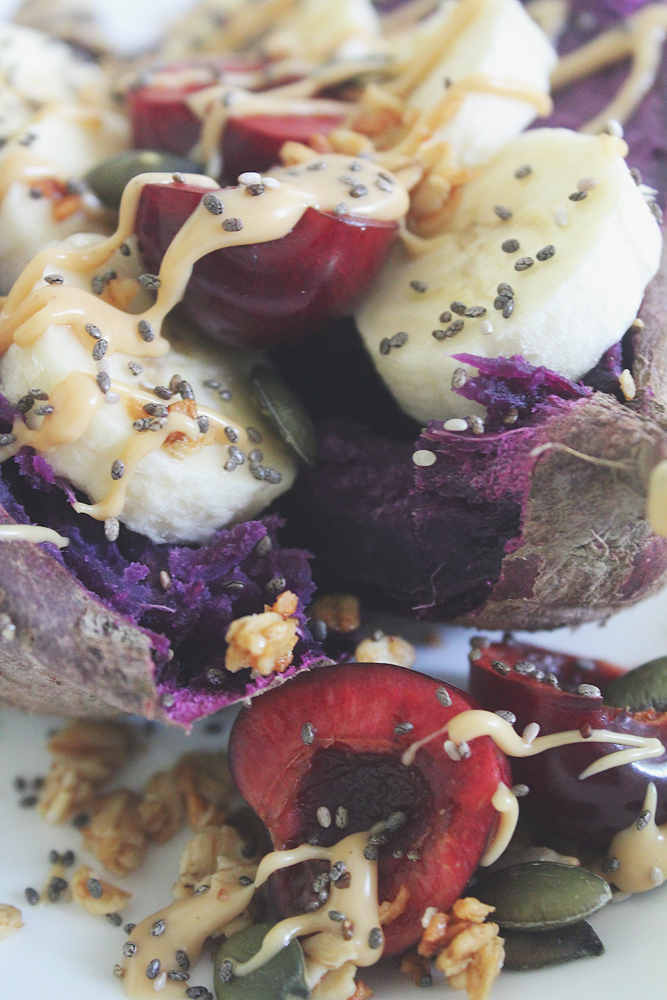
Tangent aside and moving on, this recipe is pretty much open for you to get your creative juices flowing. Pair your favourite fruits together, add an element of crunch, and drizzle with your desired spread. What you can also do is play around with colour – I chose my fruits based on what colours will pop next to a beautiful deep purple sweet potato. This will make it look oh so aesthetically pleasing to the eye and (of course) taste even better in your tummy.

Before we dive into tonight’s recipe, be sure to check out where I drew inspiration for this beautiful breakfast dish over on Food with Feeling by Brita. Also, please make sure to read the end of this post to find out what’s happening on Amcarmen’s Kitchen for the month of August!

Baked Purple Sweet Potato with Banana & Cherries Ingredients

Baked Purple Sweet Potato with Banana & Cherries Ingredients

PREP TIME 10 MINS | COOKING TIME 80-95 MINS* | SERVES 2**

*Baking time time will vary depending on the size of your sweet potato.
**Half of a sweet potato for breakfast is already pretty filling, but the recipe can easily be doubled, tripled, and so on if you’re feeding more than 1-2 people at the table.

INGREDIENTS***

  • 1 medium-sized sweet potato, washed and scrubbed clean
  • 1 large banana, sliced
  • Chia seeds
  • Handful of fresh cherries, halved and pitted
  • Heaped spoonful of peanut butter
  • Granola

***Other optional toppings just to get your mind flowing: an array of mixed berries such as blueberries, strawberries, raspberries, and blackberries, hemp seeds, pepitas, nut butter, nutella, and many other choices for you to have fun with it!

METHOD

  1. Preheat oven 200C (400F or gas mark 6).
  2. Bake the sweet potato**** directly on the rack for about 40 to 50 minutes. Baking times may vary depending on the size of the potato. So to know if they’re done, stab it with a fork and if it easily pierces into the centre of the potato, the inside is most definitely tender.
  3. Once tender, cut a slit down the centre of the sweet potato about two thirds of the way down. Optional: slighty mush the inside of the potato.
  4. Top with your favourite breakfast toppings and don’t forget to make it look pretty on the plate too!
  5. Serve and enjoy!

****Here’s a tip: you can bake extra potatoes at the same time (I actually baked these together with my from week 2 of July), so that you can chuck them in the fridge and heat them up the next morning or two for another super easy and quick breakfast! It only takes less than 5 minutes to throw something together with your pre-baked potato.

Baked Purple Sweet Potato with Banana & Cherries

Baked Purple Sweet Potato with Banana & Cherries

Before I end tonight’s post, I’d like to share a little introduction to what’s coming as I won’t have the chance to when the next wave of recipes hit. If you have been following my blog since the beginning, or have been a frequent follower for more than a year or so, you’ll already know what August (or should I say, Auguest) means for Amcarmen’s Kitchen. Every year since 2015 I have been rounding up a couple of food bloggers and foodies alike to share their recipes in relation to the set theme. This year I have been able to round up some new faces, as well as familiar and recurring guests on Amcarmen’s Kitchen!

Stay tuned for an enticing array of delectably sweet and savoury breakfast dishes! If you want to read more on how this all started, click on the ‘Auguest’ tab above and there should be a link to take you to an introductory post that I wrote back in 2015.

BON APPÉTIT

– Ally xx

myTaste.com

Sweet Purple Sweet Potato Toasts (3 ways)

Sweet Purple Sweet Potato Toasts (3 ways)

Hello everyone! Apologies for not getting this post up last week as it was supposed to – I feel like I’ve been repeating myself in every post so far but yes, things have been hectic. Amongst the hecticness I speak of, my sister also arrived back from Singapore last week. Other than that, nothing exciting has happened over the past week – the week ahead though will definitely be one to remember.

Anyway, I’ll keep tonight’s introduction short and just dive straight into the recipe. To recap, the theme for this month on Amcarmen’s Kitchen is to hero Sweet Potatoes for breakfast! At the beginning of he month, I shared Savoury Orange Sweet Potato Toasts 3 Ways for you, and tonight I’m going to share you a Sweet Purple Sweet Potato Toasts 3 Ways for those who prefer a sweet option rather than savoury to kick start their mornings!

Sweet Purple Sweet Potato Toasts (3 ways)

Preparing your Sweet Potato Toasts

PREP TIME 10 MINS | COOKING TIME 20 MINS* | MAKES 5 SLICES**

*Baking time time will vary depending on the size and thickness of your sweet potato slices.
**Or how-ever-so-many slices you can get from a single sweet potato

INGREDIENTS

  • 1 large purple sweet potato, wash and dried

METHOD

  1. Preheat oven to 180C (350F or gas mark 4). Place a wire rack on a large rimmed baking sheet.
  2. Trim both ends from the sweet potato using a knife and slice them lengthwise into 1/4-inch thick slabs using a knife or mandolin slicer.
  3. Arrange the slabs in a single layer on the wire rack and bake for about 15-20 minutes or until the potatoes are tender, but not fully cooked.
  4. Remove the potatoes from the oven and allow them to cool on wire rack completely before transferring to a storage container. They can be stored in the fridge for up to 4 days.

When it’s go-time simply add the desired number of slices to your toaster and toast away. Setting it on the highest setting takes only one toasting cycle to get them how I like them (warm, bubbly and crispy on the edges). Just be wary that yours may need more or less depending on the toaster that you are using. Adjust to your liking!

Notes/Tips:

    • Look for sweet potatoes that are relatively shaped like a tube so that they’re easier to slice.
    • Don’t remove the skin because fibre in it is good and it helps the slices hold up better during storage.
    • Using a mandolin slicer gives you uniform slices of sweet potatoes, and is easier and safer than using a big knife.
    • Allow them to cool completely after baking before stacking them in a container or they’ll get sweaty and will definitely take longer to toast when you’re ready to eat them.

Now the fun starts – you get to add toppings! The possibilities are pretty much endless but these three are my absolute favourite combinations for a yummy start to my day – the sweet edition!


Blackberries & Buttermilk Caramelised White Chocolate

Sweet Purple Sweet Potato Toasts (3 ways): Blackberries & Buttermilk Caramelised White Chocolate

PREP TIME 5 MINS | COOKING TIME 5-10 MINS | SERVES 1

INGREDIENTS

  • Blackberries, fresh or frozen (thawed)
  • Sweet potato slice(s)
  • Whittaker’s West Coast Buttermilk Caramelised White Chocolate (Artisan Collection), roughly chopped

METHOD

  1. Place the sweet potato slices into a toaster and toast on the highest setting until warm, bubbly and crispy on the edges.
  2. Top with the above garnishes and enjoy!

Banana, Blueberries & Peanut Butter

Sweet Purple Sweet Potato Toasts (3 ways): Banana, Blueberries & Peanut Butter

PREP TIME 5 MINS | COOKING TIME 5-10 MINS | SERVES 1

INGREDIENTS

  • Banana slices
  • Blueberries, fresh or frozen (thawed)
  • Chia seeds
  • Granola
  • Peanut butter
  • Sweet potato slice(s)

METHOD

  1. Place the sweet potato slices into a toaster and toast on the highest setting until warm, bubbly and crispy on the edges.
  2. Top with the above garnishes and enjoy!

Strawberries & Goats Cheese with Balsamic Reduction

Sweet Purple Sweet Potato Toasts (3 ways):Strawberries & Goats Cheese with Balsamic Reduction

PREP TIME 5 MINS | COOKING TIME 5-10 MINS | SERVES 1

INGREDIENTS

  • Balsamic reduction
  • Goats Cheese
  • Lemon zest
  • Strawberry slices, fresh
  • Sweet potato slice(s)

METHOD

  1. Place the sweet potato slices into a toaster and toast on the highest setting until warm, bubbly and crispy on the edges.
  2. Top with the above garnishes and enjoy!

And there you have it – three simple ways you can make you mornings sweeter, brighter, full of colour, healthier, and energising altogether! I’ll TRY to get the last post for the month up, if not on Wednesday night, then on Thursday night hopefully – fingers crossed!

BON APPÉTIT

– Ally xx

myTaste.com

Breakfast Muffins: Spiced Plum & Quinoa

Breakfast Muffins: Spiced Plum & Quinoa

Hello Everyone! I hope the week has been good to all. Tonight will be the last of my Muffin Making Monday series on Amcarmen’s Kitchen and I will be back to sharing recipes with y’all on my usual Wednesday night uploads. I’ll still be continuing the overall theme for the year of Breakfast Foods, but next week I’ll be sharing a completely new sub-theme on the blog so stay tuned for that!

Yesterday was such a tiring day overall that I think I crashed in bed right after dinner and probably had one of the best sleeps that night – it would’ve been even better if I hadn’t had to wake up so early for work. We held a garage sale yesterday morning from 7am to (officially) 10am, but people still kept coming by the house past 11am that morning. The night before we invited our close friends to the house so that they could have the first choice in picking out what they wanted before we sold our stuff to others the following morning. We made almost $500 that night and morning for all our small items such as clothes, jewellery, bags, accessories, toys, etc. and about $1000 more on our large furnitures. After a tiring morning of turning our unwanted things into money, I spent the afternoon catching up with friends and food at one of our friend’s open house. That was my day in a nutshell.

Breakfast Muffins: Spiced Plum & Quinoa

Moving on, plums are extremely nutritious, offering a wide variety of health benefits. They contain over 15 different vitamins and minerals, and in addition, fibre and antioxidants that may help reduce the risk of several chronic diseases. To have a further read on the health benefits of Plums (and Prunes), head on over to Health Line. Moving on, in addition to the many vitamins and minerals packed into these breakfast muffins, quinoa also gives them a major protein boost. Check out the original recipe from The Good Housekeeping Test Kitchen.

Breakfast Muffins: Spiced Plum & Quinoa Ingredients

PREP TIME 10 MINS | COOKING TIME 15-20 MINS | SERVES 12 MUFFINS

INGREDIENTS

  • 1 & 1/4 cup plain flour
  • 1 cup buckwheat flour
  • 1 cup full-fat plain yoghurt
  • 1/2 cup honey, plus more for drizzling
  • 1/3 cup raw white quinoa
  • 113g unsalted butter, melted
  • 2 large free range eggs
  • 2 plums, 1 roughly chopped and 1 sliced, thinly
  • 1 & 1/2 tsp baking powder
  • 1 tsp ground cinnamon
  • 1/2 tsp baking soda
  • 1/2 tsp ground ginger
  • 1/2 tsp salt

METHOD

  1. Preheat oven to 200C (400F or gas mark 6). Line a 12 hole muffin pan with paper cases. Set aside.
  2. In large mixing bowl, whisk the flours, quinoa, baking powder, cinnamon, ginger, baking soda, and salt together.
    In another mixing bowl, medium-sized, whisk the eggs, yoghurt, melted butter, and honey together. Gently fold the egg mixture into flour mixture until just combined; then stir in the chopped plum.
  3. Divide the batter equally among the prepared muffin cases (about 1/4 cup each) and top each with a couple of plum slices.
  4. Bake for 15 to 20 minutes or until toothpick inserted into centres of the muffins comes out clean. Cool in the pan for about 5 minutes and then transfer them to a wire rack to cool down completely.
  5. Drizzle with honey, if desired, before serving and enjoy!

Breakfast Muffins: Spiced Plum & Quinoa

Breakfast Muffins: Spiced Plum & Quinoa

Breakfast Muffins: Spiced Plum & Quinoa

BON APPÉTIT

– Ally xx

myTaste.com

Breakfast Muffins: Brownie, Salted Caramel & Avocado Gelato

Breakfast Muffins: Brownie, Salted Caramel & Avocado Gelato

Hello Everyone! The title of this post already sounds super enticing doesn’t it? Well brace yourselves, for tonight I will be sharing a cheekily sweet breakfast muffin that borderlines dessert. Who says you can’t have dessert for breakfast though? If anyone says that you can’t, unfriend them because you don’t need that kind of negativity in your life EVER. For those of you that are just tuning in, I usually upload a recipe to Amcarmen’s Kitchen on Wednesday nights. However, yes I am aware that it is a Monday night (in Brunei that is, for some it may be just the morning of), and the reason for the switch up for this month only is because Muffin Making Monday has returned!

I’m not sure if I’ve mentioned this in a post before, but I’ll say it again anyway, I am NOT a huge fan of chocolate. I can already see a few jaws dropping upon reading the previous sentence in pure disbelief. But yes it’s true. I can’t sit down and eat a whole bar of chocolate even if I wanted to. I’d probably get sick after just one bite. Don’t fret guys for there is a however – a slice (or two, maybe more) of a dark, rich, dense, and fudgy with a deep to-die-for chocolate flavour brownie is my exception. Oh and of course, how could I forget my love for the beautiful marriage between dark chocolate and avocado!

Breakfast Muffins: Brownie, Salted Caramel & Avocado Gelato

Therefore behold the Brownie Muffin – combining my Breakfast Muffin series with a favourite dessert of mine! I was going to call this hybrid a ‘Bruffin’ like how Brookies are for Brownie Cookies. Alas, I was disappointed to find that the term Bruffin has already been registered and trademarked for a light and flaky, brioche-like pastry in the form of a muffin! So should I call these Broffins? Sounds less cool than Bruffin *sad face* so I guess I’ll just stick with Brownie Muffins instead of a portmanteau of the two. Check out the original recipe by Shiran over on Pretty. Simple. Sweet.

To take it to the next level, I’ve filled these Brownie Muffins with a sticky and salty caramel sauce so that you’re hit with an oozy gooey treat when you bite (or cut) into them! And of course, you need to complete this breakfast (dessert) with a generous serving of avocado gelato! I sourced mine from my favourite gelato place in Brunei known as Rumah Gelato! Whenever I want my fix of dark chocolate AND avocado gelato, this is where I’m at. I bought a large tub of just the avocado gelato to pair with this recipe, and of course extra to just indulge in happily for the next couple of days.

Breakfast Muffins: Brownie, Salted Caramel & Avocado Gelato Ingredients

Rumah Gelato's Bravo Avocado

PREP TIME 15 MINS | COOKING TIME 30 MINS | SERVES 6 MUFFINS

INGREDIENTS

For the brownie muffin batter

  • 113g (4oz) bittersweet or semisweet chocolate, coarsely chopped
  • 113g unsalted butter, cut into small cubes
  • 2 large free range eggs
  • 1/3 cup + 1 tbsp plain flour
  • 1/3 cup granulated sugar
  • 1/3 cup unsweetened cocoa powder
  • 1/8 tsp salt

For the salted caramel sauce

  • 2 cups granulated sugar
  • 170g unsalted butter, room temperature and cut into pieces
  • 1 cup double cream, at room temperature
  • 1 tbsp sea salt rocks
  • Avocado Gelato or any of your favourite flavours that tickle your tastebuds

METHOD

  1. Preheat oven to 180C (350F or gas mark 4). Grease a 6 hole muffin pan with butter. Set aside.
  2. Brownie Muffin Batter: Place the chopped chocolate and unsalted butter cubes into a medium-sized heatproof bowl. Heat in the microwave at 20-second intervals, stirring between each interval, until melted. Set aside.
  3. In a small bowl sift the plain flour, cocoa powder, salt, and set aside.
  4. Using an electric handheld mixer fitted with the whisk attachment, whisk the eggs and sugar on high speed until thick and pale, about 4 minutes. Reduce speed down to low and slowly add in chocolate and butter mixture, whisking until just incorporated.
  5. Using a spatula, fold in the flour mixture until just combined. Do not over-mix.
  6. Spoon the mixture into the prepared muffin pan, filling each case to about 3/4 of the way full. Bake for 13-16 minutes or until a toothpick inserted into the center of the muffins comes out with moist crumbs and not dry.
  7. Once done, transfer to a wire rack and let them cool for about 10 minutes before removing from the pan. Allow muffins to cool completely on the wire rack.
  8. Salted Caramel Sauce: In a small saucepan, melt the sugar over medium-high heat, stirring frequently to avoid burning. Once all the sugar has melted, watch your caramel carefully, swirling the pan occasionally.
  9. As soon as the sugar turns amber in colour add the butter and whisk vigorously until all the butter has melted.
  10. Remove the pan from the heat and slowly pour in the cream while whisking vigorously until the cream is incorporated well, and then whisk in the sea salt rocks.
  11. Fill a piping bag fitted with a small decorating tip with the caramel sauce. Insert the tip into the top of the muffin, pushing about an inch into the muffin. Squeeze the filling into the muffin. If the filling starts to leak outside of the hole, stop.
  12. Serve with ice-cream or gelato with the flavour of your choice, and drizzle more of the salted caramel sauce atop. Enjoy!

Breakfast Muffins: Brownie, Salted Caramel & Avocado Gelato

Breakfast Muffins: Brownie, Salted Caramel & Avocado Gelato

You can store these Brownie Muffins in an airtight container at room temperature or in the refrigerator for up to 2 days. Make sure to let them reach back to room temperature before serving. I personally would prefer to warm them up in a steamer (the oven or microwave usually dries it out even more) because I’d rather have a warm, fudgy, and gooey muffin than a room temperature one *cheeky grin* but like I said, it’s just my personal preference.

Before I wrap up tonight’s recipe, here’s a key extract from Shiran:

Timing is everything: The right baking time is always the most crucial part of making brownies. It only takes a couple of minutes to turn them from rich fudge brownies to a dry chocolate cake. When done, brownies should appear baked on the outside, but the center should still be soft. You’ll need to bake them only until a toothpick inserted into the center comes out with very moist crumbs, not dry.
— Shiran from Pretty. Simple. Sweet.

Breakfast Muffins: Brownie, Salted Caramel & Avocado Gelato

BON APPÉTIT

– Ally xx

myTaste.com

Spiced Red Wine Poached Pears

Spiced Red Wine Poached Pears

… on a bed of Pistachio Crumble with a Quenelle of Homemade Vanilla Bean Ice Cream drizzled with a Red Wine & Orange Reduction *drools*

Hello Everyone! I’m really bad at this, and I sincerely apologise. I know I said that I would get back on track with Amcarmen’s Kitchen until the end of the year but once again I have fallen slack and behind for God knows how many weeks now. The truth is that I have been super busy towards the end of last month and into early November with a hectic and stressful event that definitely took a toll on my high blood pressure for sure. Though the past 2 weeks have been quiet, I spent most of it recovering and relaxing from that hell of an event.  I worked at least 15 hours a day from 8am until almost midnight on most nights. I’m just glad that it’s all over… For now.

But anyway, the recipe that I will be sharing tonight is one that I actually made waaaaaay back somewhere in June when I was left home alone (my mom and my sister flew out to Singapore to visit my other sister), during a long weekend too, and I had no plans of stepping out of the house unless I had to *cheeky grin*. So why didn’t I upload the recipe for this back then? Simple – it didn’t comply with the theme I had set out to accomplish for this year on Amcarmen’s Kitchen. So then why now? It’s still 2017. Stop asking so many questions! Haha! I amuse myself sometimes. Well, this is actually part of a special recipe that I will be posting (hopefully) next week, which will also most likely be the last recipe for the year unfortunately. I’m going to use the rest of my time before the year ends to plan and prepare recipes for the upcoming year. I already have a theme in mind to tackle for the whole year and I’m already excited for it!

Spiced Red Wine Poached Pears

Moving on, sorry that introduction went on way longer that I thought it would (as always though right?). If I can recall, I decided that I wanted to practice my dessert-making skills, you know to a MasterChef quality level worthy of a place in the competition ONE DAY. I have to say that I’m quite impressed with how this dessert played out in my head, to paper, and to the actual deal. The pears were soft on the outside, but still had a nice bite and a bit of crunch to it on the inside; beautifully spiced and contrasted well to the mild sweetness of the vanilla bean ice cream. And everyone loves pistachios, or at least I hope they do so throw that onto the plate for another added texture to the overall dessert dish.

You may want to get a head start on the ice cream so that it’ll have time to set in the freezer. You can either make it the day before, or early in the morning so that it’s ready for dessert time after a hearty dinner.

Spiced Red Wine Poached Pears Ingredients

PREP TIME 4 HOURS* | COOKING TIME 25-35 MINS | SERVES 6

*Includes the minimum freeze time for the no churn vanilla bean ice cream; see below for the freeze time range

INGREDIENTS

For the spiced red wine poached pears

  • 6 large pears, peeled and keeping the stems intact**
  • 1 bottle (750ml) red wine
  • 3/4 cup white sugar
  • 10 cloves
  • 3-inch cinnamon stick
  • 2 star anise
  • Juice and zest of 1 orange

For the no churn vanilla bean ice cream

  • 2 cups thickened cream
  • 1 can (300g) sweetened condensed milk
  • 1 vanilla bean pod
  • 1 tbsp pure vanilla extract

For the pistachio crumble

  • 1/2 cup roasted and salted pistachios
  • 3/4 cup plain flour
  • 6 tbsp unsalted butter, melted
  • 2 tbsp white sugar
  • 1/2 tsp salt

**Make sure that you use fairly large pears for this recipe. I found that using smaller pears overcook easily as they need a while to absorb that beautiful red wine colour as well as the flavours.

METHOD

  1. No Churn Vanilla Bean Ice Cream: Using a mixer, beat the thickened cream on medium speed until heavy peaks start to form. Add the can of sweetened condensed milk and beat further. Be careful as to not over whip the mixture. Add the vanilla beans into the mixture along with the pure vanilla extract and gently stir it into the ice cream mixture. Place the ice cream mixture into a container and freeze for a minimum of 4 to 6 hours or overnight.
  2. Spiced Red Wine Poached Pears: Add all the ingredients for the poached pears into a large pot or any that’s a suitable size. Cut out a piece of parchment paper and place it directly on the pears so they remain submerged in the liquid, or alternatively you could also use a small plate.
  3. Bring the wine mixture to boil and then turn it down to a simmer and cook until the pears are soft on the outside are still a little crisp in the middle instead of soft all the way through (about 25 minutes); cooking time will however depend on the size of the pears. For softer pears, cook for a further 10 minutes.
  4. Once the pears are cooked through, use a slotted spoon remove the pears and set aside to cool. Keep cooking the liquid until it reduces to a syrup. Then, strain the wine reduction and discard the spices and zest. If you find the sauce too sweet, add some lemon juice to it to cut through some of that sweetness.
  5. Pistachio Crumble: Preheat oven to 180C (350F or gas mark 4) and line a rimmed baking tray with parchment paper. Process the pistachios in a food processor until roughly chopped. Add the flour, sugar, and salt; processing further just until combined. Add the unsalted butter, and continue processing until the mixture is thoroughly combined and forms pea-size crumbs.
  6. Spread the pistachio crumble mixture on the prepared baking tray. Press gently with damp hands, flattening the crumble to about 1/2 inch thick and bake in the preheated oven until the crumble starts to brown at the edges, about 15 minutes.
  7. Remove from oven, and, using a flat spatula to lightly crumble the mixture. Return to oven, and bake until the crumble is golden brown, about 8 to 10 minutes further. Once done, transfer to a wire rack, and set aside to cool on the baking tray completely, about 20 minutes, before roughly crumbling.
  8. Assemble your dessert by spreading the crumble onto the middle of each individual serving plates. Place one pear on top of the crumble and drizzle with the orange and wine reduction syrup. Quenelle the vanilla bean ice cream and place atop the crumble on the side of the pear.
  9. Serve and enjoy!

Spiced Red Wine Poached Pears

BON APPÉTIT

Ps: speaking of desserts – this is completely unrelated by the way, but I just thought I’d share this because it’s hilarious! A week ago or so, my friend asked a question on our whatsapp group chat and the question was: if you were a dessert, what would you be? Without hesitation, my other friend quickly replied “cactus” and to her hasty realisation, she retracted and said “oh I thought you meant desert” and everyone went spiralling down into a pit of undignified laughters – well I couldn’t stop laughing out loud and looking like an insane freak in front of my colleagues at work during that time. God bless her.

– Ally xx

myTaste.com

Beetroot Brownies with Chocolate Chunk Beet Ice Cream

Beetroot Brownies with Chocolate Chunk Beet Ice Cream

Hello Everyone! Firstly, I’d like to apologise to the moon and back to all my friends and followers for not posting in what seems like (or quite frankly has been) forever! A lot of things have been going on for the past few months, both in my personal and work life that I found it difficult to balance alongside with keeping up with Amcarmen’s Kitchen. The truth is, I haven’t had the time to write, or let’s just say that I did have the time, but I was either using my time unproductively or for something else instead of sitting down and getting back on track with posting. So yes, I am very sorry for the lack of consistency of posting on the blog in the recent months, but I’m planning on getting back on board with this for the remaining 3 months of 2017 (hopefully). It will however be a little scattered in a sense that you won’t see a set theme for the month just because I still have an archive of recipes that never got posted from the previous months.

Beetroot Brownies with Chocolate Chunk Beet Ice Cream

Back in July I started to hero beetroot in my cooking, and I shall continue that for the next two weeks (I think) before I share other recipes that still stick with the theme for 2017 which is Blood Pressure Friendly foods. Before I jump onto the recipe, I’d like to thank my friends Simon Swadling and Jialing Mew for contributing their recipes for this year’s Auguest – and yes, another thing that I did not plan properly for with everything going on so I apologise that I could only round up these amazing two friends for you!

Anyway, so somewhere down the path of whipping up this batch of beetroot brownies, which by the way includes Whittaker’s (New Zealand) Kaitaia Fire Chili Pepper Spice Dark Chocolate, I made the realisation that I basically just made red velvet brownies *cheeky grin* but of course, what makes a nice warm slice of heaven without ice cream? Specifically Chocolate Chunk Beet Ice Cream? Even MORE specifically, chunks of chocolate from Whittaker’s (New Zealand) Hawke’s Bay Black Doris Plum and Roasted Almonds Dark Chocolate? I think I just drooled. Cold ice cream with a kick of spice in it to really heighten the flavours atop a chocolatey, chewy, and moist brownie drizzled with a vibrant beetroot icing glaze? I’ll have the whole batch please thank you very much.

The original recipe to the brownies can be found over on BBC Good Food, and the original recipe to the beetroot ice cream can be found on Vegan Heaven.

PREP TIME 25 MINS | COOKING TIME 45 MINS | SERVES 12 SLICES

Note: Make the ice cream either the day before or a few hours (4-5 hours) to allow for freezing time before baking your brownies.

INGREDIENTS

Beetroot Brownies Ingredients

For the brownies

  • 500g whole raw beetroot, washed
  • 250g dark chocolate (70% cocoa), chopped*
  • 100ml olive oil
  • 3 large free range eggs
  • 1 & 1/4 cup plain flour
  • 3/4 cup granulated sugar
  • 2/3 cup cocoa powder
  • 1/3 cup macadamia nuts, roughly chopped
  • 2 tsp vanilla extract
  • 1 tsp baking powder

For the beetroot icing glaze

  • 1 cup icing sugar
  • 1 tbsp beetroot juice

Chocolate Chunk Beet Ice Cream Ingredients

For the ice cream

  • 500g whole raw beetroot, washed
  • 1 cup thick full fat coconut milk
  • 1/4 cup honey
  • 3 tablespoons chopped dark chocolate (Whittaker’s (New Zealand) Hawke’s Bay Black Doris Plum and Roasted Almonds)
  • 1 piece thumb-sized ginger, grated

*As mentioned earlier, I used Whittaker’s (New Zealand) Kaitaia Fire Chili Pepper Spice Dark Chocolate. But since I only had 100g of this, I used regular dark chocolate for the brownies and added half of the Whittaker’s chocolate to the mix, while the other half sprinkled on top of the baked brownies.

METHOD

  1. Boil the beetroots for both for the brownies and ice cream, in a pan of boiling salted water for 15-20 mins or until tender. Drain and leave to cool before peeling (wear clean rubber gloves to peel if you want to avoid beet-stained hands).
  2. Chocolate Chunk Beet Ice Cream: Roughly chop the cooked beets into small chunks and place them together with the coconut milk, honey, and the grated ginger in a food processor and blend until smooth.
  3. Transfer the beetroot-coconut mixture in a freezer-safe container, stir in the chococalte chunks and freeze for about 4-5 hours, whisking slightly every 20-30 minutes to avoid it getting too icy.
  4. Beetroot Brownies: Preheat oven to 180C (350F or gas mark 4) and grease a 10cm x 25cm baking dish. Chop a third of the cooked beetroots into small cubes and blitz the remainder in a blender or food processor to a paste. Sit the paste in a sieve over a bowl – just until you have collected 1-2 tbsp juice. Save the juice for the icing, and mix the olive oil into the beetroot paste. Set both aside.
  5. Bring a pan of water to a bare simmer and place a heatproof bowl with the chopped chocolate. Lightly stir until the chocolate had melted then set aside to cool slightly.
  6. Use an electric whisk to beat the eggs, sugar, and vanilla together in a large mixing bowl until light, fluffy, and tripled in size. Carefully fold the eggs into the beetroot and olive oil mixture, followed by the melted chocolate. Fold in the flour, cocoa powder, and baking powder, then add macadamia nuts and the chopped beetroot.
  7. Pour the mixture into your prepared baking dish and bake for 20-25 mins. The brownies should still be slightly gooey in the middle. Set aside to allow to cool slightly. While cooling, you can thaw your beetroot ice cream for 5-10 minutes before scooping and serving
  8. Mix enough reserved beetroot juice with the icing sugar to get a runny icing – dilute with water if you need. Remove brownies from the tin, drizzle with the icing and cut into squares.
  9. Enjoy a sinful slice or two, or more (who’s gonna stop you?) with family and/or friends, or you know, just by yourself *cheeky grin*.

Beetroot Brownies with Chocolate Chunk Beet Ice Cream

Beetroot Brownies with Chocolate Chunk Beet Ice Cream

BON APPÉTIT

– Ally xx

myTaste.com

Blueberry Goat Cheese Empanadas

Blueberry Goat Cheese Empanadas

Hello Everyone! I hope everyone in Brunei had a great long weekend, and enjoyed yesterday’s public holiday as well while I unfortunately had to work yesterday. Don’t worry, I was 80% rebellious today to compensate for the fact that we had work yesterday and decided to take the whole day to work on a small task haha. Anyway, for anyone not in Brunei, I still hope that you had a great weekend nonetheless.

Before I dive into tonight’s recipe, I just want to apologise for the post going up a day late and also for not getting this post up last week like it was scheduled to be. I had a ladies night out with two of my friends whom I’ve not seen since forever and I ended up getting home past my bed time, not having prepared this post beforehand. I had initially started off the post with some distressing news, but because I didn’t want to start off with a downer, I’ve saved what I have to say for last. So if you want to know what’s been happening, read until the end.

Blueberry Goat Cheese Empanadas

Blueberry Goat Cheese Empanadas

So let’s get cracking then shall we? I came across tonight’s recipe while I was browsing through Pinterest one night, searching up new and unique recipes to try out for myself, and I was particularly drawn to this recipe by Joanna from JoCooks of her Blueberry Goat Cheese Empanadas. I never thought about sweet empanadas before so I thought that this was a pretty unique recipe, and definitely something new to me and quite possibly to many others I know. I have no idea why but all my empanadas decided that they wanted to spew out their innards! Okay that sounded a bit gross, but I’m not going to lie, I laughed way too much at that sentence!

Blueberry Goat Cheese Empanadas Ingredients

PREP TIME 40 MINS* | COOKING TIME 15-18 MINS | SERVES 9-12 EMPANADAS

*includes chilling time in the fridge

INGREDIENTS

For the empanada dough

  • 1 cup plain flour
  • 1/3 cup plain whole wheat flour
  • 1/3 cup cold water
  • 20g unsalted butter, chilled
  • 1 large free range egg, yolk only
  • 1 tsp granulated sugar
  • 1/4 tsp salt

For the filling

  • 1 punnet (125g) fresh blueberries
  • 1/2 cup crumbled goat cheese
  • 2 tsp granulated sugar
  • 2 tsp plain flour
  • 1/2 tsp vanilla extract
  • 1 large free range egg, lightly beaten, for egg wash

METHOD

  1. In a small food processor, combine the plain flour, plain whole wheat flour, sugar, and salt. Pulse a few times until combined, then add in the butter and pulse for about 5 seconds. Add the egg yolk in together with the cold water and process until a soft dough is formed, a couple of minutes in total.
  2. Turn the dough onto a lightly floured surface and knead until smooth. Cover with plastic wrap and let it rest in the fridge for about 30 minutes.
  3. Preheat oven to 200C (400F or gas mark 6). Line a baking tray with parchment paper.
  4. In a small bowl, add the fresh blueberries, vanilla extract, plain flour, and sugar. Toss to combine. Set aside.
  5. Roll out the empanada dough so that it is about 1/8 of an inch in thickness. Cut the dough into 4-inch rounds, using a cutter if you have one or a bowl/big mug to measure out the rounds, should make about 9-12 rounds depending on the size of each round.
  6. Spoon about half a tablespoon of goat cheese onto each round, and then about a tablespoon of the prepared blueberries onto the centre of each round. Fold the dough over in half to enclose the filling. Press the edges together to seal and crimp with either your fingers or a fork.
  7. Transfer the empanadas to the prepared baking tray and brush each empanada with the egg wash. Poke a few holes into each using a fork before baking for about 15 – 18 minutes or until the empanadas are golden brown in colour. Set aside to cool for a while then serve and enjoy with a nice cup of tea!

Blueberry Goat Cheese Empanadas

Blueberry Goat Cheese Empanadas

Blueberry Goat Cheese Empanadas

BON APPÉTIT

For those of you who are just tuning into Amcarmen’s Kitchen, I sometimes like to treat my blog a like a journal where you get to read small snippets of my life from time to time – I feel that’s what makes this blog more human and that way you get to know who I am a little at a time.

Okay, for those of you who have managed to reach this point of tonight’s post, here we go… How do I begin to say this. If you could see me right now, I just spent a whole 10 minutes sighing heavily whilst fighting back the tears just thinking about how I am going to write this next sentence.

My Blacky, my bundle of joy who has been in the family since he was a little pup for just short of 7 years, passed away on Sunday afternoon. My Mom, sister, and I were out for not even 2 hours doing our usual Sunday groceries, and when we got back home, there we saw him, lifeless, on a bed of green grass under the lovely sun. I cried instantly, wanting to believe that what I was seeing was just a dream… But it wasn’t. He was gone. I immediately called up a colleague of mine, to ask if he had a shovel and a hoe so that we could dig a resting place for Blacky, and within less than half an hour, he was at my house, with his team members from work, there to help me dig and lay Blacky into the ground. I wasn’t expecting this at all – all I asked for was the tools so that I could do it myself, so I am thankful to have him as my colleague and my friend. Sorry to end the post on a downer, but like I said before, I didn’t want to start the post off with this. Goodbye Blacky. You will be missed oh so dearly.

– Ally xx

myTaste.com

Pan-fried Cinnamon Bananas

Pan-fried Cinnamon Bananas

Hello Everyone! First and foremost, I am truly apologise for the lack of posts for the past month! As some of you may have been aware from previous posts, or if you follow my personal social media pages, I spent the last 3 weeks travelling Australia and the Northern Island of New Zealand. I arrived back home last weekend and have just been catching up on truckloads of work that I haven’t had the time to update Amcarmen’s Kitchen during that catch up week, as well as when I was on holiday. I did have content and material prepared beforehand and I was supposed to be posting while I was on holiday, but let’s face it – I didn’t want to be stuck in front of the computer all day while there were so many beautiful places around me to visit. Plus, I usually get home late and just want to rest a recharge for the following day’s adventure. Other than my apologies, I had an amazing time in New Zealand and I am already planning a trip back same time next year for a South Island trip!

Just a quick note before I jump onto today’s recipe (yes I am aware that today is Sunday and it’s not my usual Wednesday upload schedule), I will be posting two more Banana recipes (this one inclusive), which for those of you who don’t follow, was the theme for the month of February for Amcarmen’s Kitchen. The reason being is that I have already had these recipe lined up to upload but didn’t get around to doing so and I didn’t just want to scrap them off, and yes, that is why I am posting today as well – just until  I catch up with the present and resume back to my normal Wednesday posts.

Today’s recipe is one of the easiest and quickest thing to make when you find yourself with a handful or more of overripe bananas. Of course, the first go-to recipe for overripe bananas would be to whip up a delicious loaf of banana bread – provided that I have the time and energy to do so – but pan-fried cinnamon bananas are just as tasty as banana bread. Pair them with a cuppa and you’ve got your Sunday afternoon hi-tea set and all ready to go!

Pan-fried Cinnamon Bananas Ingredients

PREP TIME <5 MINS | COOKING TIME 10 MINS | SERVES 2

INGREDIENTS

  • 2 large slight overripe bananas, sliced into 1/3″ thick rounds
  • 2 tbsp granulated sugar
  • 1 tsp ground cinnamon
  • 1/4 tsp ground nutmeg
  • Olive oil, for frying

METHOD

  1. Combine the granulated sugar, cinnamon, and nutmeg in a small bowl. Set aside.
  2. Add about a teaspoon of olive oil to a large non-stick frying pan and warm over medium heat.
  3. Add the sliced banana rounds and cook for about 2-3 minutes. During the last minute of cooking on the first side, sprinkle about half of the cinnamon mixture over the banana rounds.
  4. Flip the rounds, sprinkle with the remaining cinnamon mixture, and cook about 2-3 more minutes, until the bananas are soft and warmed through.
  5. Remove from the pan. Serve and enjoy with a nice cup of tea.

Pan-fried Cinnamon Bananas

BON APPÉTIT

– Ally xx

myTaste.com

Death by Chocolate Cupcakes

Death by Chocolate Cupcakes

Hello Everyone! It’f finally November which means, other than a new theme on the blog as usual, it is also my birthday month! I’ll be 25 in exactly a week and I’ve got a few get-togethers planned with family, friends, and colleagues. I actually baked these cupcakes last year for my Manager’s birthday. The week before her birthday I shared the leftover red velvet cupcakes that I had baked for halloween with my colleagues. When I offered her the cupcakes, she told me that she didn’t like red velvet, and that chocolate was more her thing. So, my colleagues told me that I should bake her some chocolate cupcakes for her birthday. I’m not sure if she liked them, but my colleagues and I definitely did!

Death by Chocolate Cupcakes

These cupcakes  are not overly sweet, but rather deep and intense in pure chocolate flavour. They are dark chocolate cupcakes with a thick dark chocolate frosting on top and sprinkled with dark chocolate shavings. The mixture of melted chocolate and cocoa powder to make these cupcakes ultra fudgey, rich, and moist. Are you salivating yet? Well, if you aren’t then please go away – if you can’t salivate over fudgey dark chocolate cupcakes then we cannot be friends *cheeky grin*

Today is actually her birthday, and we tried to surprise her today which ended up being a massive fail. Well, it’s hard to surprise someone who already expects a surprise – my colleague was right, we should’ve just not surprised her as that would’ve been the ultimate surprise. She’ll probably get mad at us for forgetting, but then again she’ll definitely know that we didn’t forget and still expect a surprise in some way or another. Maybe that will be the plan for next year?

Anyway, Please take the time to check out the original recipe over on Sally’s Baking Addiction. Anyway, I don’t want to take you guys on a massive tangent so let’s move on to the recipe for tonight!

Death by Chocolate Cupcakes Ingredients

PREP TIME 12 MINS | COOKING TIME 18 MINS | SERVES 12 CUPCAKES

INGREDIENTS

For the dark chocolate cupcakes

  • 3/4 cup (95g) all-purpose flour
  • 1/2 cup buttermilk*
  • 1/2 cup granulated sugar
  • 1/2 cup unsweetened cocoa powder
  • 1/4 cup light brown sugar
  • 115g unsalted butter
  • 60g semi-sweet baking chocolate
  • 2 large eggs, at room temperature**
  • 1 tsp vanilla extract
  • 3/4 tsp baking powder
  • 1/2 tsp baking soda
  • 1/4 tsp salt

For the dark chocolate frosting

  • 2 & 3/4 cup confectioners’ sugar
  • 2/3 cup unsweetened cocoa powder
  • 95ml heavy cream
  • 90g unsalted butter, softened to room temperature
  • 1 tsp vanilla extract

Optional

  • Semi-sweet chocolate chips or shaved dark chocolate for decoration

*Room temperature eggs are required for this recipe. To bring eggs to room temperature quickly, put them in a glass of warm water for 5-10 minutes.

**Buttermilk is required for this recipe. If you do not have buttermilk, make your own by mixing 2 teaspoons white vinegar or lemon juice with 1/2 cup milk. Stir and let sit for 5 minutes.

METHOD

  1. Preheat the oven to 180C (350F or gas mark 4). Line a 12-cup cupcake/muffin pan with cupcake liners and set aside.
  2. For the cupcakes: Melt the butter and chocolate together in the microwave at 30-second intervals, stirring between each time until smooth. Once smooth, set aside to slightly cool. You may also melt the butter and chocolate over low heat on the stovetop.
  3. In a medium-sized bowl, combine the cocoa powder, flour, baking soda, baking powder, and salt together, and then set aside.
  4. In a large bowl, whisk the eggs, sugar, brown sugar, and vanilla together until smooth. Then, add in the cooled butter and chocolate mixture, whisking until smooth. Add half of the flour mixture, then half of the buttermilk. Repeat until everything is added, stirring until just combined; be careful to not over mix otherwise the batter will be very thick like pudding. Fill the cupcake liners about 2/3 of the way full with batter.
  5. Bake for 18 minutes, or until a toothpick inserted into the centre of the cupcake comes out clean. Allow to cool completely before frosting.
  6. For the frosting: Sift the confectioners’ sugar and cocoa powder together to assure there are no lumps, and then set aside.
  7. With a handheld or stand mixer fitted with a paddle attachment, beat the butter on medium speed until creamy – about 2 minutes. Gradually add the sifted sugar and cocoa powder mixture alternately with the heavy cream and vanilla extract. Beat on low speed after each addition. Once all added, beat on high speed until creamy and combined for at least 2 minutes. Add a pinch of salt if frosting is too sweet.
  8. Frost the cooled cupcakes and top with chocolate chips or shaved dark chocolate as desired. Cupcakes stay fresh at room temperature in an airtight container for up to 4 days. Store covered in the refrigerator is desired for up to 1 week.
  9. Share and enjoy amongst family and friends!

Death by Chocolate Cupcakes

Death by Chocolate Cupcakes

BON APPÉTIT

– Ally xx

myTaste.com

Poached Pears with Chocolate Chia Mousse

Hello! I’m Jialing and I will be taking over Amcarmen’s Kitchen for today. I will confess that today’s blog was very close to being a two-step tutorial on how to boil a cup of water and make tea – the only semi-regular dietary part of my life that does not involve any animal by-products.

As someone who has clearly only ever eaten vegan food a handful of times (I genuinely thought that the vegan theme was intended as a joke when I first agreed to do a recipe), I found this year’s Auguest theme to be a punishment. I mean challenge. I ended up ransacking my own pantry and refrigerator for inspiration, confirming with Allison and Google about what ingredients could and couldn’t be used by vegans. What seems like day later, I emerged triumphant – pears, wine, cocoa powder, and a questionable bag of chia seeds (waste not, want not…) sat atop my counter, ready for the arduous vegan road ahead.

Now, onto the recipe, poetically inspired by the very essential act of boiling water.

Poached Pears with Chocolate Chia Mousse Ingredients

PREP TIME min. 24 HOURS* | COOKING TIME 40 MINS | SERVES 4

*The chocolate chia mousse will need to be prepared the day before to allow chia seeds time to soak

INGREDIENTS

For the chocolate chia mousse

  • 1 & 1/2 cups almond milk
  • 1/3 cup chia seeds
  • 1/4 cup cocoa powder
  • 4 tbsp 100% pure maple syrup**
  • 1/2 tsp vanilla extract
  • Strawberries for garnish

For the poached pears

  • 4 buerre bosc pears, peeled
  • 1/2 bottle moscato or other sweet dessert wine***
  • 3 tbsp 100% pure maple syrup**
  • 3 star anise
  • 2 cinnamon sticks
  • 2 tsp cloves
  • Pinch of nutmeg
  • Water

**Maple-flavoured syrup isn’t vegan, so be sure to check the label!
***Find your fave vegan wines here http://www.barnivore.com/wine

METHOD

  1. Chocolate Chia Mousse: Prepare the chocolate chia mousse the day before, to allow chia seeds time to soak. Combine the cocoa powder, vanilla, and maple syrup, stirring until well mixed.
  2. Slowly pour in almond milk, stirring until mixture is smooth. Add chia seeds and stir until well-incoporated. Leave in fridge to soak overnight, stirring mixture once in between.
  3. Once the chia seeds have fully absorbed the liquid, they will increase significantly in size and have a gelatinous texture. Transfer to a blender or food processor and blitz until smooth and creamy. Tip: leave the chia mixture unblended and top with fresh fruit and desiccated coconut as a healthy and envy-worthy breakfast.
  4. Poached Pears: In a sauce pot large and deep enough to hold pears, combine wine, maple syrup, cinnamon sticks, star anise, cloves, nutmeg, and just enough water to cover pears.
  5. Bring the wine and spices to the boil over high heat.
  6. Add the pears, positioning them so that they are completely submerged, and continue to boil for another 25 minutes, until pears are cooked through and tender. Be sure to turn pears for even cooking, particularly when liquid gets low, keeping in mind that the bottoms of the pears will take longer to cook than the tops.
  7. Once pears are cooked, remove from the pot, reserving the syrup, and set aside to cool.
  8. Carefully simmer remaining syrup until reduced to about 1/2 cup.
  9. To serve, divide mousse into small bowls or stemless glasses and garnish with sliced strawberries. Place a pear on each plate, next to the mousse. Drizzle the pear with syrup. Enjoy!

Poached Pears with Chocolate Chia Mousse

Recipe Copyright © 2016 | jialingmew

ENJOY YOUR MEAL!

Jialing.

myTaste.com