
Hello Everyone and Happy Halloween! I have a simple Halloween dessert idea that will definitely compliment your halloween-themed party! It requires no cooking/skill, only a bit of patience and effort needed really. The only thing you might not have handy at the moment is a brain mould! I purchased this brain mould 2 years ago for a project that I did for an Objects class and it was basically sitting in a box called “Kitchen Stuff” since I started moving here and there. I decided to take it out today (or more like yesterday in preparation for today) to make a Jelly Brain dessert for Marissa’s Halloween Party, which by the time this will be uploaded just happened, or happened yesterday night. I’m really looking forward to this party as this will be the first time, since primary school maybe, that I’ll be dressing up AND going to a Halloween party. I even made my own zombie costume!


PREP TIME 15 MINS | COOKING TIME 6 HOURS | SERVES 8-10
INGREDIENTS
- 1.35L boiling water
- 3 packs lime flavoured jelly crystals
- Dark green food colouring, optional
- Black writing icing
METHOD
- Add the jelly crystals into a large bowl of boiling water (follow packet instructions, this required 450ml of boiling water per packet). Stir until all the crystals have dissolved. If needed, add a few drops of green food colouring (or however much you want) to give it a deeper colour. Mix until well incorporated. Set aside to cool down completely as this will affect the outcome of your jelly brain! If your mixture is too hot, or even lukewarm, it will melt the writing icing straightaway.
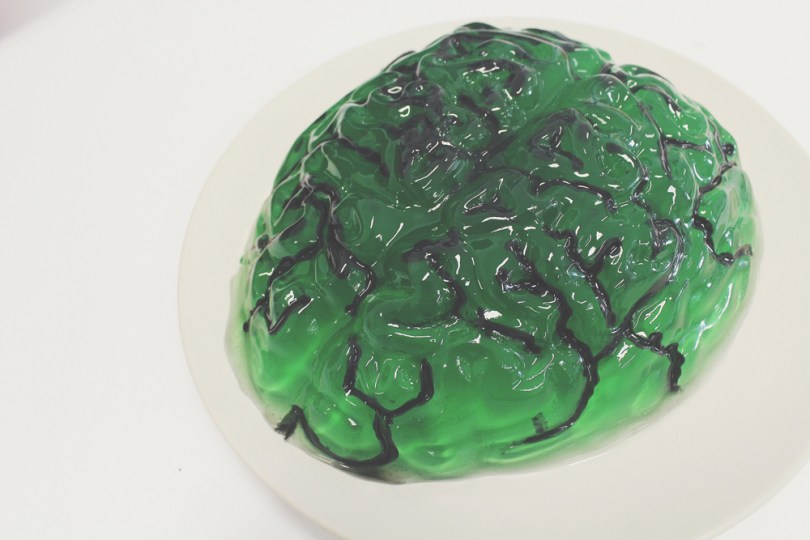
- Outline the veins on the brain mould with the black writing icing. Place the outlined mould into the freezer to let it set. It is important that you place it in the freezer so that it will be able to hold its shape when pouring the jelly mixture into the mould.
- Place the mould into a bowl (this will allow the brain mould to stand upright while pouring the jelly mixture into it as well as when placed in the fridge during the setting process), and slowly and gently pour the jelly mixture into the mould from the sides. This will ensure that your veins will not run due to the pressure from the pouring. Cover the mould with cling wrap and place in the fridge for at least 6 hours or ideally overnight before serving. Braaaaaaaaains!!!


Don’t be afraid to mix up the colours a little bit. When I made them 2 years ago, I used red writing icing to outline the veins and a pineapple(?) flavoured jelly. I also did one part water to two parts evaporated milk to make it look like a real-ish human brain! Also, if you want to make it more for the adults, add tequila, vodka, or any other alcoholic beverage that you fancy.

BON APPÉTIT
– Ally xx
