Bourbon & Coke Beef Short Ribs

Bourbon & Coke Beef Short Ribs

Hello Everyone! Week 3 of Cooking with Alcohol is here and I’ve got a recipe that is sure to knock your socks off! Beef Ribs are without a doubt a favourite of mine – especially is they are Bourbon and Coke braised! I first had a similar dish back when I was still studying in Australia at a Café, or maybe it was a Restaurant – I honestly cannot remember, and I think the place was called New Orleans… Something. Wow, I cannot believe I actually forgot the name of the place! It was actually one of my favourite fix of Southern American food whenever I craved it! I guess the reason why I forgot the name was because I had only been there a couple of times when I lived in the Lower North shore for about a year and a half. My then housemate and I would always walk over to Crows Nest from Cammeray to grab a plate of spicy Buffalo Wings, or this delicious Bourbon & Coke braised Beef Ribs for dins. When I moved out of the Lower North Shore area and to the Eastern Suburbs, I almost never visited Crows Nest after that. Then one day, after a kayaking trip that started in the Lower North Shore. all the way down to the Harbour, and then back up, I wanted to take my friends to that Restaurant and then later found out that it had closed down and another café took over! I was really sad at that time because I was really looking forward to visiting an old favourite. Oh well… Life goes on.

Bourbon & Coke Beef Short Ribs

Wow, I didn’t realise my introduction was going to be that long – and I am going to apologise now because I’m about to take a short tangent before moving on to tonight’s recipe. Now that I think about it, it may not be as short as I think it will be. Oops! Anyway, I was reading through old posts from about a year ago, and I remember mentioning in some that I had been going through a lot of stress, but I could not say the reason why. I don’t know if I officially told everyone what the reason was behind that when it was all clear to actually say it on social media, and on my blog for that matter. If I haven’t, then I’m definitely going to say it tonight as today marked my 1-year worksary! Haha, yes, worksary as my colleagues would say it. On this day last year I started my unofficial first day of work at D’Sunlit Sdn Bhd, Brunei’s leading advertising agency. I say unofficial because at that time, I was under my 3-month probation, and didn’t get my official permit to legally work at D’Sunlit until just a few months ago when I arrived back from the Philippines in August. Don’t get me wrong, I passed my 3-month probation – it was just that the company was excruciatingly sluggish in getting all the paperwork done so I could be official and legal. Anyway, the past is the past! My colleagues tries to surprise me with a worksary cupcake… I mean… I wouldn’t say that they failed miserably – only just a little bit. Let’s just say when something doesn’t seem right, I get a bit nosy haha! So I kinda figured out that they were up to something before they could surprise me because of a few tiny hints. But thank you anyway to Laurence, Wendy, and Tifah for trying *cheeky grin*

One Year Worksary at D'Sunlit Sdn Bhd

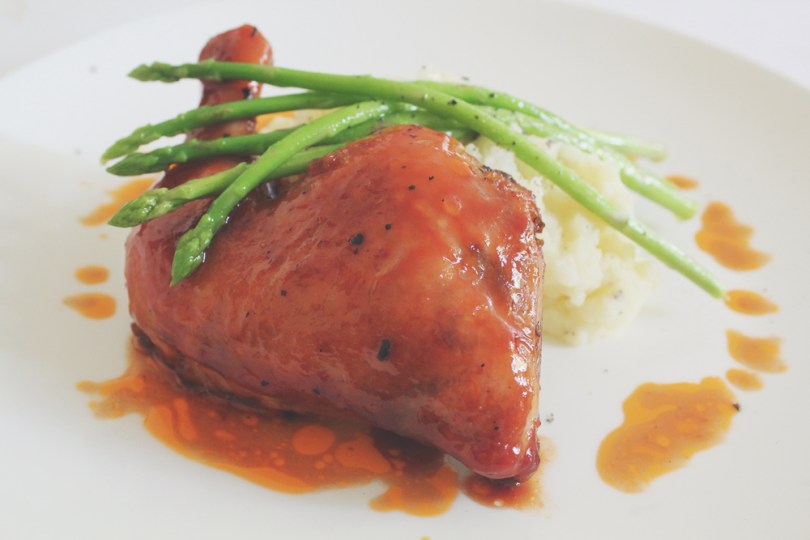
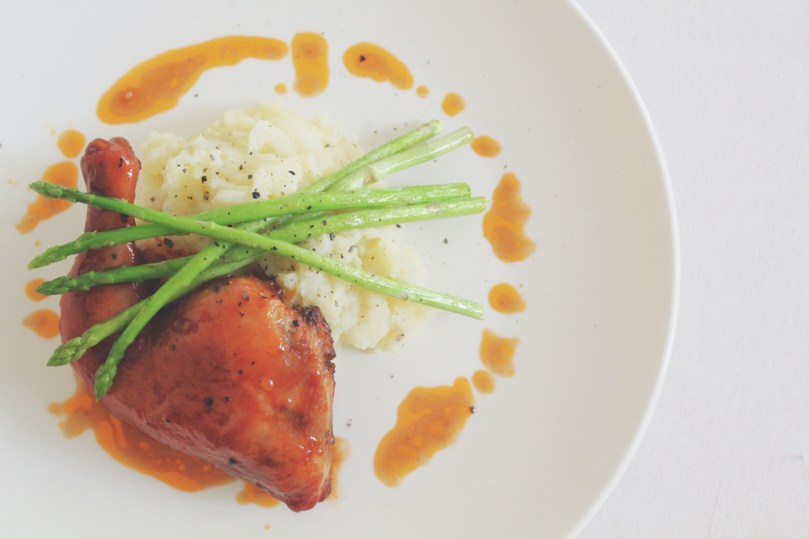
Again, I apologise for the short (but long) tangent, so let’s not waste anymore characters and let’s head on to tonight’s recipe! The original recipe can be found over on The Hopeless Housewife. Just a little note: these ribs were packed with intense and bold flavours that really made my family and I go whoa. Pairing it with a smooth cauliflower purée really helped cut the intensity back a bit. Okay, another small (I promise) tangent – my Mom would always see contestants on Masterchef Australia make a cauliflower purée to add to their overall dish; and every time that they did, she would always ask me, “what does it taste like” to which I would always respond, “I don’t know” because I sincerely don’t! I’ve never made it before – not until today that was. When I was thinking of what to pair the ribs with I thought of trying out a cauliflower purée as I recalled this memory.

Bourbon & Coke Beef Short Ribs Ingredients

Cauliflower Purée with Thyme Ingredients

PREP TIME 10 MINS | COOKING TIME 3-4 HOURS | SERVES 6
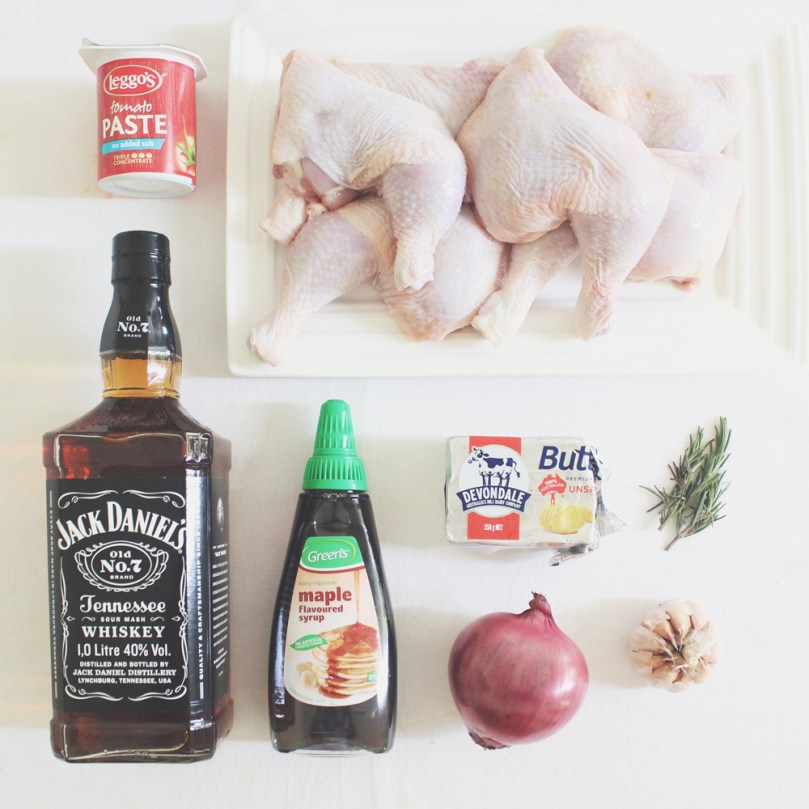
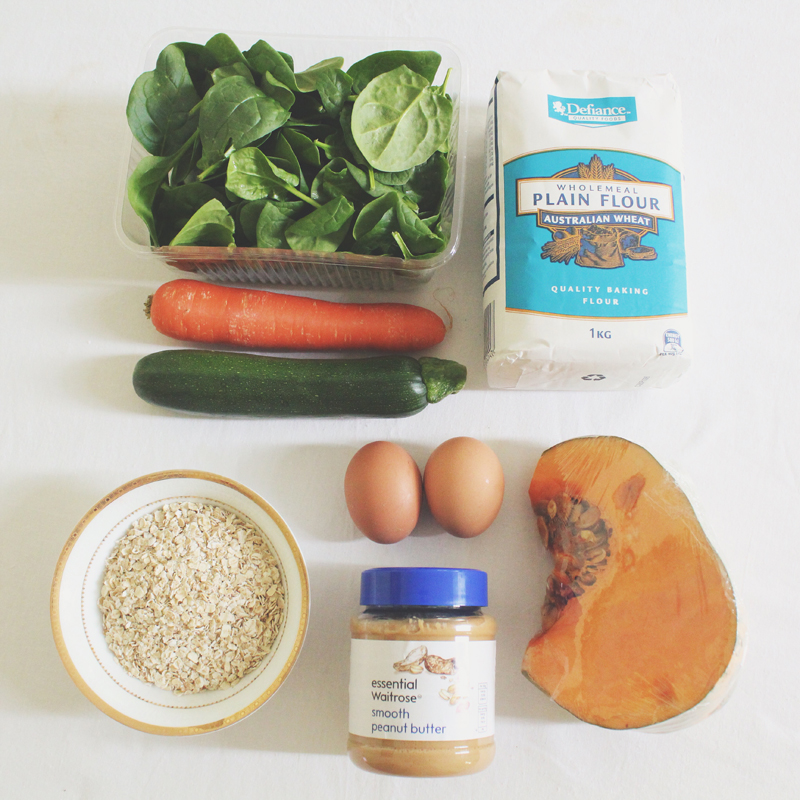
INGREDIENTS

For the bourbon and Coke ribs

  • 3 kg beef ribs
  • 3 & 1/2 cups beef stock
  • 1 & 3/4 cups bourbon (or a little more if you’d like!)
  • 1 & 1/2 cups Coke
  • 7 garlic cloves, minced
  • 3 onions, chopped
  • 2 bay leaves
  • 2 medium-sized carrots, roughly chopped
  • 2 stalks celery, roughly chopped
  • 4 tsp vegetable oil
  • 2 tsp freshly ground black pepper
  • 2 tsp salt

For the cauliflower purée (original recipe from Once Upon a Chef)

  • 1 head cauliflower, cut into 1/2-inch pieces (don’t worry about keeping florets intact) 
  • 40g unsalted butter, cut into chunks
  • 1 cup chicken broth
  • 1 tsp fresh thyme, chopped
  • 1 tsp salt, plus more to taste
  • Freshly ground black pepper, to taste

METHOD

  1. Preheat oven to 140C (275F or gas mark 1). Season the ribs generously with salt and pepper. In a heavy oven-proof dutch oven, heat the vegetable oil over medium-high and sear each side of the ribs until they’ve turned to a nice caramelised brown colour, about 3-4 minutes per side. Remove from the dutch oven and set aside.
  2. In the same dutch oven (do not clean out), add the garlic, sautéing until lightly golden and fragrant. Follow with the onions, carrots, and celery, cooking over medium heat until tender, scraping the brown bits from the bottom of the pan, about 4-5 minutes in total.
  3. Add the bourbon to deglaze the pan, making sure to incorporate any brown bits from the bottom of the pan. Follow with the Coke, bay leaves, and beef stock, stirring well, cooking until it starts to bubble.
  4. Lay the seared short ribs on top of the vegetables and cover the dutch oven. Place in the oven and cook for about 3-4 hours, until the short ribs are very tender and fall off the bone. If there is a lot of fat on top, use a baster to remove the excess fats. If there is too much liquid, place on range over medium-medium high to reduce the liquid. When it’s reduced, season to taste with salt and pepper.
  5. Meanwhile, when the ribs are nearly almost done (give it about half an hour to go), bring the chicken broth and salt in a large pot to a boil over high medium-high heat. Add in the cauliflower and bring back to a boil.
  6. Cover, and reduce the heat to low and steam for 20 minutes, or until the cauliflower is very tender. Use a slotted spoon to transfer the cauliflower to a food processor.
  7. Add 3 tablespoons of chicken broth from the pot, along with the unsalted butter. Process until smooth. Taste and adjust seasoning with salt and freshly ground pepper. Add thyme and process until just combined.
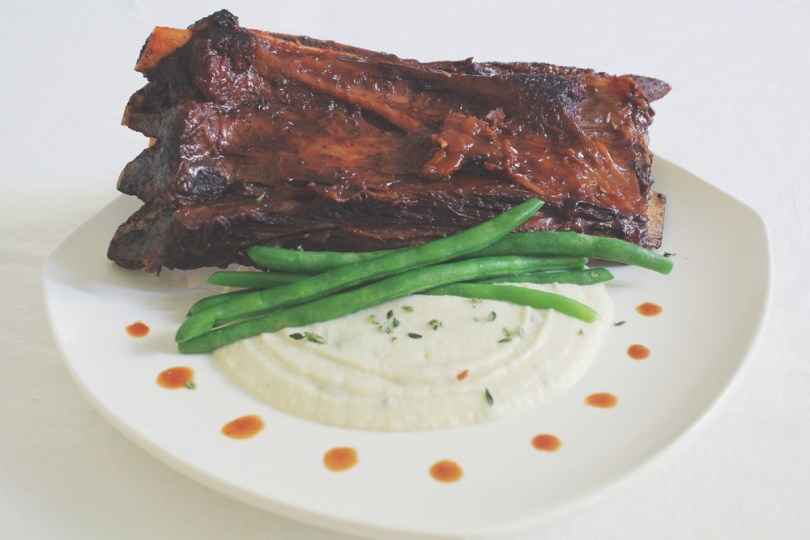
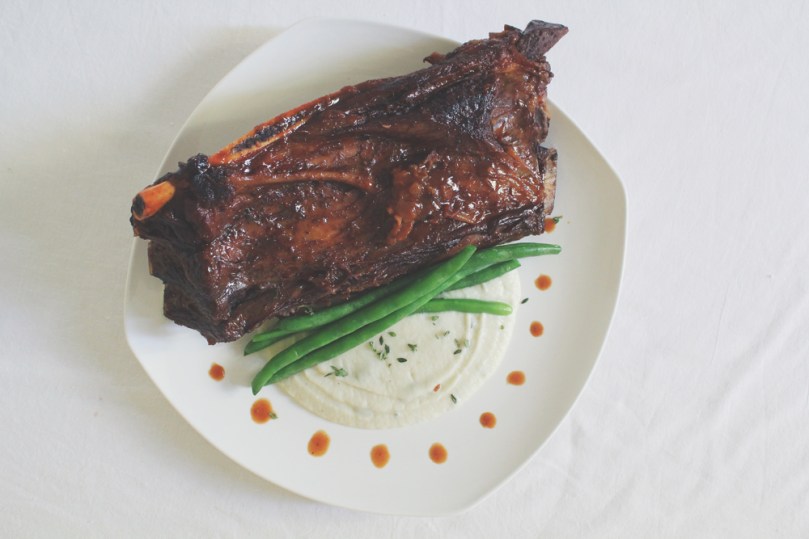
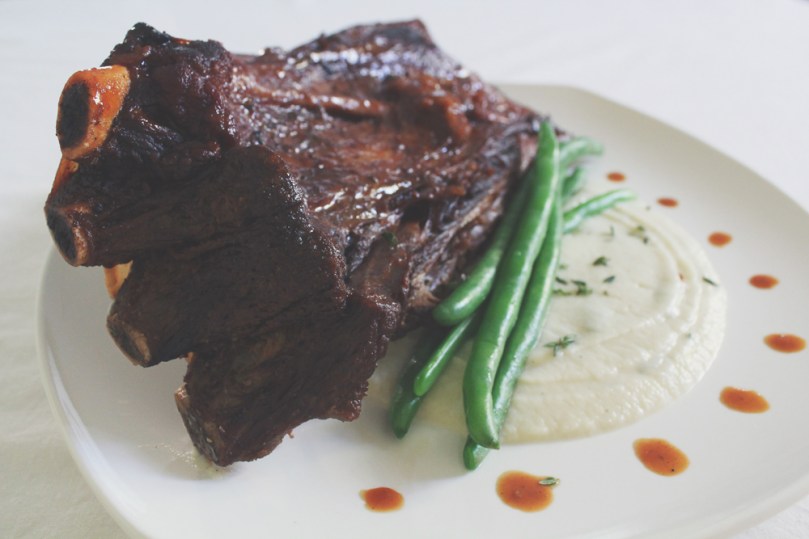
  8. Serve the beef ribs on a bed of smooth cauliflower purée with blanched green beans. Enjoy!

Bourbon & Coke Beef Short Ribs

Bourbon & Coke Beef Short Ribs

Bourbon & Coke Beef Short Ribs

BON APPÉTIT

– Ally xx

ps: just before I end things (yes, I saved this for last because the introduction was getting a tad bit too long than usual – I mean, sorry if my life got a little bit more interesting this week hehe), I wanted to say that on Sunday our beloved President Rodrigo Roa Duterte visited the Sultanate for 3 days, and his first stop when he landed was to meet the Filipino Community in Brunei. The event, which was held at the National Indoor Stadium housed more than 6,500 Filipinos, out of the 23,000 residing in the Sultanate, greeted President Duterte that night. My Mom, my sister, and myself we’re among the 6,500:

President Rodrigo Roa Détente visits Brunei Darussalam

myTaste.com

Bœuf Bourguignon with Potato Gnocchi

Bœuf Bourguignon with Potato Gnocchi

Hello Everyone! It’s week 2 of Cooking with Alcohol month and today I will be cooking with one of my favourite bevvys to have when I’m out with friends or just socialising with – well, this was back when I was in Australia and I don’t do it now; only if a friend throws a party and there’s red wine being served *cheeky grin*. Of course, using red wine in your cooking is just as good as having a glass or two (whispers: or more) on the weekends.

“Secondary cuts of meat are my favourite and I love to use them in this dish. Remember, you’ll need to start this the day before so the beef has time to marinate overnight in that gorgeous red wine. You really do need to use a bold red wine for this recipe, it makes all the difference — just make sure you buy an extra bottle to drink with the meal!” — Manu Feildel

Bœuf Bourguignon Ingredients

Okay, so a little bit of a tangent before I move on to the recipe, this morning at work, my colleague asked me a question after she had seen the ingredients shot that I uploaded just minutes before she asked me this: “I have one question… Whenever you cook, do you always buy new ingredients?” At first I was confused, because obviously I buy meat and veggies when I need them so it’s always fresh, and then she pointed out that my block of butter was new as seen in the photograph below, and went on to point out a new tube of maple syrup in another photo, and a new jar of something which I can’t remember. Well, to answer your question, especially to the particular photograph that she pointed out this morning, yes, most of the stuff were new there because I didn’t have those ingredients in my pantry at that time. Then she saw another photograph that had the same tube of maple syrup that looked new. I then told her that I gently move it around so that the maple syrup sticks to the sides of the tube to make it look full. Also, in terms of butter, I always, and I repeat ALWAYS have a new block of untouched butter in the fridge for my photos, especially if it’s less than half a block already. I eventually use it anyway within the next couple of weeks – it’s not like it sits in the fridge for months/years.

Anyway, one last thing, but not a tangent – before I head on to the recipe, please visit Manu Feildel for the original recipe! I once made Manu’s recipe for Bœuf Bourguignon, while I was still studying in Australia. I made this dish during my second year of studies, and when I come to think of it, that was 4 years ago! I can’t believe how long ago that was! Well, I decided to whip it up again for this theme since I really enjoyed this dish the first time I cooked it. So don’t forget, as the man Manu said: you need to start the recipe a day before so that your beef cuts have enough time to soak in the marinade overnight. And of course, make sure you leave some wine behind, or buy an extra bottle to have with your Bœuf Bourguignon!

Bœuf Bourguignon Ingredients

PREP TIME min. 24 HOURS* | COOKING TIME 2 HOURS | SERVES 6-8

*If you didn’t read above, the beef needs to marinate overnight to soak up all the yummy flavours before cooking.

INGREDIENTS

  • 2kg beef chuck

For the marinade

  • 1L red wine (Burgundy or Shiraz)*
  • 4 garlic cloves, minced
  • 2 sprigs rosemary**
  • 2 bay leaves
  • 1 brown onion, roughly chopped
  • 1 carrot, roughly chopped
  • 1 stick celery, roughly chopped

*I used Jacob’s Creek Shiraz Cabernet.

**Manu’s recipe used thyme, but at that moment I couldn’t find fresh thyme in the stores and I really didn’t want to use the dried kind – however, I had some sprigs of rosemary in the fridge leftover from another recipe I whipped up before this, so I used that instead.

For the stew

  • 250g brown mushrooms
  • 200g bacon, cut into bits
  • 20g unsalted butter
  • 3 brown onions, quartered
  • 2 carrots, peeled and chopped
  • 3 tbsp olive oil
  • 2 tbsp plain flour
  • Ground sea salt and black pepper, to taste

To serve

  • Fresh parsley
  • Pasta, mashed potato, gnocchi, or crusty French bread***

***I first paired my Bœuf Bourguignon with soft pillows of potato gnocchi, and any leftovers we had, we paired them with fettuccine pasta.

METHOD

  1. Place the chopped carrots, celery, and onions in a large bowl (or deep pyrex dish like I have) together with the minced garlic, rosemary sprigs, and bay leaves. Cut beef into large 4cm/1.5″ cubes and add to the dish with the aromatics. Pour over the red wine to submerge the meat and vegetables, then cover with some cling wrap and refrigerate overnight.
  2. Remove beef from marinate and season well with salt and pepper. Strain out the marinade herbs and vegetables and discard, but reserve the liquid as this will be your sauce!
  3. Heat the butter and half of the olive oil in a large heavy-bottomed pot over medium-high heat. When the butter starts to foam, add in the meat and sear on all sides for a minute or two. Do this in batches if needed, and once done, set the meat and any pan juices aside.
  4. Heat the remaining olive oil in the same pot, and add onions, carrots, and mushrooms, cooking until golden and caramelised on the edges, about 2-3 minutes. Add in the bacon bits and cook for a further 3 minutes.
  5. Return seared beef and juices to the pan and sprinkle over the plain flour. Stir well, and then add in the red wine liquid to the pan.
  6. Cover the surface of the liquid with a cartouche (baking paper lid), and bring to the boil. Once boiling, reduce it to a simmer and cook for 1.5 to 2 hours until the beef is tender enough to pull apart with your fingers.
  7. Once tender, spoon the Bœuf Bourguignon into a dish, sprinkle with freshly chopped parsley and serve with fresh pasta, mashed potato, potato gnocchi, or even a big wedge of crusty French bread. Enjoy!

Bœuf Bourguignon with Potato Gnocchi

Bœuf Bourguignon with Potato Gnocchi

BON APPÉTIT

– Ally xx

myTaste.com

Bourbon & Maple Glazed Chicken

Bourbon & Maple Glazed Chicken

Hello Everyone! I really want to start of with a Green Day classic, but I realised just how lame it is and how overdone the joke is in the past years. For the non-Green Day fans or just those that have been living under a rock, Green Day released a song on their 2004 American Idiot album, a song titled Wake Me Up When September Ends – and I was going to go on this tangent about how it’s already October and that I wasn’t woken up when September ended. I told you it was lame *cheeky grin*

Anyway, mini tangent aside; as per usual, a new month calls for a new theme on the blog! This month, I will be sharing recipes that incorporate the use of alcohol into the dishes. Okay, how I came up with this theme was because I have a full bottle of Jack that has been sitting in the living room collecting dust for almost 3 years now, and I also brought back a bottle of red wine from my recent trip to the Philippines. For those of you who know me personally, you’ll know that I am not a drinker – so why do I have these beverages lying around the house if I don’t drink? Well, I mean the fact that my bottle of whisky has been sitting around for years speaks for itself. I don’t even know why I bought it in the first place; the only reason I could think of was so that I could use it in my cooking – and here we are now! I guess, with these two alcoholic beverages, you can tell when the month is going to predominantly feature *cheeky grin*

Bourbon & Maple Glazed Chicken

Tonight’s recipe was one that I whipped up a while back, during the long weekend in the middle of September. I brought it for lunch in the office the next day back, and my colleague asked me what I had brought in for lunch today. I replied “Bourbon and Maple-glazed Chicken with Chunky Mash and Pan-fried Asparagus.” She then laughed and continued to say “it sounds so Masterchef – like usually if you ask any locals what they had for lunch, they will just say ‘Buttermilk Chicken’.” I too laughed when she said that, referring to the fact that one would normally have a simply-named dish for lunch, but not me apparently. My lunch’s name was Masterchef worthy hahaha – yes, just the name, the overall dish is still maybe a bit too simple for Masterchef level. Maybe if I cooked it in liquid nitrogen to give it the Heston Blumenthal touch then I could be in it to win it… As if hahaha! Anyway, the original recipe for tonight can be found over on Simply Recipes.

Bourbon & Maple Glazed Chicken Ingredients

PREP TIME 5 MINS | COOKING TIME 1 HOUR | SERVES 6

INGREDIENTS

  • 6 pcs chicken whole legs, cleaned thoroughly
  • 3-4 garlic cloves, minced
  • 2-3 sprigs of fresh rosemary (or about 2-3 tsp of dried rosemary)
  • 1 small red onion, finely diced
  • 3/4 cup maple syrup
  • 1/2 cup bourbon whisky
  • 2 tbsp tomato paste
  • 1 tbsp unsalted butter
  • 1/4 tsp ground black pepper
  • 1/4 tsp salt

METHOD

  1. Preheat oven to 180C (350F or gas mark 4). Prepare the chicken by placing them skin side up in a oven-proof dish. Set aside.
  2. Bourbon Maple Glaze: Heat a medium-sized saucepan over medium-high and melt the butter until melted. Add in the minced garlic and cook until fragrant, about 1 minute, and then add the diced onions, cooking for about 2 to 3 minutes further.
  3. Add the bourbon whisky together with the maple syrup, tomato paste, rosemary, and season with salt and pepper. Whisk to combine and bring the glaze to a low simmer.
  4. Coat chicken with glaze and roast: Pour half of the glaze mixture over the pre-prepared chicken and toss to coat well. Place in the oven, and then roast the for about 30 minutes, then turn the chicken over and roast for a further 12-15 minutes, or until nicely browned. Lower the heat or remove from the oven if the chicken whole legs start getting too dark.
  5. Simmer remaining glaze until thickened: Meanwhile, as the chicken roasts away, simmer the remaining sauce in the medium-sized saucepan until it thickens slightly and can coat the back of a spoon. Once done, remove from the heat and then set aside. Tip: if it is taking too long for the sauce to reduce, pour it into a wide shallow pan and bring to a boil. The wider pan will make sauce evaporate more easily.
  6. Coat cooked chicken in glaze: When the whole legs are done, remove from oven and dip them into the saucepan with the reduced glaze.
  7. Serve on a bed of chunky roasted garlic mashed potatoes and some pan-fried baby asparagus stalks – of course, whatever you fancy with your chicken will do the trick. Enjoy!

Bourbon & Maple Glazed Chicken

BON APPÉTIT

– Ally xx

myTaste.com

Spicy Kimchi Quinoa Bowls

Spicy Kimchi Quinoa Bowls

Hello Everyone! Wow! I can’t believe that we’ve reached the end of Cooking with Quinoa month, and with that, I can’t believe that September will be ending in a couple of days! Now that we’re approaching October soon, I can’t believe that we’re already into the 10th month of the year — which also means that I will have been working in my current company as a Creative Design Executive for a year already. *sigh* Time is flying by in the blink of an eye. I don’t know why, but the introduction to this blog post is feeling very overemotional *cheeky grin* and I guess I will stop here.

I’ve saved the best recipe for last! Well actually, now that I think of it, I think the best recipe for this month was the very first that I posted in the beginning of the month with my take on a Californian-inspired Quinoa Salad. I still consider tonight’s a recipe one of the best as it is a creative and healthy take on a classic kimchi fried rice recipe — and you guessed it! Quinoa will be replacing the rice in this recipe. I was going to try an attempt to make my own Kimchi at home, but I forgot why I didn’t try to DIY it since it’s actually super easy to do — I guess the reason was because I saw a shelf of ready-made kimchi at the supermarket and just could not resist to pick up a jar to speed up my time in the kitchen for that day  *cheeky grin* The original idea for this recipe can be found over on Simply Quinoa.

Spicy Kimchi Quinoa Bowls

For those of you who do not know, kimchi is a traditional Korean dish that uses the process of fermentation to pickle and preserve fresh vegetables. The spicy, crunchy, cabbage-based vegetable mixture has a texture similar to sauerkraut but boasts much bolder flavours thanks to garlic and spicy seasonings. This process of pickling and preserving fresh vegetables was originally developed in 7th Century Korea as a means of storing vegetables during cold winters. Though of Korean origin, the dish has been steadily — if not, slowly — gaining recognition beyond the boundaries of its native country. Fermentation in general has been shown to increase the nutritional properties of food. Kimchi specifically has been linked to anti-obesity effects, and might help treat atopic dermatitis and even lower cholesterol. Other than that, the dish’s health benefits are in large part attributable to its high probiotic content (i.e. good-for-you bacteria), and it is also loaded with fibre and vitamins A, B, and C. Spicier varieties also get a boost from capsaicin, a component of hot peppers that’s been shown to improve metabolism.

Spicy Kimchi Quinoa Bowls Ingredients

PREP TIME 5 MINS | COOKING TIME 10 MINS | SERVES 2

INGREDIENTS

  • 2 cups cooked tri-colour quinoa, cooled
  • 2 cups kale, finely chopped
  • 1 cup kimchi, chopped
  • 3-4 garlic cloves, minced
  • 2 large free range eggs
  • 2 tsp gluten-free tamari
  • 2 tsp kimchi “juice” (the liquid from the jar)
  • 2 tsp toasted sesame oil
  • 1/2 tsp freshly grated ginger

Optional

  • 1/4 cup sliced green onions, for garnish
  • 1 tsp hot sauce
  • Fresh ground black pepper, for garnish

METHOD

  1. Heat about a tablespoon of olive oil in a large frying pan over medium-high. Add the grated ginger and garlic and sauté for until golden and fragrant, about a minute.
  2. Add the quinoa and kimchi and cook until just lightly heated through, about 2 – 3 minutes. Stir in kimchi juice, tamari, and hot sauce if using, then turn the heat down to low and stir occasionally while you prepare the other ingredients.
  3. In a separate frying pan, cook the eggs on low until the whites have cooked through but the yolks are still runny, about 3 – 5 minutes. Set aside.
  4. Steam the kale in a separate pot for 30 – 60 seconds until soft. Set aside.
  5. Transfer the kimchi-quinoa mixture and kale to two separate serving bowls evenly and top it off with a sunny side up egg each. Garnish with some green onions and fresh ground black pepper if using. If you fancy, top with more kimchi.
  6. Serve and enjoy!

Spicy Kimchi Quinoa Bowls

BON APPÉTIT

– Ally xx

myTaste.com

Honey Lime Rainbow Fruit & Quinoa Salad

Honey Lime Rainbow Fruit & Quinoa Salad

Hello Everyone! I can’t believe the month is going by in the blink of an eye! It’s already the third week of Cooking with Quinoa and I’ve got another colourful recipe to share with y’all. I’ll keep tonight’s post short as I’ve got nothing much to tell really – other than the fact that it was a slow day at work today, and has been for the second half of last week up until today. Tomorrow may be another slow day and I guess it will be like this for a while until another event creeps up on me. Even though there’s not much to do, I’m still slowly preparing the things that I need to deliver for January’s event so that I won’t find myself stressing out and doing things last minute a month before the event. At least I can enjoy my Christmas and New Years when it comes.

All that aside, if you’re obsessed with fresh fruit, then this is a dish you’d want to whip up as an easy pre and/or post workout meal. This salad is also very versatile in a sense that you can easily mix and match fruit combinations depending on what you like and what fruits are in season. The original recipe can be found over on The Recipe Critic: Tried and True.

Honey Lime Rainbow Fruit & Quinoa Salad Ingredients

PREP TIME 10 MINS | COOKING TIME 15 MINS | SERVES 4-6

INGREDIENTS

For the salad

  • 1 cup baby spinach leaves, rinsed and drained
  • 1 cup tri-colour quinoa, uncooked
  • 1 large orange, peeled and segmented
  • 1 punnet (125g) blueberries
  • 1 punnet (125g) strawberries, hulled and halved
  • 1/2 pineapple, peeled and cut into bite-sized chunks

For the honey lime glaze

  • 1/4 cup honey
  • 2 tbsp freshly squeezed lime juice

METHOD

  1. Rinse the quinoa before combining it with 2 cups of room temperature water in a medium-sized pot. Turn the heat up to high and bring the quinoa to a boil. Once boiling, cover, reduce heat to low, and simmer until the quinoa is tender, about 15 minutes. Drain and then set aside to cool. Note: Quinoa holds lots of water, so you have to make sure you drain it thoroughly after it’s cooked.
  2. Meanwhile, combine the honey and lime juice in a small bowl. Set aside.
  3. Add all the fruits into a large mixing bowl together with the cooked and cool quinoa. Mix until well combined.
  4. Transfer to a serving dish with the spinach leaves and then drizzled with the honey lime glaze. Serve as a healthy morning or afternoon snack, pre or post gym workout. Enjoy!

Honey Lime Rainbow Fruit & Quinoa Salad

Honey Lime Rainbow Fruit & Quinoa Salad

BON APPÉTIT

– Ally xx

myTaste.com

Quinoa Minestone Soup with Kale Pesto

Quinoa Minestrone Soup with Kale Pesto

Hello Everyone! Week 2 of cooking with quinoa is here and I’ve got a classic recipe with a twist. For those of you who don’t know, minestrone soup is a thick soup of Italian origin made with vegetables that range from, but are not limited to, beans, onions, celery, carrots, and tomatoes. Often, rice or pasta is added to the soup to bulk it up with some carbs. There is no set recipe for minestrone, since it is usually made out of whatever vegetables are in season. It can be vegetarian, contain meat, or contain a meat-based broth.

I’ve made this soup a couple of times before in the past, and is featured in the Mediterranean section of my blog – but today, I’m going to add a little twist to a traditional minestrone soup. I’m switching out the pasta that I would normally add to my soup, with quinoa. Using quinoa in place of pasta adds extra protein and makes this soup gluten free! In addition to using quinoa for this soup, I’m topping it off with some kale pesto as well to give the dish a touch of freshness – and of course, if you have any extra leftover, you can totally whip up another dish just by mixing it through some freshly cooked pasta! Top it of with some grilled chicken or seared tiger prawns for a complete lunch or dinner. The original recipe for this dish can be found over on Taste Australia.

Quinoa Minestone Soup with Kale Pesto Ingredients

PREP TIME 10 MINS | COOKING TIME 20 MINS | SERVES 4

INGREDIENTS

For the soup

  • 1 can (400g) cannellini beans, drained and rinsed
  • 1 can (410g) Italian chopped tomatoes
  • 150g bacon, diced
  • 4 cups chicken stock
  • 1/3 cup tri-coloured quinoa, rinsed
  • 3-4 garlic cloves, minced
  • 1 celery stick, sliced
  • 1 dried bay leaf
  • 1 large brown onion, coarsely chopped
  • 1 medium-sized carrot, peeled and cut into small chunks
  • 1 medium-sized zucchini, cut into small chunks

For the kale pesto

  • 2 & 1/2 cups kale leaves, shredded
  • 1/4 cup grated parmesan
  • 1 small garlic clove, halved
  • 1 tbsp extra virgin olive oil
  • 1 tbsp lemon juice
  • 1 tbsp water

METHOD

  1. For the Soup: Heat the extra virgin olive oil in a large pot over medium-low heat. Add the bacon bits and cook, stirring, for 3-4 minutes or until browned. Remove from the pot and set aside.
  2. Turn the heat up to high and then add in the garlic. Sauté until golden brown and fragrant, about a minute or so. Then add in the onions and cooking, stirring, until soft, about 2 minutes.
  3. Add in the carrot and celery, together with the bay leaf, and cook, covered, stirring occasionally, for about 4 minutes or until soft.
  4. Next, add in the chicken stock and canned chopped tomatoes to the pot. Bring to the boil.
  5. Once boiling, reduce the heat down to medium-low and then stir in the quinoa. Simmer, stirring occasionally, for 5 minutes.
  6. Stir in zucchini. Cook, stirring occasionally, for 5 minutes, and then add in the cannellini beans. Cook, stirring occasionally, for 2 minutes or until the quinoa and zucchini are tender. Season with a touch of ground salt and pepper.
  7. For the Kale Pesto: Add the kale leaves, parmesan cheese, and garlic into a food processor and process until finely chopped. Combine the juice, oil, and water in a jug, and slowly stream the juice mixture into the kale mixture until well combined. Season.
  8. Divide soup among four equal bowls and top with the kale pesto and extra parmesan if you wish.
  9. Serve and enjoy!

Quinoa Minestone Soup with Kale Pesto

Quinoa Minestone Soup with Kale Pesto

BON APPÉTIT

– Ally xx

myTaste.com

California-inspired Quinoa Salad

California-inspired Quinoa Salad

California-inspired Quinoa Salad Ingredients

Hello Everyone! A new month calls for a new theme on the blog, and for the month of September, I’ve got some creative and healthy quinoa recipes for everyone! Now, I remember the times where people would ask me… “What is quinoa (kee-NOO-ah)?” Firstly, I’d correct them and say that it’s pronounced KEEN-wah, and not kee-NOO-ah – but then again after doing some research, I realised that both are actually correct in a way. Apologies to those that I’ve made a big fuss with in terms of how to pronounce this grain.

So back to the question, what is quinoa? Well, I have always been stumped whenever this question pops up, and all I could respond was “it’s a grain, like rice – but it’s not really rice.” Yeah, that doesn’t help. Quinoa is a grain crop grown primarily for its edible seeds. The seeds are cooked in the same manner as rice and can be used in a wide range of dishes. Quinoa is naturally gluten-free and contains iron, B-vitamins, magnesium, phosphorus, potassium, calcium, vitamin E, and fibre. It is one of only a few plant foods that are considered a complete protein, containing all nine essential amino acids. Quinoa also has a low glycemic index, which is good for blood sugar control, however, be mindful as it is still pretty high in carbs, so it is not a good choice for a low-carb diet.

California-inspired Quinoa Salad Ingredients

Find the original recipe over on Jo Cooks. She used sultanas in her salad, I didn’t. If you know me personally, I really despise raisins and sultanas – don’t ask me why, I just do. So I’ve omitted them from my salad and replaced them with wake instead. Wakame is a sea vegetable; edible seaweed or kelp common in Japanese, Korean, and Chinese cuisines. It has a subtly sweet flavour and is most often served in soups and salads. Wakame is a good source of the following (Source: MindBodyGreen):

  1. Magnesium: A mineral critical in the contraction and relaxation of muscles, function of certain enzymes in the body, production and transport of energy, and the production of protein.
  2. Iodine: Iodine is needed for strong metabolism of cells – the process of converting food into energy. It also maintains the balance of the thyroid gland and is needed for the production of thyroid hormones.
  3. Calcium: Wakame easily allows for the absorption of calcium into the human body. Each 100 grams of raw wakame contains 150mg of calcium. Calcium is needed for strong healthy bones and the prevention of osteoporosis.
  4. Iron: We need iron because it is essential for the production of red blood cells and the prevention of anemia.
  5. Vitamins!
    • Vitamins A, C, E, and K: These vitamins are all amazing for skin health and repair as well as immunology.
    • Vitamin D: Promotes the absorption of calcium for healthy bones and enhances the nerve, muscle, and immune systems.
    • Riboflavin (Vitamin B2): We need riboflavin to use the carbohydrates, fats, and proteins in the foods we eat. Riboflavin helps us use these nutrients for energy in our bodies for growth and is also necessary for red blood cell production. Riboflavin functions as an antioxidant and works in the body with other vitamins such as niacin, folate, and vitamin B6.
  6. Folate: Helps the body make new cells and is especially important for pregnant women.
  7. Lignans: Thought to play a role in preventing certain types of cancer, particularly breast cancer.

California-inspired Quinoa Salad Ingredients

PREP TIME 20 MINS | COOKING TIME 10 MINS | SERVES 4

INGREDIENTS

For the salad

  • 1 cup shelled edamame, steamed
  • 3/4 cup almond slices (toasted if you prefer)
  • 3/4 cup unsweetened shredded coconut
  • 1/2 cup tri-coloured quinoa, cooked and cooled
  • 1/4 cup chopped cilantro, or parsley if you don’t like cilantro
  • 1/4 cup wakame
  • 1 large mango, cut into small chunks
  • 1 small red capsicum, chopped
  • 1 small red onion, chopped
For the dressing
  • 2 tbsp balsamic vinegar
  • 1 tbsp honey
  • 1 tbsp olive oil
  • Ground salt and black pepper, to taste
  • Juice of 1 lemon

METHOD

As easy as whisking all the dressing ingredients together in a small bowl, and then tossing all the salad ingredients together in a large bowl until well mixed; dressed and then served cold. Enjoy! It will keep in the fridge for about 5 days, but of course, it’s always better when it is consumed right away!

California-inspired Quinoa Salad

California-inspired Quinoa Salad

California-inspired Quinoa Salad

BON APPÉTIT

– Ally xx

myTaste.com

Poached Pears with Chocolate Chia Mousse

Hello! I’m Jialing and I will be taking over Amcarmen’s Kitchen for today. I will confess that today’s blog was very close to being a two-step tutorial on how to boil a cup of water and make tea – the only semi-regular dietary part of my life that does not involve any animal by-products.

As someone who has clearly only ever eaten vegan food a handful of times (I genuinely thought that the vegan theme was intended as a joke when I first agreed to do a recipe), I found this year’s Auguest theme to be a punishment. I mean challenge. I ended up ransacking my own pantry and refrigerator for inspiration, confirming with Allison and Google about what ingredients could and couldn’t be used by vegans. What seems like day later, I emerged triumphant – pears, wine, cocoa powder, and a questionable bag of chia seeds (waste not, want not…) sat atop my counter, ready for the arduous vegan road ahead.

Now, onto the recipe, poetically inspired by the very essential act of boiling water.

Poached Pears with Chocolate Chia Mousse Ingredients

PREP TIME min. 24 HOURS* | COOKING TIME 40 MINS | SERVES 4

*The chocolate chia mousse will need to be prepared the day before to allow chia seeds time to soak

INGREDIENTS

For the chocolate chia mousse

  • 1 & 1/2 cups almond milk
  • 1/3 cup chia seeds
  • 1/4 cup cocoa powder
  • 4 tbsp 100% pure maple syrup**
  • 1/2 tsp vanilla extract
  • Strawberries for garnish

For the poached pears

  • 4 buerre bosc pears, peeled
  • 1/2 bottle moscato or other sweet dessert wine***
  • 3 tbsp 100% pure maple syrup**
  • 3 star anise
  • 2 cinnamon sticks
  • 2 tsp cloves
  • Pinch of nutmeg
  • Water

**Maple-flavoured syrup isn’t vegan, so be sure to check the label!
***Find your fave vegan wines here http://www.barnivore.com/wine

METHOD

  1. Chocolate Chia Mousse: Prepare the chocolate chia mousse the day before, to allow chia seeds time to soak. Combine the cocoa powder, vanilla, and maple syrup, stirring until well mixed.
  2. Slowly pour in almond milk, stirring until mixture is smooth. Add chia seeds and stir until well-incoporated. Leave in fridge to soak overnight, stirring mixture once in between.
  3. Once the chia seeds have fully absorbed the liquid, they will increase significantly in size and have a gelatinous texture. Transfer to a blender or food processor and blitz until smooth and creamy. Tip: leave the chia mixture unblended and top with fresh fruit and desiccated coconut as a healthy and envy-worthy breakfast.
  4. Poached Pears: In a sauce pot large and deep enough to hold pears, combine wine, maple syrup, cinnamon sticks, star anise, cloves, nutmeg, and just enough water to cover pears.
  5. Bring the wine and spices to the boil over high heat.
  6. Add the pears, positioning them so that they are completely submerged, and continue to boil for another 25 minutes, until pears are cooked through and tender. Be sure to turn pears for even cooking, particularly when liquid gets low, keeping in mind that the bottoms of the pears will take longer to cook than the tops.
  7. Once pears are cooked, remove from the pot, reserving the syrup, and set aside to cool.
  8. Carefully simmer remaining syrup until reduced to about 1/2 cup.
  9. To serve, divide mousse into small bowls or stemless glasses and garnish with sliced strawberries. Place a pear on each plate, next to the mousse. Drizzle the pear with syrup. Enjoy!

Poached Pears with Chocolate Chia Mousse

Recipe Copyright © 2016 | jialingmew

ENJOY YOUR MEAL!

Jialing.

myTaste.com

Spinach, Carrot, and Zucchini Dog Treats

Spinach, Carrot, and Zucchini Dog Treats

Happy Birthday Blacky!

Hello Everyone! Wow I’m definitely on a roll here with the recipes – posting 3 back-to-back for this week! Well, the only reason for that is just because two very special days just happened to sandwich my normal Wednesday post schedule. So yes, today is indeed another special day and having read the title of this recipe, you already know who’s special day it is. Of course it is none other than my not so baby boy anymore, Blacky! Happy 6th Birthday to my Mutt Blacky, or as my friends have nicknamed him, Mr. Black and Cinnabon (because of his cinnamon scroll-like tail).

Last year a made him a batch of bacon doggie treats, and since the theme of my blog for this month is vegan, I decided to make him a healthy treat this time ’round. Okay, okay. I know. This isn’t vegan treat, but I realised a little bit too late when I was photographing the ingredients for this recipe. I guess I could’ve easily omitted the eggs from the recipe – but would that have somehow ruined the recipe altogether? Or is there a substitute for the eggs that I could’ve used instead? Any vegans out there please let me know in the comments section below. Thank you 🙂

Spinach, Carrot, and Zucchini Dog Treats

That aside, I know Blacky hates his vegetables. Whenever we feed him some soup with meat, veggies, and rice, he is able to pick out anything green that he sees in his bowl. I thought that maybe by hiding some greens into a doggie treat, he wouldn’t notice and eat them. I guess I was wrong…ish. He still ate the treat, but it looked like he was being very picky in the beginning by just playing around with them, but not actually eating them. Then after a few hours, he’d eat half of the biscuit. Then by the end of the day, once I’m home from work, he’d show off and eat the rest of them and made sure that I saw him eating it. What a clever and devilish dog he is haha!

Once again, Happy Birthday Blacky! Original recipe can be found over on Damn Delicious.

Spinach, Carrot, and Zucchini Dog Treats Ingredients

PREP TIME 5-8 MINS | COOKING TIME min. 40 MINS | SERVES 75 BISCUITS

INGREDIENTS

  • 225g pumpkin, steamed and then puréed*
  • 3 cups wholewheat flour, or more as needed
  • 1 cup baby spinach, chopped
  • 1/2 cup old fashioned oats
  • 1/4 cup peanut butter
  • 2 large free range eggs
  • 1 carrot, peeled and shredded
  • 1 zucchini, shredded

*225g of pumpkin should be able to make 1 cup of cooled pumpkin purée which is needed for this recipe

METHOD

  1. Preheat oven to 180C (350F or gas mark 4). Line a baking tray with parchment paper or a silicone baking mat and then set aside.
  2. In the bowl of an electric mixer fitted with the paddle attachment, beat the cooled pumpkin purée, peanut butter, and eggs on medium-high until well combined, about 1-2 minutes.
  3. Gradually add the old fashioned oats and 2 1/2 cups flour at low speed, beating just until incorporated. Add an additional 1/4 cup flour at a time just until the dough is no longer sticky. Then, add in the carrot, zucchini, and spinach, beating just until incorporated.
  4. Working on a lightly floured surface, knead the dough 3-4 times until it comes together. Using a rolling pin, roll the dough to 1/4-inch thickness. Using cookie cutters, cut out desired shapes and place onto the prepared baking sheet.
  5. Place into oven and bake until the edges are golden brown, about 20-25 minutes.**
  6. Let cool completely. Makes about 75 biscuits.***

**Baking time will vary depending on the size and thickness of the treats.
***Serving size will also vary depending on the desired shapes and cookie cutters used.

Spinach, Carrot, and Zucchini Dog Treats

Spinach, Carrot, and Zucchini Dog Treats

So just like last year, I decided to try the biscuits for myself. Of course, they tasted really bland to me because I didn’t add any sugar or anything to sweeten it up a bit. I gave some to my Mom and sister to try, and my Mom actually liked them. Because I ended up making around 75 biscuits, I asked my Mom if I could give them to a colleague of mine who also has a dog. To which my Mom replied, “No, I will eat them” *crying laughing face emoji* Well, at least I know someone in the house will finish them if Blacky can’t! Hahaha!

BON APPÉTIT

– Ally xx

myTaste.com

Auguest 2016: Brendon D'Souza

Spinach, Broccoli & Thai Green Curry Soup

Hi Foodies, it’s so exciting to be able to share a recipe with you via Amcarmen’s Kitchen and I want to say a big thank you to Allison for organising such a wonderful global blogging experience. Last year, I was able to cook and collaborate in the same kitchen with Allison, where were exchanged some delicious recipes. If you haven’t had the chance to read them, here are the links to my Giant Chocolate Chip Cookie and Cookies & Cream.

My friends call me a chilli fiend. I can’t help it, I am after all Indian. I just love the pungency and zing it adds to soups, curries and stews. I created this recipe on one of those cold winter Sydney evenings when feeling a little bit under the weather. It’s packed full of delicious super greens, fragrant herbs and spices that will help to reinvigorate your senses. Make a big batch and pack it for work the next mayor freeze in snap-lock bags for 1-2 months.

Spinach, Broccoli & Thai Green Curry Soup Ingredients

PREP TIME 30 MINS | COOKING TIME 30 MINS | SERVES 3-4

INGREDIENTS

For the green curry paste

  • 1 large garlic clove, peeled
  • 5cm piece of ginger, washed
  • 2 spring onions
  • 1 bunch coriander, washed, roots and stems scrubbed
  • 1 bunch Thai basil, washed (optional)
  • 2 tbsp cumin powder
  • 1/2 tsp turmeric powder
  • 2-3 small green chillies

For the soup

  • 2 tbsp sunflower oil
  • 1 cup firmly packed English Spinach, washed and finely chopped
  • 1 broccoli, cut into florets, stem diced
  • 1/2 cup coconut milk
  • Lime wedges
  • Extra coconut milk, to serve

METHOD

  1. Roughly chop the garlic clove, ginger, spring onions, coriander leaves, root and stems, and Thai basil. Place these and the remaining ingredients into a blender along with a 1/4 cup water. Blitz to form a smooth paste. You may need to add some more water to help the mixture along.
  2. Heat the sunflower oil in a large saucepan over medium heat. Add the curry paste to the saucepan and cook, stirring occasionally until fragrant. Add the spinach and broccoli and season with salt and pepper to taste. Add 1L cold water and cook over medium-high heat for 10 minutes or until the broccoli stems are tender and the spinach is wilted. Allow to cool.
  3. Purée the mixture using a stick blender, then return to the heat and add the coconut milk. Allow to heat through. Serve with lime wedges and a drizzle of coconut milk. This soup goes really well with turkish borek or spinach and ricotta triangles.

Spinach, Broccoli & Thai Green Curry Soup

For more tasty recipes and Sydney food adventures head to www.brendonthesmilingchef.com

About Brendon
I’m a food writer, blogger and passionate home cook living and working in Sydney. By day I work at one of the world’s fastest growing premium restaurant delivery services, and by night I cook, style and photograph recipes for my award-winning recipe blog. I really can’t stop smiling, believe me, I’ve tried and probably lasted 2 seconds. Sharing food, stories and recipes with family and friends makes me happy, which is exactly why I created “Smiling Chef”. I often try to include a selection colourful vegetables in my cooking, for both it’s nutritional benefits, and the fact that it makes such great #foodporn for Instagram. Get in touch if you need #instaworthy shots of your restaurant or cafe food for your website and social networks. I’m also keen singer and pianist and also love street and landscape photography – see more at @my_omd_and_me.

Instagram: @brendonthesmilingchef/ @my_omd_and_me
SnapChat: bthesmilingchef
Facebook: brendonthesmilingchef
Twitter: bthesmilingchef

Recipe Copyright © 2016 | brendonthesmilingchef

Happy cooking and keep smiling,

Brendon D’Souza:)

myTaste.com