Auguest 2020: Shazrinah Shazali

Roasted Garlic & Onion Tomato Tagliatelle with Butter Beans,Tuna, and a Chilli Balsamic Drizzle

“Cooking is an exploration of our own creativity. Always try out new flavour combinations, different cooking techniques, build on textbook recipes, and have fun!” — Shazrinah Shazali

Auguest 2020: Shazrinah Shazali

Hello Everyone! I am a neuroscientist and home-grown chef best known as ShefShaz. I started my entrepreneurial journey from home, supplying healthy lunch meal plans to offices and homes. I then ventured into collaboration with The Healthy Habit in January 2018 to develop menus and co-founded FUEL’D. Just this year I’ve also recently co-opened a cafe in the gardens to work with the garden’s nursery to develop menus and create delicious food from their produce.

Tonight I will be sharing a delicious and healthy dish that is packed with the flavours of roasted garlic, chilli, and balsamic vinegar. You can easily whip up for a quick weeknight dinner if you’re pressed for time!

Roasted Garlic & Onion Tomato Tagliatelle with Butter Beans,Tuna, and a Chilli Balsamic Drizzle Ingredients

PREP TIME 10 MINS | COOKING TIME 20 MINS | SERVES 4

INGREDIENTS

For the tagliatelle

  • 200g dried tagliatelle pasta
  • 1 can (approx 400g) butter beans, drained
  • 1 can (approx. 185g) tuna in olive oil
  • 1 can (approx. 400g) roasted garlic and onion tomato pasta sauce
  • 4 garlic cloves, minced
  • 4 shallots, minced
  • 2 red bird’s eye chillies, minced
  • 1 tsp sweet ground paprika
  • Salt and freshly cracked black pepper, to taste
  • Parmesan cheese (optional)

For the chilli balsamic drizzle

  • 1/4 cup olive oil
  • 2 garlic cloves, minced
  • 1 red bird’s eye chilli, minced
  • 2 tbsp balsamic vinegar
  • 1 tsp fresh parsley, minced
  • Salt and freshly cracked black pepper, to taste

METHOD

  1. Chilli Balsamic Drizzle: In a mortar and pestle, grind the garlic, chilli, and parsley together. Add the olive oil, balsamic vinegar, and season with salt and pepper to taste. Adjust to your liking and set aside.
  2. Roasted Garlic & Onion Tomato Tagliatelle: In a large pot with boiling salted water, cook the tagliatelle pasta according to packet directions or until al dente. Drain and set aside, reserving about half a cup of the pasta water.
  3. In a separate pan over medium-high heat, sauté the minced garlic, shallots, and chilli until golden, fragrant, and translucent, about a minute or two.
  4. Add in the drained butter beans together with the tuna in olive oil and cooked until warmed through. Add the ground paprika and season with salt and pepper to taste.
  5. Stir in the canned tomato pasta sauce plus the half cup of reserved pasta water. Bring to a rapid simmer before adding the cooked pasta. Once done, transfer to individual serving plates.
  6. Top with parmesan cheese if desired, fresh arugula or any other leafy greens you prefer, and drizzle with the chilli balsamic mixture. Serve and enjoy!

Roasted Garlic & Onion Tomato Tagliatelle with Butter Beans,Tuna, and a Chilli Balsamic Drizzle

Roasted Garlic & Onion Tomato Tagliatelle with Butter Beans,Tuna, and a Chilli Balsamic Drizzle

Photo Courtesy & Recipe Copyright © 2020 | Shazrinah Shazali (@shefshaz // @fueld.bn // @glowcafebn)

BON APPÉTIT

– Shazrinah Shazali

myTaste.com

Advertisement
Strawberry & Mascarpone Dessert Pizza

Strawberry & Mascarpone Dessert Pizza

Hello Everyone! For the month of February, I’ll be sharing some sweet dishes to celebrate the month of love! Though in my opinion, I believe love should be celebrated every day. No, I don’t mean that you should buy gifts and whip up something special in the kitchen every single day, but you should always make your significant other feel loved, whether big or small the gesture.

Strawberry & Mascarpone Dessert Pizza

For tonight’s recipe, forget chocolate dipped strawberries. Here’s a dish that takes the classic combination of Strawberries and Chocolates to the next level and is sure to impress your significant other for Valentine’s Day. I originally had a different recipe planned for tonight, but I was inspired by someone special to make this dessert pizza and share it with you guys.

Also, check out this recipe that I made a couple of years back if you wish to try out a different take on a berry dessert pizza: Nutella & Mixed Berries Pizza.

PREP TIME 10 MINS* | COOKING TIME 10 MINS | SERVES 3-4

* When you plan to tackle this recipe, make your dough ahead of time as needs to be refrigerated overnight before using.

INGREDIENTS

  • Classic New York Style Pizza Dough Recipe
  • 2 punnets (600g) fresh strawberries, washed, hulled, and sliced
  • 250g Mascarpone Cheese
  • 1/2 cup balsamic vinegar
  • 1/4 cup nuts, roughly chopped
  • 5 tsp Nutella
  • Handful of fresh basil leaves

METHOD

  1. Preheat oven to 220C (245F or gas mark 7). Place your pizza stone in the oven as well to heat it up.
  2. Roll out your dough to a circle about the same size as your pizza stone on a lightly floured surface as thick or thin as you want. Transfer the rolled-out dough onto a sheet of parchment paper. This will easily help you transfer your pizza onto the preheated stone.
  3. Brush around the edges with a little bit of water, then spread a thick wall of Nutella all the way around the edges. Fold, or roll the edges over the wall of Nutella and seal it in by pressing down on the damp dough to form a stuffed crust.
  4. Carefully remove the pizza stone from the oven. Transfer the dough onto the hot stone and bake in the oven for about 3-4 minutes.
  5. While the pizza is baking, heat the balsamic vinegar in a small non-stick saucepan over medium-high heat. Simmer, continuously stirring to check on the consistency of the glaze, until the vinegar is reduced to a thick sauce, about 5 minutes, Remove from the heat and leave to cool down for a bit.
  6. Remove the pizza from the oven. Spread a thin (or if you are that type, a generous) layer of mascarpone cheese onto the dough and, top with the sliced strawberries and the nuts. Place it back into the oven with the grill setting on and grill for a further 3-4 minutes or until cooked all the way through. It should not take more than 10 minutes in total.
  7. Remove from the oven and top with fresh basil leaves and drizzle with the balsamic reduction. Serve and enjoy immediately!

Strawberry & Mascarpone Dessert Pizza

Strawberry & Mascarpone Dessert Pizza

BON APPÉTIT

– Ally xx

myTaste.com

Bacon Eggs Benedict

Bacon Eggs Benedict

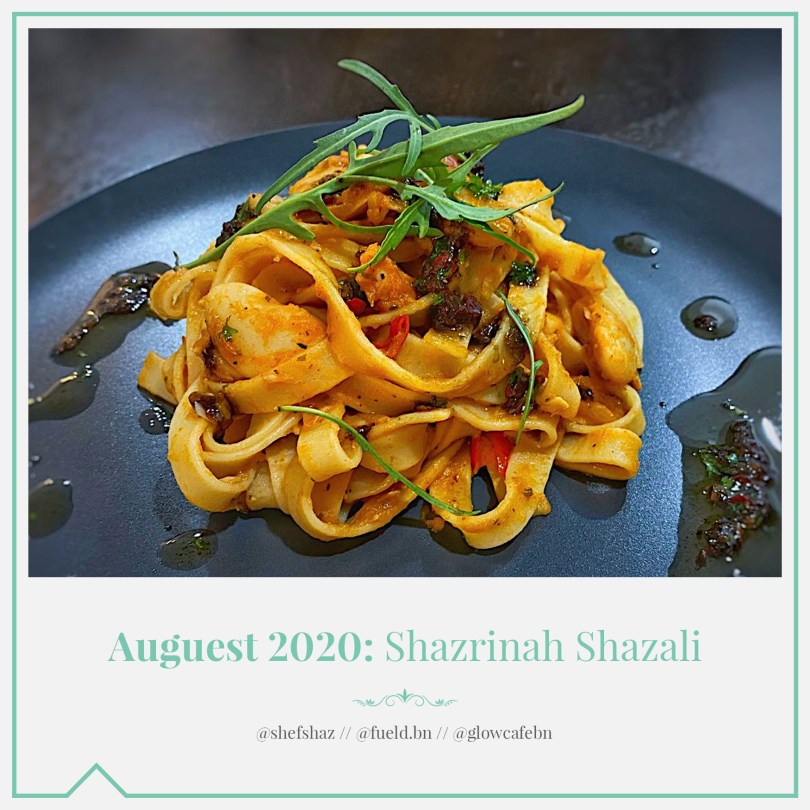
Hello Everyone and welcome to an all new theme for the month of May on Amcarmen’s Kitchen! For the month of May, I will be sharing recipes and renditions of a classic go-to foolproof Eggs Benedict! The thing I love about a good ol’ Eggs Benedict dish is its versatility – if you like pork, then go for a Beer-braised Pulled Pork Eggs Benedict accompanied with a Sriracha hollandaise sauce *drools* Or maybe you prefer beef, chicken, lamb, or seafood? The options are endless! You can even take a vegetarian spin to this and go meatless if you prefer. Get creative with the classic hollandaise sauce that makes an Eggs Benedict what it is. Fuse cuisines and cultures.

All this will be covered on the blog this month so do stay tuned on how you can tackle the endless possibilities to make your Eggs Benny experience one to remember! Tonight, I will be starting off with a classic with a slight twist, and as the month progresses, we’ll delve deep into creative fusions that have been inspired from my café adventures back when I was still studying in Australia.

Bacon Eggs Benedict

Now forgive me if I’m giving out false information as I am relying on the world of Wikipedia here. I guess my teachers from high school and uni haven’t taught me well enough to not source from wiki *cheek grin* but anyway, though there seemed to be conflicting recounts on the exact origins of the Eggs Benedict, this one in particular speaks out to me:

Lemuel Benedict, a retired Wall Street stock broker, said that he had wandered into the Waldorf Hotel in 1894 and, hoping to find a cure for his morning hangover, ordered “buttered toast, poached eggs, crisp bacon, and a hooker of hollandaise”. Oscar Tschirky, the maître d’hôtel, was so impressed with the dish that he put it on the breakfast and luncheon menus but substituted ham for the bacon and a toasted English muffin for the toast — “Talk of the Town”. The New Yorker. December 19, 1942.

Therefore, you could safely say (I guess) that the original main ingredients found in a classic Eggs Benedict dish are eggs, bacon, hollandaise sauce, and an English muffin – popularised by Oscar Tschirky. Okay well, when I said that it speaks out to me, I don’t mean in a sense that I’ve ever been hungover, but that this is what I imagined a morning-after hangover meal would be.

Bacon Eggs Benedict Ingredients

Before we dive in, there’s a slight twist to the classic recipe that I will be sharing with you guys tonight – and the twist is basically just a few extra ingredients to bulk it up and add some zing and tang to it. Tanginess from the balsamic reduction and a slight zing from the chimichurri sauce!

PREP TIME 15 MINS | COOKING TIME 25 MINS | SERVES 3

INGREDIENTS

For the eggs benedict

  • 6 slices of streaky bacon
  • 3 English muffins, halved, slightly toasted, and butter
  • 3 large free range eggs
  • 1 large avocado, peeled, pitted, and smashed*
  • 1 large tomato, sliced
  • Chilli flakes, to top

*Squeeze a touch of lemon or lime juice to prevent it from browning

For the hollandaise sauce

  • 3 large free range eggs, yolks separated
  • 175g unsalted butter, cut into cubes, at room temperature
  • 2 tbsp water
  • 2 tbsp fresh lemon juice
  • Fresh Thyme Leaves
  • Ground salt and black pepper to taste

For the chimichurri sauce (by Karina from Cafe Delites)

  • 1/4 cup olive oil
  • 1/4 cup parsley, finely chopped
  • 3-4 garlic cloves, finely minced
  • 2 red bird’s eye chillies, deseeded and finely chopped
  • 1 tbsp white wine vinegar
  • 1/2 teaspoon dried oregano
  • Ground salt and black pepper, to taste

For the balsamic reduction

  • 1/2 cup balsamic vinegar

So I know that there are a heck load more ingredients mentioned in the list above than what is shown in the shot – apologies! If you want a classic Bacon Eggs Benny without the fancy schmancy reductions and sauces, then feel free to omit. They’re really just optional for an extra boost of flavours to an already flavoursome dish.

METHOD

  1. Chimichurri Sauce: Mix all the ingredients together in a small bowl. Allow to sit for 5-10 minutes to release all of the flavours into the oil before using, but I think that the longer it sits, the better it tastes, so prepare this first before everything else to ensure this!
  2. Bacon and Tomatoes: Heat a medium size non-stick frying pan over high heat. Add the bacon  strips and cook for about 3-4 minutes per side. Place on a dish lined with paper towels to drain the excess oils. Next add the tomatoes and fry in the bacon fat for about 3-4 minutes per side as well. Set aside in an oven to keep warm before serving.
  3. Balsamic Reduction: Next, pour the 1/2 cup of balsamic vinegar in a small saucepan over medium heat. Bring the vinegar to a boil, then turn down the heat down so that the boil reduces to a simmer. Stir occasionally and allow to simmer until the vinegar has reduced by at least half (for a thinner reduction) or more (for a more syrup-like consistency). If you have impatient tendencies like me when it comes to food, do not increase the heat at this point! Your reduction may burn and you will be left with a stiff, hardened mess.
  4. Hollandaise Sauce: While the balsamic reduction is underway and slowly simmering, start on the Hollandaise sauce. Place a heatproof bowl over a medium saucepan that is quarter-filled with water. Make sure that the bowl should fit snugly into the pan without touching the water (lift the bowl to check and remove some water if it does). Bring the water to a boil over high heat, then reduce heat to very low so the water is barely simmering (there should be almost no movement at all). It is important that the water is barely simmering while making the sauce – if it is too hot, the egg yolks will cook too much and the sauce will curdle.
  5. Place the egg yolks and the 2 tablespoons of water in the heatproof bowl and place over the pan. Whisk the mixture constantly for 3 minutes or until it is thick and pale, has doubled in volume and a ribbon trail forms when the whisk is lifted.
  6. Add the butter a cube at a time, whisking constantly and adding another cube when the previous one is incorporated completely (about 10 minutes to add it all in). If butter is added too quickly, it won’t mix easily with the egg yolks or the sauce may lose volume. At the same time, it is important that the butter is at room temperature and added a cube at a time, so that it doesn’t take too long to be incorporated – if the sauce cooks for too long, it can curdle.
  7. Remove the bowl from the pan and place on a heatproof surface. The cooked sauce should have the consistency of very lightly whisked thickened cream. Whisk in the lemon juice, fresh thyme leaves, and season with salt and pepper.
  8. Poached Eggs: Bring small saucepan of water to the boil over medium-high heat, then reduce the heat to low-medium – the water should be just simmering. Add in the vinegar and stir. Crack one egg into a small bowl and quickly, but gently pour it into the water. Repeat with the other egg. A really soft poached egg should take around 2 minutes, but if you want it a bit more firm, it will take about 4 minutes. To check if they’re cooked right, carefully remove the egg from the pan with a slotted spoon and give the yolk a gentle push (you can tell just by your instincts if it is under or over – or perfect)!
  9. Assembly: Spread the smashed avocado on the toasted and buttered English muffin half and top with the crispy bacon strips, tomato slice, and then the poached egg. Top a generous amount of the hollandaise sauce and sprinkle with a bit of chilli flakes to pack a slight kick. Finally, drizzle with the balsamic reduction and chimichurri sauce around the plate. Serve and enjoy!

Bacon Eggs Benedict

BON APPÉTIT

– Ally xx

myTaste.com

California-inspired Quinoa Salad

California-inspired Quinoa Salad

California-inspired Quinoa Salad Ingredients

Hello Everyone! A new month calls for a new theme on the blog, and for the month of September, I’ve got some creative and healthy quinoa recipes for everyone! Now, I remember the times where people would ask me… “What is quinoa (kee-NOO-ah)?” Firstly, I’d correct them and say that it’s pronounced KEEN-wah, and not kee-NOO-ah – but then again after doing some research, I realised that both are actually correct in a way. Apologies to those that I’ve made a big fuss with in terms of how to pronounce this grain.

So back to the question, what is quinoa? Well, I have always been stumped whenever this question pops up, and all I could respond was “it’s a grain, like rice – but it’s not really rice.” Yeah, that doesn’t help. Quinoa is a grain crop grown primarily for its edible seeds. The seeds are cooked in the same manner as rice and can be used in a wide range of dishes. Quinoa is naturally gluten-free and contains iron, B-vitamins, magnesium, phosphorus, potassium, calcium, vitamin E, and fibre. It is one of only a few plant foods that are considered a complete protein, containing all nine essential amino acids. Quinoa also has a low glycemic index, which is good for blood sugar control, however, be mindful as it is still pretty high in carbs, so it is not a good choice for a low-carb diet.

California-inspired Quinoa Salad Ingredients

Find the original recipe over on Jo Cooks. She used sultanas in her salad, I didn’t. If you know me personally, I really despise raisins and sultanas – don’t ask me why, I just do. So I’ve omitted them from my salad and replaced them with wake instead. Wakame is a sea vegetable; edible seaweed or kelp common in Japanese, Korean, and Chinese cuisines. It has a subtly sweet flavour and is most often served in soups and salads. Wakame is a good source of the following (Source: MindBodyGreen):

  1. Magnesium: A mineral critical in the contraction and relaxation of muscles, function of certain enzymes in the body, production and transport of energy, and the production of protein.
  2. Iodine: Iodine is needed for strong metabolism of cells – the process of converting food into energy. It also maintains the balance of the thyroid gland and is needed for the production of thyroid hormones.
  3. Calcium: Wakame easily allows for the absorption of calcium into the human body. Each 100 grams of raw wakame contains 150mg of calcium. Calcium is needed for strong healthy bones and the prevention of osteoporosis.
  4. Iron: We need iron because it is essential for the production of red blood cells and the prevention of anemia.
  5. Vitamins!
    • Vitamins A, C, E, and K: These vitamins are all amazing for skin health and repair as well as immunology.
    • Vitamin D: Promotes the absorption of calcium for healthy bones and enhances the nerve, muscle, and immune systems.
    • Riboflavin (Vitamin B2): We need riboflavin to use the carbohydrates, fats, and proteins in the foods we eat. Riboflavin helps us use these nutrients for energy in our bodies for growth and is also necessary for red blood cell production. Riboflavin functions as an antioxidant and works in the body with other vitamins such as niacin, folate, and vitamin B6.
  6. Folate: Helps the body make new cells and is especially important for pregnant women.
  7. Lignans: Thought to play a role in preventing certain types of cancer, particularly breast cancer.

California-inspired Quinoa Salad Ingredients

PREP TIME 20 MINS | COOKING TIME 10 MINS | SERVES 4

INGREDIENTS

For the salad

  • 1 cup shelled edamame, steamed
  • 3/4 cup almond slices (toasted if you prefer)
  • 3/4 cup unsweetened shredded coconut
  • 1/2 cup tri-coloured quinoa, cooked and cooled
  • 1/4 cup chopped cilantro, or parsley if you don’t like cilantro
  • 1/4 cup wakame
  • 1 large mango, cut into small chunks
  • 1 small red capsicum, chopped
  • 1 small red onion, chopped
For the dressing
  • 2 tbsp balsamic vinegar
  • 1 tbsp honey
  • 1 tbsp olive oil
  • Ground salt and black pepper, to taste
  • Juice of 1 lemon

METHOD

As easy as whisking all the dressing ingredients together in a small bowl, and then tossing all the salad ingredients together in a large bowl until well mixed; dressed and then served cold. Enjoy! It will keep in the fridge for about 5 days, but of course, it’s always better when it is consumed right away!

California-inspired Quinoa Salad

California-inspired Quinoa Salad

California-inspired Quinoa Salad

BON APPÉTIT

– Ally xx

myTaste.com

Avocado, Chickpea, & Roasted Capsicum Salad

Avocado, Chickpea, & Roasted Capsicum Salad

Hello Everyone! I hope everyone has had a relaxing CNY long weekend unlike me – well, it was relaxing as I stayed home all day on Sunday doing nothing, but it was also because I was sick over the long weekend *sad face*. I think I got sick from fatigue which resulted in a painful dry cough, a very high temperature, and muscle aches especially in my back, shoulders, and thigh regions. I’m feeling a little bit better with thanks to the long weekend as I get to rest up for 3 days after a straight 13 days of working from an average of 8am-11pm. Yes you read that right, I’m officially employed! I actually started working in late October in Brunei’s leading Advertising Agency known as D’Sunlit Sdn. Bhd. as a Graphic Designer for the Marketing Team. I was under a 3-month probation contract, and last Friday I was able to sign a permanent contract! Oh and the 13 days of straight working, that was because I was involved in an event known as the 17th Consumer Fair. I worked from Monday-Sunday two weeks ago, and last week I worked Monday-Saturday (yes no rest in between for working on that Sunday). So I guess that’s where my fatigue came from. I was actually already starting to feel under the weather last Thursday, but it only came into full effect on Saturday morning. I guess it didn’t quite help as well that I was surrounded by sick colleagues, and a sick mom and sister at home too. My sister got sick first, then me, and lastly my mom. I today in the office, I learnt that I may have made a few other colleagues sick too. How am I ever going to recover?!

Anyway, let’s move on to the recipe shall we? It’s week two of healthy eating, and I’ve got a yummy salad for you that you can pair up with any kind of meat be it beef, chicken, or lamb – whatever tickles your fancy that is! If you’re like me, and you can’t go without meat in your diet, then whip up your favourite roast chicken to go with your salad – we roasted some whole chicken legs with my Mom’s secret and special BBQ marinade. Otherwise, you can keep the dish vegetarian or vegan friendly. We all know that avocados are loaded with heart-healthy monounsaturated fatty acids known as oleic acid. Oleic acid has been linked to reduced inflammation and has been shown to have beneficial effects on genes linked to cancer. Not only does it contain this fatty acid, it also contains minerals and vitamins such as: fibre, folate, potassium, and vitamins B5,B6, C, E, and K.

Chickpeas, also called garbanzo beans, belong to the legume family, which includes a variety of beans, peanuts, soybeans and lentils. Opting for legumes over foods high in saturated fat might lower your risk of heart disease. Chickpeas also offer specific health benefits, and consuming them regularly boosts your intake of a few key nutrients such as: protein, fibre, manganese, and folate. The mineral manganese helps support bone development and wound healing and also helps carry out chemical reactions important to your metabolism. Folate, or vitamin B-9, aids in new cell growth and brain cell communication and protects against genetic mutations that contribute to cancer development.

Avocado, Chickpea, & Roasted Capsicum Salad Ingredients

PREP TIME 10 MINS | COOKING TIME 10 MINS | SERVES 5-6

INGREDIENTS

  • 2 avocados, peeled, pitted, and thinly sliced
  • 2 brown onions, peeled and quartered
  • 1 can (400g) chickpeas in water, drained
  • 1 packet (250g) mixed salad greens
  • 1 packet (150g) semi-dried tomatoes, halved, oil reserved
  • 1 yellow capsicum
  • Balsamic vinegar
  • Ground salt and black pepper, to taste
  • Olive Oil

METHOD

  1. Rub the yellow capsicum with a little bit of oil and place directly on open flame of gas stove. Rotate occasionally so that the capsicum blisters and chars on all sides. Once done, set aside to cool down. Peel the skin off and cut into strips once it has cooled down enough to handle. Add to a large mixing bowl.
  2. Blanch the chickpeas in boiling water for about 5 minutes. Drain and add to the large mixing bowl together with the roast capsicum strips.
  3. Heat olive oil in a small frying pan over medium-high. Add the onions and cook until soft and caramelised. Once done, transfer to the large mixing bowl.
  4. Add the semi-dried tomatoes together with its herbed oil, mixed salad greens, and balsamic vinegar. Season with a touch of ground salt and black pepper and give it a good toss until well coated. Transfer to a serving dish and top with the sliced avocados.
  5. Serve and enjoy!

Avocado, Chickpea, & Roasted Capsicum Salad

Avocado, Chickpea, & Roasted Capsicum Salad with Roast BBQ Chicken

BON APPÉTIT

– Ally xx

myTaste.com

Greek-inspired Barley Salad

Greek-inspired Barley Salad

Hello Everyone! I can’t believe that it’s already February, which means sad times ahead as I only have less than two week in this beautiful city I have been calling home for the past 4 years. I’m finding it difficult to wrap my head around the fact that once I leave, the possibility of coming back is unlikely. Yes I will be back for graduation, but after that it’s quite possible that it’s sayōnara for good.

So why am I starting off my blog post on this matter? Well it’s because leaving and knowing you won’t be back in a long time has me in this cleaning-up-the-pantry phase. I discovered that I have a tin of pearl barley in my pantry and so I wanted to make use of this. I came across a recipe on the Food Network for a Barley Greek Salad and decided to give this a try. I didn’t change much of the recipe besides the fact that I used balsamic vinegar instead of red wine vinegar only because I had about a quarter of a bottle left of balsamic. I didn’t want to buy a whole new bottle of red wine vinegar seeing as I didn’t have any (since my whole point is to clear the pantry)! I also decided to throw in some avocado chunks instead of cucumber because for those who know me, cucumber isn’t my thing.

Greek-inspired Barley Salad

Easy, simple, and packed with lots of flavour. Good for a light and healthy (I presume) lunch or as a side to a classic Aussie summer BBQ. The flavours worked really well together; you’ve got the saltiness from the olives, counterbalanced with the acidity of the balsamic vinegar. You’ve got the freshness of the added vegetables as well as the crunch from the diced capsicum, chewiness from the pearl barley, and creaminess of the avocado. Like fireworks in your mouth I tell you; an absolute burst of flavours to the palette!

Greek-inspired Barley Salad Ingredients

PREP TIME 15 MINS | COOKING TIME 45 MINS | SERVES 4

INGREDIENTS

  • 1 cup pearl barley
  • 1/2 cup danish feta cheese, crumbled
  • 1/2 cup kalamata olives, pitted
  • 1 avocado, pitted and cut into chunks
  • 1 punnet (250g) cherry tomato medley, quartered
  • 1 small red capsicum, seeded, ribs removed, and diced
  • 1 small red spanish onion, minced
  • 3 tbsp balsamic (or red wine) vinegar
  • 3 tbsp fresh mint leaves, torn
  • 2 tbsp extra-virgin olive oil
  • Freshly ground black pepper
  • Pinch of salt

METHOD

  1. Combine the barley, 3 cups water, and a pinch salt in a medium-sized saucepan and bring to a boil. Once boiling, reduce the heat to low and simmer until the barley is tender, approximately 45 minutes. Strain* and set aside to cool.
  2. Combine the tomatoes, feta, olives, mint, capsicum and shallots in a large bowl. Once the barley has cooled down, add it to the bowl. Set aside.
  3. Whisk together the balsamic vinegar and olive oil in a separate small bowl. Season with salt and pepper, and dress the salad and toss to combine. Cover with plastic wrap and place in the refrigerator until ready to serve. It’s best to make the barley salad at least 3 hours ahead of time so the flavours have time to incorporate and mingle into each other.

*Optional: when straining the barley, reserve the water for drinking. There are numerous health benefits associated to drinking barley water such as lowering cholesterol levels in the body because of its high fibre content. Barley water also helps reduce the risk of developing type-2 diabetes. It is a good source of magnesium, which reacts with various enzymes involving glucose levels in the body. To find out more about the health benefits of barley water, check out the Diet Health Club.

Greek-inspired Barley Salad

BON APPÉTIT

– Ally xx

myTaste.com