Tinolang Manok (Chicken & Green Papaya Soup)

Tinolang Manok (Chicken & Green Papaya Soup)

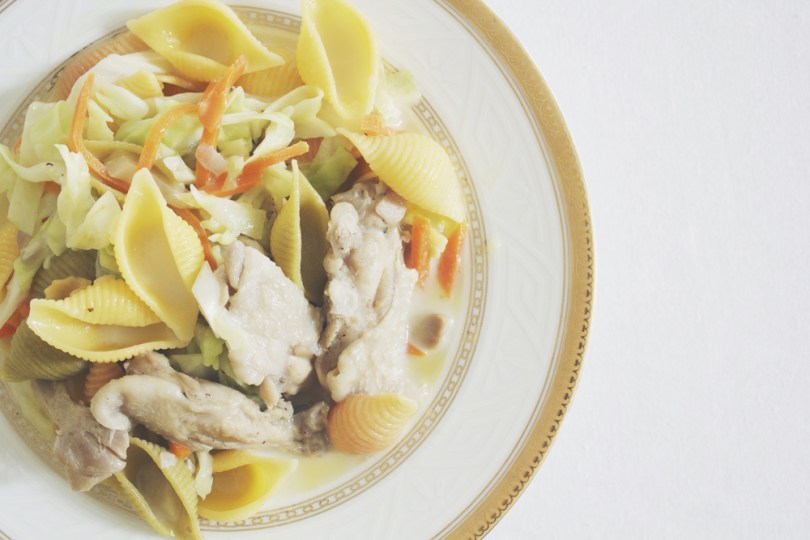
Hello Everyone! My goodness has it been cold these past few days/nights! Today I didn’t particularly do much besides staying indoors, away from the cold and rain, and cooking up a nice pot of Chicken Soup to stay warm. I made Arroz Caldo, a Filipino chicken porridge, over the weekend seeing as I thought I’d be doing down with a cold, but I was mighty fine the next day. I had some leftover chicken and ginger from that, and so I decided to make chicken soup with it! All I really needed was green papaya and malungay or chilli leaves. Also, perfect as it’s winter warmer month on my blog, and I actually didn’t have chicken soup pre-planned into the month.

Growing up, my mom always made this dish, even though we live in the tropics where we have hot weather all year round, it was still a perfect dish for a rainy day. We usually skip the malunggay or chilli leaves altogether since its not commonly found in the markets, unless you grow your own, and we usually use chayote (or known as chokos here in Australia, which by the way I never knew until I arrived here) instead of green papaya; no real reason for the substitute. My mom also adds glass noodles to the soup rather than pairing the soup with rice (but I still add the glass noodles and have a serving of rice anyway).

Tinolang Manok (Chicken & Green Papaya Soup)

I think I may have at one point in my life tried this chicken soup with green papaya, and I honestly could not tell the difference in taste, until today that is. I’m not sure if it’s the particular papaya that I picked or the way I prepared it, or whatever it may be, it did not leave a lovely taste to my buds. It just tasted wrong and I can’t pinpoint what it tasted like. Probably just raw papaya to me, but I believe that I’ve cooked it long enough because it was soft, and I don’t think I needed to do anything with it besides peeling and removing the seeds to prepare it. After this dish of mine, I definitely prefer using chayote/choko with my chicken soup. Anyway, I also tried to look for malunggay and chilli leaves in the markets. No one knew what malunggay leaves were and a lady told me that “no one here sells chilli leaves”. I stopped and thought for a while, and then I saw a sign that said that they sell curry leaves. I thought to myself if I could use curry leaves instead of chilli leaves, and so I bought a small bag of fresh curry leaves. It was a wise decision in my opinion! The curry leaves made the soup even more fragrant, which I didn’t think was possible seeing as the chicken soup alone without it was already fragrant enough. It also added a subtle flavour to the soup which I can’t quite describe. Basically, if you’ve had the chance to smell curry leaves, that smell is the flavour. I don’t know if I made any sense there but that’s what I feel/taste.

Tinolang Manok (Chicken & Green Papaya Soup) Ingredients

PREP TIME 10 MINS | COOKING TIME 25 MINS | SERVES 4

INGREDIENTS

  • 1kg chicken wingettes, washed and cleaned
  • 1.5L water
  • 1/2 small-sized green papaya, peeled, seeds removed and cut into wedges
  • 2-3 garlic cloves, minced
  • 1 brown onion, diced
  • Thumb-sized ginger, julienned
  • Small bunch curry leaves
  • Ground salt and black pepper, to taste

METHOD

  1. Heat oil in a large pot over medium-high. Add the julienned ginger strips and sauté until fragrant. Add in the garlic together with the curry leaves and continue sautéing until golden brown. Finally, add in the onions and cook until they are soft and translucent.
  2. Add in the chicken wingettes together with a bit of salt and pepper. Give it a good mix, then cover the pot and let it cook for about 8-10 minutes.
  3. Add in the water and bring to a boil. Once boiling, add in the papaya wedges and cook for a further 15 minutes or until the papayas are tender. Taste and if needed, season a bit more to your liking.
  4. Turn the heat off and serve immediately with steamed rice. Enjoy!

Tinolang Manok (Chicken & Green Papaya Soup)

The secret to making a good chicken tinola is to simmer the chicken for a long period of time. This enables the flavours of the chicken to infuse into the soup and also tenderises the chicken. I’d say cook it between 45-60 minutes, but 20 minutes cooking time is good enough if time is not on your side. Both has worked out fine for me.

BON APPÉTIT

– Ally xx

myTaste.com

Potato & Caramelised Leek Soup with Crispy Bacon

Potato & Caramelised Leek Soup with Crispy Bacon

Hello Everyone! It’s the beginning of Winter Warmer Month on the blog! For the next month of July I will be sharing my favourite soup recipes, as well as learning how to make other various soups that I don’t already have up my sleeve. These soups are sure to keep you warm on a mid-winter’s night while you’ve got a duvet wrapped around you as you binge watch all your favourite movies and/or tv shows; I know I’ll be doing that most nights!

Potato & Caramelised Leek Soup with Crispy Bacon

Today’s recipe is one that I’ve made many times before in the past when I started getting into cooking, before I started my blog. Before moving to Australia, I’ve never seen a leek before, not including the one that Farfetch’d carries around and whacks other pokémon with. I don’t think Brunei sells them? Or maybe they do but call them a different name or something. I know one grocery store that sells them now, and at a whopping $15.99/kg. Leeks can be pretty hefty so imagine the price! Here at Coles they sell it at $2.48 or something around that price range per piece, and of course I always choose the bigger piece.

The only possible thing that I dislike about this recipe is that it made me cry and left my eyes with a stinging sensation – those darn leeks and onions! Other than that, this is quite possibly one of my favourite soup recipes alongside roast pumpkin soup. Leeks are an excellent source of vitamin K, and are a very good source of manganese, vitamin B6, copper, iron, folate, and vitamin C. It has quite a number of health benefits, but a majority of people don’t know how to cook leeks, or what to pair them with. I am probably one of them as I only know how to use leeks in this recipes, and a pasta recipe with chorizo sausages. Maybe I’ll have a week where I just cook and experiment with the use of leeks in various dishes!

Potato & Caramelised Leek Soup with Crispy Bacon Ingredients

PREP TIME 15 MINS | COOKING TIME 1 HOUR | SERVES 3-5

INGREDIENTS

  • 3 large yukon gold potatoes, peeled and cut into chunks
  • 300ml thickened cream
  • 100g streaky bacon, cut into bits
  • 2 cups chicken (or pork)* stock
  • 2-3 garlic cloves, minced
  • 1 large brown onion, diced
  • 1 leek, washed thoroughly** and thinly sliced
  • 2 tbsp brown sugar
  • Ground salt and pepper to taste

*Remember my last post on roast pork belly crackling? Well, I had about 2 cups of rich pork broth that I didn’t want to throw away, so I reserved it and decided to use it for this recipe instead of using store bought stock or the powdered/bouillon version of it; made my soup super (or should I say, souper) tasty indeed! Okay I’ll stop there.

**Tips for cleaning leeks: Cut off the green tops of the leeks, removing any outer tough leaves. Cut off the root and cut the leeks in half lengthwise. Fan out the leeks and rinse well under running water, leaving them intact. Make to to thoroughly wash out any dirt/soil that can be found in the insides of the leek.

METHOD

  1. Heat a large pot over medium-high. Add in the bacon bits and fry until crispy. Remove from the pot and set aside, leaving the bacon fat/oils in the pot.
  2. Add the garlic in and sauté until golden brown before adding the onions in and cooking them until soft. Add the leeks and a little bit of water. Mix it around leave it to cook for about 5 minutes or until the leeks have softened. Add the brown sugar to the leeks and give it a good mix. Cover the pot and let the leeks cook and caramelise for a further 10 minutes.
  3. Throw in the potatoes and add the pork stock to the vegetables. Season the soup with a bit of salt and pepper and leave it to boil for about half an hour or until potatoes are soft. Once done, remove from the heat and let it sit too cool down slightly for about 10 minutes.
  4. Using a stick blender, blend the vegetables together with the liquid in the cooking pot until smooth. Add in the cream and give it a good mix.
  5. Divide the soup equally into serving bowls (3 large bowls, or 4-5 small bowls), and top each with a bit of crispy bacon, spring onion, and drizzle with a bit of olive oil. Serve immediately with some toasted bread.

Potato & Caramelised Leek Soup with Crispy Bacon

BON APPÉTIT

– Ally xx

myTaste.com

Roast Pork Crackling with Kale & Quinoa Salad

Roast Pork Crackling with Kale & Quinoa Salad

Hello Everyone! Can’t believe that it’s already the end of June! How time flies by much too fast. I’ve got just about a month left here in Sydney and then it’s quite possibly goodbye for a while. I wish I could stay, I really do, but it’s time for me to move on…

Sorry for the late post; I just got back home from a rather late dinner out with Amrita and Kevin. We had French Galettes and Crêpes in Randwick at Four Frogs Crêperie, exchanged conversations and laughs, and got up to a little mischief on our walk home. Basically Kevin managed to command Amrita to get into a shopping trolley that we found on our walk and pushed her down the street for a good 10 minutes or so I guess. He gave her a pretty rough ride by letting go on some occasions and leaving her in the middle of the road which made it all the more funny, especially Amrita’s priceless facial reactions.

Kale & Quinoa Salad

Anyway, besides that, this morning/afternoon I was in the kitchen making a lovely Kale and Quinoa Salad to go with my Roast Pork Belly Cracking. The crackling was no doubt well cooked; juicy, tender meat with a crackle to die for, paired with a chilli, garlic, lemon, soy sauce dip that made it all the more enjoyable. Of course, all that delicious but fatty belly needed to be paired with a light and healthy salad. I’ve never actually cooked quinoa before, but I have had quinoa at cafés. While I was cooking it, I could smell something burning, and at first I thought it was the quinoa because I could’ve sworn the smell was coming from the pot, and then I remembered my almonds. My poor almonds we’re slightly over-tanned on one side as I forgot that they were roasting in the oven.

Roast Pork Crackling Ingredients

Kale & Quinoa Salad Ingredients

PREP TIME 24 HOURS* | COOKING TIME 30 MINS | SERVES 3-4

*Includes time needed to set aside the pork belly in the fridge overnight to draw out extra moisture for a crispy crackling when roasted.

INGREDIENTS

For the pork belly crackling

  • 750g pork belly
  • 5-6 dried bay leaves
  • 1 tsp salt, plus more for rubbing
  • 1 tsp whole black peppercorns
  • Oil for rubbing

For the dipping sauce

  • 4 tbsp dark or light soy sauce
  • 2-3 garlic cloves, minced
  • 2 red bird’s eye chillies, slices
  • 1 lemon wedge, juiced

For the kale & quinoa salad

  • 150g organic quinoa
  • 50g roasted almonds, unsalted
  • 1 avocado, peeled, pitted, and cut into small chunks
  • 1 bunch kale, roughly chopped
  • 2 tbsp balsamic vinegar
  • 2 tbsp olive oil
  • Crumbled feta cheese
  • Ground salt and black pepper to season
  • Lemon juice

METHOD

  1. Pork Roast Prep: Score the skin with a very sharp knife. Place the meat in a large pot with water, salt, whole peppercorns, and bay leaves. Boil for about 45 minutes to an hour. Remove from the heat and drain, placing in a large bowl lined with a paper towel. Once the meat has cooled down, refrigerate uncovered for at least 24 hours. Refrigerating the meat will help to draw out any remaining moisture. Remove from the refrigerator and bring back to room temperature prior to roasting in the oven.
  2. Roast Pork Crackling: Preheat oven between 220-240C (425-475F or gas mark 7-9). Rub oil and plenty of salt into the scored skin, really getting it into the slits of the score marks. The fat under the skin will react to the salt and that is what makes the skin puff up and crisp up. Roast in the oven for 20 minutes and then bring the temperature down to 160C (325F or gas mark 3) and roast for another 10 minutes. Remove from the oven and let the meat rest for 20 minutes.
  3. Kale & Quinoa Salad: While the pork belly is roasting in the oven, blanch the chopped kale in hot salted water for about 4-5 minutes. Drain thoroughly. Add to a large serving bowl together with the roasted almonds and avocado chunks.
  4. Bring a medium-sized pot of water to a boil. Once boiling, add the quinoa in and cook for about 15 minutes. Once done, drain thoroughly and add to the serving bowl. Season with a bit of salt and pepper. Dress with balsamic vinegar, olive oil, and about 1 tablespoon of freshly squeezed lemon juice. Mix around until well combined. Top with feta cheese.
  5. Dipping sauce: Add all the ingredients together in a small bowl and mix well.
  6. Serve for the family and/or friends and enjoy!

Roast Pork Crackling with Kale & Quinoa Salad

Roast Pork Crackling with Kale & Quinoa Salad

BON APPÉTIT

– Ally xx

myTaste.com

Angel Hair Carbonara

Angel Hair Carbonara

Hello Everyone! Today has been a particularly lazy day spent at home binging on Game of Thrones; now on the last episode of Season 3 and I must say, episode 9 was just brutal with the death of the Starks, just as Arya was about to reunite with her mother and elder brother. Sorry if I spoilt it for anyone; just don’t read the sentence before this! While on the topic of GoT, I totally ‘ship Arya and Gendry.

Angel Hair Carbonara

In other news, no I didn’t actually rip strands of hair from an angel; it is actually known as Capellini, literally translated: ‘little hair’, which is a very thin variety of pasta. As it is very thin and light, it goes well in soups or dressed with very light sauces. I did actually get out of bed today in between episodes and made myself lunch, and today I decided to whip up an easy angel hair carbonara. I was told once before that the key to a good carbonara was to add a dash of worcestershire sauce. Of course I didn’t believe the man (my ex-housemate’s friend) at first because he was piss-drunk at the backyard of the house that I used to live in. At first I was like “worcestershire sauce, really?” in my head, but I nodded and said that I would give it a try, but not that day. Today, I tried it with worcestershire sauce, and I must say that it actually tasted pretty good. Well, he is Italian so I guess he knew what he was talking about.

I’ve made carbonara two ways before; one with cream and one without. Personally, I prefer the first with cream. If you prefer without cream, just add a ratio of one egg to one egg yolk in a bowl together with some parmesan cheese, a bit of salt and ground black pepper. Beat well and pour over a pot of drained hot pasta, heat off. Mix well and allow the hot pasta to cook the egg. Add fried bacon bits and spinach or rocket leaves if you wish.

Angel Hair Carbonara Ingredients

PREP TIME 5 MINS | COOKING TIME 10 MINS | SERVES 4

INGREDIENTS

  • 250g capellini (angel hair) pasta, or any other type of pasta
  • 150g streaky bacon, cut into small bits
  • 300ml thickened cream
  • 100ml milk
  • 4 large free range egg yolks
  • 3/4 tsp worcestershire sauce
  • Handful of rocket leaves, washed and drained
  • Ground salt and pepper to taste
  • Shaved parmesan cheese, to serve

METHOD

  1. Heat a bit of oil in a medium-sized frying pan and fry the bacon bits until browned. Add the cream and milk, and season with salt and pepper. Bring to a simmer. Once simmering, add in the worcestershire sauce.
  2. Meanwhile, bring a pot of salted water to a boil and cook your pasta according to packet directions. In this case, Barilla angel hair pasta takes about 4-5 minutes. Once cooked, drain and add the pasta to the sauce mixture together with the rocket leaves. Give it a good mix.
  3. Portion the pasta into 4 separate plates and place an egg yolk on top of each bed of pasta (the hot pasta will cook the egg yolk once you mix it all in together). Serve immediately and enjoy!

Angel Hair Carbonara

Not too long ago, I remember my friend saying to me that she missed my mom’s carbonara. Her’s is a little bit different since during that time I wasn’t even interested in cooking. She bought white sauce from a jar in the supermarkets and added minced chicken and sausages for her fettuccine carbonara. Even if it was jarred sauce, it was still a hit amongst my high school friends. They remembered how my mom used to pack extra lunch boxes on Thursday afternoon and delivered them to school during lunch break to share amongst my friends. I miss those days.

BON APPÉTIT

– Ally xx

myTaste.com

Sinigang na Bangús

Sinigang na Bangús

Hello Everyone! I’ll make this a quick one because I am eager to start watching Season 2 of Game of Thrones – yes that’s right! After much questions have been asked if I watch Game of Thrones, and hearing the gasps of shock when I say no – peer pressure got the best of me and now I am pretty much hooked onto it; I finished Season 1 in a day and a half! Just a note to myself, don’t watch when having lunch or dinner. I made that grave mistake of eating my dinner and the episode started with someone removing the guts of an animal and skinning it – I wanted to puke.

Anyway, if you have been following my blog for a while now, I posted a recipe for Sinigang somewhere in May last year. I made mention in that post that the dish can be made with any type of meat ranging from fish, pork, beef, shrimp, or chicken, stewed with tamarinds, tomatoes, and onions as its base. With that recipe, I used pork spare ribs, and for today’s recipe, I made it with bangús (milkfish). It is essentially the same ingredients and a similar process of cooking. Of course you can make it with any other types of fish; my mom has made this dish with pomfret, mackerel/tanigue steak, and even salmon belly – whatever floats your boat! Also, a perfect winter warmer!

Sinigang na Bangús Ingredients

PREP TIME 10 MINS | COOKING TIME 25 MINS | SERVES 2-3

INGREDIENTS

  • 1 large bangus (milkfish); scales removed, cleaned, and cut into 4-5 thick slices
  • 2 small spanish red onions, quartered
  • 1 bunch kangkung, washed, leaves separated from the stems, and stems cut into short lengths
  • 1 large tomato, cut into wedges
  • 1 long red chilli
  • 1 medium sized daikon, peeled and sliced
  • 1 thumb-sized ginger, peeled and sliced
  • 1 tbsp tamarind soup base
  • Ground salt
  • Fish sauce (optional)

METHOD

  1. Fill a pot with about 1.5L-2L of water. Add the chilli, ginger slices, onions, and tomatoes and boil for about 10-15 minutes. Once boiling, add the tamarind soup base and season with a bit of salt. If you want your soup a little less sour, add in a teaspoon at a time to adjust to your liking (I love my sinigang soup really sour!)
  2. Then add in the daikon and let it simmer for about 5 minutes. Follow with the bangús and let it cook for about 10 minutes. Taste, and add a few drops of fish sauce if the soup is tasting a bit bland.
  3. Remove from the heat and add the kangkung in. Serve immediately with steamed rice.

Sinigang na Bangús

BON APPÉTIT

– Ally xx

myTaste.com

Pritong Bangús Steak (Fried Milkfish Steak)

Pritong Bangús Steak (Fried Milkfish Steak)

Hello Everyone and sorry for a very late post tonight (or more like just past midnight by the time I am done with the post)! I spent the day bringing my family around to Bondi Beach and Maroubra Beach despite the gloomy weather. We managed to visit the beaches and take some photographs before it started to pour. After that, we chilled around at my friend’s place before finally heading off to the airport; I said my goodbyes to my Mom and my two younger sisters. Safe travels! They’ll be in Kuala Lumpur for about 7-hours, and then finally arriving in Brunei the next day in the afternoon. I just finished editing and uploading my graduation photos on Facebook, and now I am writing this post. I thought of just going to bed since I am quite tired, but I felt bad for not even attempting to write a post for tonight/today. Anyway, I’ll make it quick if I can; I’ll probably end up taking the long route and explaining some components of the dish that may be unfamiliar to some people.

Pritong Bangús Steak (Fried Milkfish Steak) Ingredients

Bangús (or Milkfish) is the national fish of the Philippines. They are notorious for being much bonier than other fish, which is why deboned milkfish, called “boneless bangús” in the Philippines, has become popular in stores and markets. There are many ways in which you can use this fish to create many loved home-cooked Filipino dishes, and I will show you two/three easy ways to prepare the milkfish for a tasteful lunch or dinner. Pritong Bangús (fried milkfish) is a simple dish that is packed with flavours. The milkfish alone has its deliciously rich taste, especially the belly, but the marinade enhances its flavour with a hint of sourness and spiciness. The bangús belly is my favourite part of the fish, especially when it is fried. I would always fight for the bigger piece of belly, or I would always make sure that I get the bigger share of the belly. In an ideal world, the belly would be ALL mine.

Pritong Bangús Steak (Fried Milkfish Steak) Ingredients

PREP TIME 8 HOURS* | COOKING TIME 12 MINS | SERVES 2-3

*Minimum. Up to 12 or even better, overnight in the fridge for marination time.

INGREDIENTS

  • 1 large boneless bangus (milkfish); scales removed, cleaned and butterflied
  • 4 cloves garlic, crushed
  • 2-3 red bird’s eye chillies, cut in half
  • 1 large red spanish onion, cut into rings
  • 1/2 cup white vinegar
  • 2 tsp dark soy sauce
  • 1/2 tsp salt
  • 1/2 tsp whole black peppercorns
  • Juice of 2-3 calamansi

METHOD

  1. Combine chillies, vinegar, garlic, whole peppercorns, and salt in a large container. Give it a good stir to combine the ingredients before laying down the fish skin side up. Cover the container and place in the fridge to marinate for about 8 to 12 hours, or even better, overnight to soak up all the flavours.
  2. Heat about 1 cup of oil in a large frying pan (preferably with a lid)** over medium-high. Fry both sides of the bangús until each side turns medium brown in colour. Once cooked, place on a serving plate. You can enjoy the fried bangús just like this with some steamed rice and atchara*** on the side, or you can add a few more ingredients to further heighten the flavour of the dish.
  3. Tip the oil out into an empty jar (you can reuse for your next frying adventure) from the same frying pan, leaving about a tablespoon or two. Fry the onions until soft and then turn the heat off. Add in the soy sauce and give it a good stir, about 1-2 minutes, and the pour the mixture over the fried bangús. Squeeze the juice from the calamansi over the fish and serve!

Pritong Bangús Steak (Fried Milkfish Steak)

Pritong Bangús Steak (Fried Milkfish Steak) Ingredients

**Caution: take care when frying as the oil has a tendency to splatter because of the liquid from the marinade. Make sure to cover the frying pan while leaving open a small space for the steam to escape.

***Atchara or Atcharang Papaya is basically pickled julienned or grated green papaya and soaked for a week in cooked vinegar and sugar mixture with onions, garlic, ginger, pepper corn, and red bell pepper.

BON APPÉTIT

– Ally xx

myTaste.com

Graduation Day Lemon Curd Cupcakes

Graduation Day Lemon Curd Cupcakes

Hello Everyone! Today is the day! Today is the day that certifies that I am no longer a student, and I am officially unemployed! Today is the day that I receive a piece of paper worth AUD$110,000 of tuition fees to say that I have completed my 4-year Bachelor of Design degree! Today is Graduation Day!

It’s supposed to rain today – great. I have the last time slot which means that instead of a nice sunny graduation day, it’s gonna be dark and cold, if the rain decides to dawn upon my ceremony. Yesterday I kept sneezing, and I know that when that starts to happen, a fever, and eventually a cough and sore throat will follow. Not much luck today as far as I can see, and it’s only 8:45 in the morning as I am writing this paragraph. The good news is, I feel fine so at least I can stop worrying about getting sick – I just hope that the sun pops out for a while, while it’s still bright out in the afternoon before my ceremony at 6:30pm.

UNSW Graduation Day 2015


UNSW Graduation Day 2015

So anyway, it actually stopped raining when I arrived on campus at around 4:15pm – praise the Lord! The cloud didn’t clear up so it was still grey and gloomy. Oh well, at least we weren’t wet from the rain. It got dark really quick though and therefore photos were not as great 😦 All in all, a fun evening seeing friends, and graduating with fellow design mates; a little nerve-wrecking as I kept thinking that I was going to be THAT ONE student who would trip and fall flat on my face. Thank God I didn’t, and neither did anyone else who graduated tonight.

Graduation Day Lemon Curd Cupcakes

I picked to bake tonight’s recipe mainly because of the colours that represent the University of New South Wales, which is Black and Yellow/Gold. Enjoy!

Graduation Day Lemon Curd Cupcakes Ingredients

PREP TIME 20 MINS | COOKING TIME 18-20 MINS | MAKES 12 CUPCAKES

INGREDIENTS

  • 1 & 1/2 cups plain flour
  • 3/4 cup caster sugar
  • 3/4 cup lemon curd
  • 1/2 cup milk
  • 110g unsalted butter, at room temperature
  • 3 tbsp fresh lemon juice
  • 2 large free range eggs
  • 1 & 1/2 tsp baking powder
  • 1 tsp vanilla extract
  • 1/2 tsp salt
  • Icing sugar for dusting
  • Zest of one large lemon

METHOD

  1. Preheat oven to 180C (350F or gas mark 4). Line a 12 hole muffin pan with paper cases and set aside.
  2. Whisk the plain flour, baking powder, and salt together in a medium-sized bowl, and set aside.
  3. In a small bowl, combine the sugar and lemon zest. Rub together with your fingers until fragrant.
  4. Using a hand-held electrical mixer, beat the butter and sugar mixture together until light and fluffy, and lightened in colour (about 8 minutes). Scrape down the sides of the bowl with a rubber spatula in between mixing.
  5. Add the eggs one at at time, beating after each addition. Then add in the vanilla extract.
  6. Add the flour mixture and milk alternately, starting and ending with the flour. Mix until the flour is just incorporated and be careful as to not over mix the batter. Mix in the lemon juice.
  7. Divide batter evenly in prepared cupcake liners, filling each case 2/3 of the way full. Bake the cupcakes for about 18-20 minutes or until a toothpick inserted in the centre of the cake comes out clean. Transfer the pan to a wire cooling rack and cool completely.
  8. Once the cupcakes have completely cooled down, using a knife, cut out a small hole in the centre of the cupcake, about the size of a dime. Carefully remove the centre piece and set aside.
  9. Fill each hole with about 1 teaspoon of lemon curd and dust with a bit of icing sugar.
  10. Share with family and friends, and enjoy!

Graduation Day Lemon Curd Cupcakes Process

Graduation Day Lemon Curd Cupcakes

BON APPÉTIT

– Ally xx

myTaste.com

Tortang Talong (Eggplant Omelette)

Tortang Talong (Eggplant Omelette)

Hello Everyone! I’m now back in Cedar Vale, QLD after spending two nights in the city. I must say that it’s very quiet in comparison to Sydney. Quiet is nice, but it’s almost just too quiet to what I am used too, for a city that is! Anyway, I caught up with some high school friends over a heck load of food last night, two of the three of them which I hadn’t seen since graduating IB five years ago. Good company over good food(s) makes for a great night out in the quiet city.

Tomorrow we commemorate 117 years of the Philippine Declaration of Independence from Spain on June 12, 1898. In honour for tomorrow, I will be making a loved Filipino dessert for a BBQ we have happening here in the countryside – Leche Flan! And tonight I am posting a very simple, yet very tasteful dish that you can have for either lunch or dinner; Tortang Talong, or in English, Eggplant Omelette.

Process

Tortang Talong (Eggplant Omelette) Process

Tortang Talong are grilled eggplants are soaked in a beaten egg mixture and then fried; as simple as that. It’s the grilled flavour of the eggplant that really hits the spot right there. I usually don’t season it with any salt or pepper as I accompany the omelette with some sautéd shrimp fry which is already very salty on its own. Otherwise, feel free to season it if you don’t fancy a side of shrimp fry!

Definitely good for those who are in a hurry or on a tight budget; you can grill several eggplants in advance and keep them in the fridge for up to 3 days, or in a freezer for several months. Easy peasy. I definitely think that its best served with some steamed rice, shrimp fry, or ketchup should do the trick! My mom usually makes these eggplant omelettes to accompany a pork belly stir-fried in the shrimp fry dish or a dish of kare-kare. For this particular time, we had them with steamed blue swimmer crabs because we bought them fresh from the market that day and we were in the process of cleaning out the fridge since we were about to travel here in Australia; at the time we had eggplant in the fridge!

Tortang Talong (Eggplant Omelette) Ingredients

PREP TIME 1 HOUR | COOKING TIME 20 MINS | SERVES 4

INGREDIENTS

For the eggplant omelette

  • 4 medium-sized lebanese eggplans
  • 4 large free range eggs
  • Ground salt and pepper (optional)

For the sautéed shrimp paste

  • 345g bagoong alamang (shrimp paste)
  • 3 garlic cloves, crushed then minced
  • 2 large tomatoes, diced
  • 2 red bird’s eye chillies, halved
  • 1 large onion, halved and then sliced
  • 1 tbsp sugar

METHOD

  1. Sautéd shrimp paste: Heat oil in a medium-sized frying pan and sauté garlic and onions until fragrant. Add the tomatoes in together with the chillies and sauté until they have softened. Add the shrimp paste in and give it a good mix. Add in the sugar and let it simmer for about 5 minutes. Turn the heat off and set aside. You may need to heat it up again before serving.
  2. Eggplant omelette: Grill the eggplants until the colour of skin turns almost black. Let the eggplants cool for a while before peeling off the skin. Set aside.
  3. Crack one egg per grilled eggplant into a deep dish and beat. Add the eggplant to the beaten egg mixture and flatten using a fork.
  4. Heat oil in a medium-sized fry pan over medium-high. Pour the egg mixture together with the eggplant into the pan and fry for about 4-5 minutes per side.
  5. Serve with steamed rice and the sautéd shrimp fry. Enjoy!

Tortang Talong (Eggplant Omelette)

BON APPÉTIT

– Ally xx

myTaste.com

Chicken Sopas

Chicken Sopas

Hello Everyone! I am now in the Sunshine State of Queensland where I spent the weekend at a family friend’s farm in the countryside of Cedar Vale, near Jimboomba. They have a lovely country home with about 4 acres of land, and an alpaca(!), a donkey, three goats, and six chickens. Today, my family and I caught the bus to the city of Brisbane where we will be staying for 2 nights before heading back to the country and then to the Gold Coast for a day. Anyway, it’s actually already late here, I mean past 11pm isn’t late, but I need to go to bed and start early tomorrow as we are spending the day at Lone Pine Koala Sanctuary! Finally after 5 years in Australia, I get to cuddle a koala and feed kangaroos! So I’ll keep tonight’s post short so I can get as much z’s as I can.

Chicken Sopas Ingredients

Tonight’s recipe is a Filipino classic; a soup dish made of shredded boneless chicken, macaroni noodles, a bit of milk, and some vegetables to flavour the dish. This dish is actually common for breakfast or a snack time treat during cold and rainy seasons. The difference between a regular chicken soup and a chicken sopas is the use of milk, either fresh or evaporated for a richer flavour. Other meats besides chicken can be added to the dish, such as diced hotdogs or luncheon meat in some recipes, and also chicken liver. I think my Mom has made a sopas dish with chicken liver before; didn’t fancy it. Play with the ingredients if you wish – the pasta and vegetables may also vary so feel free to use the appropriate ingredients in which you desire!

Note: If anywhere you see ‘soaps’ instead of ‘sopas’, it’s not a typo, it’s autocorrect and I’m a bit tired to go through and change them if you see any beyond this point – it’s happened to the first two above and I managed to go back and change those; but otherwise Chicken Soaps sounds like an intriguing dish! Also, on the ingredients photograph, you will notice the chicken wings. We actually used chicken spare ribs in this recipe but my Mom was insistent on photographing the wings because it looked ‘prettier’ than the ribs.

Chicken Sopas Ingredients

PREP TIME 20 MINS | COOKING TIME 20 MINS | SERVES 4

INGREDIENTS

  • 500g chicken spare ribs, washed and cleaned
  • 250g tri-colour shells
  • 2 cups water
  • 1 cup fresh milk
  • 3 small red onions, thinly sliced
  • 2 cloves garlic, crushed and minced
  • 1 small carrot, julienned
  • Half head cabbage, roughly chopped
  • Ground salt and pepper to taste

METHOD

  1. Heat oil in a large pot and sauté the garlic until golden brown. Add in the onions and cook until soft, about 2 minutes. Add in the chicken ribs, seasoning with salt and pepper. Give it a good mix and then let it cook for about 10 minutes, checking and mixing regularly to avoid the chicken meat sticking to the bottom of the pot.
  2. Add in the water and bring it back to a boil. Once boiling, add in the shells and cook according to packet instructions, mine took about 10 minutes.
  3. About 5-6 minutes into the 10, add the carrots and cabbage. Continue cooking until pasta is tender. Add in the milk and turn the heat off.
  4. Serve hot and enjoy!

Chicken Sopas

BON APPÉTIT

– Ally xx

myTaste.com

Goong Ob Woon Sen (กุ้งอบวุ้นเส้น)

Goong Ob Woon Sen (กุ้งอบวุ้นเส้น)

Hello Everyone! Tonight’s recipe is actually quite different from a traditional Goong Ob Woon Sen (Prawns and Glass Noodles in Claypot), only because my Auntie taught my Mom how to cook it very differently. I only knew that it was different when I looked up the Thai name for this dish before I started to write this post and saw other recipes that used bacon, and other ingredients to make up the broth/sauce.

Goong Ob Woon Sen (กุ้งอบวุ้นเส้น) Ingredients

Oh well. Also, you would whip up this recipe in a claypot, but since we didn’t have one, we cooked it in a regular frying pan. Actually, we remembered that my Auntie had one, and so we borrowed it and transferred the prawns and glass noodles to the claypot for the presentation. Anyway, the dish was nevertheless still delicious, but I bet would taste even better with the bacon in it – because who doesn’t love bacon?

Goong Ob Woon Sen (กุ้งอบวุ้นเส้น) Ingredients

PREP TIME 20 MINS | COOKING TIME 15 MINS | SERVES 4

INGREDIENTS

  • 750g tiger prawns, washed, cleaned, and deveined
  • 500g glass noodles
  • 2 cups chicken broth, hot
  • 2 inch ginger, thinly sliced
  • 2 tbsp vegetable oil
  • 1 tbsp light soy sauce
  • 1 heaped tbsp whole black peppercorns
  • 1 tsp annatto powder
  • 1 tsp chicken stock powder
  • Fish sauce to taste, optional
  • Fresh coriander, cut into 1-inch lengths

METHOD

  1. Heat vegetable oil in a large frying pan and fry the garlic, ginger, black peppercorn until fragrant. Add in the prawns together with the chicken stock powder; mix and let to cook for about 2-3 minutes. Remove from the prawns pan, leaving the garlic, ginger slices, and peppercorns in the pan. Set the prawns aside.
  2. Dissolve the annatto powder in the hot chicken broth and pour into the same frying pan. Bring to a boil before adding in the glass noodles. Cook the noodles in the broth until they start to soften.
  3. Place the prawns back into the frying pan, together with the coriander and fish sauce (if you need to season it a bit more) and cook until the noodles have absorbed the gravy, about 5 minutes.
  4. Once done, turn the heat off an transfer to a claypot. Garnish with some more coriander and serve hot. Enjoy!

Goong Ob Woon Sen (กุ้งอบวุ้นเส้น)

PS: On the train home from Melbourne City to Cranbourne, I was going through my Instagram feed and saw that Thanis Lim also made Ob Woon Sen with a twist, adding clams instead of prawns. Maybe I will give this recipe a try, using bacon and cooking it the traditional way for next time!

BON APPÉTIT

– Ally xx

myTaste.com