The Ultimate Brekkie

The Ultimate Brekkie

Hello Everyone! Back with a quick one since I feel like you guys deserve another upload after being away for so long. Today I wanted to make a really filling and unforgettable brekkie where I can just sit down and enjoy it instead of packing it with me to bring to the office or even just skipping breakfast altogether. Well okay, I ended up having these for lunch after a deserved Sunday sleep in, but breakfast for lunch (even for dinner) is just the best thing ever!

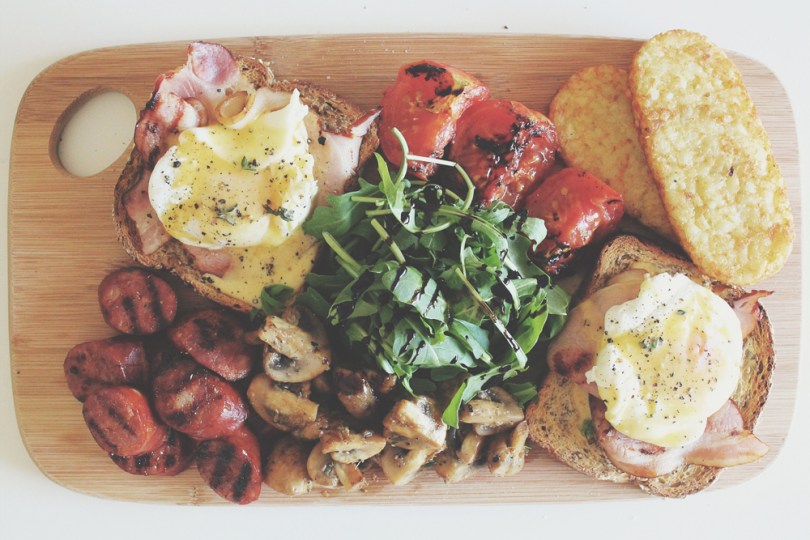
So after my visit to Paper Plane Café 2 weeks ago or so (again as I mentioned in the previous post, I will do a review soon-ish), I really wanted to recreate their breakfast board at home. It looked simple enough to be able to do so just by glancing at the board and even pin-pointing the obvious ingredients. I must say that it was a huge success in the kitchen this morning, even though I may have burnt my balsamic reduction and the other side of the toast, oops! But nonetheless a brekkie so worth the time and effort spent in the kitchen. I invited my housemate Lydia as well for breakfast/brunch/lunch, so basically today’s lunch was a joint effort between the two of us. She’s now a professional chef! Under my guidance and supervision, as well as the Taste recipe being read to her, she made the Hollandaise Sauce all by herself for the very first time to go with the poached eggs. Her sauce was to die for! Apart from that, she helped wash and cut up the tomatoes, mushrooms and chorizo sausages, and also did a fair bit of the cleaning up. I took care of the rest. (This note is for Vidhya – don’t stop reading here, there’s a small paragraph/story at the end of the post!)

The Ultimate Brekkie

PREP TIME 10 MINS | COOKING TIME 30-35 MINS | SERVES 2

INGREDIENTS

  • 2 hash browns
  • 2 hickory-smoked bacon rashers
  • 2 large free range eggs
  • 2 slices of Country Grain bread
  • 2 field grown tomatoes, quartered
  • 1 chorizo sausage, sliced diagonally
  • 250g cup mushrooms, quartered
  • 1 cup balsamic vinegar
  • 2 tbsp fresh lemon juice
  • Handfull of rocket leaves
  • Small thumb-sized ginger, grated
  • Fresh Thyme Leaves
  • Olive Oil

For the Hollandaise Sauce

  • 3 large free range eggs, yolks separated
  • 175g unsalted butter, cut into cubes, at room temperature
  • 2 tbsp water
  • 2 tbsp fresh lemon juice
  • Fresh Thyme Leaves
  • Ground salt and black pepper to taste

METHOD

  1. Preheat oven to 180C. Place the hash browns and slices of bread on a tray lined with baking paper. Drizzle the slices of bread with a bit of olive oil and bake for 10-15 minutes. Turn the oven heat down to about 50C to keep the food warm while you prepare and cook everything else.
  2. Balsamic Reduction: Next, pour a cup of balsamic vinegar in a small saucepan over medium heat. Bring the vinegar to a boil, then turn down the heat down so that the boil reduces to a simmer. Stir occasionally and allow to simmer until the vinegar has reduced by at least half (for a thinner reduction) or more (for a more syrup-like consistency). If you are a hopeless impatient person like me when it comes to food, do not increase the heat at this point! Your reduction may burn and you will be left with a stiff, hardened mess – basically what I did for the first batch of balsamic reduction. I was also stupid enough to try it and see if it was still edible, and it ended up sticking to the front of my teeth (not a very pleasing experience might I add).
  3. Meat, Tomatoes, and Mushrooms: Heat a grill pan over high heat. Add the bacon and chorizo and cook for about 3-4 minutes per side. Place on a dish lined with paper towels to drain the excess oils. Next add the tomatoes and grill for about 3-4 minutes per side as well. Place the bacon, chorizo slices, and tomatoes in the oven to keep warm. Add the mushrooms to the grill pan with a bit of olive oil and sauté for about 2-3 minutes. Add the grated ginger and lemon juice, and cook for a further 3-4 minutes. Sprinkle with fresh thyme leaves and then set aside in the oven to keep warm.
  4. Hollandaise Sauce: While the balsamic reduction is underway and slowly simmering, start on the Hollandaise sauce. Place a heatproof bowl over a medium saucepan that is quarter-filled with water. Make sure that the bowl should fit snugly into the pan without touching the water (lift the bowl to check and remove some water if it does). Bring the water to a boil over high heat, then reduce heat to very low so the water is barely simmering (there should be almost no movement at all). It is important that the water is barely simmering while making the sauce – if it is too hot, the egg yolks will cook too much and the sauce will curdle.
  5. Place the egg yolks and the 2 tablespoons of water in the heatproof bowl and place over the pan. Whisk the mixture constantly for 3 minutes or until it is thick and pale, has doubled in volume and a ribbon trail forms when the whisk is lifted.
  6. Add the butter a cube at a time, whisking constantly and adding another cube when the previous one is incorporated completely (about 10 minutes to add it all in). If butter is added too quickly, it won’t mix easily with the egg yolks or the sauce may lose volume. At the same time, it is important that the butter is at room temperature and added a cube at a time, so that it doesn’t take too long to be incorporated – if the sauce cooks for too long, it can curdle.
  7. Remove the bowl from the pan and place on a heatproof surface. The cooked sauce should have the consistency of very lightly whisked thickened cream. Whisk in the lemon juice, fresh thyme leaves, and season with salt and pepper.
  8. Poached Eggs: Bring small saucepan of water to the boil over medium-high heat, then reduce the heat to low-medium – the water should be just simmering. Add in the vinegar and stir. Crack one egg into a small bowl and quickly, but gently pour it into the water. Repeat with the other egg. A really soft poached egg should take around 2 minutes, but if you want it a bit more firm, it will take about 4 minutes. To check if they’re cooked right, carefully remove the egg from the pan with a slotted spoon and give the yolk a gentle push (you can tell just by your instincts if it is under or overcooked – or perfect)!
  9. Assembly: While the Hollandaise Sauce and Poached Eggs are almost done, assemble your dish, this part is entirely up to you on how you wish to present it. Drizzle your balsamic reduction over your rocket leaves. Use a slotted spoon to carefully remove the eggs from the saucepan. Place on top of the toast and bacon. Then top with a generous amount of sauce to your poached eggs. Crack a little salt and pepper and serve immediately!

While having our lunch, all Lydia could talk about was how good it all tasted. She was already full, but she still wanted to eat more. We also talked about how in cafés you’d get an average dollop of hollandaise sauce, which is sometimes not enough with the amount of serving your get from the rest of the food. We had a whole bowl of it and basically drowned our eggs in them, and had them with everything basically. Also, the best thing about eating at home is that we get to be barbaric in a sense that we didn’t care about using our forks and knives, we ate our toast with our hands and weren’t afraid to have them smothered over the sides of our mouths or dripping down the side of our fingers.

The Ultimate Brekkie

BON APPÉTIT

– Ally xx

myTaste.com

Breakfast Muffins: Bacon, Cheese & Zucchini

Breakfast Muffins: Bacon, Cheese & Zucchini

Hello Everyone! Yes I am back and I do apologise for not posting a recipe or review for over 3 weeks now I think! I’ve been busy, with work, uni, and mainly procrastinating really. I haven’t stopped cooking though, in fact I have quite a few dishes to post – I just haven’t had the time to sit down and actually write a post for it. I know, you’re probably thinking that it’s not so hard writing up a recipe especially if it’s one that I followed from a book or online. Writing up the recipe isn’t the hard part, what’s sort of hard for me is spending time writing about let’s say a back story or just a story in general. I know this is a food blog but I do like to share a few things about myself, or my day/week etc.

Anyway, before I get to today’s recipe post, I just want to update all of you, about what’s been going on lately – also because I think my housemate Vidhya deserves a story to read after she was falsely mislead from my previous post. Now that I think about it, there’s actually nothing much to talk about – I know I have such a boring life! Just kidding! Otherwise I would’ve had all the time in the world to keep this blog updated. I mean, between uni and work, I do go out and see my friends over the weekend. I don’t even think that I’ve spent a lazy weekend at home just sleeping in and doing nothing all day for quite some time.

Breakfast Muffins: Bacon, Cheese & Zucchini

Two weeks ago I had a mid semester break, which really meant that I only had 2 weekdays off from classes because I still had to go in for my internship. And even so, those two days were spent out eating, shopping, and going to the cinema with friends. I went to Parramatta with Marissa and Jialing to check out this place called Paper Plane Café and the trip there was worth it all especially aster we massacred our brunch. I will get into more detail with this when I get around to posting a review on the place. I also recently joined the gym with Jialing! We’ve probably been going for three weeks now, basically just adding exercise into our daily life, toning the muscles, and overall staying fit (we have to burn all the brunches somehow)! I also hosted a dinner party probably 2 weeks ago or so for my COFA friends; a great success in terms of food and laughter. Those were probably the highlights of the past 3 weeks. Oh I almost forgot, the public holiday after the mid semester break, Edison, Jialing, and I had a photo shoot at the Royal Botanical Gardens, well more like Edison needed a new profile picture before he turned 23 and of course asked me to take the photos. Jialing and I had to join in the photo shoot fun of course! This photo shoot happened last week Monday which interrupted Muffin Making Mondays with Jialing and I – which is why we had our muffin session this Monday instead!

Today’s recipe post was actually requested by my mother. She told me she watched a cooking show with Chef Michael Smith in which he made mini bacon and cheese muffins. She told me to give it a go and tell her how it went and if it tasted good or not. I went online and found a recipe from Taste – Bacon, Cheese, and Zucchini Muffins! They taste so good! And I definitely made a few people in the office jealous I think as the smell of bacon travelled around. Jialing on the other hand made Orange, Lemon, and Poppy Seed Muffins – also so good! So good that I think I may make them for our next Muffin Making Mondays. I also baked some Macadamia and White Chocolate Cookies that Monday, but I will save the recipe for another time.

Breakfast Muffins: Bacon, Cheese & Zucchini Ingredients

PREP TIME 10 MINS | COOKING TIME 22 MINS | MAKES 12 MUFFINS

INGREDIENTS

  • 4 hickory-smoked bacon rashers, diced
  • 2 eggs, lightly beaten
  • 1 cup milk
  • 1 cup plain flour
  • 1 cup self-raising flour
  • 1/2 cup tasty cheese, grated
  • 1/2 cup zucchini, grated
  • 1/4 cup vegetable oil
  • 1 tsp baking powder
  • 1 tsp olive oil

METHOD

  1. Preheat oven to 190C. Line a 12 hole muffin pan with paper cases.
  2. Heat olive oil in a frying pan over medium-high heat. Add the bacon bits and cook for 5 minutes or until crisp. Once crisp, transfer the bacon bits to a dish lined with paper towels to drain off all the excess oils. Allow to cool.
  3. Meanwhile, squeeze the excess liquid from zucchini, this will prevent your muffins from becoming soggy. Tip, place the grated zucchini in a clean tea towel and squeeze – otherwise you can also just use your hands like what I did, working in small batches.
  4. Sift flours and baking powder into a bowl and make a well in the centre. Add in the vegetable oil, milk, and egg. Mix well until combined, and then fold in bacon, cheese, and zucchini.
  5. Spoon the mixture between the paper cases (makes 12 muffins). Bake for 20 to 22 minutes or until golden and just firm to touch. Stand in pan for 5 minutes and then transfer to a wire rack to cool.

Breakfast Muffins: Bacon, Cheese & Zucchini

Breakfast Muffins: Bacon, Cheese & Zucchini

BON APPÉTIT

– Ally xx

myTaste.com

Breakfast Muffins: Banana & Cinnamon Crumb Top

Breakfast Muffins: Banana & Cinnamon Crumb Top

Hello Everyone! Sorry for not posting in a while, and I’m pretty sure my regular followers should know by now the reason for it. Just because I haven’t been uploading, doesn’t mean that I’ve stopped cooking and experimenting in the kitchen. I actually have three dishes that are waiting to be posted (basically I have the photos, I just haven’t had the time to do a write up). I know for sure that I have a handful of readers out there (or maybe just Vidhya), who actually like reading this part of the post. She was upset that the last post I made was short and had no back story. Well, I guess I won’t disappoint her here!

Anyway, today’s recipe is part of what I think will start becoming a regular thing, which is Muffin Making Monday’s (fortnightly) with Jialing. For those of you who don’t know Jialing (and basically haven’t read ANY of my previous posts because her name comes up almost ALL the time), she started this whole idea of making muffins on Monday’s because she wanted to be able to have a quick breakfast, be it at home or at the bus stop, or even at work. Since she doesn’t have an oven at home, she asked if she could bake at my place. That’s when I thought, what a great idea for breakfast on the go, because as you may/may not know, I am pretty bad at breakfast – meaning that I just altogether skip breakfast and go straight to brunch/lunch. Also, I wasn’t just going to sit around and watch her bake muffins, so I decided to bake a batch myself.

Breakfast Muffins: Banana & Cinnamon Crumb Top

Two weeks ago I made a batch of savoury muffins with Prosciutto & Chives, while Jialing made a sweet batch with Apple, Pear, and Sultanas. Yesterday we unintentionally switched and this time I made a batch of sweet muffins with Banana & Cinnamon Crumb Top, while Jialing made a batch with Turkey, Pesto, Sun-dried Tomatoes, and Cheese. I followed a recipe from allrecipes, and I think I might recommend adding a little less salt than said because I found my muffins just a tad salty. Who doesn’t? Otherwise, the result was amazing! Tasted really good, especially the crumb topping! Which also reminds me, I added a tad more cinnamon because I LOVE cinnamon. I didn’t realise how much these muffins were going to rise – I didn’t even peak through the oven door while they were cooking because I was busy washing up all the bowls and utensils that Jialing and I used. So to my surprise, when my timer rang and I looked at them I said out loud and in a shocking tone “OH MY GOD! THEY ARE SO FAT!” It was pretty hilarious, and priceless might I add.

Breakfast Muffins: Banana & Cinnamon Crumb Top Ingredients

PREP TIME 5 MINS | COOKING TIME 18-20 MINS | MAKES 12 MUFFINS

INGREDIENTS

For the muffin batter

  • 3 large bananas, mashed (plus one extra banana, sliced)
  • 1 & 1/2 cups plain flour
  • 1 egg, lightly beaten
  • 3/4 cup white sugar
  • 1/3 cup unsalted butter, melted
  • 1 tsp baking powder
  • 1 tsp baking soda
  • 1/4 tsp salt

For the crumb topping

  • 30g unsalted butter, chilled and cut into cubes
  • 1/3 cup packed brown sugar
  • 2 tbsp plain flour
  • 1/2 tsp cinnamon

METHOD

  1. Preheat oven to 190C. Lightly grease a muffin tray, or line with muffin paper cups.
  2. In a large bowl, mix together the flour, baking powder, baking soda and salt. In another bowl, beat together the bananas, sugar, egg, and melted butter. Stir the banana mixture into the flour mixture until moistened. Spoon the batter into the prepared muffin cups, about 2/3 of the way full.
  3. In a small bowl, mix together the brown sugar, flour, and cinnamon. Add the cubed butter and using your finger tips, quickly mix the ingredients together until looks like rough bread crumbs. If your mixture is too warm, put the bowl into the refrigerator for 15 minutes and start again when it has chilled.
  4. Sprinkle the crumb topping over the muffin batter and top with a slice of banana.
  5. Bake in preheated oven for 18 to 20 minutes, or until a toothpick inserted into center of a muffin comes out clean.  Makes about 12 muffins.
  6. Store any leftovers in the fridge and remember to warm slightly before serving.

Breakfast Muffins: Banana & Cinnamon Crumb Top

Breakfast Muffins: Banana & Cinnamon Crumb Top

BON APPÉTIT

– Ally xx

myTaste.com

Baked Eggs with Chorizo & Red Capsicum

Baked Eggs with Chorizo & Red Capsicum

Hello Everyone! So I actually cooked up these bad boys over the weekend for a lovely Sunday brunch. I honestly did not intentionally make it look like a face – it just so happened that when I pulled them out of the oven and was taking photos of the outcome did I realise it was smiling back at me. A happy Sunday indeed (even though it’s like Thursday already). Also, don’t forget to check out the original recipe on SBS.

Baked Eggs with Chorizo & Red Capsicum Ingredients

PREP TIME 5 MINS | COOKING TIME 20-25 MINS | SERVES 4

INGREDIENTS

  • 250ml tomato passata
  • 4 free range eggs
  • 2 cloves garlic, diced
  • 1 chorizo sausage, sliced
  • 1 brown onion, diced
  • 1 red capsicum, cut into slices
  • 1 bay leaf
  • 2-3 tbsp olive oil
  • Ground sea salt and pepper to taste

METHOD

  1. Preheat oven to 200C.
  2. In a small frypan, heat the olive oil over medium heat and gently sweat the onions and garlic. Add the sliced capsicum and cook for another 4–5 minutes to soften them a bit.
  3. Add the chorizo slices to pan with the vegetables and stir to cook until the capsicum and onions are really soft. Add the bay leaf, passata, and a splash of water. Cook for a further 10-15 minutes. Season with salt and pepper.
  4. Transfer the sauce to 4 individual shallow ramekins and crack an egg in each. Bake for about 5–10 minutes, or until the eggs are cooked to your liking. Serve immediately with a side of soldiers.

Baked Eggs with Chorizo & Red Capsicum

BON APPÉTIT

– Ally xx

myTaste.com

Breakfast Muffins: Prosciutto & Chives

Breakfast Muffins: Prosciutto & Chives

Hello Everyone! So as you all probably know by now by mentioning it in previous posts, I am interning at a company know as Hello Social three times a week from 9am-5pm. On top of that, I have two days of classes, both of which start at 9am as well. This means that I really only have my weekends of having the pleasure of snoozing my alarm and enjoying a good sleep in – which is usually 1-2 hours after my alarm goes off. Having 9am starts 5 times a week is starting to get exhausting. Last week I started snoozing for an extra 10 minutes and I actually cannot believe what an impact those 10 minutes have had; basically a domino effect. Getting up 10 minutes later made me found myself debating whether I should still sit down and have a quick breakfast, or just head out immediately to get to uni/work on time. I ALWAYS choose breakfast. Choosing breakfast meant that I would miss the buses that I usually catch, and would have to wait an extra 10 minutes at the bus stop (and even sometimes the buses that do come 10 minutes later are packed that I end up waiting an extra 3-5 minutes for one that is not full). Extra waiting time last week meant that I was either 10 minutes late to class, or that I would have to race through the packed city and pedestrian crossings to get to work on time – practically two things I hate; being late and running.

Sometimes I wish that my Mom was here with me. I miss the days where I would still be able to snooze a few extra minutes, get ready and come down to have a decadent breakfast ready for me, and the same goes for lunch and dinner. Now when I get up in the morning and get ready, I still have to prepare a simple breakfast (usually toast or cereal). I sound like such a princess, but I really do miss having everything ready, and fresh from the stove too!

Breakfast Muffins: Prosciutto & Chives

So how do I solve this issue of needing and wanting breakfast without being late or having to race through the morning? Easy. BREAKFAST MUFFINS ON THE GO. Now, this wasn’t my idea to begin with. On Saturday, while shopping with Jialing and Lydia, Jialing mentioned that she wanted to come over and make breakfast muffins so that she could start either taking them to work or eating them while waiting for the bus – and I thought, what a great idea? I mean, I wasn’t just going to watch her bake muffins at my place knowing that I wouldn’t have a batch for myself, so I decided to make some too and they are so great! I snoozed an extra 10 minutes, got ready, grabbed my muffins and lunch, and got to work with still about 15 minutes to spare (the thing about getting into the city before 9am is that I am either super early, or super late because of the bus schedules and everyone wanting to go into the city at the same time, so obviously super early is the better option). Got to work and still had 15 minutes to eat my muffins. I made a few other interns jealous of the delicious smell circulating the office though!

I might start a series on Breakfast Muffins for this blog for those who think they might find this helpful – I mean, day 1 and I am already finding it super helpful! Since I get off from uni at 12pm on Monday’s, I basically have the whole afternoon to make these muffins to last the working week. So, enough babbling, let’s get on with the recipe! But first, please do check out the original recipe on the kitchn.

Breakfast Muffins: Prosciutto & Chives

PREP TIME 10 MINS | COOKING TIME 30-35 MINS | MAKES 12 MUFFINS

INGREDIENTS

  • 4 large free range eggs
  • 75g prosciutto, roughly chopped
  • 1 cup almond meal (the one I bought from the store had quinoa in it)
  • 1 cup cottage cheese
  • 1/2 cup Parmesan cheese, grated
  • 1/4 cup chives, finely chopped
  • 1/4 cup water
  • 1/4 cup whole wheat flour
  • 1 teaspoon baking powder
  • 1/2 teaspoon smoked paprika
  • 1/4 teaspoon salt

METHOD

  1. Preheat oven to 200C. Grease the muffin tray with a little bit of butter and line each hole with baking paper (the butter will help it hold in place while you prepare your batter).
  2. Whisk the cottage cheese, Parmesan cheese, eggs, and water together in a large bowl. Then add the flour, almond meal with quinoa, baking powder, smoked paprika, and salt. Whisk until no lumps remain.
  3. Fold in the prosciutto and chives, whisking one more time if necessary to break up the clumps of prosciutto.
  4. Then, divide the batter between the muffin cups and bake for about 30 to 35 minutes or until puffed and golden brown. Makes about 12 muffins.
  5. Store any leftovers in the fridge and remember to warm slightly before serving.

Breakfast Muffins: Prosciutto & Chives

BON APPÉTIT

– Ally xx

myTaste.com

Homemade Salted Caramel Sauce

Homemade Salted Caramel Sauce

Hello Everyone! I’ll keep this short and to the point today, to compensate for a rather long post yesterday. Also only because I don’t have an amazing back story to tell! I mean, it’s just Salted Caramel Sauce really. Don’t forget to check out the original recipe at American Heritage Cooking where dubbed the BEST Salted Caramel Sauce.

Homemade Salted Caramel Sauce Ingredients

PREP TIME 2 MINS | COOKING TIME 10 MINS | MAKES 1 JAR

INGREDIENTS

  • 2 cups granulated sugar
  • 170g unsalted butter, room temperature and cut into pieces
  • 1 cup double cream, at room temperature
  • 1 tablespoon sea salt rocks

METHOD

  1. In a small saucepan, melt the sugar over medium-high heat, stirring frequently to avoid burning. Once all the sugar has melted, watch your caramel carefully, swirling the pan occasionally.
  2. As soon as the sugar turns amber in colour add the butter and whisk vigorously until all the butter has melted.
  3. Remove the pan from the heat and slowly pour in the cream while whisking vigorously until the cream is incorporated well, and then whisk in the sea salt rocks.

Now, the salted caramel in this recipe was used for Lydia’s birthday cake (which I did a post on yesterday). If you are making this sauce to keep for other recipes, set the sauce aside to cool for 15 minutes prior to pouring it into a glass jar, that has been sterilised, to cool completely. You can then refrigerate the sauce for up to 2 weeks, but remember to warm it up before using.

Homemade Salted Caramel Sauce

BON APPÉTIT

– Ally xx

myTaste.com

Layered Chocolate & Salted Caramel Cake

Layered Chocolate & Salted Caramel Cake

Hello Everyone and welcome back to reading another blog post! So this recipe was actually made (and consumed) yesterday, but I would like to take this opportunity to tell you all what the cake was for. Basically last week when Jialing and I were having our lava cake bake off session, Lydia asked if I was free next week (which was yesterday), to make a chocolate cake for her birthday (which is today, Sunday). So first off, Happy 21st Birthday once again to my housemate and friend, Lydia! So on Thursday, I was going through chocolate cake recipes to make, and I came across this one on Taste. Chocolate and Salted Caramel – the ultimate flavour sensation! Jialing, and most specifically the birthday girl, were happy with this selection. So Saturday morning, Lydia and I met up with Jialing at Kingsford, had a gigantic lunch, and then headed over to Maroubra Junction to do our grocery shoppings, and also of course cake ingredient shopping. While shopping – may I just point out, we saw a tub of ready made salted caramel. We debated over whether we should just buy one, and I made the call to just make our own caramel – I mean why not? We were already making the cake from scratch!

Got home and immediately started on the cake because we knew it was going to take a while. Of course, Lydia was on dry ingredient duty, Jialing took over the wet, while I helped Lydia with the dry. Popped the mixture in the oven, and then it was onto the salted caramel. Seriously, so many problems with this, but nonetheless, it tasted #amazeballs. Also, while I was working on this, Jialing and Lydia started to prep the frosting for the cake. Also, somewhere in-between all that, Vidhya, our acting supervisor (not really) sat around and watched the chaos unfold in the kitchen – okay she did help a little bit as well before going back to sleep again (after having just woken up from her slumber). It was then more or less time to take the cakes out of the oven, left to cool, and then assemble! We assembled the first two layers and then, disaster struck. Our top layer wasn’t cooked all the way through so we had to pop it back into the oven. Once we got it out of the oven, we still had to wait for it to cool down. While that was happening, we left everything to where it was and headed out to get a take out dinner. We were so engrossed in our cake making session that we totally forgot about dinner! So went to the Indian place nearby and got dinner for 6 – by then Abdullah, Marissa, and Vidhya (when she woke up) joined us.

Layered Chocolate & Salted Caramel Cake

We then assembled the cake. Once that was done and over with, we had Vidhya distract Lydia so that we could put candles on her cake (which by the way she was not expecting). It was hilarious because whatever Vidhya needed doing was basically a one-man job turned two/three person job just to keep Lydia distracted and away from the dining room for a bit. When she finally walked back into the dining room, she was SO happy and even had a little jump/skip when she saw the candles on her cake. Priceless moment. We then took photos, sang happy birthday, had more housemates join us, ate cake, drank wine, and had a good time. So yes, if you took the time to read all that, thank you! And if you are just here for the recipe, fear not, it begins here…


Layered Chocolate & Salted Caramel Cake Ingredients

Layered Chocolate & Salted Caramel Cake Ingredients

PREP TIME 20 MINS | COOKING TIME 30-35 MINS | SERVES 8-10

INGREDIENTS

For the cake

  • 2 cups plain flour
  • 1 & 1/2 cups self-raising flour
  • 1 & 1/2 cups buttermilk
  • 1 & 1/4 cups caster sugar
  • 1/2 cup cocoa powder
  • 1/2 cup vegetable oil
  • 395g can caramel*
  • 4 free range eggs
  • 2 tsp vanilla extract (or 1 tsp if using concentrated extract)
  • 1 & 1/2 tsp sea salt rocks
  • 1 tsp baking soda
  • Sea salt rocks, to decorate (optional)

For the chocolate frosting

  • 400g dark chocolate, melted and cooled
  • 250g unsalted butter, softened
  • 1/2 cup icing sugar, sifted
  • 1/4 cocoa powder, sifted

*If you read all of the above before scrolling down to the recipe, I actually made my own salted caramel which I will be uploading the recipe to tomorrow (hopefully), so stay tuned for that!

METHOD

  1. Preheat oven to 180C. Grease three 9″ round disposable aluminium tins (we didn’t have cake pans to work with so we bought these instead, and since they came in a pack of three, we made a three-layer cake instead).
  2. Sift flours, sugar, cocoa, baking of soda and 1/2 teaspoon of salt into a large bowl. Add in the eggs, buttermilk, oil, vanilla extract, and 1 cup cold water. Combine using a spatula. Then, using and electrical mixer, beat the mixture over medium speed for 3 to 4 minutes or until the mixture is smooth.
  3. Divide the batter between the tins and bake for 30 to 35 minutes or until a skewer inserted in the centre comes out clean. Stand in pans for 5 minutes before turning them out onto a wire rack to cool.
  4. Meanwhile, gather ingredients for your salted caramel while waiting for your cakes to cook (if making from scratch).
  5. Chocolate Frosting: Whisk the cocoa powder and 1/4 cup of warm water in a bowl until the cocoa powder has dissolved. Meanwhile, using an electric mixer, beat butter and sugar until pale and fluffy. Beat in the melted chocolate, then cocoa mixture until combined.
  6. Using a serrated knife, trim tops of cakes. Then, transfer the base of 1 cake to a plate. Spread with 1/3 of the caramel. Top with another cake layer and spread with 1/2 of the remaining caramel. Repeat layering with 1 cake layer and remaining caramel mixture. Top with remaining cake layer. Spread top and sides of cake with chocolate frosting. Serve!

Layered Chocolate & Salted Caramel Cake

Layered Chocolate & Salted Caramel Cake

You can’t really see the layers of caramel in-between because while we were assembling we realised that the top layer wasn’t cooked all the way through. So while waiting for that to bake away in the oven, on top of getting take out and eating dinner, the caramel that was on the other layers of cake either seeped into the cake or dripped over the sides. Sad times, but still oh so decadent in flavour!

Happy Birthday Lydia

Once again, Happy Birthday Lydia! ❤

BON APPÉTIT

– Ally xx

myTaste.com

Red Velvet Chocolate Lava Cake

Red Velvet Chocolate Lava Cake

Hello Everyone! Back with another recipe for you! I know right? It’s a weekday and she’s actually uploading a post? If you read yesterday’s post, I mentioned that I had a baking session with my good friend/lover Jialing. What happened was that she was feeling bait down that she couldn’t do the internship that she really wanted due to requirement issues with our University – and so she contacted me and basically wanted to bake a chocolate lava cake to drown her sorrows in. So, we decided to do that! I suggested that we make a red velvet lava cake – drooled instantly as I made that suggestion. So Sunday we met up at the grocers and bought our ingredients for it. While shopping, Jialing decided that she wanted to make a dark chocolate lava cake, and bought ingredients for those too. Lava cake bake-off!

Red Velvet Chocolate Lava Cake

This was my first time trying out this recipe and I don’t particularly like making lava cakes because I always end under either undercooking it, or overcooking it until it’s rock solid and dry. Jialing’s dark chocolate lava cakes were slightly overdone and not very molten, while mine on the other hand were slightly undercooked – the sides were perfect, but the tops (as in when you invert them) weren’t cooked at all, even when they were in the oven for the maximum amount of time they should be in. Nonetheless taste and texture were spot on – and in my opinion made the presentation of the dish more dynamic! Please check out the original recipe on The Dinner Pages. I SO wanted to make the cream cheese ice cream, but I didn’t have an ice cream maker so I mean, store bought Cadbury vanilla ice cream did wonders as well anyway!

Red Velvet Chocolate Lava Cake Ingredients

PREP TIME 10 MINS | COOKING TIME 15-18 MINS | SERVES 4

INGREDIENTS

  • 1 cup white chocolate buttons
  • 85g unsalted butter, plus extra for greasing
  • 1/2 cup plain flour
  • 1/3 cup white sugar
  • 1/4 cocoa powder
  • 2 large free range eggs
  • 2 tsp red food colouring
  • pinch of salt

METHOD

  1. Preheat oven to 200C. In a microwave safe bowl, melt the white chocolate and butter until smooth, at intervals of 20-30 seconds to prevent the mixture from burning (approximately 2 minutes altogether). Grease the moulds with the extra butter.
  2. Add in the cocoa powder and sugar to the white chocolate and butter mixture. Stir until well combined.
  3. Beat the eggs in a medium-sized mixing bowl. Add in the chocolate mixture in small amounts, stirring together to allow the eggs to warm slowly (temper) and avoid scrambling. Add in the remaining chocolate batter in small amounts as well and stir until fully combined.
  4. Stir in the red food colouring, flour, and pinch of salt until well combined. Then divide the batter amongst the 4 well greased moulds (should go up to about 3/4 of the way).
  5. Bake for 15 minutes (or as I found that my cakes didn’t quite cook at the top, add an extra 2 minutes, maybe).
  6. Remove from the oven and run a knife around the edges right away. Invert each mould onto an individual serving plate and let sit for 2 minutes, then carefully lift up the mould. Top with vanilla ice cream to serve.

Red Velvet Chocolate Lava Cake

I mean, look at that gloss on the lava! So much loves!

BON APPÉTIT

– Ally xx

myTaste.com

Blueberry & White Chocolate Pancakes

Blueberry & White Chocolate Pancakes

Hello Everyone! Again apologies for the lack of posts, but I already explained my situation in the last post so I won’t be going through all that again! Anyway, apologies as well as this post was supposed to go up last night but I got so caught up in the kitchen the whole day from morning to afternoon, and night. Basically cooking all day long, firstly because I promised my housemate pancakes, and promised Jialing a baking session to drown her sorrows in, and then an impromptu homemade dinner session with Jialing as well. Recipes will be posted hopefully within the next few days, if I can get them all written up by tonight and just post over the coming days. I was also helping my lover Jialing to prepare her for her interview today, and also helped a fellow housemate with his internship application. The night flew by so quickly that it was way past midnight – I hadn’t written a post, and I needed to go to bed for an early 9am start. But don’t worry, because here it is now for you!

So, I actually promised my housemate Lydia that I’d make pancakes for her for breakfast on Saturday morning, but because I had a pretty rough night on Friday/early morning Saturday, I didn’t end up making pancakes for her. Long story short – it was a friend’s birthday party, things got out of hand, ended up spending my early weekend morning in the hospital until 3:45am. Don’t be alarmed! I was totally fine and sober (even after so many drinks, more than I thought I could handle), it was my friend who was totally out of it and I stayed by her side and made sure she was okay.

Blueberry & White Chocolate Pancakes

Anyway, so yes, pancake making day was pushed to yesterday morning. It was a great success in my opinion – especially since that this was the first time I was trying out this recipe, I mean, I’ve made my fair share of pancakes before, but not particularly with blueberries and white chocolate. So a little back story (because I know a few people out there who enjoy a few creative words on my posts), my housemate Lydia was trying to flip pancakes one night, prepping for breakfast the next day of course, and her pancakes crumbled. She got a few good ones though, but all in all she labelled them as fail pancakes. So the next time she made pancakes again… Well, it was hilarious! Basically we were having lunch together one day or more like our lunch times crossed at one point because I finished eating before her and I went back to my room. To my surprise when I came back down, I saw her in the kitchen and she was flipping pancakes. I asked her how she was going with them, and she replied “not so good. I actually waited for you to go upstairs so you wouldn’t see my fail pancakes!” How cute! So funny!

So basically, I decided to show Lydia how to flip pancakes yesterday. She tried, but still couldn’t flip them – so we made a deal that she will, by the end of the semester, be able to flip pancakes properly and cook me some! She did however participate in the making process – she was in charge of measuring out the dry ingredients while I worked on the wet, flipping of pancakes, presentation, and photography. And before I get on moving with today’s recipe, please check out the original recipe that I followed over on Oh Sweet Basil.

Blueberry & White Chocolate Pancakes Ingredients

PREP TIME 15 MINS | COOKING TIME 45 MINS | SERVES 3-4

INGREDIENTS

  • 2 cups plain flour
  • 2 cups buttermilk*
  • 2 free range eggs
  • 1 cup fresh or frozen blueberries
  • 1/2 white chocolate chips
  • 2 tbsp white sugar
  • 2 tbsp unsalted butter, melted
  • 2 tsp baking powder
  • 1 tsp baking soda
  • 1 tsp salt

*I didn’t have any buttermilk in the pantry so what I did was for every cup of milk I added a tablespoon of vinegar. Buttermilk has enzymes and lactic acid, which will react with the baking powder to create a light and fluffy texture with lots of little pockets of air for the pancakes. The vinegar in the milk will help to ensure this. Using just regular milk will not give you this result.

Blueberry & White Chocolate Pancakes

METHOD

  1. Preheat oven to 100C. Start by adding all the dry ingredients into a large mixing bowl and whisk to combine.
  2. Separate the egg whites and egg yolks in two small bowls. Using an electrical mixer, beat the egg whites until stiff peaks form.
  3. In the other bowl whisk the egg yolks until light in colour. Then add in the butter and whisk. Finally add the buttermilk and whisk to combine altogether. Add the egg yolk mixture into the dry ingredients and stir with a wooden spoon.
  4. Fold in the egg whites gently together with the blueberries and white chocolate chips. Be careful as to not to over mix the batter.
  5. Lightly butter a small fry pan over medium heat and add about half a cup of batter. Allow it to cook until the bottom begins to turn golden and bubbles just start to form on the top. Flip and cook until set on the other side. Repeat with remaining batter – should make about 9 pancakes. Place the cooked pancakes on a baking tray lined with parchment paper and place in the oven to keep warm until all the pancakes have been cooked. Serve immediately.

Blueberry & White Chocolate Pancakes

BON APPÉTIT

– Ally xx

myTaste.com

Mini No-bake Blueberry Cheesecake

Mini No-bake Blueberry Cheesecake

Hello Everyone! Very sorry indeed for the lack of updates! I’ve been quite busy the past two weeks almost since my last post upload. I haven’t had the time to really get into the kitchen and cook up a new dish, or try a new recipe. For starters, uni was hectic last week. I also had a high school friend from Brunei visit me last weekend, ate out lots so expect a few café reviews soon.

And finally, I started my graphic design internship this week with Hello Social, a social media marketing agency that is based in Sydney that works with a variety of businesses to assist in achieving their marketing objective’s, through social media. I am basically now at uni twice a week, and at my internship 3 times a week, which really means that I only have the weekends to really enjoy my cooking. So I’m letting you know now that my posts will not be as regular as they used to be, but I will still upload whenever I take on another culinary adventure in the kitchen. Thank you for understanding.


All that aside! Let’s get on with today’s recipe shall we? So I actually made these (not-so) mini no-bake cheesecakes last week Monday – I just never had the chance to do a write up and post it immediately. Also, I said not-so mini because when I gave one to Marissa, she struggled to eat the whole thing herself in one go. To quote her, “Dude, this is not mini okay?!” She loved it never the less! I honestly wasn’t expecting you to finish the whole thing in one go, even I could only eat half and the other half a bit later!

What actually happened that day was that I had a 9am-12pm Photography class, and interview for my internship straight after, and then a cheesecake bake-off with my food lover Jialing. Well more or like she asked me in advance if she could use my oven (since she doesn’t have one at her place) to bake a cheesecake for her boyfriend and their two-year anniversary! Of course I wasn’t just gonna sit back and watch her make a cheesecake that wasn’t for me to eat as well – so I decided to make a (few) cheesecake(s) too!

Please check out the original recipe here at taste.com.au. Now, this recipe as you can see makes one 6cm-deep, 20cm-round base cheesecake, which equates to about 5 mini tins (I only had 4 with me on hand, so I made the remaining one in two small ramekins and ate it straight out of it – with Jialing of course!

Mini No-bake Blueberry Cheesecake Ingredients

PREP TIME 35 MINS* | COOKING TIME 20 MINS |
MAKES
 4 MINI CHEESECAKES

*Add 4-5 hours extra for chilling time in the fridge

INGREDIENTS

For the cheesecake

  • 2 x 250g packets cream cheese, softened
  • 300ml thickened cream, whipped
  • 250g ginger nut biscuits
  • 125g butter, melted
  • 1/2 cup fresh or frozen blueberries
  • 1/2 cup caster sugar
  • 1/4 cup boiling water
  • 1 teaspoon vanilla extract
  • Icing sugar mixture, to serve

For the blueberry compote

  • 2 cups fresh or frozen blueberries
  • 1/4 cup caster sugar
  • 3 tbsp water
  • 2 tsp lemon juice

Mini No-bake Blueberry Cheesecake

METHOD

  1. To make the blueberry compote, combine 1 cup of the blueberries, water, sugar and lemon juice in a small saucepan. Cook over a medium heat for about 10 minutes. Add the rest of the blueberries and cook for 8 minutes more, stirring frequently. Set aside until needed.
  2. Prepare the springform pans by lining the bases with baking paper and greasing the edges with butter. In a food processor, process the ginger nut biscuits until mixture resembles fine breadcrumbs. Tip it into a medium sized mixing bowl, add the melted butter a mix until well combined. Press the mixture over the base of the prepared pans. Place in the refrigerator for 20 minutes or until firm.
  3. Next, sprinkle the gelatine powder into a mug and add the boiling water to it. Whisk with a fork until the gelatine powder fully dissolves. Set aside to cool for 15 minutes.
  4. Meanwhile, whip the thickened cream in a small mixing bowl using the electric mixer – be careful as to not over whip the cream (this is what I did and ended up with a lumpy mixture, managed to fix it but it still wasn’t a smooth and silky in texture). Set aside. Beat the cream cheese, sugar, and vanilla in a large mixing bowl using the electric mixer. Then, gradually beat in gelatine mixture until combined. Using a rubber spatula, gently fold the whipped cream in.

Now for the fun part! This is where you can get creative with your cheesecakes – and of course, typical me, why make 4 cheesecakes exactly the same when you can use the same ingredients but incorporate them differently into the mixture? But first, let’s separate the cheesecake batter into 2 mixing bowls. Here’s my take on no-bake blueberry cheesecake 4-ways:

Mini No-bake Blueberry Cheesecake
Cheesecake #1: Add the cheesecake mixture into one of the springform pan as is and top with the 1/2 cup of blueberries.

Mini No-bake Blueberry Cheesecake
Cheesecake #2: Same as the first cheesecake, but instead, top with the blueberry compote

Mini No-bake Blueberry Cheesecake
Cheesecake #3: Same as the first two cheesecakes, but instead, marble in the blueberry compote.

Mini No-bake Blueberry Cheesecake
Cheesecake #4: Pour the blueberry compote into the cheesecake mixture and using the electric mixer, beat until well combined. Add the mixture into the last springform pan.

Lastly, remember to wrap each springform pan with cling film and place in the fridge for at least 4-5 hours to set. Top the cheesecakes with a sprinkle of icing sugar before serving.

BON APPÉTIT

– Ally xx

myTaste.com