Crispy Fried Leche Flan

Hello Everyone! Firstly, I would just like to say to you all that I am back in Sydney! Currently staying at a friends place while waiting for my Mom and two younger sisters to arrive in Sydney on Saturday morning before we start our Australian tour!I’ll be showing them around Sydney, and then we will be off to Melbourne, Brisbane, and then back again for my graduation ceremony in mid-June! Now because of all our travels, I will momentarily cease Review Sundays, only because I don’t have any places in my folders to write about, and also because there is a possibility that I won’t have the time (or most likely won’t be bothered) to write reviews on places I’ve visited on this trip, during the trip. Once I’ve settled back down from my 1-month vacation, then I will get back into Review Sundays; but don’t fret, I will still be uploading recipes twice a week on Tuesdays and Thursdays as I’ve cooked up a whole lot of dishes while I was in Brunei to prepare for this vacation period of mine.

Crispy Fried Leche Flan Process

Anyway, today’s recipe is a little twist on what I have been making for a while now – mainly for lunch/dinner parties, or during Christmas and New Year celebrations. Or sometimes, I make it upon the request of my friends for their birthdays (Jialing especially) or just whenever they want me to make it for them when I invite them over to my place. During my recent trip to the Philippines, I encountered ‘Crispy Fried Leche Flan’ on two different menus. I thought long and hard about the possibility and HOW they are able to deep-fry a soft, smooth, and silky custard – at one point I thought, battered flan? Anyway, weird techniques were going through my mind and it killed me not knowing how it was possible – until I ordered it that is. I did not expect it to be wrapped spring roll style; such a clever idea! The first time I had these babies was at Catalino’s Restaurant (Villa Javierto) in Lucena City. I was so amazed by the lovely golden brown, crispy spring roll pastry complimented by an oozy, smooth flan filling with a side of soft caramel dip. It was like love at first bite with these I tell you. Never have a ever heard of crispy fried flan until this very day at Catalino’s; and I was even more excited to see it on Mesa’s menu in the city! However, as I probably mentioned in that blog review, Mesa’s crispy flans did not live up to the hype of my first experience. To quote my blog review, I said that theirs were “small, not so crispy rolls of flan that didn’t quite taste like flan in my opinion and more like steamed egg”.

Ever since my trip to the Philippines and encountering these beautiful rolls of delight, I knew I had to take it to my kitchen and whip up a batch of these. At first I was unsure of how it was they managed to handle and wrap soft flan; I thought that they needed to go into the freezer first and once frozen you could handle them easily. My mother showed me otherwise; she handled the slices of flan with great care, and was very gentle with them when wrapping them. The trick to get them nice and crispy is basically the same with the plantain rolls I posted roughly a month back; by freezing them overnight and frying them straight away with no defrosting required.

Leche Flan Ingredients

Crispy Fried Leche Flan Ingredients

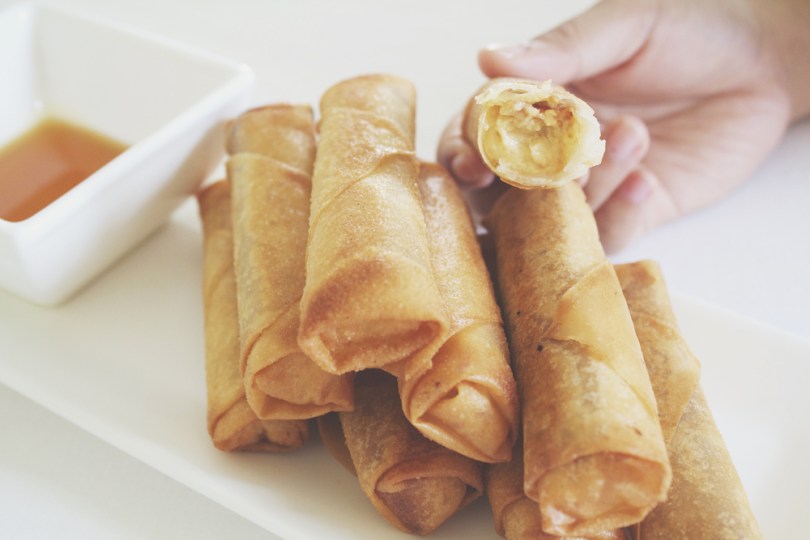
PS: Before I start with the recipe, I just want to point out that I showed these images to one of my friends prior to writing this post because I told her about how I made crispy leche flan. She wanted to know how it was possible and so I showed her how it was done. Her first reaction to the side of caramel dip – “IS THAT FISH SAUCE?” I seriously could not stop laughing.

INGREDIENTS

  • 1 recipe Leche Flan (Crème Caramel)
    • 6 egg yolks, at room temperature
    • 1 can (395g) condensed milk, at room temperature
    • 1 cup milk, at room temperature
    • 6 tsp caster sugar
    • 1 & 1/2 tsp vanilla extract
  • Large springroll wrappers

METHOD

  1. Make a batch of leche flan prior to starting this recipe. Make sure that you refrigerate them for at least 6 hours before working with them. You can find the recipe linked above in the ingredient list. Instead of using small round moulds, I suggest you use square moulds (or in my case I used oval because that’s what I had) and cut them into thick rectangular strips. Do not discard the caramel sauce, instead pour it into a sauce dish and serve alongside the crispy fried leche flan rolls.
  2. Place the slice of flan on top of a spring roll wrapper and fold, locking the wrapper on each side. then place in a container and repeat until all the slices of flan have been wrapped. Freeze overnight.
  3. In a small (or medium, depending on how many you’re going to fry) pan, heat the oil over medium-high. Make sure it is quite hot before adding the wrapped flans in. Fry until the wrapper turns golden brown.
  4. Serve hot during dessert or meryenda, with ice cream on the side if you wish. Enjoy!

Crispy Fried Leche Flan

BON APPÉTIT

– Ally xx

myTaste.com

Dragon Fruit & Calamansi Shake

Dragon Fruit & Calamansi Shake

Hello Everyone! Today’s recipe as you can see is a very vibrant one indeed; but colour aside, the dragon fruit (or also known as pitaya) has many health benefits. For starters, it is low in cholesterol and even though the fruit does have small amounts of fat because of the many seeds in the edible part of the fruit, it has little to no unhealthy cholesterol producing fats. Dragon fruits also contain high amounts of vitamin C that provide you a rich balance of nutrients. These are only some of the health benefits that dragon fruits have to offer and you can head on over to Natural Food Benefits for further information.

Pink Dragon Fruit

The Pitaya is the fruit of several cactus species and are originally native to Mexico, and are now cultivated in East Asian, South Asian, and Southeast Asian countries. It is commonly know as the dragon fruit as it traces back to its Asian names, for example: the Thai kaeo mangkon (แก้วมังกร) (dragon crystal), the Vietnamese thanh long (green dragon), and the Chinese huǒ lóng guǒ (fire dragon fruit) or lóng zhū guǒ (dragon pearl fruit) to name a few. The dragon fruit comes in three different colours; a red-skinned fruit with either white or red flesh, or a yellow-skinned fruit with white flesh. With the red-skinned fruit, you can’t tell the colour of the flesh unless you ask the man or lady who sells them at the local markets, otherwise, supermarkets usually label them according to the colour of the flesh.

I cannot remember if I’ve touched on what a calamansi is on a previous blog, but I’ll give a brief description on what it is for those of you who don’t know. The calamansi citrus is like a cross between mandarin oranges and kumquats. The flavour is slightly sweeter than a lime, but has the taste of a sour orange. The fruit is grown throughout Southeast Asia, primarily in the Philippines and Malaysia, and is an ingredient used to flavour dishes and make them taste truly authentic. Other than that, it can be sipped on its own as a refreshing drink.

Dragon Fruit & Calamansi Shake

We bought these brightly coloured fruits in the market 2 weeks ago and we didn’t know what to do with them besides just eating them. Then I remembered that a had a red dragon fruit smoothie when I was back in Sydney and decided to turn these fruits into a drink of my own. I searched for recipes online and found one that had the addition of lime and other ingredients in it. I think at the time that I wanted to make this drink, I didn’t have any of the ingredients in the pantry but I had calamansi; and so I decided to give that a go and combine just the two. It tasted really good! The mild sweetness of the dragon fruit paired wonderfully with the sourness of the calamansi.

Pink Dragon Fruit

PREP TIME 10 MINS | COOKING TIME | SERVES 4

INGREDIENTS

  • 2 red dragon fruits, skins peeled* and cut into chunks
  • 2 cups ice
  • 1/4 cup cold water
  • Juice of 5 calamansi
  • Mint leaves, to garnish

*First slice the fruit into quarters, lengthwise, and then you can peel back its skin easily.

METHOD

  1. Combine all the ingredients, except the mint leaves, into a blender.
  2. Blend until smooth. Pour into a tall glass and garnish with mint leaves.
  3. Serve and enjoy a refreshing drink in the summer sun!

Dragon Fruit & Calamansi Shake

PS: Consumption of significant amounts of red-fleshed dragon fruit may result in a harmless pinkish/reddish colouration of the urine and poop.

BON APPÉTIT

– Ally xx

myTaste.com

Avocado & Date Smoothie

Avocado & Date Smoothie

Hello Everyone! Today’s recipe was inspired by a smoothie drink that I had about a few weeks ago from The Energy Kitchen here in Brunei. I really loved the taste of it and I was surprised by how little ingredients it contained. It was not only rich and flavourful, but it is also healthy indeed. However, the drink was very pricey; if I’m not mistaken I think it was about $9.00, maybe almost $10.00 for a large glass (11oz maybe). Because of that, I decided to then give this smoothie a try with local avocados that cost $4.00/kg; and you get about 5-6 avocados depending on their size per kilo. Dates were probably around $4.00 per 500g and a carton of almond milk was about $5.00. I with all this, I was able to make at least 4 large glasses with these and still had a lot of dates and almond milk leftover for another 2 rounds of this smoothie. It’s definitely much cheaper making it at home!

Avocados have several proven health benefits including an abundance of nutrients such as vitamins B5, B6, C, E, K, potassium (even more than bananas), and small amounts of magnesium, manganese, copper, iron, zinc, phosphorous, etc. Avocados are also loaded with heart-healthy monounsaturated fatty acids, in which the majority of the fat is oleic acid; beneficial in that these acids activate the part of your brain that makes you feel full. In addition, oleic acid has been linked to reduced inflammation and has beneficial effects on genes linked to cancer. To find out more on the health benefits of avocados, visit the Authority Nutrition page.

This drink also doesn’t contain any sugar. Instead they contain dates that are naturally sweet, and not only that, dates are also known to have many health benefits; to name a few, they relieve constipation, intestinal disorders, heart problems, anemia,  sexual dysfunction, diarrhea, abdominal cancer, and many other conditions. Dates are rich in several vitamins, minerals and fibre too, containing oils, calcium, sulfur, iron, potassium, phosphorous, manganese, copper, and magnesium; all of which are beneficial for our health health. To read up more on the health benefits of dates, visit the Organic Facts page.

Pair these two together with about 3/4 cup of almond milk (you can use any other type of milk if you wish, and also add more milk if you want you smoothie to be a little bit thinner), and you’ve got yourself a rich and healthy drink. I didn’t add any ice to this drink so make sure that your milk is cold or place your smoothie in the freezer for about 10 minutes before drinking.

Avocado & Date Smoothie Ingredients

PREP TIME 10 MINS | COOKING TIME | SERVES 4

INGREDIENTS

  • 6 ripe avocados, peeled, pitted, and cut into chunks
  • 1/2 cup dates, pitted and roughly chopped
  • 1/2 cup almond milk (or any other milk)

METHOD

  1. Combine all the ingredients into a blender. Blend until smooth.
  2. Pour into a tall glass and enjoy a healthy smoothie!

Avocado & Date Smoothie

BON APPÉTIT

– Ally xx

myTaste.com

Lemon Molten Cakes with Raspberry & Cream

Lemon Molten Cakes with Raspberry & Cream

Hello Everyone and Happy Mother’s Day to all mothers out there, and most especially to my mother. You are braver than you believe, stronger than you seem, smarter than you think, and loved more than you know. Happy Mother’s Day to you Mumu; love you forever and always, even if we sometimes don’t see eye to eye.

Happy Mother's Day
There is nothing more sincere than a mother’s love for her children, and this picture clearly portrays your love for me while I care more about putting my hairband on for the picture (but really I’ve got my eye on the food).

Last week after my Mom’s birthday celebration (and that whole fiasco that I had with baking her cake), I asked her what she wanted me to bake for her for Mother’s Day, and I’m not gonna lie, but said aloud to her, “please not another cake” – the troubles of my mother being born a week before Mother’s Day. We both started thinking for a while, and then I remembered that I wanted to make this cake back when I was still in Sydney. Now I know I said no cakes, but this technically isn’t a massive layered cake, but instead, mini molten lava cakes.

Lemon Molten Cakes with Raspberry & Cream

Somewhere back in July last year, I hosted a tea and scones party for some of my favourite ladies, and one male housemate. We had an assortment of tea of course, homemade scones, homemade strawberry jam, and homemade lemon curd. I had a lot of strawberry jam left over, but I had a way of finishing it by having it with toast in the mornings with a cup of tea. Lemon curd on the other hand I had no clue on how to consume it. I then searched for other recipes that used lemon curd, except for the obvious lemon meringue pie/tart since I am not a huge fan of meringue. I then came across this recipe and I instantly knew that this was the recipe that I was going attempt – but never got around to doing so. Reasons? I actually don’t remember. I think it was because the lemon curd had been sitting in the fridge for weeks and probably already off at the time I decided that I want to make these molten cakes. After that, I wasn’t bothered to make a whole new batch of lemon curd just for this dessert to happen. But now for Mother’s Day – I don’t see any better chance to have a go at these!

The original recipe can be found on The Gallery Gourmet and this recipe makes about 8 cakes but I guess differs on the size of your moulds/ramekins.

Lemon Molten Cakes with Raspberry & Cream Ingredients

PREP TIME 15 MINS | COOKING TIME 13-15 MINS | MAKES 4 CAKES

INGREDIENTS

  • 120g white baking chocolate, roughly chopped
  • 100g unsalted butter
  • 3/4 cup Homemade Lemon Curd
  • 2/3 cup plain flour
  • 1/2 cup confectioners’ sugar
  • 4 large free range eggs, lightly beaten
  • 4 large free range egg yolks, lightly beaten
  • 2 tsp freshly grated lemon zest
  • 1/2 tsp vanilla extract
  • Pinch of salt
Accompaniments
  • Confectioners’ sugar for dusting
  • Whipped cream
  • Fresh raspberries

METHOD

  1. Preheat the oven to 220C (425F or gas mark 7). Grease 8 ramekins with softened butter or non-stick baking spray.  Place them onto a baking tray and set aside.
  2. Melt the butter and white chocolate in a large microwave-safe bowl, stirring every 15 seconds (for a total of 60-90 seconds) until melted and smooth. Remove from the microwave and whisk until smooth.
  3. Add the flour, sugar and salt; mix well. Then add in the eggs, egg yolks, lemon curd, lemon zest, and vanilla extract and whisk until well blended. Divide the batter evenly into the prepared ramekins.
  4. Bake for about 13-15 minutes or until the edges are just starting to to turn golden brown, and the centre is puffy and just beginning to set. Transfer the ramekins to a wire rack and let cool for 5 minutes.
  5. Run the tip of a paring knife around the edges of the cakes to loosen them and then invert the cakes onto small dessert plates or dishes.
  6. Dust the top with confectioners’ sugar, garnish with fresh raspberries, and serve with whipped cream.
  7. Share with the family (or friends) and enjoy!

Lemon Molten Cakes with Raspberry & Cream Process

Lemon Molten Cakes with Raspberry & Cream

PS: I completely forgot about the whipped cream when I was photographing the cakes, and by the time I had the cream ready and whipped, I found out that my Mom and my sister had already dug into the perfect molten cake that I specifically set aside for my photograph (the other cakes weren’t as runny as the one I had opened for the photo). The whipped cream nicely balances out the sweetness and tartness of the cakes.

BON APPÉTIT

– Ally xx

myTaste.com

Masala Chai Tea with Soy Milk Ingredients

Masala Chai Tea with Soy Milk

Hello Everyone! So on Tuesday I posted a recipe for homemade soy milk. The first thing I thought after making having made the soy milk was what other things could I do with it to make another delicious drink. So today’s recipe uses the soy milk that I made to make a masala chai tea. I mean, you can always use store bought soy milk, or any other milk for that matter.

Masala Chai (literally translated: ‘mixed-spice tea’) is basically a flavoured tea beverage made by brewing black tea with a mixture of aromatic Indian spices and herbs. Nowadays, it is a very popular and feature drink in many coffee and tea houses. Chai is traditionally prepared by brewing green cardamom pods, cinnamon sticks, ground cloves, ground ginger, and black peppercorn together with black tea leaves. Most retail versions of this tea includes tea bags for infusion, instant powdered mixtures, and concentrates. I used tea bags for mine only because I could not find any loose black tea leaves in stores.

I love chai tea. In fact, I ordered it almost every time I went to a café, aside from a café latte that is. I was surprised that it was that easy to make when I came across a recipe online on how to make you own chai tea.

Masala Chai Tea with Soy Milk Ingredients

PREP TIME 5 MINS | COOKING TIME 10-15 MINS | SERVES 4-5

INGREDIENTS

  • 3 cups water
  • 1 cup homemade soy milk (or any other type of milk)
  • 1/4 cup loose black tea leaves (or about 5 tea bags)
  • 3 tablespoons granulated white sugar
  • 1/4 inch of ginger root, peeled and sliced thinly
  • 6 cardamom pods
  • 6 whole cloves
  • 2 cinnamon sticks
  • Several peppercorns

Other optional spices that you can add to your chair tea inlaced: vanilla, almond, nutmeg, bay leaves, star anise, or fennel and allspice; I added star anise to mine.

METHOD

  1. Combine the water, spices, and tea in a medium-sized saucepan. Turn the heat to high and bring to a boil. Once boiling, let it boil for a further 5 minutes and then turn the heat off. Let the mixture steep for at least 10-15 minutes.
  2. Strain the tea mixture and discard the spices. Add the soy milk and sugar to the strained tea mixture and stir well. Then reheat the tea until piping hot.
  3. Enjoy! Serves about 4 cups of tea.

Masala Chai Tea with Soy Milk

BON APPÉTIT

– Ally xx

myTaste.com

Homemade Soy Milk Ingredients

Homemade Soy Milk

Hello Everyone! I’ve got a few drinks that I want to cover on the blog for the next two weeks; simple but very tasty indeed! Today’s recipe is pretty straight forward, just plain regular soy milk, but definitely much richer than those that you find at the stores/markets because the ones I’ve bought are usually very watered down. By making your own soy milk as well, you ensure that no other extra ingredients go into them, especially sugar in my case (or more like in the case of my mom who is a diabetic).

Homemade Soy Milk Process

Homemade Soy Milk Process

Though it sounds very simple and the process doesn’t require a lot of skill, it requires a lot of time. Firstly having to soak the beans for a couple of hours until they are soft takes about 4-5 hours of waiting (the longer the better I guess). Then having to blend the beans with water and strain out the liquids using a muslin cloth, batch by batch; and then finally boiling it with the pandan leaves for about 30 minutes. Indeed simple, but can be time consuming. Whenever I make soy milk, I always needs another pair of hands in the kitchen and it’s usually my mom who does the straining while I do the blending.

Homemade Soy Milk Ingredients

PREP TIME 5 HOURS 30 MINS | COOKING TIME 30 MINS | SERVES 10-12

INGREDIENTS

  • 1kg soybeans
  • 5 pandan leaves
  • 3 litres water

METHOD

  1. Place the soybeans in a large bowl of water and soak for 4-5 hours or until the beans have doubled in size and have softened. Drain.
  2. Working in batches, add about 2 cups of the softened soybeans into the blender together with about 3 cups of water. Blend until the mixture is smooth.
  3. Pour out the mixture onto a muslin cloth placed over a large bowl. Strain and squeeze out as much of the liquids as possible. Transfer the remaining soybean pulp into another bowl.
  4. Repeat steps 2 and 3 for the remaining soybeans.
  5. Transfer the raw soy milk to a large cooking pot and together with the pandan leaves, boil of about 30 minutes. Stir the mixture at intervals to avoid the milk sticking to the bottom of the pot. Skim the top to get some of the foam off.
  6. Add about a quarter cup of sugar if you wish (we usually add a teaspoon of sugar afterwards in our mug of soy milk), or flavour it up any way you want. Some flavouring suggestions include: chocolate, honey, vanilla, etc.
  7. Drink and enjoy either hot or cold!

Homemade Soy Milk Process

Homemade Soy Milk

PS: Don’t throw the leftover bean pulp away! You can make your very own homemade tofu from it! Visit this the Food Network for more on how to make your own tofu.

BON APPÉTIT

– Ally xx

myTaste.com

Ube Cake with Mango Cream Cheese Frosting

Ube Cake with Mango Cream Cheese Frosting

Hello Everyone! As I already mentioned in yesterday’s post, I have a very special recipe for all of you today as today is my Mother’s 55th Birthday! Not only that, it is also my Cousin’s 35th Birthday! A very Happy Birthday to the both of them! Not only do they share the same birthday, but they also share the same-ish name. My mom’s name is Josephine, while my cousin’s name is Joseph; and my mother is also his godmother in both his baptismal and wedding. So yes, these two people are very important to me.

Happy Birthday Mom Josephine & Kuya JR
Happy Birthday to my mom Josephine & my cousin Joseph Russell! This is the latest photo that I could find of the two of them. This photograph dates back to December 2012 when my cousin JR got married. Kuya J, payat mo oh! Anyare? Hehehe.

To be completely honest, this cake has given me a lot of headaches to the point where I just had to redo everything again. The plan was to bake it the day before so that it would be in the fridge overnight; that obviously didn’t happened. Something went wrong in the batter; it was very pale and it looked like the batter and the eggs whites separated because when I took them out of the oven, the top half was very airy white the bottom half was cake-y. Since I had quite a tiring day yesterday, I gave up on baking the cake and decided to bake it early the next morning (today). The cake this time went well, I just mixed the batter very well and added some food colouring to bring out the purple a bit more.

Ube Cake with Mango Cream Cheese Frosting

However, today my frosting decided that it wanted to wreck havoc. The frosting was actually an experiment, because I wanted to incorporate mango into the cream cheese frosting somehow. The big mistake that I did was that I mixed the mango purée together with the cream cheese and and butter instead of smoothening out the cream cheese and butter first. I ended up with a mess of what looked like really bad scrambled eggs. I tried so hard to save it, but in the end I started all over again. At one point I kind of just had about enough with this cake… But I told myself to carry on because it’s a special cake for my Mom’s Birthday! The flavours were all there, form the cake in the beginning, and even the frosting, but it would’ve ended up looking like a shit cake if I hadn’t redone the whole thing.

Anyway, all mishaps aside, the cake turned out to be pretty good! But what decided to ruin everything yet once again was the weather. It was pitch black and raining when I was about to do the final touches on the cake and I have no natural light to photograph my cake. I am so devastated. It was as if everything was trying to ruin this cake for me… Thank goodness that it was still a little bit bright outside, but I really had to put my ISO up and decrease my shutter speed to get some light!

Ube Cake with Mango Cream Cheese Frosting Ingredients

PREP TIME 30 MINS | COOKING TIME 30-35 MINS | SERVES 8-10

INGREDIENTS

For the cake batter

  • 2 & 1/2 cups cake flour*
  • 1 cup ube (purple yam), cooked and finely grated**
  • 1 cup white sugar
  • 7 egg yolks, lightly beaten
  • 7 egg whites
  • 3/4 cup milk
  • 1/2 cup corn syrup***
  • 1/2 cup vegetable oil
  • 3 tsp baking powder
  • 1 tsp salt
  • 1 tsp vanilla extract
  • Blue & red food colouring (optional)

For the frosting

  • 1 very ripe mangoes, puréed
  • 1 package (250g) cream cheese, softened
  • 100g unsalted butter, softened
  • 1 cup confectioners’ sugar

*I barely use cake flour, and if you so happen as to not have cake flour in your pantry, you can substitute 1 cup of cake flour with 2 tablespoons of corn flour place into a measuring cup and then filling it with plain flour all the way to the 1 cup mark.

**Place the ube (leaving its skin on) in a pot of boiling water and boil for about 45 minutes to an hour, depending on how big it is, or until tender. Peel off its skin and then grate.

***If you’re like me and you don’t have corn syrup sitting in your pantry because you barely use it anyway, you can substitute corn syrup by dissolving 3/4 cup of granulated sugar in 1/4 cup of boiling water.

METHOD

  1. Preheat oven to 165C (325F or gas mark 3). Grease three 8.5-inch cake pans with a little butter and set aside.
  2. Ube Cake: In a medium-sized bowl, mix together the flour, baking powder, and salt. Set aside.
  3. Place the grated ube into a large bowl and mix together with the milk and vanilla extract; gradually mix into the ube until it is smooth. Then add in the corn syrup, egg yolks, and oil. Mix together and then add in the flour mixture and mix until smooth. Set aside.
  4. In another large bowl, beat the egg whites until foamy. Gradually add in the sugar, then red and blue food colouring (optional), while continuing to beat until stiff peaks form.
  5. Fold in a third of the egg white mixture into the batter, then quickly fold in remaining whites until no streaks remain. Pour batter into prepared pans.
  6. Bake in the preheated oven for 30 to 35 minutes, or until a toothpick inserted near the centre comes out clean. Cool for 10 minutes before removing the cakes from the pans to wire racks to cool down completely.
  7. Mango Cream Cheese Frosting: Using an electric handheld mixer, beat the cream cheese, butter, and maple syrup in a small bowl until smooth. Then beat in the confectioners’ sugar, and then fold in the mango purée.
  8. Assembly: Place one cake layer on a serving plate and trim the tops so that they are level. spread with about 1/4 cup of frosting. Top with the second layer of cake and spread another 1/4 cup of and frosting. Finally, top with the last layer of cake and frost the top and sides of the cake. Decorate with the cake trimmings and store in the fridge before serving. Enjoy!

Happy Birthday Mom Josephine

Ube Cake with Mango Cream Cheese Frosting

BON APPÉTIT

– Ally xx

myTaste.com

Mango Shake

Mango Shake

Hello Everyone! I’ll be keeping today’s post very simple and straight forward as tomorrow I will be doing a special post for two very loved people in my life. What I like about being back in the tropics around this time of the year is that it’s summer and summertime means MANGOES! Once, someone asked me a question: “If you were to be shipped to a deserted island and you could only take 1 item of food with you, what would you bring?” I thought a while about this and I remembered that my final answer was mangoes. The moment I said it, everyone nodded and agreed that it was a good choice; I could tell that their mouths watered as soon as I said it.

Mango Shake

I love mangoes, especially Philippine mangoes. I’m sorry but Kensington Pride mangoes, which are the ones I’ve been buying from Coles during summertime down under, cannot compare. Today’s recipe is very simple, and is definitely much better than what you get at restaurants. I remember the one that I had at Arabela, it was very watered down, and more on ice than mango.

Mango Shake Ingredients

PREP TIME 10 MINS | COOKING TIME | SERVES 4

INGREDIENTS

  • 4 ripe Philippine mangoes, peeled and cut into chunks
  • 2 cups ice
  • 1/4 cup cold water
  • Mint leaves, to garnish

METHOD

  1. Combine all the ingredients, except the mint leaves, into a blender.
  2. Blend until smooth. Pour into a tall glass and garnish with mint leaves.
  3. Serve and enjoy a refreshing drink in the summer sun!

Mango Shake

BON APPÉTIT

– Ally xx

myTaste.com

Fresh Fruit Salad

Fresh Fruit Salad


Hello Everyone! Today’s post is a special one as this is my 100th recipe on the blog! I wanted to make something special, for my 100th recipe post, but I wasn’t in the mood to bake a cake for it because I baked one just last week, and I will be baking one this coming Thursday ready for my Mom’s birthday on Friday!

Fresh Fruit Salad

Anyway, today’s recipe is a classic dish that you will find on every Filipino’s table during Noche Buena (the eve of Christmas) and/or Media Noche (New Year’s eve) feasting celebrations. ‘Fruit Salad’ is a general term referring to a dish that is typically composed of an assortment of fruits, fresh or canned. The Filipino version of the fruit salad consists of these fruits, condensed milk, and table cream, making the dish a rich and sweet dessert. I personally don’t like the use of canned fruits just because of the amount of preservatives in them. Anyway, there are plenty of fresh fruits that can be bought at the local markets – and Philippine mangoes are in season right now so why substitute that for canned fruit cocktail?! However, buying a can of fruit cocktail is definitely cheaper for the average Filipino.

Here’s what you’d get if you use canned fruit cocktail to make your fruit salad; not as vibrant as the one above right? Also, by using fresh fruits, you get to play around not only with the type of fruit but with the many colours as well, for example vibrant green kiwis or bright orange mandarins/papayas? Take your pick! Just don’t forget to include bright yellow mangoes and definitely those luscious red dragonfruits.

Fruit Salad

Now, I’ve had a look at a few recipes online and none that I have come across add cheese in their fruit salads. From what I know, or I guess what my mom has told me is that, since this would normally be a dish served during Christmas and New Year’s time, a fruit salad would not be complete without the addition of pieces of queso de bola. Queso de Bola (translated: “ball of cheese”) is just Edam cheese, traditionally sold in spheres with a pale yellow interior and a coat of red paraffin wax.

Other than fruits, fresh or canned, and cheese, palm seeds and nata de coco can also be added. I love nata de coco; I’d always fish these out from the serving bowl! Nata de Coco, for those of you who don’t know, is produced by the fermentation of coconut water. It is translucent and has a jelly-like and chewy texture.

Fresh Fruit Salad Ingredients

PREP TIME 25 MINS | COOKING TIME | SERVES 8-10

INGREDIENTS

  • 3 young coconuts, flesh removed and shredded*
  • 1 can (380ml)  Nestlé cream
  • 1 can (570g) palm seeds, with syrup
  • 1 jar (340g) nata de coco, drained
  • 1 red dragonfruit, cut into chunks
  • 1 green apple, cut into chunks
  • 1 red apple, cut into chunks
  • 1 ripe Philippine mango, cut into chunks**
  • 1/2 block (125g) cheddar cheese, diced
  • 1/2 pineapple, cut into chunks
  • 1/2 large pomegranate, peeled and deseeded
  • 3 tbsp condensed milk
  • Handful of small black and red grapes

*The best thing about using fresh young coconut is that you get to have a nice tall glass of fresh coconut juice! The best thing in the world especially if you’re living right on the equator and experiencing high 30s all year round!

**You can use any other kinds of mango i.e. Kensington Pride mangoes, but honestly, Philippine mangoes are simply the best!

METHOD

  1. Combine all the fruits (except the dragonfruit), cheese, palm seeds with syrup, and nata de coco in a large serving bowl. If you add the dragonfruit in now and mix everything together, its colour will bleed into the cream and make everything pink!
  2. Add the condensed milk and cream and mix well, being careful though so that the fruits still remain intact and do not get crushed when mixing. Once everything is mixed, top with the dragonfruit chunks.
  3. Chill in the fridge/freezer for at least three hours.
  4. Serve and enjoy!

Fresh Fruit Salad

Fresh Fruit Salad

BON APPÉTIT

– Ally xx

myTaste.com

Avocado & Roast Pumpkin, Kale Salad

Avocado & Roast Pumpkin, Kale Salad

Hello Everyone! Sorry for not getting this post up on Tuesday night (please forgive me) – it was quite a stressful day for me trying to get important things done. I hoped to have finished them by the evening so that I could move on and write this post for you, but it didn’t happen. Today I am a little bit more relaxed as I pretty much finished what I could do yesterday. So here is what was meant to go up for Tuesday’s post, today!

This recipe is one that started off a little bit more simpler than what you’ve seen above. It was one that I used to make a while back during my second year of University, and during that time avocados were not only in season, but cheap as well! I wanted to try out various recipes that used avocados and I came across a simple avocado and roast pumpkin mixed leaf salad. I would always pair it with marinated oven-baked chicken drumsticks or a whole chicken leg. I won’t post the marination recipe for our chicken on my blog as it’s a secret blend of ingredients that my mom came up with, but I mean, you can basically pair it with your own secret recipe or keep it simple with just the salad.

Avocado & Roast Pumpkin, Kale Salad

Over time I started to add a few extra ingredients here and there that I thought might jive well together in terms of flavour and texture. I added toasted walnuts, and then pomegranate seeds after I made the dish a few times with just the addition of the walnuts. There was also one time where our avocados were very overripe and basically couldn’t add it to the salad, and instead I added marinated feta cheese because that’s what I had in my fridge at the time that was sort of creamy in texture to substitute; of course flavour was no where near. Lastly, the supermarket didn’t have pre-bagged mixed leaf salad leaves so I had to go with what they did have on the shelves – kale! Quite a transformation from just an avocado and roast pumpkin mixed leaf salad to begin with I must say.

Avocado & Roast Pumpkin, Kale Salad Ingredients

PREP TIME 15 MINS | COOKING TIME 20 MINS | SERVES 4

INGREDIENTS

  • 2 small avocados, peeled, pitted, and cut into small chunks
  • 1 bunch kale, stems and leaves coarsely chopped
  • 1/2 medium-sized butternut pumpkin, cut into chunks
  • 1/2 large pomegranate, peeled and deseeded
  • Handful of walnuts, toasted and roughly chopped
  • Marinated feta cheese
  • Salt and ground pepper to taste

METHOD

  1. Preheat oven to 180C (350F or gas mark 4). Season the pumpkin with a bit of salt, ground pepper, and olive oil. Line a baking tray with foil and spread the pumpkin over the lined tray. Roast in the oven for about 20 minutes or until tender.
  2. Meanwhile, bring a pot of salted water to a boil. Once boiling, add in the kale and simmer for about 6-8 minutes. Drain and transfer to a serving plate.
  3. Top the kale with avocado, roasted pumpkin, feta, pomegranate seeds, and walnuts.
  4. Enjoy the salad as it is or as a side with your preferred choice of meat.

We had ours with Mama G’s Special Spicy Roast BBQ Whole Leg Chicken!

Avocado & Roast Pumpkin, Kale Salad with Roast Chicken

BON APPÉTIT

– Ally xx

myTaste.com