Avocado Egg Rolls with Parsley Dipping Sauce

Avocado Egg Rolls with Parsley Dipping Sauce

​Hello Everyone!​ The week has been quiet. Well quiet in a sense that other than the routinely eat work eat sleep repeat, nothing really exciting has happened this past week. Well, it was like that until the past few days happened. I’m not going to do into the details, but all I can say is that I’ve only been back for just over a month since my trip to Australia and New Zealand, and I’m already wanting to get away again, maybe to the UK? Or somewhere closer like South Korea or Japan? Maybe somewhere warmer like Peru or South Africa? I don’t know. Actually, ICELAND! Yes that’s right. Iceland is a must sooner or later.

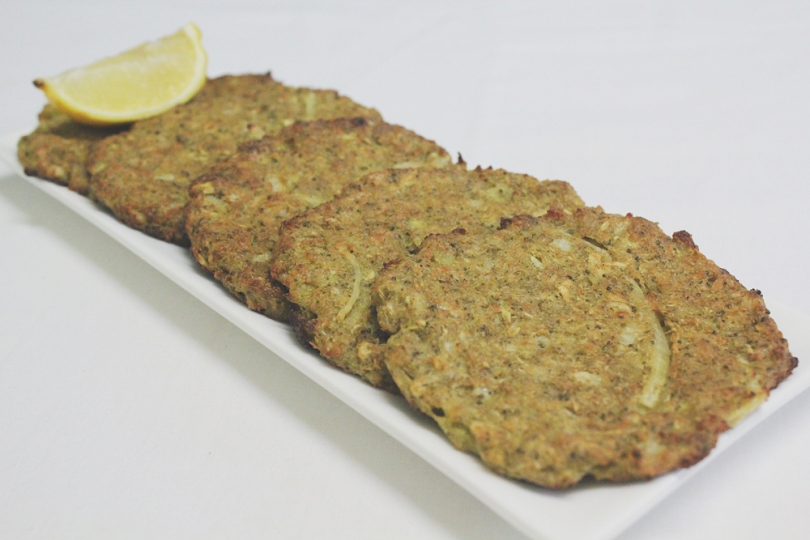
Anyway, tonight’s recipe is a simple one that I came across on Pinterest one day as I was browsing for new and exciting recipes. This one stood out for two reasons, the first is obvious, avocado in an egg roll?! Now this is something different and tasty as I love both avocados and egg rolls. The second would be the fact that they are Cheesecake Factory Avocado Egg Rolls. Okay, I’ve never been to Cheesecake Factory before but I’ve heard a lot about it from various forms of media and it seemed like a pretty famous place to eat at. Maybe one day when I do get the chance to travel the States again, I’ll definitely pop by and see what the hype is all about. Before I delve into the recipe, please be sure to check the original out by Chung-Ah over on DAMN delicious.

Avocado Egg Rolls with Parsley Dipping Sauce

PREP TIME 15 MINS | COOKING TIME 5 MINS | SERVES 6-8 ROLLS

INGREDIENTS

For the avocado eggs rolls

  • 8 spring or egg roll wrappers
  • 2-3 avocados, halved, peeled and deseeded
  • 1 Roma tomato, diced
  • 1 small-sized red onion, diced
  • Ground sea salt and black pepper, to taste
  • Juice of one lime
  • Parsley leaves, roughly chopped (enough for about 2 tbsp)
  • Vegetable oil, for frying

For the parsley dipping sauce

  • 3/4 cup parsley leaves, roughly chopped
  • 1/3 cup fat-free yoghurt
  • 2 tbsp mayonnaise
  • 1 garlic clove, minced
  • Ground sea salt and black pepper, to taste
  • Juice of one lime

METHOD

  1. Combine all the ingredients for the parsley dipping sauce in a medium-sized bowl and mix to combine, adjusting the salt and pepper to taste. Set aside.
  2. In another medium sized bowl, gently mash the avocado flesh using a fork. Add the diced tomatoes, red onion, parsley, lime juice, salt and pepper, to taste, to the mashed avocado and gently toss to combine.
  3. Working one at a time, place the avocado mixture in the center of each wrapper. Bring the bottom edge of the wrapper tightly over the filling, folding in the sides. Continue rolling until the top of the wrapper is reached. Repeat with remaining wrappers and avocado mixture.
  4. Heat vegetable oil in a large frying pan over medium-high. Working in batches, add the egg rolls to the pan and fry until evenly golden brown and crispy, about 2-3 minutes altogether. Once golden, transfer to a paper towel-lined plate.
  5. Serve immediately with cilantro dipping sauce.

Avocado Egg Rolls with Parsley Dipping Sauce

Avocado Egg Rolls with Parsley Dipping Sauce

Side note: It was supposed to be a cilantro dipping sauce, but since I can’t stand the taste of cilantro, I substituted it out for parsley instead. But if you’re not like me, then you can definitely go ahead and put the cilantro back in! Also, when I buy spring/egg roll wrappers from the store, they usually come in a pack of 40 wrappers, so what my Mom did with the remaining 32 wrappers was make them into lumping shanghai!

BON APPÉTIT

– Ally xx

myTaste.com

Smashed Avo Toast (9 ways)

Hello Everyone! Finally I am back on track with my posts and the theme for the month of April is Avocado! All you need is about half a medium-sized avocado everyday as it provides 1% of the calcium, 5% of the magnesium, and 10% of the potassium that you need daily. Avocados are a good source of potassium, which can help lower blood pressure, and in addition, the dark green flesh just under an avocado’s brittle skin contains large amounts of disease-fighting compounds. Though avocados are proven to help lower blood pressure and an abundance of health benefits, we have to be weary of how much we intake daily as they are also high in calories.

Tonight, I will be sharing 9 different ways you can start your mornings with a smile on your face with 9 different smashed avocado toasts! Of course, don’t limit yourselves to just these 9 recipes; I encourage you to get creative with your smashed avo toasts and share your creations with me on Instagram using the hashtag #amcarmenskitchen

1. Five Pepper Smoked Salmon with Red Onions, Capers & Chilli Flakes

Five Pepper Smoked Salmon with Red Onions, Capers & Chilli Flakes

PREP TIME <5 MINS | COOKING TIME  | SERVES 2

INGREDIENTS

  • 2 slices multigrain brown bread
  • 1/2 avocado, smashed
  • 1 small red onion, cut into rings
  • 2 tsp capers
  • Smoked salmon slices with five peppers

METHOD

  1. Lightly toast bread in a toaster for about 1-2 minutes.
  2. Spread a generous amount of the smashed avocado onto the toast and top with smoked salmon, red onion rings, and capers. Sprinkle with a touch of chilli flakes for an added kick (optional).
  3. Enjoy!

2. Medley of Grape Tomato Caprese Salad with Balsamic Reduction

Medley of Grape Tomato Caprese Salad with Balsamic Reduction

PREP TIME <5 MINS | COOKING TIME 5 MINS | SERVES 2

INGREDIENTS

  • 2 slices multigrain brown bread
  • 1/2 avocado, smashed
  • 1 punnet (250g) grape tomato medley, halved
  • 4 cherry bocconcini cheese, sliced
  • 4 tbsp balsamic vinegar
  • Ground sea salt and black pepper, to taste
  • Olive Oil
  • Sweet basil leaves

METHOD

  1. Combine the grape tomatoes, bocconcini slices, and sweet basil leaves in a small bowl. Drizzle with olive oil and season with a touch of ground sea salt and black pepper to taste. Set aside and leave to macerate.
  2. Meanwhile, heat the balsamic vinegar in a small non-stick saucepan over medium-high heat. Simmer, continuously stirring to check on the consistency of the glaze, until the vinegar reduces to a thick sauce, about 5 minutes. Remove from the heat and leave to cool down for a bit.
  3. Lightly toast bread in a toaster for about 1-2 minutes.
  4. Spread a generous amount of the smashed avocado onto the toast, top with the tomato cappers salad, and drizzle the balsamic reduction over the salad.
  5. Enjoy!

3. Sliced Banana & Pumpkin Seeds drizzled with Honey

Sliced Banana & Pumpkin Seeds drizzled with Honey

PREP TIME <5 MINS | COOKING TIME  | SERVES 2

INGREDIENTS

  • 2 slices multigrain brown bread
  • 1/2 avocado, smashed
  • 1 large banana, sliced
  • Honey
  • Pumpkin seeds

METHOD

  1. Lightly toast bread in a toaster for about 1-2 minutes.
  2. Spread a generous amount of the smashed avocado onto the toast, top with banana slices and pumpkin seeds, and drizzle with honey.
  3. Enjoy!

4. Soft-boiled Egg with Chilli Flakes & Parsley

Soft-boiled Egg with Chilli Flakes & Parsley

PREP TIME <5 MINS | COOKING TIME 6 MINS | SERVES 2

INGREDIENTS

  • 2 slices multigrain brown bread
  • 1/2 avocado, smashed
  • 2 large free range eggs
  • Chilli Flakes
  • Parsley, roughly chopped

METHOD

  1. Bring a small pot of water to a rolling boil. Once boiling, reduce the water to a rapid simmer before gently lowering the eggs one by one into the pot. Cook for 5 minutes for a runny yolk, or 7 minutes for a barely set yolk. Once done, remove from the heat and place in an ice bath to stop the cooking process. Once cool, peel the shell off and slice.
  2. Lightly toast bread in a toaster for about 1-2 minutes.
  3. Spread a generous amount of the smashed avocado onto the toast, top with the sliced eggs, and sprinkle with a touch of chilli flakes, and parsley.
  4. Enjoy!

5. Sliced Strawberries & Crumbled Goat’s Cheese with Balsamic Reduction and Peppermint Leaves

Sliced Strawberries & Crumbled Goat's Cheese with Balsamic Reduction and Peppermint Leaves

PREP TIME <5 MINS | COOKING TIME 5 MINS | SERVES 2

INGREDIENTS

  • 2 slices multigrain brown bread
  • 1/2 avocado, smashed
  • 4 large strawberries, sliced
  • 4 tbsp balsamic vinegar
  • Goat’s cheese, crumbled

METHOD

  1. Heat the balsamic vinegar in a small non-stick saucepan over medium-high heat. Simmer, continuously stirring to check on the consistency of the glaze, until the vinegar reduces to a thick sauce, about 5 minutes. Remove from the heat and leave to cool down for a bit.
  2. Lightly toast bread in a toaster for about 1-2 minutes.
  3. Spread a generous amount of the smashed avocado onto the toast, top with the sliced strawberries, crumbled goat’s cheese, and drizzle the balsamic reduction over the strawberries.
  4. Enjoy!

6. Sautéd Brown & Shimeji Mushrooms topped with Fried Enoki & Parsley

Sautéd Brown & Shimeji Mushrooms topped with Fried Enoki & Parsley

PREP TIME <5 MINS | COOKING TIME 8 MINS | SERVES 2

INGREDIENTS

  • 2 slices multigrain brown bread
  • 1/2 avocado, smashed
  • 4 large brown mushrooms, sliced
  • 1/2 bunch (100g) shimeji mushrooms
  • 1/2 bunch (50g) enoki mushrooms
  • 2-3 garlic cloves, minced
  • Ground sea salt and black pepper, to taste
  • Knob of unsalted butter
  • Olive oil
  • Parsley, roughly chopped

METHOD

  1. Melt the unsalted butter in a small frying pan over medium-high heat and add about a teaspoon of olive oil.
  2. Sauté the minced garlic until golden brown and fragrant, about 30 to 45 seconds. Add in the sliced brown mushrooms and shimeji mushrooms and cook until tender, about 3-4 minutes.  Season with pinch of ground sea salt and black pepper. Once tender, remove from the pan and set aside.
  3. In the same pan, heat about 3 tbsp of olive oil over high heat until slightly smoking. Add the enoki mushrooms in and fry until golden brown in colour, about 2-3 minutes. Once done, transfer to a small plate lined with a paper towel. Set aside.
  4. Lightly toast bread in a toaster for about 1-2 minutes.
  5. Spread a generous amount of the smashed avocado onto the toast and top with the sautéd garlic mushrooms and the fried enoki mushrooms. Garnish with a touch of ground black pepper and parsley.
  6. Enjoy!

7. Diced Mango with Chilli Powder & Peppermint

Diced Mango with Chilli Powder & Peppermint

PREP TIME <5 MINS | COOKING TIME  | SERVES 2

INGREDIENTS

  • 2 slices multigrain brown bread
  • 1/2 avocado, smashed
  • 1 small mango, diced
  • Chilli powder
  • Peppermint leaves

METHOD

  1. Lightly toast bread in a toaster for about 1-2 minutes.
  2. Spread a generous amount of the smashed avocado onto the toast and top with the diced mangoes, chilli powder, and peppermint leaves.
  3. Enjoy!

8. Roasted Chickpeas & Parsley

Roasted Chickpeas & Parsley

PREP TIME <5 MINS | COOKING TIME 10 MINS | SERVES 2

INGREDIENTS

  • 2 slices multigrain brown bread
  • 1/2 avocado, smashed
  • 1 can (200g) chickpeas, drained
  • 2 tsp ground smoked paprika
  • Ground sea salt and black pepper, to taste
  • Olive oil
  • Parsley, roughly chopped

METHOD

  1. Preheat oven to 200C (400F or gas mark 6). Line a baking tray with aluminium foil. Set aside.
  2. Add the drained chickpeas in a small bowl together with the ground smoked paprika, sea salt, black pepper, and a drizzle of olive oil. Toss to coat.
  3. Spread the chickpeas onto the prepared baking tray and roast in the oven for about 10 minutes. Once done, remove from the oven.
  4. Lightly toast bread in a toaster for about 1-2 minutes.
  5. Spread a generous amount of the smashed avocado onto the toast and top with the roasted chickpeas and parsley.
  6. Enjoy!

9. Chorizo Sausage & Sweet Corn

Chorizo Sausage & Sweet Corn

PREP TIME <5 MINS | COOKING TIME 4-6 MINS | SERVES 2

INGREDIENTS

  • 2 slices multigrain brown bread
  • 1/2 avocado, smashed
  • 1 chorizo sausage, sliced
  • 1 can (200g) sweet corn kernels, drained
  • Olive oil

METHOD

  1. Heat olive oil in a small frying pan over medium-high. Pan-fry the chorizo slices until browned, about 2-3 minutes per side. Once done, transfer to a plate lined with a paper towel. Set aside.
  2. Bring a small pot of water to a rolling boil and blanch the sweet corn kernels for about a minute or two. Drain and set aside to cool down for a bit.
  3. Lightly toast bread in a toaster for about 1-2 minutes.
  4. Spread a generous amount of the smashed avocado onto the toast, top with the pan-fried chorizo sausages and sweet corn kernels, and drizzle with a bit of the chorizo oil (optional).
  5. Enjoy!

Just a little side note before I end tonight’s post, I spent the whole day amending quite possibly the same artwork because their comments/amendments were all on an installation basis. Such completely waste of time which then prevented me from actually completing the work I had set to do today because I had to keep going back and forth to the same bloody artwork.

​BON APPÉTIT

– Ally xx

myTaste.com

Chicken & Broccoli Alfredo Stuffed Conchiglie

Chicken & Broccoli Alfredo Stuffed Conchiglie

Hello Everyone! I’ve got one last Broccoli recipe to share with you guys before I power through with the theme for April. I’ll be back to my usual Wednesday posts as I have finally caught up with all the recipes I had planned for the past two months. It wasn’t easy playing catch up seeing as I had to balance both writing the recipes and work over the past few weeks when I posted more than a recipe or two for the week. Anyway, I’ll keep tonight’s post short and sweet as I don’t really have much to talk about in terms of how my week went. I spent pretty much a whole two hours in the kitchen this afternoon whipping up multiple ways for you to add some colour and enjoyment to your breakfast mornings, all of which will be revealed on Wednesday!

Chicken & Broccoli Alfredo Stuffed Conchiglie

Tonight’s recipe is one that I have been wanting to try out for a while now – well not this specific recipe, but rather to work with jumbo pasta shells ever since I brought them back from my recent travels to Singapore. I was at the grocers looking for some products to bring back to Brunei, more specifically products that you don’t find in Brunei, and I came across these jumbo pasta shells (also known as ‘Conchiglie’). You’d think that you’d be able to find Conchiglie pasta in Brunei, and you can actually but just not the jumbo-sized ones. With this recipe, you can choose to make your own Alfredo sauce, or you can just buy the ready made ones at your local grocers; I guess it depends on whether you have time up your sleeve or not! The recipe may be a little bit time consuming like shredding the chicken, stuffing the shells, but trust me when I say that it all pays off in the end and it is actually a very easy and fool-proof recipe! It tastes so good straight out of the oven, and even better the day after if you have any leftovers. Be sure to check out the original recipe over on Life in the Lofthouse by Holly.

Chicken & Broccoli Alfredo Stuffed Conchiglie Ingredients

PREP TIME 30 MINS | COOKING TIME 25 MINS | SERVES 4-6

INGREDIENTS

For the pasta

  • 500g jumbo Conchiglie pasta
  • 500g chicken breast
  • 1 head broccoli, cut into florets
  • 1 cup shredded mozzarella cheese
  • 1/2 cup shredded parmesan cheese
  • Ground sea salt and black pepper, to taste

For the Alfredo sauce

  • 300ml thickened cream
  • 1 cup full cream milk
  • 3/4 cup freshly shredded mozzarella cheese
  • 2/3 cup freshly shredded Parmesan
  • 2-3 garlic cloves, minced
  • 1 small red onion, finely diced
  • 3 tbsp unsalted butter
  • Ground sea salt and black pepper, to taste
  • Olive oil

METHOD

  1. Add the chicken breast together with 2-3 dried bay leaves, a pinch of whole black peppercorns, and about a teaspoon of salt in a pot of water. Bring to a boil and leave to simmer for about 20 minutes. Once done, remove the chicken breast from the stock and set aside to cool down. *Do not discard the stock as it can be kept as a base for soups. I used mine on the same day and made a delicious pumpkin soup while I had these shells on the go too.
  2. Once the chicken as cooled down, shred and place in a medium-sized mixing bowl. Set aside.
  3. Bring a small pot of salted water to a boil and add the broccoli florets in. Poach for about a minute or two so that it still has a crispy bite to it. Immediately transfer to an ice bath to stop the cooking process. Roughly chop the broccoli florets and add to the bowl with the shredded chicken.
  4. Preheat oven to 180C (350F or gas mark 4).
  5. Bring a pot of salted water to a boil and cook the Conchiglie pasta to the package instructions, 18 minutes until al dente. Once done, drain and lay the shells out on a baking tray lined with parchment paper. Let shells cool down completely.
  6. While waiting for the shells to cool, heat the olive oil in a medium-sized saucepan over medium-high. Melt the unsalted butter and then sauté the minced garlic until golden brown and fragrant, about 30 to 45 seconds. Add in the finely diced onions and cook until soft, about 1-2 minutes.
  7. Add the thickened cream and milk to the saucepan and reduce the heat down to medium. Bring to a simmer. Once simmering, remove from heat and stir in the parmesan and mozzarella cheese. Season with ground sea salt and black pepper to taste. Set aside to cool down a bit.
  8. Pour about a cup of the Alfredo sauce to the shredded chicken and chopped broccoli and stir together until well combined.
  9. Add a spoonful of Alfredo sauce to the bottom of a greased baking pan, about 9″ x 13″ will do.
  10. Fill the shells with a large spoonful of the chicken, broccoli, and Alfredo sauce mixture, and place each shell into the prepared pan.
  11. Pour the remaining Alfredo sauce evenly over the shells and sprinkle the tops with more mozzarella and parmesan cheese.
  12. Bake in the oven, uncovered, for about 25 minutes or until warm and bubbly.
  13. Serve and enjoy!
Chicken & Broccoli Alfredo Stuffed Conchiglie

Chicken & Broccoli Alfredo Stuffed Conchiglie

BON APPÉTIT

– Ally xx

myTaste.com

Sicilian-style Salmon with Garlic Mushrooms & Poached Broccoli

Sicilian-style Salmon with Garlic Mushrooms & Poached Broccoli

Hello Everyone! I can’t believe that it’s already the last day of March, meaning quarter of the year has just zoomed past in the blink of an eye! I felt like the first part of March went by really quickly for me, and the rest of the month just dragged on slowly to be honest. Maybe it was just because I spent the final week of my travels to New Zealand and Australia in the first week of March and the second week pouting about my post-vacation depression, and then of course dragging myself out of bed and to the office through the rest of March. I sound so pessimistic in this post in comparison to Wednesday’s post when I was all motivational and whatnot. Haha! I don’t mean to be pessimistic, I’m just stating the obvious lack of adventure in my life the moment I arrived back from my trip to Australia and New Zealand.

Negativity aside, I forgot to mention this in my previous post: last week, I was contacted by a student from Spain who was drawn to the concept of Amcarmen’s Kitchen following the concept of a ‘third culture kid/foodie’ and my style of food photography. She sought my help through an interview that we shared earlier on the week on Monday evening and she was interested in having me as a sample in her research thesis on International Food Bloggers, which I found this to be quite an interesting topic. I’d like to take this opportunity to thank her for choosing to sample Amcarmen’s Kitchen in her work and I am looking forward to seeing her work when it’s done!

Sicilian-style Salmon with Garlic Mushrooms & Poached Broccoli

​Moving forward, I just want to make mention that this is not the final recipe for this month’s theme. If you’re a new follower on Amcarmen’s Kitchen, I have been posting a recipe up every Wednesday evening, Brunei time, since the beginning of 2016, and since there are 5 Wednesdays in March, you will be getting 5 recipes that hero/include broccoli in it! So there’s just one more to go before after this recipe is up before I dive into the theme for April!

Tonight’s recipe is a simple one. Nothing too fancy and over-the-top, just fresh ingredients with humble flavours brought to your plate from Sicily. Bake or pan-fry your salmon portions that have been massaged with some smoked paprika and chilli powder for that added kick. Pair them with some sautéed garlic mushrooms, and poached broccoli for a nice crunch to the plate and you’ve got yourself a delectable fish supper. Before we delve into tonight’s recipe, please don’t forget to check out the original recipe over on BBC Food Recipes by Gino D’Acampo.

Sicilian-style Salmon with Garlic Mushrooms & Poached Broccoli Ingredients

PREP TIME 10 MINS | COOKING TIME 10-15 MINS | SERVES 3

INGREDIENTS

For the salmon

  • 3 salmon portions (100g-150g per portion)
  • 2 tsp ground smoked paprika
  • 1 tsp chilli powder
  • Ground sea salt and black pepper, to taste
  • Juice of 1 lemon
  • Olive oil, for drizzling

​For the mushrooms

  • 1 punnet (250g) brown mushrooms, sliced
  • 30g unsalted butter
  • 3-4 garlic cloves, minced
  • 1 small red onion, finely diced
  • 1 tbsp olive oil
  • 1 head broccoli, cut into florets

METHOD

  1. Preheat oven to 180C (350F or gas mark 4). Line a baking tray with parchment paper and lightly oil.
  2. Place the salmon portions on the baking tray and drizzle a little bit of olive oil and lemon juice over the salmon. Gently massage the chilli powder, smoked paprika, sea salt, and black pepper.
  3. Bake in the oven for about 10 minutes, or until cooked through. Alternatively, you can pan-fry the portions for about 5-6 minutes per side over medium heat.
  4. Meanwhile, melt the butter in a medium-sized frying pan over medium-high heat and then add the tablespoon of olive oil until foamy. Sauté the minced garlic until golden brown and fragrant, about 30 to 45 seconds. Add in the finely diced onions and cook until soft, about 1-2 minutes.
  5. Toss in the mushrooms and cook until tender, about 2 to 3 minutes. Set aside.
  6. Bring a small pot of salted water to a boil and add the broccoli florets in. If you prefer a crispy bite, a minute or two is enough for the boil. If you would like to have it softer, then 2-3 minutes is great. Once done, drain immediately.
  7. Plate up and enjoy with a squeeze of lemon on top!

Sicilian-style Salmon with Garlic Mushrooms & Poached Broccoli

BON APPÉTIT

– Ally xx

myTaste.com

Baked Broccoli Parmesan Fritters

Baked Broccoli Parmesan Fritters

Hello Everyone! How are y’all doing on this fine Wednesday evening? Or morning? Or even still Tuesday evening for some? Well, whatever timezone you’re in, I hope everything is going well, and if it isn’t, keep your head held high and power through, for remember that life doesn’t always give you what you want, but it gives you what you deserve. Push yourself to strive for better, because no one else is going to do it for you – if anything, they’re going to drag you down. Walk away from anyone who takes you joy away, for life is too short to put up with them.

​Wow, I just realised how emotionally motivational I just got there, and no it doesn’t have anything to with what’s going on with me right now, but I just wanted to start off by asking you guys how you are all doing. When I hit the point of assuming that everyone is doing fine, I instantly became aware of that fact that not everyone may be doing fine, and it’s okay to not feel 100% all the time; just remember that YOU are the creator of your own destiny.

Baked Broccoli Parmesan Fritters

All that aside, we’re powering through with hero-ing Broccoli for the month of March! Two more days to April, and still 2 more recipes (excluding this one) to share for this month! Tonight’s recipe I stumbled upon one day while on Pinterest in search for some food inspiration, but before I move onto the recipe, be sure to check out the original over on Karina from Cafe Delites: for all good food lovers.

A fair warning, my fritters don’t look anywhere as near as how amazingly delicious to the eye Karina’s, but they nonetheless taste amazing, but probably not crispy. ​Well, apparently the trick to getting baked fritters pan-fried crispy is to lightly spray a coating of olive oil on top of them. Also, I think I may have accidentally baked mine for too long and they’re probably a bit too spread out and hence flatter… Oops!

Baked Broccoli Parmesan Fritters Ingredients

PREP TIME 10-12 MINS | COOKING TIME 25-30 MINS | SERVES 8-10 FRITTERS

INGREDIENTS

  • 1 head broccoli, cut into florets
  • 1 large free range egg
  • 1 medium-sized brown onion, diced
  • 2-3 garlic cloves, minced
  • 1/3 cup plain flour (or if you wish for a low-carb option, use almond flour instead)
  • 1/3 cup grated or shaved parmesan cheese
  • 1 tsp ground sea salt
  • 1/4 tsp ground black pepper
  • Olive oil cooking spray

METHOD

  1. Preheat oven to 200C (400F or gas mark 6). Line a baking tray with parchment paper. Set aside.
  2. Place the broccoli florets in a food processor and pulse a few times until the florets have been chopped finely.
  3. Add the egg, diced onions, minced garlic, plain flour, and parmesan cheese to the food processor and pulse again a couple of times until the ingredients are well combined. Add the sea salt and black pepper to the mixture and stir.
  4. Form about 8 to 10 fritters on the prepared baking tray, making sure that they do not touch each other. Spray the tops of each fritter with a light coating of olive oil.
  5. Bake in the oven for 12-15 minutes on each side until golden. Alternatively, you can pan fry these fritters in a non-stick pan over medium heat until golden on both sides.
  6. Allow the fritters to cool down slightly before serving with your choice of dip. Enjoy!

Baked Broccoli Parmesan Fritters

BON APPÉTIT

– Ally xx

myTaste.com

Vegan Broccoli & Kale Soup

Vegan Broccoli & Kale Soup

Hello Everyone! I’ll try to keep tonight’s post short and sweet, well, I guess the only reason why it’d be short is because I don’t actually have much to share about the past week I’ve had. It was just one of those routinely days like wake up, go to work, eat, go home, eat, go to the gym, shower, sleep, repeat kind of week *sigh* Oh wait! How did I possibly forget the most important thing that happened this week?! My Mom, my sister, and I went to see the Power Rangers Movie on opening night! So many childhood memories came back alive and I think that this movie was much more worth the hype than for Beauty and the Beast. Please go watch it if you haven’t already watched it!

Moving on, I used to make a lot of soups when I was still studying in Sydney​, ​especially during the winter season​. Now, being the typical Asian that I was, I used to never see a meal without rice as a fully complete meal, so you can imagine how distraught I was when I’d hear people say that they had “soup” for dinner. I would be like, “only soup?!” with a hint of what-the-actual-fishsticks are you on about look on my face. However, having lived in Sydney for 4 years and basically exposed to cuisines other than the typical I-need-rice in every meal ideal, I grew to appreciate soups as a meal. It can actually be quite filling if you pair it with a nice crusty bread to soak up all the yummy flavours and wipe the bowl clean. Tonight’s recipe is a delicious blend of Broccoli and Kale, both nutritious super green foods that are packed with healthy vitamins and minerals essential to one’s daily diet. Please check out the original recipe by Taylor over on The Girl on the Bloor.

Vegan Broccoli & Kale Soup Ingredients

PREP TIME 10 MINS | COOKING TIME 15 MINS | SERVES 6-8

INGREDIENTS

For the soup:

  • 2 cups non-dairy milk, for instance almond or coconut milk
  • 2 cups vegetable broth
  • 1 head broccoli, cut into florets
  • 1 large brown onion, diced
  • 1 leek, cleaned and sliced
  • 3-4 garlic cloves, minced
  • 4 tbsp coconut oil
  • 1/2 tsp red pepper flakes
  • Chilli flakes, for garnish
  • Flaked almonds, for garnish
  • Ground sea salt and black pepper, to taste
For the kale chips:
  • 2 cups kale, chopped
  • 1-2 tsp olive oil
  • Ground sea salt and black pepper, to taste

Okay, before I venture on to the method, some of you might/might not have picked up on a bit of a confusion with the ingredients. The list says to use leeks, but in the ingredient shot, the “leeks” would appear to some as spring onions. Actually, I do believe that what has been photographed are indeed spring onions, and not leeks, but the label did say “local leeks” at the grocery store. Since these were the only leeks available at that time, I had no choice but to buy them I guess. If you didn’t notice the difference, then I guess I could’ve gotten away without having to explain myself here, haha!

METHOD

  1. Preheat oven to 200C (400F or gas mark 6). Line a baking tray with parchment paper. Set aside.
  2. Wash and thoroughly dry the 2 cups of chopped kale for the chips before tossing it with olive oil. Massaging oil into leaves and season with ground sea salt and black pepper before spreading in onto the prepared baking tray. Set aside for now.
  3. Melt the coconut oil in a large pot over medium-high heat and sauté the minced garlic until golden brown and fragrant, about a minute. Follow with the diced onions and sliced leeks, cooking until soft, about 2 to 3 minutes.
  4. Add broccoli florets and vegetable broth, bringing the mixture to a boil and then simmering for a further 2 minutes until the broccoli is tender.
  5. Once the broccoli is tender, remove from heat, and stir in the chopped kale. Leave the soup to cool down for about 15 minutes.
  6. While waiting for the soup and veggies to cool down, you can start baking your kale chips! Bake them in the preheated oven for 7 to 8 minutes, checking and flipping them every couple minutes so they don’t burn. When they’re crispy, remove them from the oven and set aside to top your soup with.
  7. Once your soup has cooled down, purée the veggies using a stick blender until the soup is smooth. Add your non-dairy milk, and season with a touch of ground sea salt and black pepper, stirring your soup until thickened.
  8. Divide the soup into individual bowls and top with the kale chips, flaked almonds, and chilli flakes. Serve and enjoy!

Vegan Broccoli & Kale Soup

Vegan Broccoli & Kale Soup

Before I end tonight’s post, I encourage you guys to head on over to Thrive Cuisine to learn more on the nutritional benefits of kale. There are plenty of links as well as to more recipes that include the famous cruciferous veggie known as kale.

BON APPÉTIT

– Ally xx

myTaste.com

Beef & Broccoli Mee Pok with Soy Eggs

Beef & Broccoli Mee Pok with Soy Eggs

Hello Everyone! Finally I’ve managed to come to the theme that was intended for the month of March on Amcarmen’s Kitchen! Three weeks late, but you know what they say, better late than never! I hope that I can get all the recipes up for March before the end of the month so that I can start fresh (frish – inside joke) for April seeing as it is also an important upcoming month ahead for Amcarmen’s Kitchen. If you have been following my blog since the beginning, or long enough to know why April is important for Amcarmen’s Kitchen – I won’t reveal things now, but as the days draw closer to April, I will tell you why!

If​ you are just tuning in to the blog, the theme for this year is all based around foods that lower or help maintain your blood pressure to normal and safe level. I drew up the theme when I found out last year that I am susceptible to high blood pressure, and ever since, I’ve been doing what I can to eat right – it hasn’t been easy. So tangent aside, the theme for March is basically hero-ing broccoli! Though I must say, some of the dishes that I will be sharing with you guys don’t exactly hero broccoli, but at least it includes the ingredient I guess? Haha. Broccoli is a good source of the blood pressure-regulating minerals magnesium, calcium, and potassium. Previous research in animals has found that a diet high in broccoli sprouts may help reduce blood pressure, cardiovascular disease, and stroke.

Tonight’s recipe is a little twist on the classic Beef and Broccoli Ramen – well okay, it’s not really a massive twist or anything like that, the only difference is that I used mee pok noodles instead of ramen noodles. Mee pok is a Chinese noodle characterised by its flat and yellow appearance, varying in thickness and width. Mee Pok is commonly served tossed in a sauce (often referred to as “dry”, or tah in Hokkien, though sometimes served in a soup (where it is referred to as “soup”, or terng), where meat and vegetables are then added on top. Other than that, everything else is pretty much the same, so before I move onto tonight’s recipe, please take the time to check out the original recipe over on Chelsea’s Messy Apron. I’ve also added a soft-boiled soy egg just for another layer of flavour and texture to the overall dish. When I thought of adding a soy egg to the dish, I didn’t look into how I could add more flavour the egg rather than just dunking it in soy sauce, but turns out that you can add star anise and cinnamon bark to the soy sauce, and apparently leave it overnight to soak up all the flavour. I left mine for about an hour or so just for the colour really.

Also, I know that this recipe calls for a lot of soy sauce which is in fact contradictory to lowering high blood pressure because of the amount of sodium in soy sauce. Therefore, ensure that you use low-sodium soy sauce for this recipe.

Beef & Broccoli Mee Pok with Soy Eggs Ingredients

PREP TIME 15* MINS | COOKING TIME 20 MINS | SERVES 4

*Plus about 4-6 hours of marination time

INGREDIENTS

For the beef marinade:

  • 500g rump steak, sliced thinly
  • 2 tbsp low-sodium dark soy sauce
  • 2 tbsp low-sodium light soy sauce
  • 2 tbsp oyster sauce
  • 2 tbsp sesame oil
  • 1/2 tsp ginger, grated
  • Ground sea salt and black pepper, to taste
  • 3 tbsp cornstarch

For the mee pok:

  • 1 package (400g) mee pok noodles
  • 1 head broccoli, cut into florets
  • 1 cup low-sodium beef stock
  • 1/4 cup low-sodium dark soy sauce
  • 3-4 garlic cloves, minced
  • Ground black pepper, to taste

For the soy eggs:

  • 4 large free range eggs
  • 1/2 cup low-sodium dark soy sauce
  • 1/2 cup warm water

Optional:

  • Chilli powder
  • Lightly toasted sesame seeds
  • Spring onion

METHOD

  1. Whisk all the ingredients for the beef marinade (except for the cornstarch) in a small bowl. Place the beef slices, and the whisked marinade into a medium-sized zip lock bag and seal. Give it a good shake and then set aside in the fridge for about 4-6 hours, or no more than 12 hours. Flip the steak in the bag halfway through the marinating time.
  2. While the beef is marinating, you can get a head start on your soy eggs. Fill a saucepan with a few inches of water and set it over high heat. Let the water come to a rolling boil. Once it comes up to a rolling boil, reduce the water to a rapid simmer by lowering the heat. Gently lower the eggs into the water one at a time and cook the eggs for 5 to 7 minutes (5 minutes for a very runny yolk or up to 7 minutes for a barely-set yolk). I cooked mine for about 6 minutes. Remove the eggs with a slotted spoon and run under cold tap water for 30 to 60 seconds. Slowly are carefully peel the shell off the eggs and dunk them into a bowl of dark soy sauce and warm water mixture. Make sure that the eggs are fully submerged in the mixture and let it sit for an hour or so until the egg white is coloured by the soy sauce.
  3. Bring a medium-sized pot of water to a boil and then cook the mee pok noodles for about 2 minutes. Drain and rinse in cold water. Set aside.
  4. Remove the rump steak from the bag and drain off any remaining marinade. Toss the steak to coat with the cornstarch.
  5. Heat some olive oil in a large frying pan over high heat, until the oil is shimmering and then cook the beef in batches if needed, adding a touch more of olive oil after each batch. Cook without moving or flipping the beef until it is well seared, about 1-1/2 minutes. Continue cooking while stirring until the beef is lightly cooked but still pink in spots, about 30 seconds. Transfer to a plate and set aside.
  6. In the same pan, sauté the minced garlic until golden brown and fragrant, about 30-45 seconds, then add the beef stock and dark soy sauce. Stir and cook (uncovered) over medium heat until sauce thickens a bit and reduces by about a third (about 5-8 minutes). You don’t want to reduce it too much so it can still generously coat all the noodles & veggies.
  7. Bring the mixture to a boil. Once boiling, top the mixture evenly with the broccoli (don’t stir in). Cover the pot with a lid and reduce the heat to low. Allow the broccoli to steam until crisp tender about 3 minutes or to desired tenderness.
  8. Once the broccoli is to your liking, remove the lid, add in the cooked noodles and beef. Stir and top with desired toppings: green onions, chilli powder, and sesame seeds, and not forgetting the soy egg!
  9. Serve and enjoy immediately with family and friends.

Beef & Broccoli Mee Pok with Soy Eggs

Beef & Broccoli Mee Pok with Soy Eggs

BON APPÉTIT

– Ally xx

myTaste.com

Banana Cheesecake Rollups

Banana Cheesecake Rollups

Hello Everyone! Yes, I’m still trying to play catch up here and hoping to get everything back to order by the time April sneaks up on us. I’ve been trying very hard to get recipes up on the blog for the past week, but I just never got around to because of, well, I was going to say several factors, but after running them by my head just a second ago, there were really only two factors that affected my mood to write. The first being unnecessary workplace drama that put me in such a mood for the past week, and second, it’s that time of month. You can imagine the rollercoaster of emotions I went through – I was just glad the the working week was over by the time it was Saturday, but it doesn’t help that I’ll be back to work again tomorrow. Seriously, a one-day weekend definitely NOT enough.

All that aside though, I watched Beauty and the Beast on Thursday night with my Mom and my sister. Belle could not have been played any better than Emma Watson; she was just an absolute fit for that role. Not only was she the definition of “Belle”, her singing was also on point. The movie just brought back many childhood memories, and I may have shredded a few tears here and there throughout the movie, and sung along to the songs while I saw people just snapchatting or Instagram storying the sh*t out of the movie – like put your phones away you uncultured and uneducated youngsters!

Anyway, tonight’s recipe is the last of the banana recipes that was supposed to be covered last month, and one that I stumbled upon through my research when I was planning for Amcarmen’s Kitchen early on the year. I did’t want to make a whole batch of these, so I only made 4 rollups. Unfortunately for me, out of the 4 only one didn’t burst open so I do apologise if the photographs for this recipe look a bit… Lonely. Hahaha! You can find the original recipe for these Banana Cheesecake Rollups over on The Cards We Drew. Also, just something to note, I tried this recipe out using puff pastry instead of crescent roll dough like in the original recipe. The reason? Nothing in particular actually aside from the fact that remade crescent roll doughs aren’t available here in Brunei and therefore I made the decision to use puff pastry instead. I also didn’t add the toppings to the rollups as I assumed that the dessert would already be too sweet for me to handle and with extra sweetness on top would probably be overkill for me. Feel free to top yours though if you’re a sweet tooth.

Banana Cheesecake Rollups Ingredients

PREP TIME 15 MINS | COOKING TIME 15-18 MINS | SERVES 12 ROLLS

INGREDIENTS

  • 2 large bananas, cut into 6 pieces each
  • 1 packet (500g) puff pasty block, defrosted
  • 250g cream cheese, softened
  • 3/4 cup of sugar
  • 1/2 cup of brown sugar
  • 1/2 tsp vanilla

METHOD

  1. Preheat oven to 180C (350F or gas mark 4). Line a baking tray with parchment paper and set aside.
  2. Lightly flour both the work surface and the pastry before rolling out to your required thickness. Allow for the pastry to stand for a few minutes to help reduce shrinkage.
  3. While the pastry is left to stand, combine the cream cheese, sugar, and vanilla in a medium-sized bowl and using a handheld electrical mixer, beat the ingredients together on high. Set aside.
  4. Roll out the puff pastry dough to about 3mm thick and cut into 12 long triangles. Starting at the largest end, add a tablespoon of the cream cheese mixture, a pinch of brown sugar, then a piece of banana on top.
  5. Tuck the edges over top of the banana, roll up, and place onto the prepared baking tray. Repeat this until you’ve made all 12 rollups.
  6. Bake in the oven for about 15-18 minutes, until golden brown and cooked through. Once baked, sprinkle some powdered sugar over top and serve warm with a cup of coffee. Enjoy!

Banana Cheesecake Rollups

Banana Cheesecake Rollups

BON APPÉTIT

– Ally xx

myTaste.com

Pan-fried Cinnamon Bananas

Pan-fried Cinnamon Bananas

Hello Everyone! First and foremost, I am truly apologise for the lack of posts for the past month! As some of you may have been aware from previous posts, or if you follow my personal social media pages, I spent the last 3 weeks travelling Australia and the Northern Island of New Zealand. I arrived back home last weekend and have just been catching up on truckloads of work that I haven’t had the time to update Amcarmen’s Kitchen during that catch up week, as well as when I was on holiday. I did have content and material prepared beforehand and I was supposed to be posting while I was on holiday, but let’s face it – I didn’t want to be stuck in front of the computer all day while there were so many beautiful places around me to visit. Plus, I usually get home late and just want to rest a recharge for the following day’s adventure. Other than my apologies, I had an amazing time in New Zealand and I am already planning a trip back same time next year for a South Island trip!

Just a quick note before I jump onto today’s recipe (yes I am aware that today is Sunday and it’s not my usual Wednesday upload schedule), I will be posting two more Banana recipes (this one inclusive), which for those of you who don’t follow, was the theme for the month of February for Amcarmen’s Kitchen. The reason being is that I have already had these recipe lined up to upload but didn’t get around to doing so and I didn’t just want to scrap them off, and yes, that is why I am posting today as well – just until  I catch up with the present and resume back to my normal Wednesday posts.

Today’s recipe is one of the easiest and quickest thing to make when you find yourself with a handful or more of overripe bananas. Of course, the first go-to recipe for overripe bananas would be to whip up a delicious loaf of banana bread – provided that I have the time and energy to do so – but pan-fried cinnamon bananas are just as tasty as banana bread. Pair them with a cuppa and you’ve got your Sunday afternoon hi-tea set and all ready to go!

Pan-fried Cinnamon Bananas Ingredients

PREP TIME <5 MINS | COOKING TIME 10 MINS | SERVES 2

INGREDIENTS

  • 2 large slight overripe bananas, sliced into 1/3″ thick rounds
  • 2 tbsp granulated sugar
  • 1 tsp ground cinnamon
  • 1/4 tsp ground nutmeg
  • Olive oil, for frying

METHOD

  1. Combine the granulated sugar, cinnamon, and nutmeg in a small bowl. Set aside.
  2. Add about a teaspoon of olive oil to a large non-stick frying pan and warm over medium heat.
  3. Add the sliced banana rounds and cook for about 2-3 minutes. During the last minute of cooking on the first side, sprinkle about half of the cinnamon mixture over the banana rounds.
  4. Flip the rounds, sprinkle with the remaining cinnamon mixture, and cook about 2-3 more minutes, until the bananas are soft and warmed through.
  5. Remove from the pan. Serve and enjoy with a nice cup of tea.

Pan-fried Cinnamon Bananas

BON APPÉTIT

– Ally xx

myTaste.com

Upside-down Banana Cake

Upside-down Banana Cake

Hello Everyone! So I don’t think I’ve shared this little piece of information on the blog before – I’m going on holiday starting this coming Friday! I’ll be in Singapore for a 10-hour layover (yay me) before finally setting off to my final destination. I won’t share where I’ll be going as I’ve been trying so hard to keep this a secret from a few people – but you’ll definitely know in next week’s post. I’ve got everything planned out and prepared for the blog for this month so you guys don’t have to worry about me being gone from Amcarmen’s Kitchen for another 3 weeks (yeap, that’s how long I’ll be on holiday for) seeing as I just returned for 2017.

Anyway, that aside, today’s recipe has been made multiple times before back when I was still studying in Sydney. My then housemate and I would whip this cake up whenever we’d see our fruit bowl of bananas start to get all spotty and soft. This is definitely a recipe you should consider when you find yourself in a similar situation – instead of throwing those bruised bananas, which are actually still pretty mint, mash them up and make an upside-down banana cake! You definitely won’t regret it.

This is an incredibly moist and flavourful dessert, but it could be great for breakfast or as a morning/afternoon snack too. You can take it a step further as well by topping it all off with some toasted pecans, a generous amount of caramel sauce, and topped with a scoop or two of creamy vanilla ice cream. I decided to keep mine simple without all the extra and unnecessary sugars on top since I’m not a big fan of too much sugar, and the fact that my Mom is a diabetic is an enough reason to hold back on the sugar since she’ll definitely be having a slice or two… Or even the whole cake to herself.

Upside-down Banana Cake Ingredients

PREP TIME 15 MINS | COOKING TIME 55-65 MINS | SERVES 10-12

INGREDIENTS

  • 65g unsalted butter, cut into cubes
  • 2/3 cup brown sugar
  • 2-3 large bananas, 1/3″ rounds
For the cake batter
  • 70g unsalted butter, softened
  • 2 large free range eggs
  • 1 & 3/4 cups plain flour
  • 1 cup overripe bananas, mashed
  • 3/4 cup granulated sugar
  • 1/3 cup plain yoghurt
  • 1 & 1/2 tsp baking powder
  • 1 & 1/2 tsp vanilla extract
  • 1 tsp baking soda
  • 1/2 tsp ground cinnamon
  • 1/4 tsp salt

METHOD

  1. Preheat the oven to 180C (350F or gas mark 4). Grease a 9″ x 2″ round cake pan, or an 8″ x 8″ x 2″ square cake pan. Spread the 2/3 cup of brown sugar on the bottom of the pan and scatter the pieces of cubed butter on top.
  2. Place the pan in the oven for about 5 to 7 minutes until the butter has completely melted. Remove the cake pan from the oven and give the butter and brown sugar a stir, spreading evenly on the bottom. Arrange the sliced bananas to cover the caramel bottom then set aside.
  3. For the batter, add the dry ingredients – plain flour, baking powder, baking soda, baking powder, ground cinnamon, and salt – to a medium sized bowl and stir together until combined. Set aside.
  4. In a large bowl using a handheld electric mixer on medium speed, cream the softened butter granulated sugar together until pale in colour. Add the eggs and vanilla extract, mixing well to combine. Then add in the plain yoghurt and mashed bananas, again mixing well to combine.
  5. Turn the speed of your mixer on low and slowly add the dry ingredients to the wet. Mix just enough to combine.
  6. Pour the batter over bananas, smoothing the top and then place in the oven to bake for 30 minutes at 180C. After half an hour, reduce the heat to 170C (325F or gas mark 3) and bake for additional 25-35 minutes until a toothpick inserted in the centre comes out completely clean.
  7. Once down, remove form the oven and let it cool in the pan completely, or at least until the bottom is barely warm before inverting onto a plate. Use a knife to loosen the edges from the pan then place a plate upside-down on top of the pan, then invert cake.
  8. At this point you can make a caramel sauce to top off the cake and add a handful of toasted, roughly chopped pecans to your dessert/breakfast/snack. Otherwise, enjoy the cake as it is!

Upside-down Banana Cake

Upside-down Banana Cake

BON APPÉTIT

– Ally xx

myTaste.com